
PCV Valve Question?
 06-25-2009, 09:30 PM
#41
04' tl 6 spd
thank
 07-20-2009, 06:57 PM
#42
Senior Moderator
can you rehost the pictures?


 lol!!! I did the timing belt and water pump as well.
 07-29-2009, 09:18 PM
#50
No; on the bottom of the container it has some kind of release valve that is stuck open. I guess it had some sort of function, but not for this purpose.
I notice the separator in the TSX thread did not have this valve. They had a rubber plug/cap on the end. I could not find that type and had to settle, but I thought the valve was closable. No biggy; problem solved.
I notice the separator in the TSX thread did not have this valve. They had a rubber plug/cap on the end. I could not find that type and had to settle, but I thought the valve was closable. No biggy; problem solved.
08-08-2009, 06:06 PM
#51
Drifting

I just did this install today. Here are my tips in addition to all the great information shared earlier:
- I wound up using two 90 degree elbows instead of the one. The hoses just seemed to route better this way. Also to work around the clearance issue with the PCV input hose, I wound up braiding the two new hoses around the other major hose in the area- just one twist is all you need. I just cut the new hoses a little longer support the braiding idea. There is no clearance issue at all now.
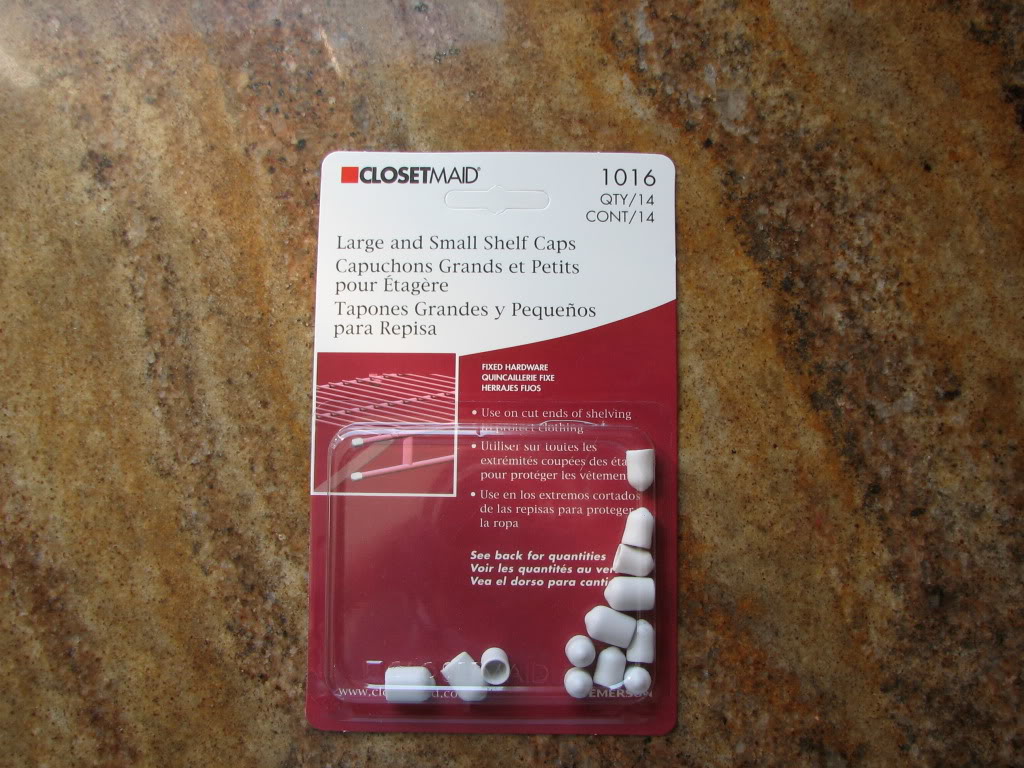
- I have a closable valve on the bottom, but it looked too easy to open since it's a 360 degree twist valve. I bought a 14 pack of ClosetMaid shelf caps to plug that nipple (found in Home Depot where the wire shelfs are sold as a 14 pack for $1.25). The package comes with two sizes and the small cap fits the bottom of the Husky nipple very well.
- I used some Heavy Duty velco to attach the filter assembly to the car. I mostly did this to prevent the filter top from scratching the paint. The Velcro keeps the unit in place very well.
I just did a test start of the car and it doesn't seem to stumble as much as I'm used to when it idles that first minute cold- perhaps coincidental but I want to think this mod helped. I guess I'll do my Wifes car next weekend since I used the extra elbow on my car and don't want to brave another Home Depo trip today.
- I wound up using two 90 degree elbows instead of the one. The hoses just seemed to route better this way. Also to work around the clearance issue with the PCV input hose, I wound up braiding the two new hoses around the other major hose in the area- just one twist is all you need. I just cut the new hoses a little longer support the braiding idea. There is no clearance issue at all now.
- I have a closable valve on the bottom, but it looked too easy to open since it's a 360 degree twist valve. I bought a 14 pack of ClosetMaid shelf caps to plug that nipple (found in Home Depot where the wire shelfs are sold as a 14 pack for $1.25). The package comes with two sizes and the small cap fits the bottom of the Husky nipple very well.
- I used some Heavy Duty velco to attach the filter assembly to the car. I mostly did this to prevent the filter top from scratching the paint. The Velcro keeps the unit in place very well.
I just did a test start of the car and it doesn't seem to stumble as much as I'm used to when it idles that first minute cold- perhaps coincidental but I want to think this mod helped. I guess I'll do my Wifes car next weekend since I used the extra elbow on my car and don't want to brave another Home Depo trip today.
Last edited by LaCostaRacer; 08-08-2009 at 06:08 PM.
08-08-2009, 08:36 PM
#52
I just did this install today. Here are my tips in addition to all the great information shared earlier:
- I wound up using two 90 degree elbows instead of the one. The hoses just seemed to route better this way. Also to work around the clearance issue with the PCV input hose, I wound up braiding the two new hoses around the other major hose in the area- just one twist is all you need. I just cut the new hoses a little longer support the braiding idea. There is no clearance issue at all now.
- I have a closable valve on the bottom, but it looked too easy to open since it's a 360 degree twist valve. I bought a 14 pack of ClosetMaid shelf caps to plug that nipple (found in Home Depot where the wire shelfs are sold as a 14 pack for $1.25). The package comes with two sizes and the small cap fits the bottom of the Husky nipple very well.
- I used some Heavy Duty velco to attach the filter assembly to the car. I mostly did this to prevent the filter top from scratching the paint. The Velcro keeps the unit in place very well.
I just did a test start of the car and it doesn't seem to stumble as much as I'm used to when it idles that first minute cold- perhaps coincidental but I want to think this mod helped. I guess I'll do my Wifes car next weekend since I used the extra elbow on my car and don't want to brave another Home Depo trip today.
08-09-2009, 11:03 PM
#53
Drifting
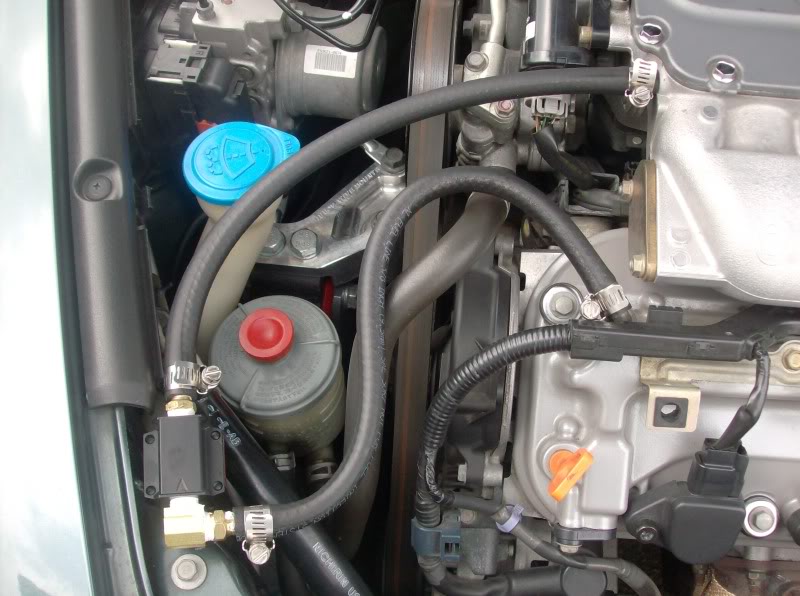
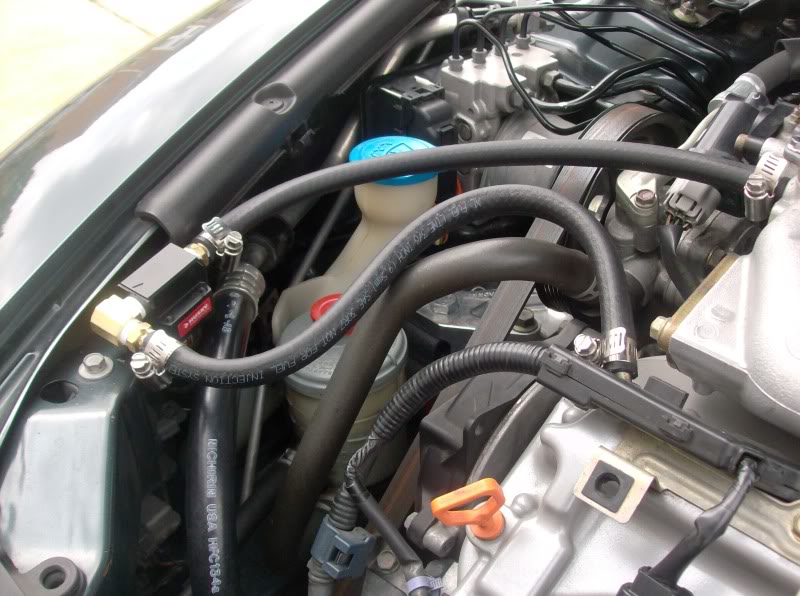
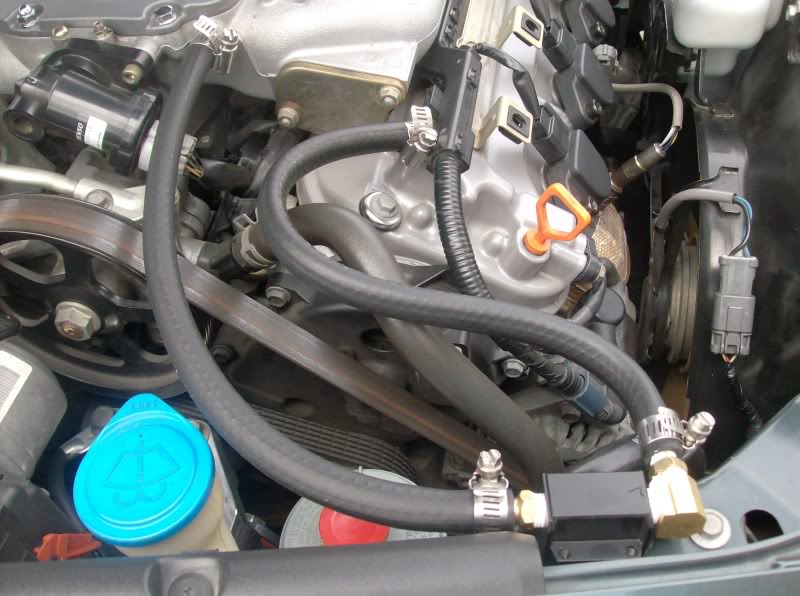
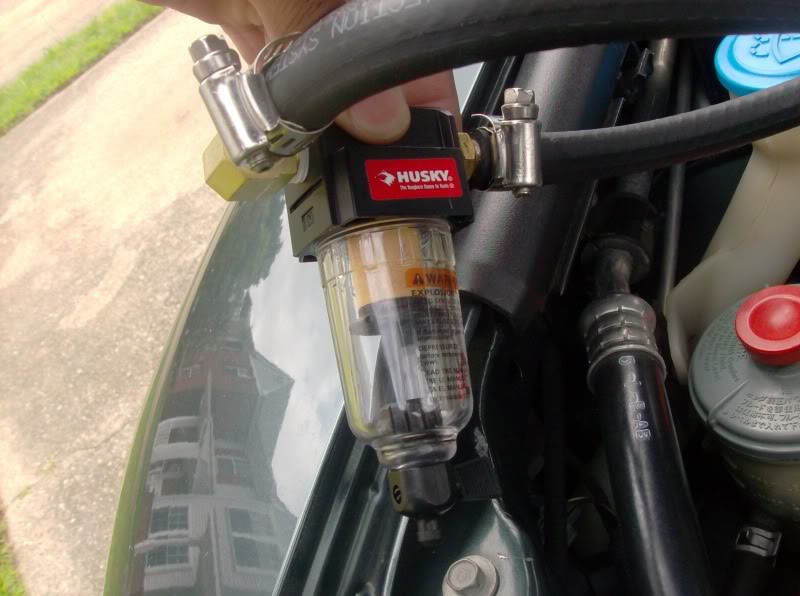
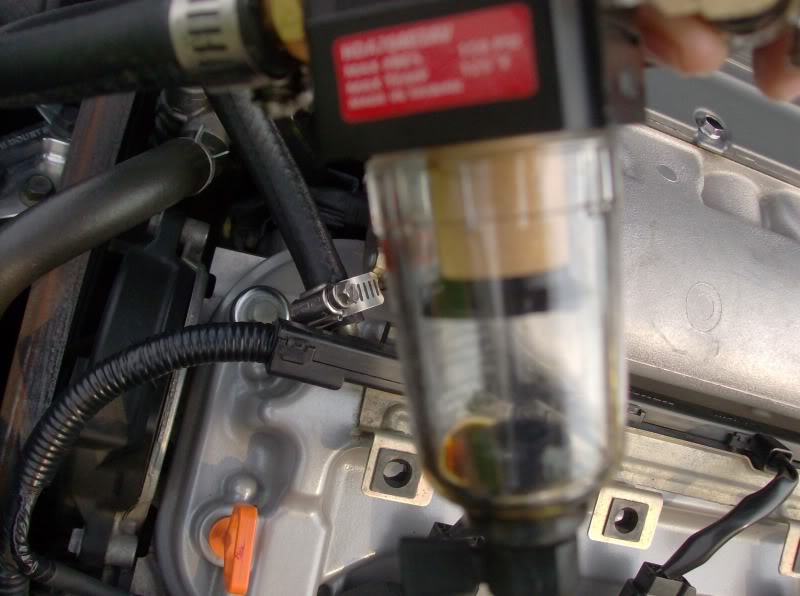
Here are some pictures of my install. My car has just 24K miles so I skipped replacing the PCV valve- hopefully this modification will preserve the PCV's life so I won't have to change it for a long time.
This should show the braided lines and the two elbow connectors:

These are the closet caps:
This should show the braided lines and the two elbow connectors:
These are the closet caps:
01-28-2010, 04:29 PM
#55
ok i did this, how come on another thread, the catch can is at the rear, close to the throttle body?
https://acurazine.com/forums/showthr...=diy+oil+catch
https://acurazine.com/forums/showthr...=diy+oil+catch
01-28-2010, 10:25 PM
#56
Team Owner

Using an oil with a super low NOACK number like Redline will nearly eliminate oily residue in the intake tract but the separator is nice.
01-30-2010, 12:16 PM
#59
Team Owner
You'll be running higher oil temps so more evaporation into the intake tract.
More blowby past the rings.
You don't want the oil and blowby gasses getting into the inlet of the turbo and coating the intercooler from the inside. Over time it knocks down the cooling efficiency of the intercooler.
With the intake manifold now under pressure, the PCV valve is non functional under boost. In a wost case scenario the PCV can fail causing boost to pressurize the crankcase. I'm not sure if the kit addresses this potential problem or not. But either way you have no PCV under boost and there's more blowby at the same time. The gasses have to exit the engine somehow and that would be through the fresh air intake pre-turbo. This is why it's a very good idea to put a breather filter on this hose and leave it disconnected from the intake.
Or to summarize, on a turbo application, use the separator on the PCV and a breather filter on the fresh air intake for the crankcase. A good oil with a low NOACK will minimize oil vapors but not blowby gasses.
01-30-2010, 04:15 PM
#60
The separator is an excellent mod for a turbo car for several reasons.
You'll be running higher oil temps so more evaporation into the intake tract.
More blowby past the rings.
You don't want the oil and blowby gasses getting into the inlet of the turbo and coating the intercooler from the inside. Over time it knocks down the cooling efficiency of the intercooler.
With the intake manifold now under pressure, the PCV valve is non functional under boost. In a wost case scenario the PCV can fail causing boost to pressurize the crankcase. I'm not sure if the kit addresses this potential problem or not. But either way you have no PCV under boost and there's more blowby at the same time. The gasses have to exit the engine somehow and that would be through the fresh air intake pre-turbo. This is why it's a very good idea to put a breather filter on this hose and leave it disconnected from the intake.
Or to summarize, on a turbo application, use the separator on the PCV and a breather filter on the fresh air intake for the crankcase. A good oil with a low NOACK will minimize oil vapors but not blowby gasses.
01-31-2010, 07:30 PM
#61
LaCostaRacer and t0talacuratl
I just purchased all the items needed for this install. It seems like valve on the bottom of the air filter is so flimsy that It will probably leak.
t0talacuratl - does your unit leak at all from the valve on the bottom?
LaCostaRacer - i bought those little caps that you mentioned and they fit very good. do you have any leaks?
I actually bought 2 air filters so I could take apart the first one and try to seal valve shut. The valve is a tiny screw that works in 360 degree open/close method. I took off the little rubber o-ring that sits between the stopper on top (that allows the fluid to drain) and the screw, and sealed the area up so It wont drain anymore. I think this method might be better but thats assuming that the filter will leak since it says to avoid oils in the bowl. When I need to drain the bowl I can just unscrew the whole bowl and dump it.
Do you guys get any leaks?
01-31-2010, 08:12 PM
#62
I just purchased all the items needed for this install. It seems like valve on the bottom of the air filter is so flimsy that It will probably leak.
t0talacuratl - does your unit leak at all from the valve on the bottom?
LaCostaRacer - i bought those little caps that you mentioned and they fit very good. do you have any leaks?
I actually bought 2 air filters so I could take apart the first one and try to seal valve shut. The valve is a tiny screw that works in 360 degree open/close method. I took off the little rubber o-ring that sits between the stopper on top (that allows the fluid to drain) and the screw, and sealed the area up so It wont drain anymore. I think this method might be better but thats assuming that the filter will leak since it says to avoid oils in the bowl. When I need to drain the bowl I can just unscrew the whole bowl and dump it.
Do you guys get any leaks?
t0talacuratl - does your unit leak at all from the valve on the bottom?
LaCostaRacer - i bought those little caps that you mentioned and they fit very good. do you have any leaks?
I actually bought 2 air filters so I could take apart the first one and try to seal valve shut. The valve is a tiny screw that works in 360 degree open/close method. I took off the little rubber o-ring that sits between the stopper on top (that allows the fluid to drain) and the screw, and sealed the area up so It wont drain anymore. I think this method might be better but thats assuming that the filter will leak since it says to avoid oils in the bowl. When I need to drain the bowl I can just unscrew the whole bowl and dump it.
Do you guys get any leaks?


 02-02-2010, 10:47 AM
#66
Three Wheelin'
^ Can't the entire nipple get epoxied before use? If the oil in the filter isn't too hot, then this might be the best way to seal it, or even glue the cap onto nipple..
Good write-up btw, I'll be doing this mod on a nice day.
Good write-up btw, I'll be doing this mod on a nice day.
 03-11-2010, 11:08 PM
#69
Drifting
^ Great work! It's been a while since I have seen this thread. Anyway, both my cars have the catch cans and they are working well with no leaks. I had to glue the nipples a while back because one came off. I'll be emptying our Pilot's this weekend when I change the oil. The capacity is ample so there are no worries on that end.
05-03-2010, 01:10 PM
#70
Three Wheelin'
Did this mod over a month ago. About 400 miles later, and just noticed a few drops this week.
Swapped the PCV valve, cleaned the intake and manifold at the same time, and it was pretty clean since all I use are RP and redline oil.
I guess the oil really makes a difference!
Swapped the PCV valve, cleaned the intake and manifold at the same time, and it was pretty clean since all I use are RP and redline oil.
I guess the oil really makes a difference!
04-02-2011, 07:05 PM
#71
Drifting
FYI: for California drivers- make sure you take this off before taking your car in for a smog test because it will fail because the emissions system has been 'altered'. I had to take this off my Wife's Pilot so she could pass the smog test. I'll do this on the TL next year when it's do for a smog test. So if you do the mod- make sure you save the original tubing because you will need it.
04-02-2011, 08:14 PM
#72
Three Wheelin'
I am going to get the parts for this mod tonight. Going FI this is a must from my civic and 240sx days. IHC was right, with FI you have alot high temps and alot more blow by. I am glad I am bored and stumbled on this!
 09-16-2013, 05:10 AM
#74
Ok so maybe I didn't answer my own question lol..
From the looks of it to me, both cylinder covers are under vacuum unless I'm missing something.
One side has the PCV valve on it, venting into the intake manifold behind the throttle body.
The other cover vents directly into the air intake, before the throttle body.
So my question, why only one filter separator?
Should I use two?
Few different options, curious, pros/cons? Diagrams attached.
09-16-2013, 09:38 AM
#76
Team Owner
The catch can traditionally goes on the PCV side but some put it on the fresh air side too. The fresh air side is not needed except during full throttle where flow can reverse due to the PCV having no vacuum and the additional crank case pressure. I would only do the PCV side unless you're boosted where the fresh air side will reverse flow often.

Thread
Thread Starter
Forum
Replies
Last Post
navtool.com
5G TLX Audio, Bluetooth, Electronics & Navigation
31
11-16-2015 08:30 PM
navtool.com
1G RDX Audio, Bluetooth, Electronics & Navigation
1
09-25-2015 05:15 PM