My '04 TL CarPC (Long with ALOT of pics, no 56k)
 02-03-2008, 01:40 PM
#1
Instructor
Thread Starter

Join Date: Apr 2007
Location: Toms River, NJ
Age: 42
Posts: 118
Likes: 0
Received 0 Likes
on
0 Posts
My '04 TL CarPC (Long with ALOT of pics, no 56k)
Hey all, I figured I would finally post my CarPC install in my '04 TL. This is a non navi car as you can tell from the clock/stock lcd displays. In my first attempt I did not like the way the bezel looked after I cut/sanded/painted it so I found a cheap cracked Navi Screen on Ebay and used that since no cutting on the outside is necessary so it looks perfect.
I did the original install in September and about a month ago I pulled the whole dash apart again and swapped out the bezels and I also had to redo the stock LCD on the bottom beacuse it didn't look very good. At the moment the Navi buttons are just kinda "there", they do nothing, they don't even light up (if anyone know�s how I can make them light, I'm all ears I couldn�t find the wiring schematic for the connector on those buttons).
I decided to place the PC in the glove box beacuse I don't like running all the PC wires to the trunk and I just didn't want the PC taking up any trunk space. Here we go :
:
PC/Hardware/Prices:
Jetway VIA C7 1.5GHz Mini-ITX Motherboard ($230)
M2-ATX 160 Watt DC-DC Power Supply (included with MB)
Kingston 1GB PC4200 CL4 240 PIN DIMM Memory ($41)
Maxtor 120GB 7200RPM IDE Hard Drive (Already had)
USGlobalSat BU-353 GPS Receiver ($53.95)
ATI All-in-Wonder Media Remote ($20)
Xenarc 700TSV 7" LCD ($295 used)
TL Navi Bezel ($35)
Software:
Windows XP Professional (already had)
Centrafuse Frontend ($124)
iGuidance Navigation Software (already had)
RWKeymaster/Factory for Remote (free)
Total Cost/To Do:
Installation: Free (DIY)
Total Cost: $798.95 + Misc Wiring/Cables/Supplies (not bad huh?)
Left to buy/do: Reverse Camera, Microphone for voice control, Possibly Internet Access.
Pictures:
Note: I did not take any new pics during the process of swapping in the navi bezel and redoing my non navi stock screen, so I will just include the pics of the orginal install with the non nav bezel for reference.
Dash/Console/Glove Box all disassembled, the two green connectors sitting on top of the head unit get cut off and extended to where the compartments were

HVAC control wires extended

Connectors for stock LCD extended

Bezel Cut/Sanded/Painted, Xenarc Inside, HVAC buttons reattached


LCD Installed, Stock LCD placed in compartment area (old pic from first install)

It's alive! Starting the car after first plugging in the screen was nerve racking after trimming the corners of the board off and all the wiring but all was well

A sheet of plexiglass cut to fit where the compartments used to be, and painted to cover the LCD board. This was completely remade on the second install.

The plexiglass that was in the stock bezel, cut down and attached to the LCD board

All the wires for the PC running through a hole I dremeled in the housing behind the glove box (now you can see why I prefer not to run all of these wires to the trunk)

Here is the Motherboard and M2-ATX Power Supply mounted to a piece of plexiglass with motherboard standoffs..

The PC installed. The glove box is basically the "case" for the PC. It JUST fits as you can see. I used a regular IDE hard drive I had in my GP GTP CarPC since I already had it. I eventually might replace this with a Laptop HD so it�s not so tight.

Here is two USB cables I ran to the center console (other one is my cell phone charger). I can also plug in a 7port USB hub into one of these if I need extra USB plugs. I just connect my 8gb USB flash drive to one of these connectors and I can play music directly off of it and/or add it to the PC Library.

USB cables coming in, the red switch (top left of pic) is the PC on/off switch if I need to manually turn it on/off.

GPS Receiver. Again, I didn't wanna take the rest of the car apart to run one measly wire to the rear deck just to hide the GPS receiver, plus these receivers can be fussy with tint. This was the best option for a good view of the sky, especially since the PC was right there in the glove box and I didn't even have to extend it's USB wire at all.

The Broken navi screen I got off ebay

Full Dash Shot

New pics of the stock screen after my redo. Looks a bit better.

Navi Bezel Installed


ATI Remote Wonder Media remote.. I just keep this on the seat next to me and use it to control centrafuse. With RWKeymaster I can set just about any button on the remote to press any keypress. Then I just set the hotkeys in Centrafuse. Easier than holding my arm up to hit the next track button 15-20 times. That hurts after a while


Windows XP Boot screen with a modified BMP image I got from mp3car.


Desktop, temporary pic until I get a few more mods done and get some nice photos of my car

Centrafuse Pics/Skins:
(Sorry, these are very grainy, I think it�s because of the batteries being almost dead in my camera, and some are darker night skins with pics taken during the day so it�s hard to see, I will replace the images later on)
Centrafuse start screen with an image I made with the Acura NSX Font.

Default Onyx Day skin:


Default Onyx Night skin:


Hope you all enjoy, this thread just took me way to long to write
Pics of more skins I have in the car here: Click here!
I did the original install in September and about a month ago I pulled the whole dash apart again and swapped out the bezels and I also had to redo the stock LCD on the bottom beacuse it didn't look very good. At the moment the Navi buttons are just kinda "there", they do nothing, they don't even light up (if anyone know�s how I can make them light, I'm all ears I couldn�t find the wiring schematic for the connector on those buttons).
I decided to place the PC in the glove box beacuse I don't like running all the PC wires to the trunk and I just didn't want the PC taking up any trunk space. Here we go
:PC/Hardware/Prices:
Jetway VIA C7 1.5GHz Mini-ITX Motherboard ($230)
M2-ATX 160 Watt DC-DC Power Supply (included with MB)
Kingston 1GB PC4200 CL4 240 PIN DIMM Memory ($41)
Maxtor 120GB 7200RPM IDE Hard Drive (Already had)
USGlobalSat BU-353 GPS Receiver ($53.95)
ATI All-in-Wonder Media Remote ($20)
Xenarc 700TSV 7" LCD ($295 used)
TL Navi Bezel ($35)
Software:
Windows XP Professional (already had)
Centrafuse Frontend ($124)
iGuidance Navigation Software (already had)
RWKeymaster/Factory for Remote (free)
Total Cost/To Do:
Installation: Free (DIY)
Total Cost: $798.95 + Misc Wiring/Cables/Supplies (not bad huh?)
Left to buy/do: Reverse Camera, Microphone for voice control, Possibly Internet Access.
Pictures:
Note: I did not take any new pics during the process of swapping in the navi bezel and redoing my non navi stock screen, so I will just include the pics of the orginal install with the non nav bezel for reference.
Dash/Console/Glove Box all disassembled, the two green connectors sitting on top of the head unit get cut off and extended to where the compartments were
HVAC control wires extended
Connectors for stock LCD extended
Bezel Cut/Sanded/Painted, Xenarc Inside, HVAC buttons reattached
LCD Installed, Stock LCD placed in compartment area (old pic from first install)
It's alive! Starting the car after first plugging in the screen was nerve racking after trimming the corners of the board off and all the wiring but all was well
A sheet of plexiglass cut to fit where the compartments used to be, and painted to cover the LCD board. This was completely remade on the second install.
The plexiglass that was in the stock bezel, cut down and attached to the LCD board
All the wires for the PC running through a hole I dremeled in the housing behind the glove box (now you can see why I prefer not to run all of these wires to the trunk)
Here is the Motherboard and M2-ATX Power Supply mounted to a piece of plexiglass with motherboard standoffs..
The PC installed. The glove box is basically the "case" for the PC. It JUST fits as you can see. I used a regular IDE hard drive I had in my GP GTP CarPC since I already had it. I eventually might replace this with a Laptop HD so it�s not so tight.
Here is two USB cables I ran to the center console (other one is my cell phone charger). I can also plug in a 7port USB hub into one of these if I need extra USB plugs. I just connect my 8gb USB flash drive to one of these connectors and I can play music directly off of it and/or add it to the PC Library.
USB cables coming in, the red switch (top left of pic) is the PC on/off switch if I need to manually turn it on/off.
GPS Receiver. Again, I didn't wanna take the rest of the car apart to run one measly wire to the rear deck just to hide the GPS receiver, plus these receivers can be fussy with tint. This was the best option for a good view of the sky, especially since the PC was right there in the glove box and I didn't even have to extend it's USB wire at all.
The Broken navi screen I got off ebay
Full Dash Shot
New pics of the stock screen after my redo. Looks a bit better.
Navi Bezel Installed
ATI Remote Wonder Media remote.. I just keep this on the seat next to me and use it to control centrafuse. With RWKeymaster I can set just about any button on the remote to press any keypress. Then I just set the hotkeys in Centrafuse. Easier than holding my arm up to hit the next track button 15-20 times. That hurts after a while
Windows XP Boot screen with a modified BMP image I got from mp3car.
Desktop, temporary pic until I get a few more mods done and get some nice photos of my car
Centrafuse Pics/Skins:
(Sorry, these are very grainy, I think it�s because of the batteries being almost dead in my camera, and some are darker night skins with pics taken during the day so it�s hard to see, I will replace the images later on)
Centrafuse start screen with an image I made with the Acura NSX Font.
Default Onyx Day skin:
Default Onyx Night skin:
Hope you all enjoy, this thread just took me way to long to write
Pics of more skins I have in the car here: Click here!
 02-03-2008, 07:58 PM
#2
Turd Polisher
iTrader: (1)
HOT. I basically just looked at what it took to make the CarPuter / costs / pictures ... but .. how long did this project take?
02-03-2008, 08:07 PM
#3
Instructor
Thread Starter
Join Date: Apr 2007
Location: Toms River, NJ
Age: 42
Posts: 118
Likes: 0
Received 0 Likes
on
0 Posts
Originally Posted by TylerT
HOT. I basically just looked at what it took to make the CarPuter / costs / pictures ... but .. how long did this project take?
02-03-2008, 08:51 PM
#5
Turd Polisher
iTrader: (1)
Originally Posted by SLAYER6669
I took my time with it, the actual install process took about 25-30 hours or so over 3 days, give or take. That includes many breaks for food etc. and some trips to the store . I just bought the car in May so it was my first time taking the car apart and putting it back together. The second time when I went back in I took it apart and put it back together in way less than half the time it took the first time.
02-04-2008, 12:02 AM
#6
Racer
Thats hotness! Pure hotness.
As for the navi buttons, you CAN make them work. I'm still looking around for a cheap navi screen and bezel to hook mine up, but we bought the OEM bezel for our 350Z and tapped it into the PC via a keyboard controller and now is fully functional.
I'm going to wait on "Saturated Fat" to see this thread. He'll fill you in.
Good stuff!
Collin
Trending Topics
02-04-2008, 07:37 AM
#8
Instructor
Join Date: Oct 2007
Location: MN
Age: 41
Posts: 159
Likes: 0
Received 0 Likes
on
0 Posts
very nice!!!! look better then mine. but aren't you worry about the mobo in the glove depotment getting to hot? it doest look like it have air flow through it..i suggest you cut anothe hole and add a fan to suck hot air out.
02-04-2008, 06:52 PM
#9
Instructor
Thread Starter
Join Date: Apr 2007
Location: Toms River, NJ
Age: 42
Posts: 118
Likes: 0
Received 0 Likes
on
0 Posts
Originally Posted by theklassic
Thats hotness! Pure hotness.
As for the navi buttons, you CAN make them work. I'm still looking around for a cheap navi screen and bezel to hook mine up, but we bought the OEM bezel for our 350Z and tapped it into the PC via a keyboard controller and now is fully functional.
I'm going to wait on "Saturated Fat" to see this thread. He'll fill you in.
Good stuff!
Collin
As for the navi buttons, you CAN make them work. I'm still looking around for a cheap navi screen and bezel to hook mine up, but we bought the OEM bezel for our 350Z and tapped it into the PC via a keyboard controller and now is fully functional.
I'm going to wait on "Saturated Fat" to see this thread. He'll fill you in.
Good stuff!
Collin
 I'm guessing that connector plugs into the navi LCD board some how, but I would think one of the wires on it is ground and one would be power for the illumination. Here is a pic of the connector:
http://www.thirdgenfbodies.com/image...nconnector.jpg
Originally Posted by RTLNOOBIE
very nice!!!! look better then mine. but aren't you worry about the mobo in the glove depotment getting to hot? it doest look like it have air flow through it..i suggest you cut anothe hole and add a fan to suck hot air out.

 02-05-2008, 07:34 AM
#12
Instructor
Thread Starter
Join Date: Apr 2007
Location: Toms River, NJ
Age: 42
Posts: 118
Likes: 0
Received 0 Likes
on
0 Posts
Originally Posted by ezland00
can you use laptop instead? you can hide it under the seats
Originally Posted by KN_TL
Slayer,
I forgot to complement you on the great job on the install in my PM's.
Since you've done 4 other installs, I assume you've tried Roadrunner at one point. Can you list the differences and advantages of Centrafuge over RR?
I forgot to complement you on the great job on the install in my PM's.
Since you've done 4 other installs, I assume you've tried Roadrunner at one point. Can you list the differences and advantages of Centrafuge over RR?
02-15-2008, 04:15 PM
#15
Instructor
Thread Starter
Join Date: Apr 2007
Location: Toms River, NJ
Age: 42
Posts: 118
Likes: 0
Received 0 Likes
on
0 Posts
Well this kinda sucks, the dash is going to have to come all apart yet again. Any time I hit a rough bump I get this plastic "snapping" sound from the Xenarc/Navi Bezel It's wierd because I never got ANY noise with the non navi bezel. I guess I will have to put some kind of felt in between the two.
Also, on the inside of my plexi that covers the stock LCD I see streaks all of a sudden. I cleaned it with Stoners Invisible Glass and held it up to light before installing and it was crystal clear.. Something in the air must have brought out the streaks.. Any suggestions on streak free plexiglass? I don't want to take it apart and clean it and end up with the same issue again. It never ends
It's wierd because I never got ANY noise with the non navi bezel. I guess I will have to put some kind of felt in between the two. Also, on the inside of my plexi that covers the stock LCD I see streaks all of a sudden.
I cleaned it with Stoners Invisible Glass and held it up to light before installing and it was crystal clear.. Something in the air must have brought out the streaks.. Any suggestions on streak free plexiglass? I don't want to take it apart and clean it and end up with the same issue again. It never ends
02-27-2008, 06:31 PM
#20
Instructor
Thread Starter
Join Date: Apr 2007
Location: Toms River, NJ
Age: 42
Posts: 118
Likes: 0
Received 0 Likes
on
0 Posts
Originally Posted by nitropwd
hey slayer, how is the xenarc actually attached to the back of the bezel? i have taken my dash just yet.
 02-28-2008, 04:19 PM
#22
B A N N E D
iTrader: (1)

Join Date: Feb 2008
Location: UCF/ Orlando 407
Age: 33
Posts: 567
Likes: 0
Received 0 Likes
on
0 Posts
Beautiful... i have a non navi and i want to make it into a navi or car-pc . Is there a whole kit to buy this ir anyweb site or know anyone that can sell them or a stock navi? get back at me yes or no - thank you and great job !!!
02-28-2008, 05:39 PM
#23
Instructor

Originally Posted by SLAYER6669
Hey all, I figured I would finally post my CarPC install in my '04 TL. This is a non navi car as you can tell from the clock/stock lcd displays. In my first attempt I did not like the way the bezel looked after I cut/sanded/painted it so I found a cheap cracked Navi Screen on Ebay and used that since no cutting on the outside is necessary so it looks perfect.
I did the original install in September and about a month ago I pulled the whole dash apart again and swapped out the bezels and I also had to redo the stock LCD on the bottom beacuse it didn't look very good. At the moment the Navi buttons are just kinda "there", they do nothing, they don't even light up (if anyone know�s how I can make them light, I'm all ears I couldn�t find the wiring schematic for the connector on those buttons).
I decided to place the PC in the glove box beacuse I don't like running all the PC wires to the trunk and I just didn't want the PC taking up any trunk space. Here we go :
PC/Hardware/Prices:
Jetway VIA C7 1.5GHz Mini-ITX Motherboard ($230)
M2-ATX 160 Watt DC-DC Power Supply (included with MB)
Kingston 1GB PC4200 CL4 240 PIN DIMM Memory ($41)
Maxtor 120GB 7200RPM IDE Hard Drive (Already had)
USGlobalSat BU-353 GPS Receiver ($53.95)
ATI All-in-Wonder Media Remote ($20)
Xenarc 700TSV 7" LCD ($295 used)
TL Navi Bezel ($35)
Software:
Windows XP Professional (already had)
Centrafuse Frontend ($124)
iGuidance Navigation Software (already had)
RWKeymaster/Factory for Remote (free)
Total Cost/To Do:
Installation: Free (DIY)
Total Cost: $798.95 + Misc Wiring/Cables/Supplies (not bad huh?)
Left to buy/do: Reverse Camera, Microphone for voice control, Possibly Internet Access.
Pictures:
Note: I did not take any new pics during the process of swapping in the navi bezel and redoing my non navi stock screen, so I will just include the pics of the orginal install with the non nav bezel for reference.
Dash/Console/Glove Box all disassembled, the two green connectors sitting on top of the head unit get cut off and extended to where the compartments were
HVAC control wires extended
Connectors for stock LCD extended
Bezel Cut/Sanded/Painted, Xenarc Inside, HVAC buttons reattached
LCD Installed, Stock LCD placed in compartment area (old pic from first install)
It's alive! Starting the car after first plugging in the screen was nerve racking after trimming the corners of the board off and all the wiring but all was well
A sheet of plexiglass cut to fit where the compartments used to be, and painted to cover the LCD board. This was completely remade on the second install.
The plexiglass that was in the stock bezel, cut down and attached to the LCD board
All the wires for the PC running through a hole I dremeled in the housing behind the glove box (now you can see why I prefer not to run all of these wires to the trunk)
Here is the Motherboard and M2-ATX Power Supply mounted to a piece of plexiglass with motherboard standoffs..
The PC installed. The glove box is basically the "case" for the PC. It JUST fits as you can see. I used a regular IDE hard drive I had in my GP GTP CarPC since I already had it. I eventually might replace this with a Laptop HD so it�s not so tight.
Here is two USB cables I ran to the center console (other one is my cell phone charger). I can also plug in a 7port USB hub into one of these if I need extra USB plugs. I just connect my 8gb USB flash drive to one of these connectors and I can play music directly off of it and/or add it to the PC Library.
USB cables coming in, the red switch (top left of pic) is the PC on/off switch if I need to manually turn it on/off.
GPS Receiver. Again, I didn't wanna take the rest of the car apart to run one measly wire to the rear deck just to hide the GPS receiver, plus these receivers can be fussy with tint. This was the best option for a good view of the sky, especially since the PC was right there in the glove box and I didn't even have to extend it's USB wire at all.
The Broken navi screen I got off ebay
Full Dash Shot
New pics of the stock screen after my redo. Looks a bit better.
Navi Bezel Installed
ATI Remote Wonder Media remote.. I just keep this on the seat next to me and use it to control centrafuse. With RWKeymaster I can set just about any button on the remote to press any keypress. Then I just set the hotkeys in Centrafuse. Easier than holding my arm up to hit the next track button 15-20 times. That hurts after a while
Windows XP Boot screen with a modified BMP image I got from mp3car.
Desktop, temporary pic until I get a few more mods done and get some nice photos of my car
Centrafuse Pics/Skins:
(Sorry, these are very grainy, I think it�s because of the batteries being almost dead in my camera, and some are darker night skins with pics taken during the day so it�s hard to see, I will replace the images later on)
Centrafuse start screen with an image I made with the Acura NSX Font.
Default Onyx Day skin:
Default Onyx Night skin:
Hope you all enjoy, this thread just took me way to long to write
Pics of more skins I have in the car here: Click here!
I did the original install in September and about a month ago I pulled the whole dash apart again and swapped out the bezels and I also had to redo the stock LCD on the bottom beacuse it didn't look very good. At the moment the Navi buttons are just kinda "there", they do nothing, they don't even light up (if anyone know�s how I can make them light, I'm all ears I couldn�t find the wiring schematic for the connector on those buttons).
I decided to place the PC in the glove box beacuse I don't like running all the PC wires to the trunk and I just didn't want the PC taking up any trunk space. Here we go
:PC/Hardware/Prices:
Jetway VIA C7 1.5GHz Mini-ITX Motherboard ($230)
M2-ATX 160 Watt DC-DC Power Supply (included with MB)
Kingston 1GB PC4200 CL4 240 PIN DIMM Memory ($41)
Maxtor 120GB 7200RPM IDE Hard Drive (Already had)
USGlobalSat BU-353 GPS Receiver ($53.95)
ATI All-in-Wonder Media Remote ($20)
Xenarc 700TSV 7" LCD ($295 used)
TL Navi Bezel ($35)
Software:
Windows XP Professional (already had)
Centrafuse Frontend ($124)
iGuidance Navigation Software (already had)
RWKeymaster/Factory for Remote (free)
Total Cost/To Do:
Installation: Free (DIY)
Total Cost: $798.95 + Misc Wiring/Cables/Supplies (not bad huh?)
Left to buy/do: Reverse Camera, Microphone for voice control, Possibly Internet Access.
Pictures:
Note: I did not take any new pics during the process of swapping in the navi bezel and redoing my non navi stock screen, so I will just include the pics of the orginal install with the non nav bezel for reference.
Dash/Console/Glove Box all disassembled, the two green connectors sitting on top of the head unit get cut off and extended to where the compartments were
HVAC control wires extended
Connectors for stock LCD extended
Bezel Cut/Sanded/Painted, Xenarc Inside, HVAC buttons reattached
LCD Installed, Stock LCD placed in compartment area (old pic from first install)
It's alive! Starting the car after first plugging in the screen was nerve racking after trimming the corners of the board off and all the wiring but all was well
A sheet of plexiglass cut to fit where the compartments used to be, and painted to cover the LCD board. This was completely remade on the second install.
The plexiglass that was in the stock bezel, cut down and attached to the LCD board
All the wires for the PC running through a hole I dremeled in the housing behind the glove box (now you can see why I prefer not to run all of these wires to the trunk)
Here is the Motherboard and M2-ATX Power Supply mounted to a piece of plexiglass with motherboard standoffs..
The PC installed. The glove box is basically the "case" for the PC. It JUST fits as you can see. I used a regular IDE hard drive I had in my GP GTP CarPC since I already had it. I eventually might replace this with a Laptop HD so it�s not so tight.
Here is two USB cables I ran to the center console (other one is my cell phone charger). I can also plug in a 7port USB hub into one of these if I need extra USB plugs. I just connect my 8gb USB flash drive to one of these connectors and I can play music directly off of it and/or add it to the PC Library.
USB cables coming in, the red switch (top left of pic) is the PC on/off switch if I need to manually turn it on/off.
GPS Receiver. Again, I didn't wanna take the rest of the car apart to run one measly wire to the rear deck just to hide the GPS receiver, plus these receivers can be fussy with tint. This was the best option for a good view of the sky, especially since the PC was right there in the glove box and I didn't even have to extend it's USB wire at all.
The Broken navi screen I got off ebay
Full Dash Shot
New pics of the stock screen after my redo. Looks a bit better.
Navi Bezel Installed
ATI Remote Wonder Media remote.. I just keep this on the seat next to me and use it to control centrafuse. With RWKeymaster I can set just about any button on the remote to press any keypress. Then I just set the hotkeys in Centrafuse. Easier than holding my arm up to hit the next track button 15-20 times. That hurts after a while
Windows XP Boot screen with a modified BMP image I got from mp3car.
Desktop, temporary pic until I get a few more mods done and get some nice photos of my car
Centrafuse Pics/Skins:
(Sorry, these are very grainy, I think it�s because of the batteries being almost dead in my camera, and some are darker night skins with pics taken during the day so it�s hard to see, I will replace the images later on)
Centrafuse start screen with an image I made with the Acura NSX Font.
Default Onyx Day skin:
Default Onyx Night skin:
Hope you all enjoy, this thread just took me way to long to write
Pics of more skins I have in the car here: Click here!
02-28-2008, 09:46 PM
#24
Instructor
Thread Starter
Join Date: Apr 2007
Location: Toms River, NJ
Age: 42
Posts: 118
Likes: 0
Received 0 Likes
on
0 Posts
Originally Posted by Orlando TL
Beautiful... i have a non navi and i want to make it into a navi or car-pc . Is there a whole kit to buy this ir anyweb site or know anyone that can sell them or a stock navi? get back at me yes or no - thank you and great job !!!
IMO a PC is better beacuse you can basically do whatever you want with it instead of just being limited to what the navi system lets you do. As for the CarPC, it's something that you have to really customize to your needs (DIY) in terms of picking out the hardware/software.. Have a visit at www.mp3car.com and all the info you need on installing a CarPC can be found on that forum. They do sell kits there in the store as well. There are also some members on here who will do installs (depending on your location) for a fee of course. Good Luck!
02-28-2008, 09:52 PM
#25
Instructor
Thread Starter
Join Date: Apr 2007
Location: Toms River, NJ
Age: 42
Posts: 118
Likes: 0
Received 0 Likes
on
0 Posts
Originally Posted by DaddysOnehotAck
Your not technical??.........you sure you didn't graduate from MIT??.....lol, Good JOB!
 Not even close man.. I just followed along with what all of the other guys on here did previously and made sure to ask alot of questions. The installation of the CarPC is mostly just basic wiring really.. If you think about it, its just power/ground/remote and then sound input for the PC itself. Then just extending the stock LCD wires and the rest just connecting wires to the PC.
02-29-2008, 05:04 PM
Not even close man.. I just followed along with what all of the other guys on here did previously and made sure to ask alot of questions. The installation of the CarPC is mostly just basic wiring really.. If you think about it, its just power/ground/remote and then sound input for the PC itself. Then just extending the stock LCD wires and the rest just connecting wires to the PC.
02-29-2008, 05:04 PM
#27
Instructor
Thread Starter
Join Date: Apr 2007
Location: Toms River, NJ
Age: 42
Posts: 118
Likes: 0
Received 0 Likes
on
0 Posts
Originally Posted by nitropwd
Slayer, how exactly did you extend the wires? Did you use use butt connectors or did you solder and use shrinktube? sorry for so many questions.
03-01-2008, 08:41 AM
#28
B A N N E D
iTrader: (1)
Join Date: Feb 2008
Location: UCF/ Orlando 407
Age: 33
Posts: 567
Likes: 0
Received 0 Likes
on
0 Posts
Originally Posted by SLAYER6669
I'm not sure much about where to get navi conversion parts from, I think most people check junkyards for parts or Ebay. If you are interested in going that route, search this forum there are a bunch of threads for non navi to navi conversions.
IMO a PC is better beacuse you can basically do whatever you want with it instead of just being limited to what the navi system lets you do. As for the CarPC, it's something that you have to really customize to your needs (DIY) in terms of picking out the hardware/software.. Have a visit at www.mp3car.com and all the info you need on installing a CarPC can be found on that forum. They do sell kits there in the store as well. There are also some members on here who will do installs (depending on your location) for a fee of course. Good Luck!
IMO a PC is better beacuse you can basically do whatever you want with it instead of just being limited to what the navi system lets you do. As for the CarPC, it's something that you have to really customize to your needs (DIY) in terms of picking out the hardware/software.. Have a visit at www.mp3car.com and all the info you need on installing a CarPC can be found on that forum. They do sell kits there in the store as well. There are also some members on here who will do installs (depending on your location) for a fee of course. Good Luck!
03-11-2008, 09:41 PM
#30
Instructor
Thread Starter
Join Date: Apr 2007
Location: Toms River, NJ
Age: 42
Posts: 118
Likes: 0
Received 0 Likes
on
0 Posts
Originally Posted by ITL
your install looks very familiar  awesome setup, man!
awesome setup, man! Though I just threw the PC in the glove box instead of making nicer cases like you did. If I didn't see your install I probably would've never thought of it. Who needs a glove box anyway! A special thanks to you for answering my questions before I began the actual install process too!
03-11-2008, 11:42 PM
#31
Honda Noob
damnit, if only i could find someone to extend my harnesses, i'm paranoid to try it. and the sad part is i have ALL the parts ready to go.....complete pc, Navi Bezel, Xenarc, EVERYTHING!!!
This is beyond depressing.
I also dont have a garage to work in. lol
This is beyond depressing.
I also dont have a garage to work in. lol
03-12-2008, 07:55 AM
#32
I do my own work.
Join Date: Jul 2004
Location: ATL
Age: 42
Posts: 1,488
Likes: 0
Received 0 Likes
on
0 Posts
Originally Posted by nitropwd
damnit, if only i could find someone to extend my harnesses, i'm paranoid to try it. and the sad part is i have ALL the parts ready to go.....complete pc, Navi Bezel, Xenarc, EVERYTHING!!!
This is beyond depressing.
I also dont have a garage to work in. lol
This is beyond depressing.
I also dont have a garage to work in. lol
There's nothing very difficult about extending the harnesses, it's just terribly time consuming. I've done this twice, and each time has taken me about 4.5hrs, which also includes fabricating the plexi for the non-navi lcd below. This is not something you ever want to try to troubleshoot, so it's important to make sure it's done right the first time. I take my time here, and label (numbered) all wires during prep. The actual soldering goes pretty quick, it's the prep work that takes so long.
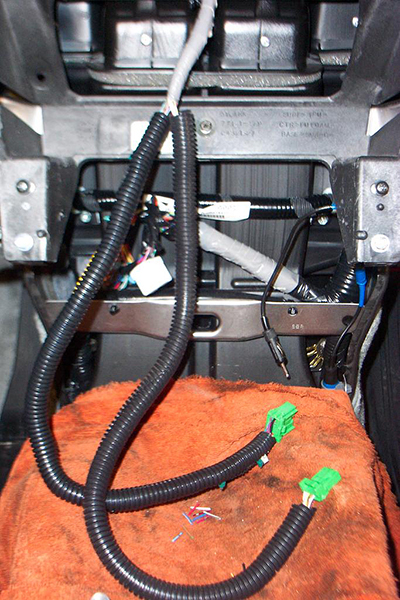
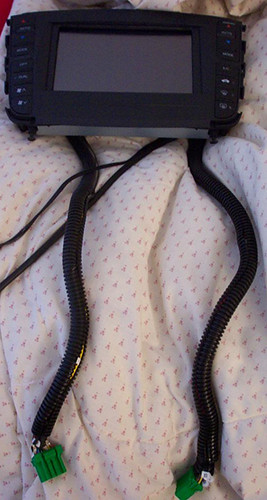
I finally found some pics to show how good the wiring came out. For the non-navi, two harnesses have to be soldered in the car (left pic). The other two harnesses (right pic) are a bit easier, since the HVAC controls can be removed from the car while extending the harnesses.
Here are a couple of pics of my extended harnesses:
 03-12-2008, 08:01 AM
#33
I do my own work.
Join Date: Jul 2004
Location: ATL
Age: 42
Posts: 1,488
Likes: 0
Received 0 Likes
on
0 Posts
Originally Posted by SLAYER6669
Yeah I imagine it does look a little familar Though I just threw the PC in the glove box instead of making nicer cases like you did. If I didn't see your install I probably would've never thought of it. Who needs a glove box anyway! A special thanks to you for answering my questions before I began the actual install process too!
Though I just threw the PC in the glove box instead of making nicer cases like you did. If I didn't see your install I probably would've never thought of it. Who needs a glove box anyway! A special thanks to you for answering my questions before I began the actual install process too!
03-12-2008, 08:45 PM
#34
Instructor
Thread Starter
Join Date: Apr 2007
Location: Toms River, NJ
Age: 42
Posts: 118
Likes: 0
Received 0 Likes
on
0 Posts
Originally Posted by nitropwd
damnit, if only i could find someone to extend my harnesses, i'm paranoid to try it. and the sad part is i have ALL the parts ready to go.....complete pc, Navi Bezel, Xenarc, EVERYTHING!!!
This is beyond depressing.
I also dont have a garage to work in. lol
This is beyond depressing.
I also dont have a garage to work in. lol
03-12-2008, 09:06 PM
#35
Instructor
Thread Starter
Join Date: Apr 2007
Location: Toms River, NJ
Age: 42
Posts: 118
Likes: 0
Received 0 Likes
on
0 Posts
Originally Posted by ITL
IMHO, the glovebox is the most elegant location for the carpc. Less wiring makes for less potential interference/noise. I didn't use my glovebox for anything anyway...though with my latest case, I even have some storage space in there, believe it or not! Glad I could help. This is such an involved project, as anyone that's already done it can obviously tell you...It makes things 10x easier to know what you're getting into, or at least have someone to guide/advise you. All I had at the time was moahdib. Now, there are quite a few guys that have done these installs, which makes everything better for everyone.
As for the glove box, it's like the perfect spot. It's out of sight for theives, out of the way, less wires, and you can even lock the glove box for whatever that's worth. Doesn't get much better than that!
Nice pics too, your wiring is so much neater than mine and I can tell that even through the wire loom
 03-13-2008, 01:04 AM
#36
Honda Noob
Originally Posted by ITL
hey nitro, where are you located? Would you be willing to drive to Atlanta?
There's nothing very difficult about extending the harnesses, it's just terribly time consuming. I've done this twice, and each time has taken me about 4.5hrs, which also includes fabricating the plexi for the non-navi lcd below. This is not something you ever want to try to troubleshoot, so it's important to make sure it's done right the first time. I take my time here, and label (numbered) all wires during prep. The actual soldering goes pretty quick, it's the prep work that takes so long.
I finally found some pics to show how good the wiring came out. For the non-navi, two harnesses have to be soldered in the car (left pic). The other two harnesses (right pic) are a bit easier, since the HVAC controls can be removed from the car while extending the harnesses.
Here are a couple of pics of my extended harnesses:
ITL, I'm Bloomington, MN.....a 'burb right outside of minneapolis. believe me i'm really thinking about coming down there to get this done. but that would be a LONG drive. Havent gone that distance since my days in the Marines Corps.
would be be possible to make an extention for the harness by using the connector from the back of a broken navi screen? if so i would more than happy to send you what i have
 03-13-2008, 06:12 AM
#37
I do my own work.
Join Date: Jul 2004
Location: ATL
Age: 42
Posts: 1,488
Likes: 0
Received 0 Likes
on
0 Posts
Originally Posted by nitropwd
would be be possible to make an extention for the harness by using the connector from the back of a broken navi screen? if so i would more than happy to send you what i have
 03-13-2008, 09:43 AM
#38
Honda Noob
Originally Posted by ITL
It wouldn't be possible with just one connector...you'd need a connector for the other end of the extension cable. Even if you had both, there are still the other harnesses in the car. I doubt you really want to pull the upper dash/airbags etc just to ship a harness
04-26-2008, 07:56 PM
#40
Pro
Join Date: Mar 2007
Location: Western Chicago Suburbs
Age: 40
Posts: 541
Likes: 0
Received 0 Likes
on
0 Posts
This is amazing - nice work! Of course, you know what you started...now I'm gonna have to start doing some reading up on all of this. I just put a subwoofer in (uncald4 built it from the vendor forum) and I built a custom amp rack - this was after months of saying I wasn't going to get back into all of this again. After seeing this, I'm sure my car will be right back to where I left the CL when I bought my TL haha
haha