
Large demand for my Ipod/Mp3 player integration setup... (3GTL Garage# I-059)
 04-01-2005, 07:08 PM
#1

Large demand for my Ipod/Mp3 player integration setup... (3GTL Garage# I-059)
Due to many PM's (which i welcome!) about my mp3 integration setup -- I will try and work on a detailed DIY (w/ some pics and schematics) of how I setup my mp3 integration.
More to come.
More to come.

 04-02-2005, 08:31 AM
#3
cool Peter. Your setup is pretty inventive. I have not done it yet to my tl because I have a shop in NYC that will put in an official one that works with the cd changer for 175.00(press cd button twice to get to it)
I have not spoken with them directly yet...if that setup gives me control over playlists for my iriver I may opt for that.
I have not spoken with them directly yet...if that setup gives me control over playlists for my iriver I may opt for that.
 04-02-2005, 09:51 AM
#5
In fact, I think the switch is very practical -- especially when you're driving and wanting to toggle b/w XM and mp3... you shouldn't have to switch out a cable in the center console. So, definitely, a diagram of how to integrate the switch will be included. Again, thanks to all for your interest.
 04-03-2005, 05:50 PM
#7
Here's the beginnings of the installation DIY:
Tools needed:
1) scissors
2) wire stripper
3) philips head screwdriver, flat-head screwdriver
4) plaster/putty knife (available in paint section of hardware store)
5) power drill w/ assorted drill bits
6) soldering iron, solder
7) labels to label wires as you splice into them
8) black electric tape
9) exacto knife
Supplies (all available at Radioshack == total cost ~ $20.00)
1) 20-25ft of insulated stereo speaker wire
2) solder
3) two (2) headphone jacks (see pic below)
4) in-line headphone amplifier
5) 3" male to male stereo headphone cable
6) stereo headphone two-input to one-output switch
Time required: 3 hours (for beginning), 2 hours (for advanced DIY-er)
People required: 1
Trending Topics


 04-03-2005, 06:06 PM
#11
Steps for Installation: CENTER CONSOLE REMOVAL
1) First step is to remove the center console as seen in pic #1 and #2
2) Using the putty knife (plaster knife) carefully wedge the knife between the aluminum trim and the plastic of the center console and gently pry the aluminum trim up. Do this on both sides UP TO THE CENTER CONSOLE curve where the aluminum trim starts to travel upward. All you need to do is remove the trim on the horizontal surface only! It is way too difficult to remove the entire trim up to the center dash vents, so do not attempt unless you want to pay $100 a piece for new aluminum trim pieces.
3) Gently move both aluminum pieces to their respective lateral sides in order to reveal some philips head screws that secure the center console to the dash/gear-shift console. These are very obvious black screws (4 total) -- remove these, then move to next step.
4) In the center console, the deepest compartment, remove the rubber liner at the bottom to reveal two BRASS screws. Remove these screws. Now the center console is free to be moved. DO NOT JUST RIP UP ON THE CENTER CONSOLE TO MOVE IT OUT OF THE WAY. There are two wires plugged into the center console underneath (one to power the center console light, the other to power the cig. lighter power adapter in the deep compartment).
5) You can move the console up and prop it up w/ something in order to do your work -- it does not necessarily need to be totally removed from the vehicle.
04-03-2005, 06:15 PM
#12
Steps for Installation: XM RECEIVER WIRE INTEGRATION
1) open the trunk (easy enough)
2) It is necessary to get behind the right side of the trunk liner. In order to do this, there are several obvious plastic knobby type of caps that lock the liner in place. Remove about 5 or 6 of these (use a flashlight to locate all of them) and also remove some plastic snap dowels that line the edge of the trunk by the right rear tail light.
3) GENTLY tug on the liner and move it out of place. The motions required to remove the liner will be obvious to you as you remove it.
4) Once removed, you'll see something like picture #7 (however, YOU WILL NOT see the large silver box that you see a red and yellow plug plugged into. You WILL see that silver box through the circular hole that has that BARCODE/SCANNER LABEL on it. as seen in pic 7. You must LOOSEN but not totally remove the screws that secure this box (this box IS the XM receiver). Once loosened, you can slide the XM receiver up and out of that corner that it's in.
5) Now you must splice into the XM receiver wires. Here is where you need to be VERY meticulous, and label-happy. Print out the diagram that I've posted of the XM receiver and keep it handy. Refer to it OFTEN. Label EACH WIRE THAT YOU WILL SPLICE BEFORE... BEFORE!!! you cut it so that there is no confusion afterwards. Make sure you have ample lighting.
6) As in diagram #6, wires A5,6, and A13, 14 correspond the the audio OUTPUT of the XM receiver. So, consider this, the wires that it connects to run UP TO THE HEADUNIT and thus the XM/Aux port on the headunit. Therefore, when you CUT these four wires, you will two sets of wires dangling: 1) XM audio output from the receiver, and 2) wires that run up to the headunit
7) Cut these four wires about 6 inches from the plug (DO NOT FORGET TO LABEL BEFORE YOU CUT). Strip down about 1 cm of wire on each of the four cut ends. Cut four (4) lengths of about 10 to 12 feet of stereo wire that you bought, strip down each end.
04-03-2005, 06:18 PM
#13
8) twist tie one length of wire to each of the corresponding dangling wires. These new lengths of wire you added will now travel up to the center console (NOTE .. the shorter the wire, the better in terms of reproducing audio -- therefore, as you start working on the center console later in the installation, you will trim down extra wire as necessary, do not worry about this now).
9) Solder the twisted connections, use electric tape to insulate the connections
10) Now, re-install the XM receiver as you previously found it, and prepare to run the cables up to the center console.
9) Solder the twisted connections, use electric tape to insulate the connections
10) Now, re-install the XM receiver as you previously found it, and prepare to run the cables up to the center console.
04-03-2005, 06:27 PM
#14
RUNNING THE WIRES FROM THE TRUNK TO THE CENTER CONSOLE:
1) Now that you have the added lengths of wire from the XM receiver and the wire the runs to the headunit, you need to run it to the console
2) in order to do this, and do it professionally (i.e. nicely hidden) you need to remove the rear seat BOTTOM (not the top/backing of the seat). This is a relatively easy task, as compared with the seat back which is FRICKEN RIDICULOUS! So, consider yourselves lucky.
3) Thanks to Robert Cotran and his awesome website for the following pics:
#9
#10
04-03-2005, 06:32 PM
#15
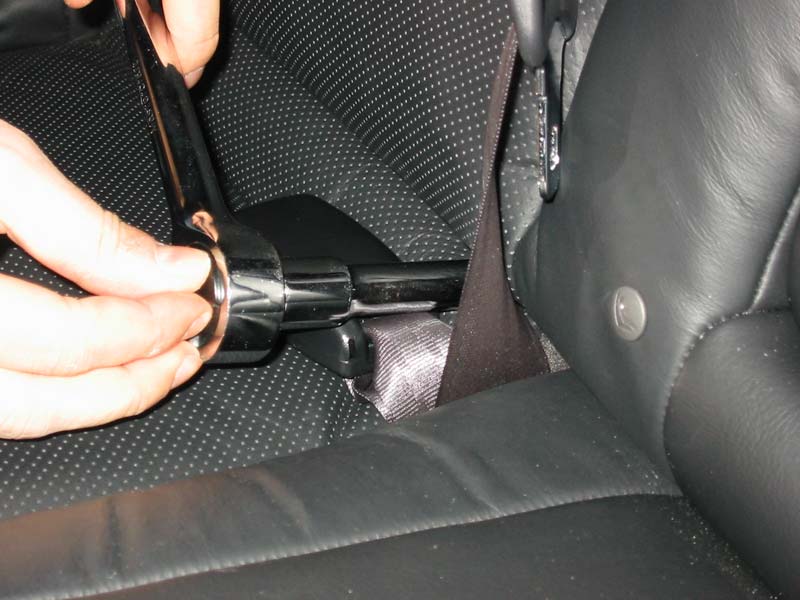
4) As in pic 9, remove this bolt in order to start unsecuring the bottom seat. Next, remove two clips from the front part of the seat -- you'll have to use one hand to lift UP on the seat above the clip, and the other hand w/ a pair of pliers to grasp the clip and move it out (in the direction of the yellow arrow as in pic 10)
5) now, the seat can be removed.
6) Open the center pass-through door and inspect how you will start bringing in the wire extensions from the trunk into the cabin and eventually to the center console (by way of travelling UNDERNEATH the seat bottom you just removed).
7) you will have to use some ingenuity of your own to figure out how to appropriately hide the wires in the trunk and allow them to pass through the center pass-through and then into the cabin. Once they are inside, you can now pipe them up and under the center console, in through the bottom door as seen in pic 11:
#11
04-03-2005, 06:44 PM
#16
8) Bring the wires through this compartment. Twist tie to two NEGATIVE terminal wire ends of A13 and A14 together, but leave the + terminal wire ends of A5 and A6 alone. You will now attach these wires to your FIRST HEADPHONE JACK as seen in pic #3
9) solder the connections carefully using a fine-tip soldering iron (REMEMBER TO USE COMMON SENSE AND PROVIDE YOURSELF GOOD VENTILATION -- take the time to set up a fan if inside, or do this outside w/ the sunroof and all windows open). Now, using small strips of black electric tape, insulate the connections carefully to protect all metalic surfaces from each other.
10) Now, w/ the other pair of stereo wires, corresponding to the Headunit input wire stream, you will attach another headphone jack to this pair of wires. Again, twist tie the negative terminals A13 and A14, and then attach these wires to the headphone jack terminals. (Recall, there are three prongs on the headphone jack, one is ground, and the other two correspond to L+ and R+ channels).
11) Now you must drill two holes in the top deck lid as seen in pic 4. The holes you drill must be the diameter of the headphone jack silver plug, as seen again in pic 3. Now, the headphone jack, you must remember, has a circular lock nut on it that must be attached from the top of the top deck in order to secure the headphone jack. However, the length of the silver part of the headphone jack is too small to traverse the entire thickness of the top deck, therefore, you must use a larger diameter drillbit to create an INSET sink for the nut to properly be able to secure the headphone jack. Once this is done, insert both jacks into their respective holes from beneath the top decklid, secure them w/ the circular nuts, and then plug in the 3" stereo male-male connector between the two jacks and turn on the XM radio to make sure you hear sound. If you hear static or popping .. re-check all the soldered connections, make sure there isn't inappropriate touching of any wires both at the center console as well as the in the trunk at the XM receiver connections.
04-03-2005, 06:46 PM
#17
12) label for yourself which jack is what .. one jack is labeled "AUX PORT/HEADUNIT/MP3 INPUT", for example, and the other may be labeled "XM OUTPUT"
13) Now, re-assemble your car!! (easier said than done .. but very do-able .. just do everything in reverse. Take some time to properly hide wires and make everything as nice and neat as to your liking.
13) Now, re-assemble your car!! (easier said than done .. but very do-able .. just do everything in reverse. Take some time to properly hide wires and make everything as nice and neat as to your liking.
04-03-2005, 06:50 PM
#19
INSTALLING IN-LINE HEADPHONE AMPLIFIER FOR MP3 PLAYER -- NOT NEEDED TO XM AUDIO
1) The XM audio output signal is very strong compared to the headphone output on most mp3 players .. therefore, you do NOT needed to install the inline amp for the XM audio -- all you do is connet the 3" stereo cable between the two jacks and enjoy your XM audio.
2) For the mp3 player, however, you do need an amplifier to so you do not drain all the batteries of your mp3 player too quickly.
3) plug in the 3" stereo cable into the "MP3/HEADUNIT/AUX" jack, then plug the OTHER end into one of the three silver jacks you see in pic 12.
4) then plug the black plug in pic 12 into your mp3 player headphone jack.
5) turn on the amplifier, and play an mp3 to test the audio.
04-04-2005, 01:07 PM
#23
INSTALLING SWITCH BETWEEN XM AND MP3 PLAYER:
1) This picture is an optional headphone jack switch that you can purchase from Radioshack for about $15.00:

2) The pink wire is for the microphone, so you can either clip this, or tie it back -- it's going to serve no purpose for this application. The GREEN wire is to be connected to the headphone jack that is labeled "HEADUNIT/AUX/MP3 Player". There are three jacks on this particular switch: 1) One to be connected to "XM OUTPUT", and the other to be connected to your MP3 player. Each of these connections can be achieved w/ 3" stereo male/male headphone cables
3) Now you're probably saying/thinking, "That's a hell of a lot of wires to deal w/" Therefore, w/ this setup, you can do one of two things:
#1 you can use the lower compartment exclusively for storing all these wires, and you can discretely bring only the switch up to the top compartment or bring it outside the center console to sit by your cupholders.
#2 you can, PRIOR TO RE-INSTALLING THE CENTER CONSOLE, tuck and hide most of these wires under the center console and therefore only have to bring up the switch to the deep compartment.
4) Creativity plays a huge role w/ this whole setup, so exercise your own to determine how you'll hide your wires.
1) This picture is an optional headphone jack switch that you can purchase from Radioshack for about $15.00:
2) The pink wire is for the microphone, so you can either clip this, or tie it back -- it's going to serve no purpose for this application. The GREEN wire is to be connected to the headphone jack that is labeled "HEADUNIT/AUX/MP3 Player". There are three jacks on this particular switch: 1) One to be connected to "XM OUTPUT", and the other to be connected to your MP3 player. Each of these connections can be achieved w/ 3" stereo male/male headphone cables
3) Now you're probably saying/thinking, "That's a hell of a lot of wires to deal w/" Therefore, w/ this setup, you can do one of two things:
#1 you can use the lower compartment exclusively for storing all these wires, and you can discretely bring only the switch up to the top compartment or bring it outside the center console to sit by your cupholders.
#2 you can, PRIOR TO RE-INSTALLING THE CENTER CONSOLE, tuck and hide most of these wires under the center console and therefore only have to bring up the switch to the deep compartment.
4) Creativity plays a huge role w/ this whole setup, so exercise your own to determine how you'll hide your wires.
 04-06-2005, 09:12 PM
#26
Intermediate
Join Date: Jun 2004
Location: Anaheim
Age: 55
Posts: 33
Likes: 0
Received 0 Likes
on
0 Posts
Originally Posted by AcuraTL2k4
Excellent write up Raj. I will be doing this mod sometime this week. Would you also be able to add a section for the people who want to add a switch.
JT
jtaudioacc.com
 04-14-2005, 01:24 AM
#29
Intermediate
Join Date: Jun 2004
Location: Anaheim
Age: 55
Posts: 33
Likes: 0
Received 0 Likes
on
0 Posts
Originally Posted by sloksig
coasterlvr -
Can you tell us more about the Soundgates X3 Switcher instalation?
Can you tell us more about the Soundgates X3 Switcher instalation?
JT
jtaudioacc.com
04-14-2005, 07:35 AM
#30
I'm Baaack!
Join Date: Sep 2004
Location: Newark, Delaware
Age: 57
Posts: 1,281
Likes: 0
Received 0 Likes
on
0 Posts
Originally Posted by coasterlvr
Basically all I do is cut the XM audio wires. I then just add RCA's and run them in and out of the switcher. The switcher still has 2 inputs you can use for video audio and a mp3. You need to extend the switch up front somewhere and that is about the basics. Of course there is more but mainly removing panels. I think this is the most basic way to interupt the audio. I used to use relays and had to wire them but the soundgate piece is the same thing and cheap enough.
JT
jtaudioacc.com
JT
jtaudioacc.com
Question: Others have reported issues with a reduction in volume by splitting the XM signal .. is there any degradation in quality or volume by using this switch?? would it be beneficial to run a line amp or something similar?
04-14-2005, 08:08 AM
#32
You do not need a line-amp on the XM signal -- as mentioned in my write-up. The power from th4 XM receiver is very sufficient to produce the same sound w/ added wire length. Just make sure you use insulated stereo wire -- and remember that if you spend a little more up front on the quality of wire, you'll get slightly better sound. The quality of the XM is also not affected -- again, so l ong as you have good wire, and clearn connections.
04-15-2005, 01:46 AM
#34
Intermediate
Join Date: Jun 2004
Location: Anaheim
Age: 55
Posts: 33
Likes: 0
Received 0 Likes
on
0 Posts
Originally Posted by Brewmaster
So it sounds like you could run an extension from the mp3 input up into the cabin (glovebox or console) for a portable input.
Question: Others have reported issues with a reduction in volume by splitting the XM signal .. is there any degradation in quality or volume by using this switch?? would it be beneficial to run a line amp or something similar?
Question: Others have reported issues with a reduction in volume by splitting the XM signal .. is there any degradation in quality or volume by using this switch?? would it be beneficial to run a line amp or something similar?
JT
jtaudioacc.com
04-18-2005, 11:40 AM
#35
Coaster ..
the headphone output on the Ipod is no different in terms of strength than any other Mp3 player... several friends of mine that have integrated mp3 players w/ similar setups as mine have to use an in-line amp ...
The 16pin connector at the bottom of the 'pod that uses a direct connector for OEM Ipod integration kits has a significantly higher volume output b/c it's a direct link to the headunit.
04-19-2005, 12:38 AM
#36
Intermediate
Join Date: Jun 2004
Location: Anaheim
Age: 55
Posts: 33
Likes: 0
Received 0 Likes
on
0 Posts
Originally Posted by PeterUbers
Coaster ..
the headphone output on the Ipod is no different in terms of strength than any other Mp3 player... several friends of mine that have integrated mp3 players w/ similar setups as mine have to use an in-line amp ...
The 16pin connector at the bottom of the 'pod that uses a direct connector for OEM Ipod integration kits has a significantly higher volume output b/c it's a direct link to the headunit.
the headphone output on the Ipod is no different in terms of strength than any other Mp3 player... several friends of mine that have integrated mp3 players w/ similar setups as mine have to use an in-line amp ...
The 16pin connector at the bottom of the 'pod that uses a direct connector for OEM Ipod integration kits has a significantly higher volume output b/c it's a direct link to the headunit.
I have never installed an amplifier on an ipod in a TL. You can boost it up, but I feel it to be not needed. The volume on a SIK line output is the same vs. the headphone jack at full volume. This is true at least in every aux in I have done in various cars.
JT
jtaudioacc.com
04-30-2005, 01:30 AM
#37
TL Loverrrrrrr
Originally Posted by PeterUbers
#12 Headphone in-line amplifier

Instead of using this in-line amp above, maybe folks can also consider using this one instead from Belkin, which also charge the ipod and allow line-in amp at the same time. $30 from Amazon (F8V7058-APL). It just have to go in at the cig charger at the lower center console.
http://www.amazon.com/exec/obidos/tg...onics&n=507846

BTW, great write up, one of these day, I will break down and actually do this mod.
Just hopefully I can put all the pieces back in place.
04-30-2005, 01:42 AM
#38
TL Loverrrrrrr

 05-10-2005, 07:10 AM
#39
Advanced

Join Date: Jan 2005
Location: new york , Ny
Age: 52
Posts: 53
Likes: 0
Received 0 Likes
on
0 Posts
Hi All,
Does anyone having any line noise while hooking up using a audio switch for the XM? Well the line noise only exist when you have the DVD audio output plug in to the audio switch when you are trying to listen to XM. If you unplug the DVD audio, the line noise will not be there.
THanks,
K
Does anyone having any line noise while hooking up using a audio switch for the XM? Well the line noise only exist when you have the DVD audio output plug in to the audio switch when you are trying to listen to XM. If you unplug the DVD audio, the line noise will not be there.
THanks,
K
01-01-2006, 08:12 PM
#40
Instructor
Just want to verify the connections, which I may just be reading wrong...
Basically you cut A5, A6, A13 and A14, which leaves 4 wires from the XM receiver connector and 4 wires that run into the headunit/amp.
Then do you connect one speaker wire to A5 and A6 (R+ and L+) on the connector, one for A13 and A14 (R- and L-) on the connector, and then the same on the 4 wires going to the headunit/amp.
On the headphone plugs, do you then take the A5, A6 connector wires, plug into one jack, then the A5, A6 headunit wires, connected to the other jack for one of the prongs. For the other prong, connect A13, A14 connector wires in one jack and then the A13, A14 headunit wires into the other jack. Then connect the ground wire for the ground prong.
Does this sound correct or have I got it all wrong?
Thanks for the info.