Android Tablet Integration
 03-27-2012, 12:26 PM
#1
Intermediate
Thread Starter
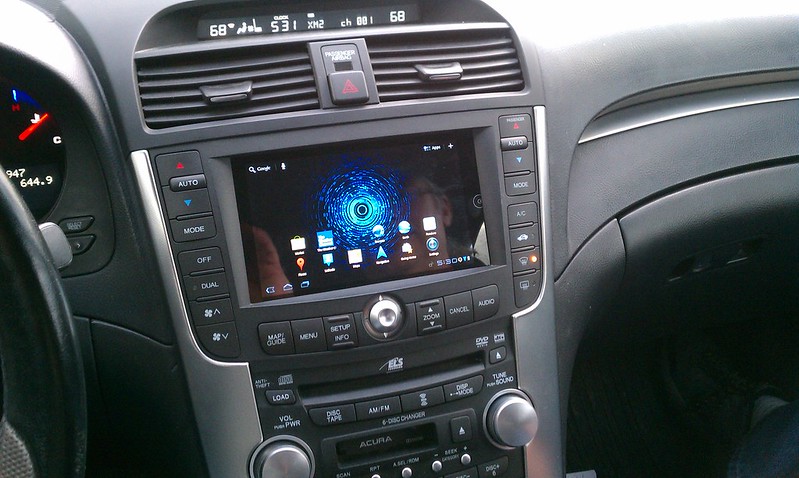
Well, I've been dreaming of doing this for some time now and have finally got around to it. Seeing all of the advances in tablets and constantly staring at the nav screen in my TL, I kept asking myself, "Why can't I have it all?" Well myself finally answered back...
Here it is in the day:
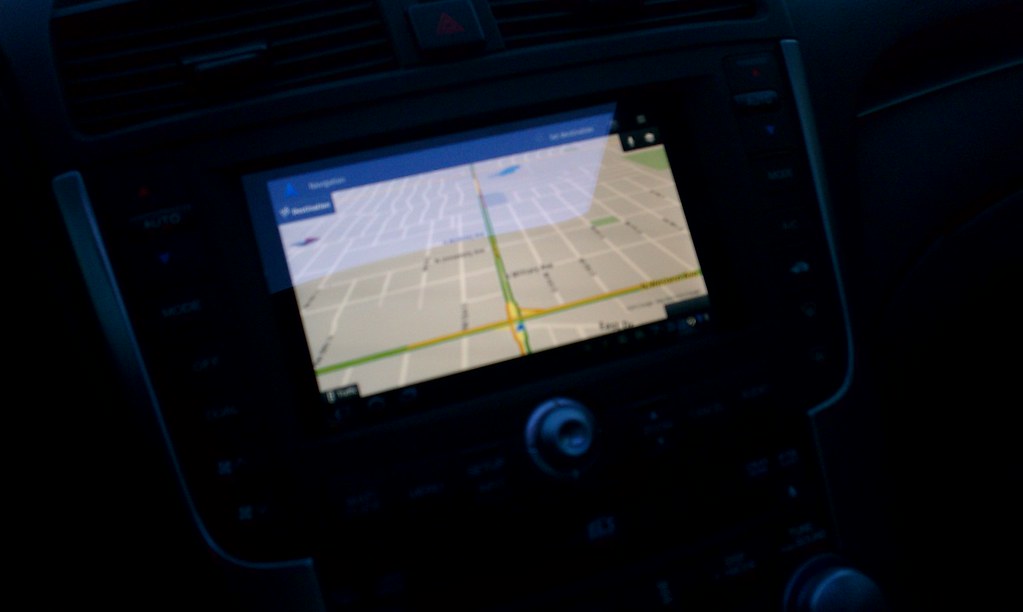
Here it is at night
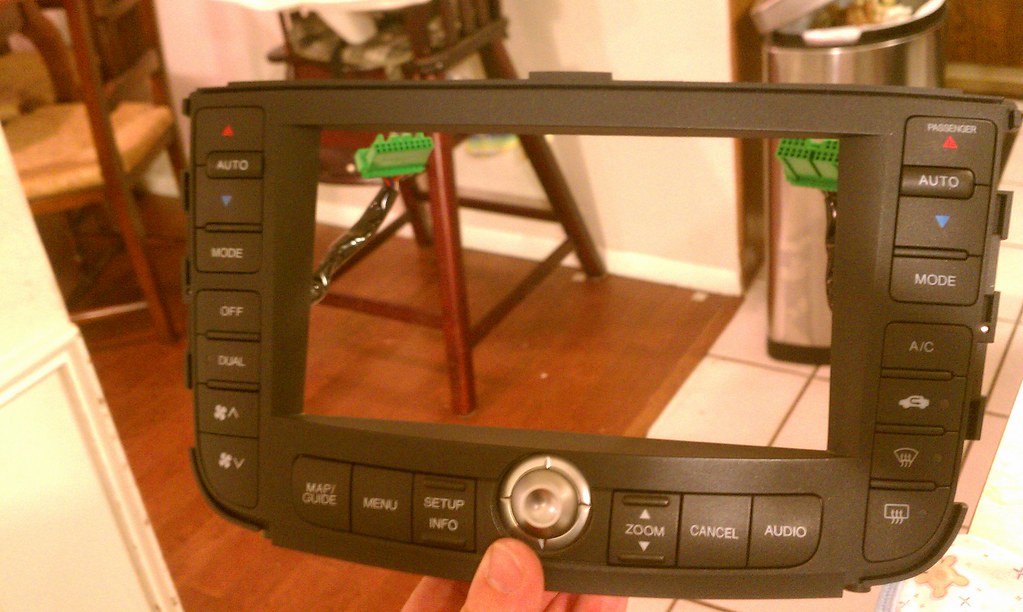
Here are some additional images of me putting this together.
Nav screen and housing removed:
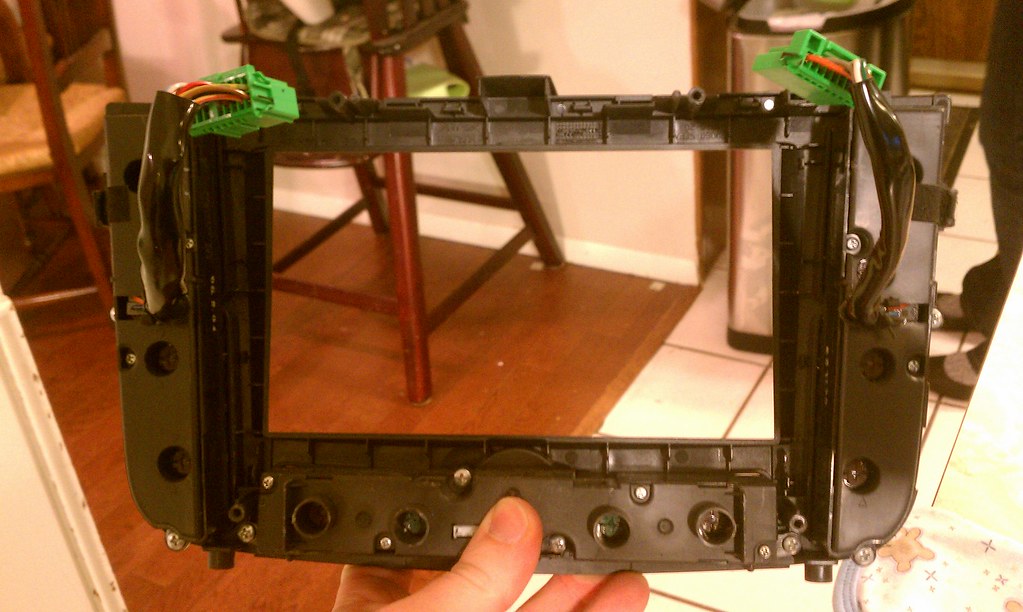
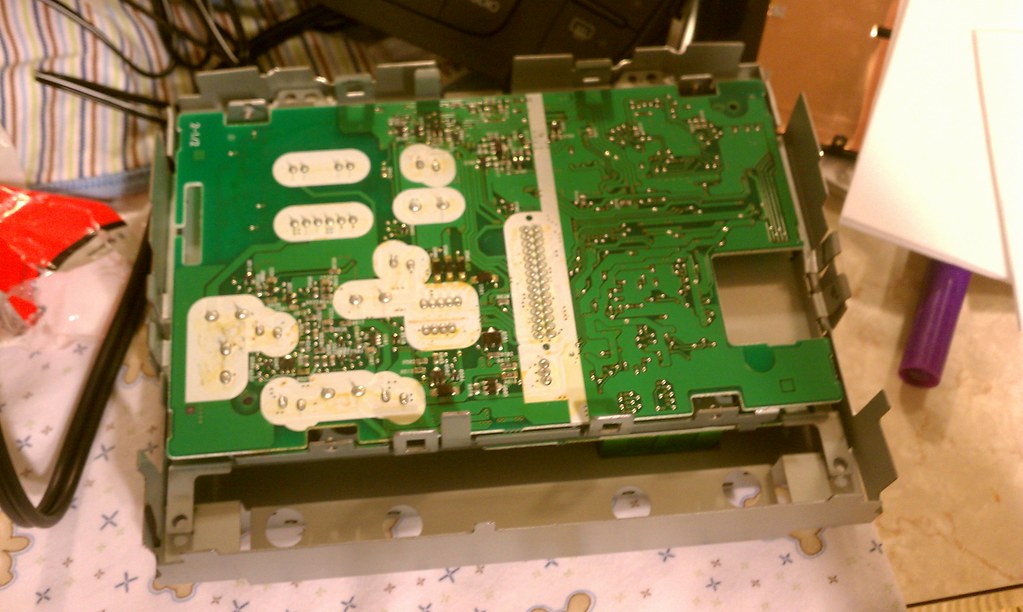
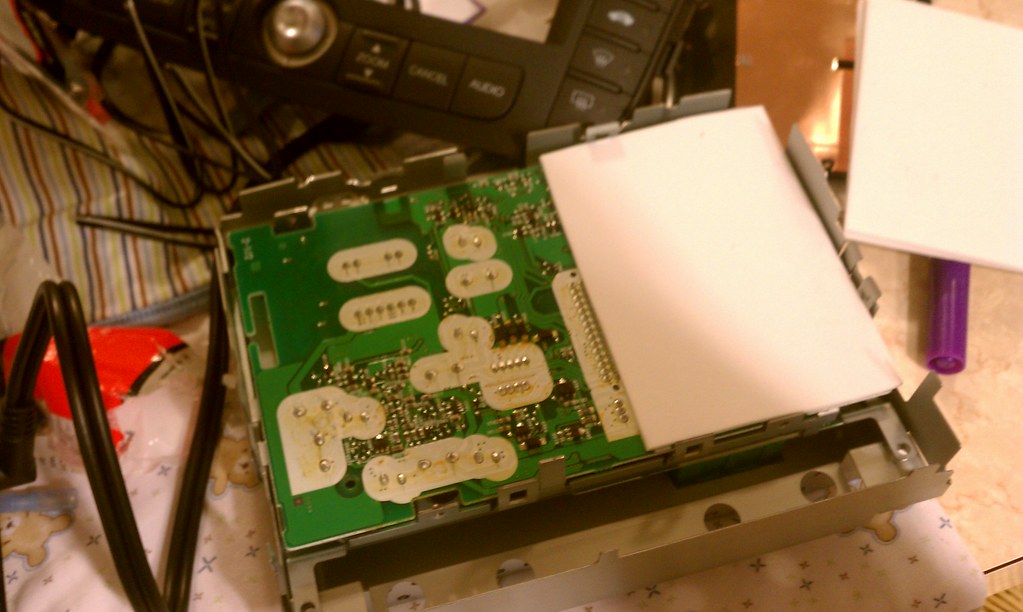
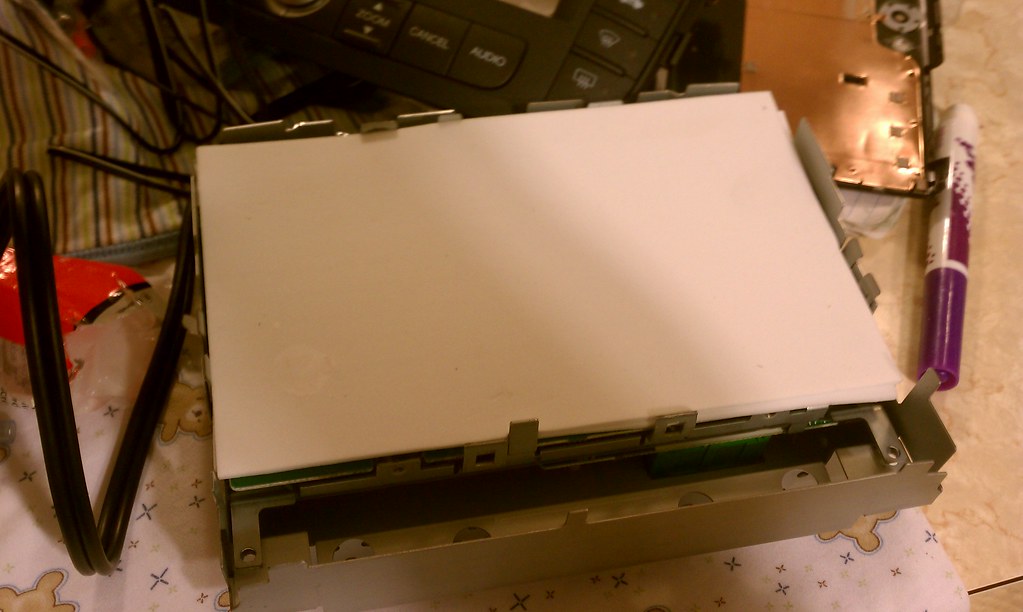
Screen removed from housing. You must leave the circuit boards in the housing connected. Otherwise your HVAC controls and LCD screen above don't work. I used a thin craft foam to create and insulating barrier and spacer to lay the tablet on top of.

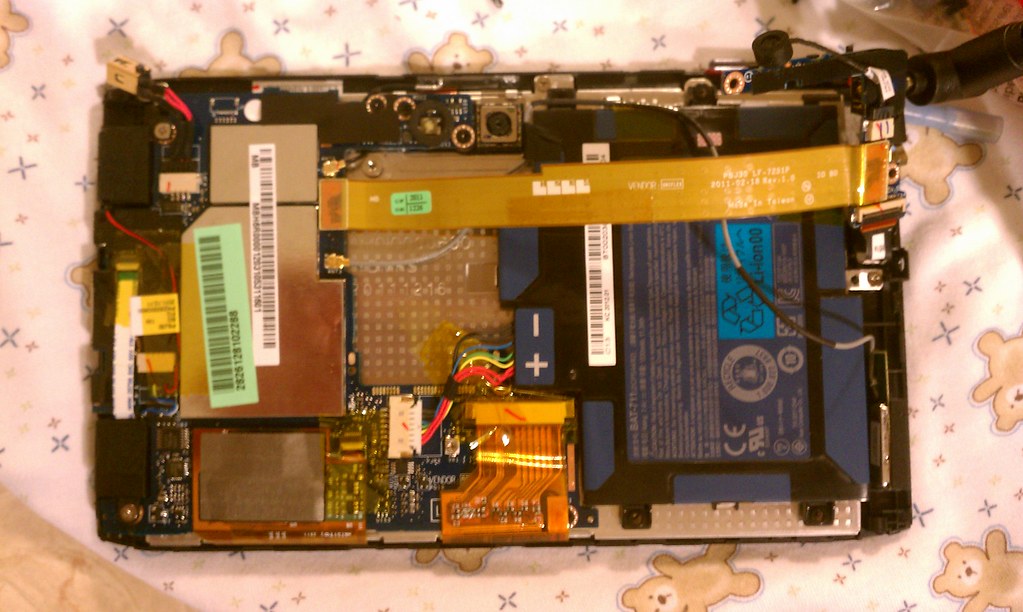
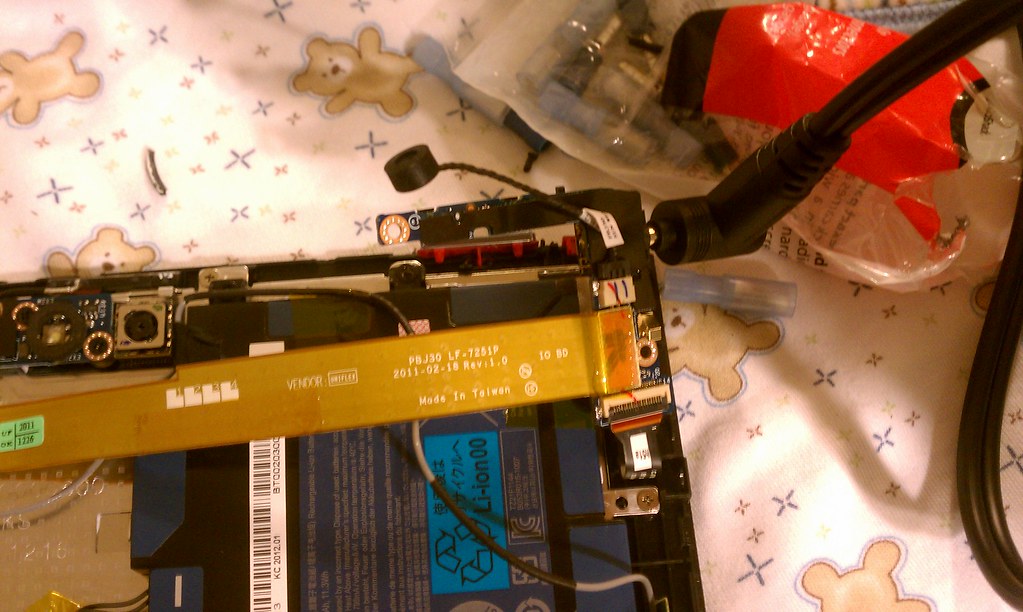
Here are some pics of the tablet with the back removed. I had to disassemble the tablet (I used an Acer Iconia A100) and re-arrange the circuit boards because there wasn't enough room to connect an audio cord into the headphones jack. I also needed to solder a wire onto the power button so that I could connect an external power button. Otherwise how ya gonna turn it on!? I connected those leads to my Map/Guide button. I also cut off the power connector for charging and wired that directly to the vehicle 12 volt. Needless to say I was doing a lot of this along the way!
Power connector. Just cut this and soldered on my leads to the external button.

Audio jack and power button were on this board and I had to move it. You can see the 90 deg. cord I used but still had to move it. I used super glue to keep the ribbon cables from coming off!
And it works! I am beyond happy with how it turned out. Things I might do differently in the future might be to either reposition the GPS sensor outside of the metal housing. It still picks up GPS very well, but it takes a lot longer than I think it should. Might do the same for the Wi-fi. But they still both work. I am not using any other screens but my next plan is seeing if I can get this done in my wife's van. I'll use the HDMI to duplicate the screen to the other screens in the van! Can't wait to start that one!
Here it is in the day:
Here it is at night
Here are some additional images of me putting this together.
Nav screen and housing removed:
Screen removed from housing. You must leave the circuit boards in the housing connected. Otherwise your HVAC controls and LCD screen above don't work. I used a thin craft foam to create and insulating barrier and spacer to lay the tablet on top of.
Here are some pics of the tablet with the back removed. I had to disassemble the tablet (I used an Acer Iconia A100) and re-arrange the circuit boards because there wasn't enough room to connect an audio cord into the headphones jack. I also needed to solder a wire onto the power button so that I could connect an external power button. Otherwise how ya gonna turn it on!? I connected those leads to my Map/Guide button. I also cut off the power connector for charging and wired that directly to the vehicle 12 volt. Needless to say I was doing a lot of this
along the way!Power connector. Just cut this and soldered on my leads to the external button.
Audio jack and power button were on this board and I had to move it. You can see the 90 deg. cord I used but still had to move it. I used super glue to keep the ribbon cables from coming off!
And it works! I am beyond happy with how it turned out. Things I might do differently in the future might be to either reposition the GPS sensor outside of the metal housing. It still picks up GPS very well, but it takes a lot longer than I think it should. Might do the same for the Wi-fi. But they still both work. I am not using any other screens but my next plan is seeing if I can get this done in my wife's van. I'll use the HDMI to duplicate the screen to the other screens in the van! Can't wait to start that one!
Last edited by Gryphter; 03-27-2012 at 12:29 PM.

The following 5 users liked this post by Gryphter:
-XIV- (07-11-2012),
cruc1a7 (03-23-2014),
genokan (07-22-2012),
n8yates (12-27-2012),
talmadgeryan (04-03-2013)
 03-27-2012, 03:11 PM
#4
I hear ya. After spending way too much time and money I finally ripped everything out threw it into a box and put it in my basement. For $600, I bought a Acer Iconia W500.
Maybe I'll do like the OP and just forget about factory nav and try integrating it into the dash.
Maybe I'll do like the OP and just forget about factory nav and try integrating it into the dash.
03-27-2012, 03:16 PM
#5
but this proved to be too much time and WORK.
with what the OP did, it takes out a lot of the 3rd party hardware.
KN_TL, not sure of your phone plans, but if the Acer Iconia has 3G/4G support, you can just add the data plan to the Acer device.
thus, solving the GPS/Navi problem.
only caveat: a 20 or 30 dollar subscription for the data plan.
Last edited by justnspace; 03-27-2012 at 03:19 PM.
03-27-2012, 03:53 PM
#6
I was buying parts for a carpc...ie: the brain unit(nav2go,doms,etc.), LCD screen, etc.
but this proved to be too much time and WORK.
with what the OP did, it takes out a lot of the 3rd party hardware.
KN_TL, not sure of your phone plans, but if the Acer Iconia has 3G/4G support, you can just add the data plan to the Acer device.
thus, solving the GPS/Navi problem.
only caveat: a 20 or 30 dollar subscription for the data plan.
I would have done an Android device as well but I want to be able to run TunerStudio.
Trending Topics
03-27-2012, 05:41 PM
#9
'06 Acura TL
Wish I could do this on my non-navi 06 TL. I have a HP Touchpad w/ Ice Cream Sandwich installed, that I barely use. This would be perfect, but I need the 2nd screen for A/C & Heat so this woud not work with a non-navi TL 
03-27-2012, 09:04 PM
#12
Suzuka Master
Thats some really nice work right there!
03-28-2012, 01:22 AM
#15

That's awesome, I had been thinking about this before too but have been working on the suspension for now.
Would be really cool if you..
- Had a rooted android phone w/ tethering enabled, just use an app to hide tethering from your carrier like PDANet
- Tether the tablet to your phone over wifi while you're driving
Now you've got internet connectivity, any nav app you want from the choices on android and free maps with free consistent updates.
No extra cost to put a 3G/4G SIM in the tablet.
03-29-2012, 09:57 AM
#17
Intermediate
Thread Starter
That's awesome, I had been thinking about this before too but have been working on the suspension for now.
Would be really cool if you..
- Had a rooted android phone w/ tethering enabled, just use an app to hide tethering from your carrier like PDANet
- Tether the tablet to your phone over wifi while you're driving
Now you've got internet connectivity, any nav app you want from the choices on android and free maps with free consistent updates.
No extra cost to put a 3G/4G SIM in the tablet.
Would be really cool if you..
- Had a rooted android phone w/ tethering enabled, just use an app to hide tethering from your carrier like PDANet
- Tether the tablet to your phone over wifi while you're driving
Now you've got internet connectivity, any nav app you want from the choices on android and free maps with free consistent updates.
No extra cost to put a 3G/4G SIM in the tablet.
That is exactly what I have done. I rooted my EVO 3G and I just turn on the Wifi hotspot. Good to go!
03-29-2012, 10:03 AM
#18
Intermediate
Thread Starter
 But maybe I can figure that one out some other way.
03-29-2012, 02:23 PM
But maybe I can figure that one out some other way.
03-29-2012, 02:23 PM
#21
Jokerman
Now that you have done this, now i have a new project. I have a non-navi, so i have to move the HVAC/Radio display down to the cubby area. I have been trying to find a detailed thread of how to do this, but most of them have been pretty vauge. I think niebur3 has the best one.
03-30-2012, 03:18 PM
#22
Jokerman
Gryphter, maybe this was already said and i missed it, but if not, i was wondering how you connected the audio output on the tablet to the stock tl radio. I am figuring that you spliced the audio cable to the xm input.
03-31-2012, 03:28 PM
#23
Suzuka Master
I have a question about the Navigation. Do you get turn by turn voice prompts and does it mute the stereo automatically for the prompts?
03-31-2012, 08:29 PM
#24
actually there are two things you can do, as someone mentioned by moving the screen down below the stereo.. or just use the HVAC screen and move it up to the clock
there are DIYs for both of them.. the hardest thing is running extensions for the wires
04-01-2012, 06:27 PM
#25

Would you mind posting DIY links ?
 going to do one or the other myself sometime this spring
04-02-2012, 10:46 AM
going to do one or the other myself sometime this spring
04-02-2012, 10:46 AM
#27
moving the HVAC screen up
doesn’t give you a good DIY but it does give you pictures on how to accomplish it
https://acurazine.com/forums/showthread.php?t=772726&highlight=carpc
Moving the HVAC and radio screen below
again doesn’t give you written details but the pictures show you how to get it done
https://acurazine.com/forums/showthread.php?t=771249&highlight=stereo
04-03-2012, 03:10 PM
#28
Intermediate
Thread Starter
You got it. That was the easiest way to get this connected in without buying a bunch of other adapters. Plus I personally don't use the XM. I now have access to my whole music and video collection through the tablet. Which I have set to automatically sync as soon as I pull into the garage via Wifi. SWEET!!! Add the streaming music apps like pandora... it just keeps getting better!
04-03-2012, 03:14 PM
#29
Intermediate
Thread Starter
I now use the google nav that comes with the tablet which is phenomenal in my opinion. You have to remember that if I want to hear the sound from the tablet I have to have the radio set to the XM input. Therefor I won't hear and music from the CD player or radio. However, also remember that I now have access to all my music with the tablet. So if I want to listen to music and need navigation i just launch the apps. Google Nav does mute/pause the music.
05-14-2012, 05:05 PM
#30
1st Gear

Join Date: May 2012
Location: erie, pa
Posts: 1
Likes: 0
Received 0 Likes
on
0 Posts
Gryphter - AMAZING work. i have the same tablet and was wondering if you could tell me a little bit more about how you wired the power button to an external button. taking that tablet apart (and looking) at your pictures show 2 red wires and 2 black wires going from the existing power button to the connector on the board. i'm currently planning on installing that a100 in my '04 non-navi tl and that seems to be the last hurdle i have to overcome...for now, anyways...
05-15-2012, 03:44 PM
#31
Burning Brakes
Ok, this is my next project. I'm looking into tablets and I have a question for the OP or anyone who knows. Is if you have the dimensions for the area the tablet resides. Or, if you remember approximately how much wiggle room you had once it was in the bezel. The Samsung Galaxy is 4.8 to the Acer's 4.6. Just making sure the tablet I buy has the options I want and will fit.
05-15-2012, 04:06 PM
#32
Race Director
iTrader: (3)
Join Date: Feb 2012
Location: South Florida
Age: 31
Posts: 18,278
Received 3,824 Likes
on
2,847 Posts
Looks awesome man!! Nice install!
05-28-2012, 04:21 PM
#35
Make it so
That is one of the sexiest things I've ever seen done regarding the navi. And here I was, thinking I could take a break from doing mods to my car since I had done all of the main stuff I was coveting.
I second the call for more pics of this baby in action!
I second the call for more pics of this baby in action!
06-04-2012, 11:02 AM
#36
Intermediate
Thread Starter
Sorry such a long time to reply. I was travelling overseas. I'll try to post more pics soon. To answer some of the questions above:
Dimensions - I should have been more detailed, but I record the measurements. I know that the Acer fit just perfectly in the bezel. I was forced however to disassemble the tablet because there was not a way to plug in to the headphones jack. In other words, no clearance on the side of the tab once it was placed behind the bezel.
I was also forced to disassemble the tab because the circuitry is extremely small. Unless you have access to some sort of electronics lab with some micro soldering tools - resoldering the jack to another location isn't an option. However you will discover the the circuit boards are small and separate. Ribbon cables connect them to each other and are able to be bent around to different positions. Thus my decision to relocate the circuit boards rather than re-solder those micro boards!
Regarding the power connections - I couldn't see a reason why there were two reds and two blacks on the board other than charging reasons. I assume from looking at the board that one pair goes to charge the battery and the other to power the unit. The only other reason would be to double the "gauge" of the copper without actually using a bigger gauge of wire. For either reason it doesn't affect what you need to connect to. Use both reds and both blacks as if they were one wire.
On other thought when you are connecting a tab to power in your car. Connect it to power that is always on. Otherwise your tab battery will only be charging when you are driving. Eventually you will run the battery out and it won't have time to charge all the way during daily drives. This will lead to you having to boot the tab up everytime you get into your car. Connecting it to always on power will keep this from happening. The drain on your car battery will be so small it will not affect things a bit. This will keep your tab on all the time and the battery charged. On a side note - doing it this way really eliminates the need for the tab's battery. However I chose to leave things alone and keep the tab's battery connected.
Lastly, once you remove your bezel and get into your dash, you will realize this is not as daunting as it first seems. Don't be afraid to get in and remove the bezel to measure it. Things are pretty self explanatory once you get into it!
Hope I answered more questions than I created!
06-04-2012, 11:33 AM
#37
Intermediate
Thread Starter
Wiring the on/off switch to a button on the dash was the hardest thing. I clipped the wiring harness wires to the nav buttons on the dash in such a way so that I could reconnect the factory harness back if I wanted to. I used my meter on the pins to check for continuity when I pressed a button on the dash. I picked the button on the dash that I wanted to use and wired it to the power button. That was the easy part! The hard part was soldering wires to the circuit board power switch. I had to get a needle tip for my soldering iron and even then it took me hours to get this right. I used my meter again and figured out the pins that had continuity when the switch was depressed. Then soldered some small gauge wire to those points on the board to extend to the harness wires for the dash button. Having a circuit board holder, magnifying glass and a needle tip gun will go along way to make this easier! This is so delicate and the pins on the board are so close to one another you do risk accidentally soldering a short between two pins. I recommend having a friend with experience if you don't have any!
06-04-2012, 11:38 AM
#38
Intermediate
Thread Starter
On more thing... I have discovered that I have no way to change my clock time. It appears with navi the only way is through the screen inputs. I am thinking about just clipping the wires that power the clock though. I have a clock widget on my tab screen already. Daylight saving sort of creates an issue right now!
06-06-2012, 08:24 AM
#39

So you wire the power directly to the 12 volt battery? Did you modify a car charger or anyhing to go in between?
iPads, tablets, and cell phones all work of 5 volts and I couldn't imagine your tablet will take 12 volts very long before going up in smoke. You may want to do something different if you haven't already and I missed it.
iPads, tablets, and cell phones all work of 5 volts and I couldn't imagine your tablet will take 12 volts very long before going up in smoke. You may want to do something different if you haven't already and I missed it.