2006 Acura TL - Nexus 7 Install
 04-21-2015, 01:54 PM
#41
Registered Bunny
My issue was really with the charging, but still discharging.
Battery Monitoring Widget is doing me a good favor. It was showing that the Nexus was drawing 0mA, which explains why it wasn't charging. This morning I adjusted my USB adapter and the Nexus started drawing 1400mA. BIG difference, and now it's charging.
Eventually, I want to change the socket in the center console to a direct USB connection, or at least add one in there somewhere.
Not sure what you mean about the socket. You're currently using a cigarette lighter adapter to power the Nexus?
 04-21-2015, 04:07 PM
#42
Advanced
Thread Starter
Just like taking a picture of the fish you just caught; It's all about the angle
 04-21-2015, 06:04 PM
#43
Registered Bunny
Yeah, cigarette lighter socket. The USB charger is a loose fit. While charging, it showed it was discharging around -300mA. I pushed down (not in) on the charger and then it showed it was charging around 1200mA.
Just like taking a picture of the fish you just caught; It's all about the angle
Just like taking a picture of the fish you just caught; It's all about the angle
04-21-2015, 07:05 PM
#44
I have checked all my connections including the back of the tablet and everything is secure. It shows ac charging but the percentage just flashes but doesn't actually charge while in use. I have to turn the screen off for it to charge. I am thinking it could be a bad battery. I have tried many apps including the one Rhydon mentioned but I can't get a amps reading. Any ideas?
04-21-2015, 09:54 PM
#45
My Backup Camera
My camera flickers during the initial startup for a few seconds, but then the video is smooth.
I'm using AutoDroid, and it's not really that stable for me. I get a system.ui stopped working a lot. It also has a slow response from time to time.
I wish I got my hands on the USB Rom before it was no longer supported for 2012 version. Didn't want to take the Nexus out to re-flash either .
.
Is there a better ROM out there that I'm not aware of, or should I just re-flash AutoDroid?
My camera flickers during the initial startup for a few seconds, but then the video is smooth.
I'm using AutoDroid, and it's not really that stable for me. I get a system.ui stopped working a lot. It also has a slow response from time to time.
I wish I got my hands on the USB Rom before it was no longer supported for 2012 version. Didn't want to take the Nexus out to re-flash either
.Is there a better ROM out there that I'm not aware of, or should I just re-flash AutoDroid?
I actually switched from AutoDroid to USB rom. Although AutoDroid is newer, they both pretty much have the same features but USB rom has been more stable and consistent for me
Last edited by aameghoo; 04-21-2015 at 09:59 PM.
The following users liked this post:
zsameer (04-22-2015)
04-22-2015, 07:00 AM
#46
Advanced
Thread Starter
I wouldn't mind having it, that would be great. I could always set them up and switch between the two until I decided which one is better.
04-22-2015, 07:52 AM
#47
I wouldnt mind having the USB rom either to give it a try. I am using Kangaroo rom and that is so far working great. I have been having charging issues but i think i have narrowed it down to my OTG cable. I could not get any of the battery apps to show what amps the tablet is getting from the charger so i tried to flash the Oxydo kernel to see if its the Kernel and i could not get the tablet to get out of boot animation so had to pull it out. While i was there i tested the amps with my phone and at the cable coming from the charger i was getting arround 860 mA but after i would connect the OTG cable they would go into negative. Anyways i am going to order a new OTG cable and see if that helps.
04-22-2015, 09:31 AM
#48
Advanced
Thread Starter
I wouldnt mind having the USB rom either to give it a try. I am using Kangaroo rom and that is so far working great. I have been having charging issues but i think i have narrowed it down to my OTG cable. I could not get any of the battery apps to show what amps the tablet is getting from the charger so i tried to flash the Oxydo kernel to see if its the Kernel and i could not get the tablet to get out of boot animation so had to pull it out. While i was there i tested the amps with my phone and at the cable coming from the charger i was getting arround 860 mA but after i would connect the OTG cable they would go into negative. Anyways i am going to order a new OTG cable and see if that helps.
If you go that route, look at using a Cat5 cable (internet cable for people that didn't know). They have 24awg which can carry more amps over a long distance. They are also solid copper wires and pretty flexible.
Cheaper (material) cables may only allow around 500mA for charging. Then you may have a device connected that draws some of that leaving less for the tablet. The Nexus can easily use that much or more, which would be why it doesn't seem to charge. Usually, USB and OTG cables have 28awg wires.
To all not having issues, this doesn't really apply to you unless you want a small project.
If you are having issues (OTG, charging), look at the connection then the cable. Connections being cable to the tablet and where it's plugged in for charging. Test OTG cable with another device that has OTG capability if that's the only issue. Newer phones should be able to do so.
I'm not claiming to be an expert in this matter. This is all from experience, previous research/knowledge, and theory. If something is wrong or can be added, feel from to correct me.
04-22-2015, 10:00 AM
#49
yeah that would probably be the best way to go about doing it. I will give it a go I already have some CAT5 cable and i can buy the connectors. I will need to find instructions on how to make one but i am sure if i had the instructions i can make one. After last night i put everything back together it seems to be keeping the charge. I drove this morning to work with the navigation and music playing with the DAC and EasyCap connected to the hub and it stayed at 100% and didnt loose any charge. I have also disabled all wakelocks on the rom to see if it helps with drain when not in use. Thanks for all the input i appreciate it. The charging is the only issue i have left to tackle with this install.
04-22-2015, 10:38 AM
#50
Advanced
Thread Starter
yeah that would probably be the best way to go about doing it. I will give it a go I already have some CAT5 cable and i can buy the connectors. I will need to find instructions on how to make one but i am sure if i had the instructions i can make one. After last night i put everything back together it seems to be keeping the charge. I drove this morning to work with the navigation and music playing with the DAC and EasyCap connected to the hub and it stayed at 100% and didnt loose any charge. I have also disabled all wakelocks on the rom to see if it helps with drain when not in use. Thanks for all the input i appreciate it. The charging is the only issue i have left to tackle with this install.

The following users liked this post:
zsameer (04-22-2015)
04-22-2015, 12:41 PM
#51
Thanks bro. I have ordered the connectors and i was looking at the same pic you posted. Was going to post it here and ask you if thats what i have to do but you beat me to it. 10 of each connectors shipped from china cost like 4 bucks. will have to wait till i get it but its better than ordering a 10 dollar OTG cable that has the same issue. Will take some time to get here but i know that cable will not be killing the amps going through it.
04-22-2015, 04:56 PM
#53
Advanced
Thread Starter
04-22-2015, 05:07 PM
#54
Yeah i checked on this and the resistor is used for charging while in host mode but the kernel fools Nexus into thinking there is a resistor so will not need it. By the way today my tab has been behaving normal and not discharging while in use. I will still make a cable once I get the connectors and replace the existing one if it gives me issues. Thanks again for your help.
Sameer.
Sameer.
04-23-2015, 11:55 AM
#55
Advanced
Thread Starter
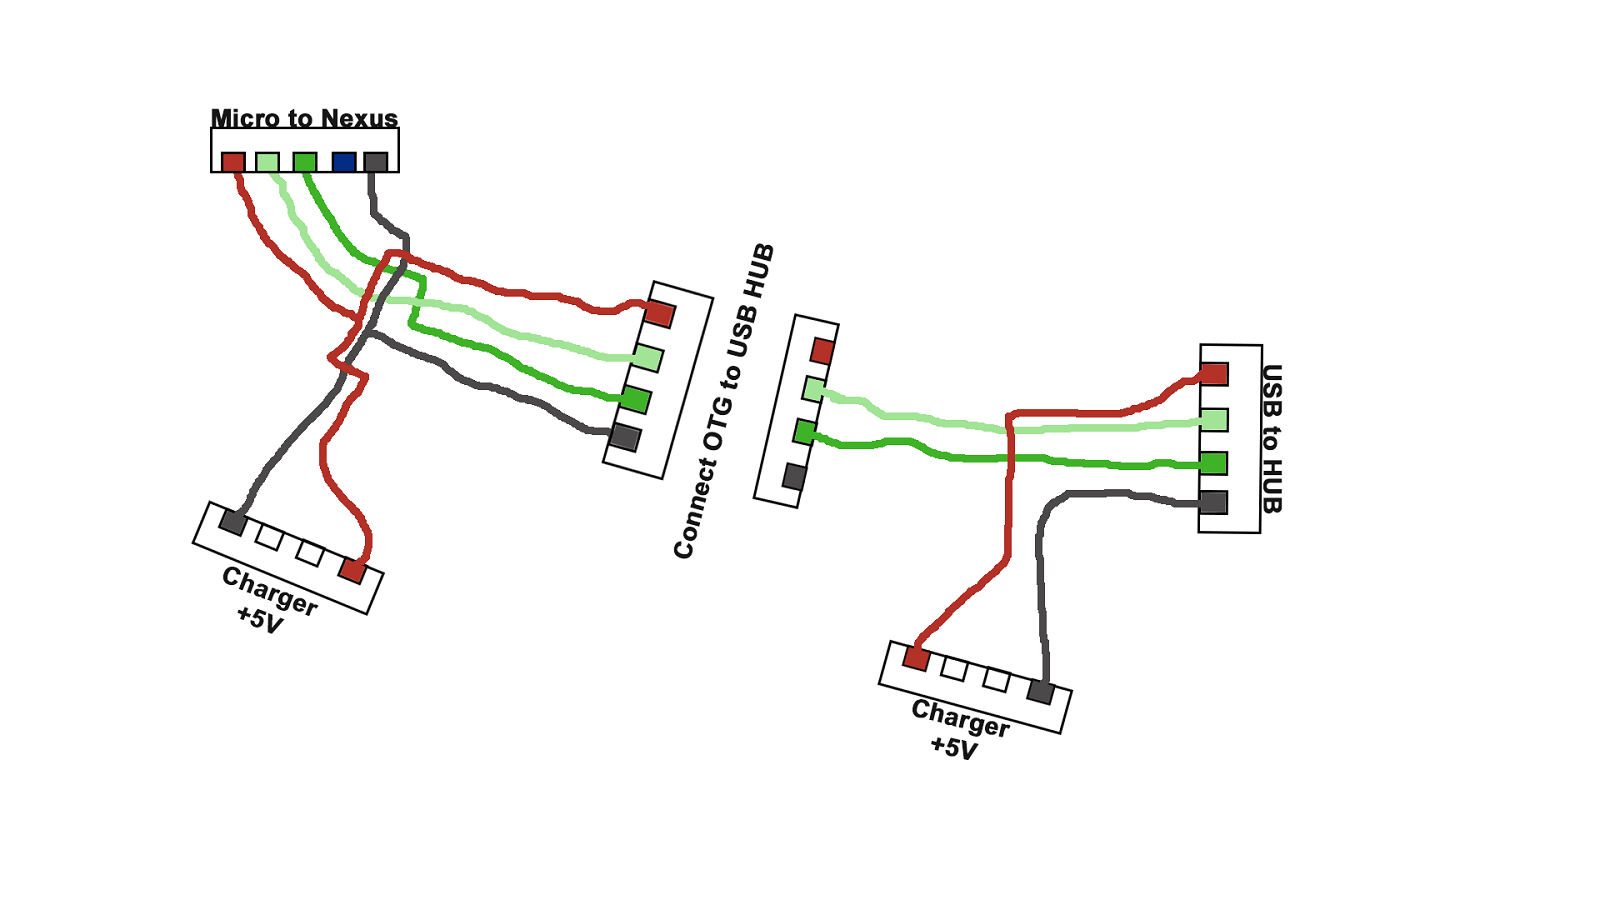
Can anyone give me a reason why this won't work???
IDEA:
Buy USB HUB and create a USB Y cable for it. The cable will split into a power USB and data USB. Power will go into a charger and data will go to the OTG cable.
The OTG cable will also have its own charger. This should power the Nexus and the HUB separately.
from Amazon
Wiring Diagram. Forgot this, but obviously the micro usb's id will be grounded.
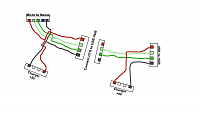
Last edited by Rhydon; 04-23-2015 at 11:59 AM.
04-23-2015, 02:00 PM
#57
Advanced
Thread Starter
Nexus will not have to share power with other devices. It's greedy.
It would be cheaper than a powered usb hub.
The only powered hubs I've seen have wall adapters.
04-23-2015, 03:35 PM
#58
Registered Bunny
I believe the N7 will take up to 2 A from a charger, something to consider. USB2.0 specs specify up to 500 mA max for each port. Wall chargers are excluded since they do not transmit data.
You can trick the N7 into charging faster by using a fast charge enabled kernel but I believe this will cut the data stream. Don't quote me on that, not sure, simply going from top of my head.
04-23-2015, 05:00 PM
#59
Advanced
Thread Starter
Hm I see where you're going and I agree with you ideally you want your tablet to charge at the best rate it can charge.
I believe the N7 will take up to 2 A from a charger, something to consider. USB2.0 specs specify up to 500 mA max for each port. Wall chargers are excluded since they do not transmit data.
You can trick the N7 into charging faster by using a fast charge enabled kernel but I believe this will cut the data stream. Don't quote me on that, not sure, simply going from top of my head.
The following users liked this post:
polobunny (04-23-2015)
05-08-2015, 08:03 AM
#60
I finally got the connectors to create my own OTG cable for the tablet using the CAT 5 cable. I was wondering if i should create a cable that goes directly from the power supply to the tablet instead of using the OEM charging cable that came with the tablet and then hooking the OTG cable to that. I would think using the CAT 5 all arround and just having one cable instead of the cable and then the OTG y cable would be better. I am also going to use the DROK converter instead of Anker to make sure there is always ample power available to the tablet and the things connected to the usb hub. What do you think?
DROK voltage converter ( )
DROK voltage converter ( )
05-08-2015, 02:55 PM
#61
Advanced
Thread Starter
That's what I would do with the cable. The one I made is one cable that goes from the tablet all the way to the center console. From there it splits as an OTG Y cable.
That converter doesn't sound like a bad idea at all. I just bought a USB adapter that have two 2.4A ports. Works better than the old one.
In all honesty, think about making the cable in two pieces.
OTG Cable = Micro (OTG part) to female USB a few inches long. This connects to Nexus and doesn't travel anywhere else.
Extension Cable = Male USB that connects to the OTG Cable, travels all the way to where the hub is located, then splits into the Y section.
This should allow you to troubleshoot the cable easier if needed. The OTG can come out with the Nexus. Was just a thought and don't know if it is really worth it.
05-11-2015, 02:34 PM
#62
Advanced
Thread Starter
So, good news. Make the Volume buttons useful. Pictures and video later.
I've been trying to figure out how to make the volume buttons useful, and I did.
I wired the power button (Nexus) to the Menu button (car). Volume up/down (Nexus) are wired to Setup up/down (car).
If you have already done this, you're ahead of the game. If not, don't be afraid to do so. I managed to solder the connections with a broken tip, also very little experience soldering.
Tested multiple times, and all the buttons work correctly. That is a very important step.
Do this directly from the tablet.
Download Xposed Framework. The tablet will reboot during the installation. Download "Physical Button Music Control" module. You will now be able to make the volume buttons do other things like skip track, pause/play, etc.
The following users liked this post:
sockr1 (09-11-2016)
05-11-2015, 10:38 PM
#63
Advanced
Thread Starter
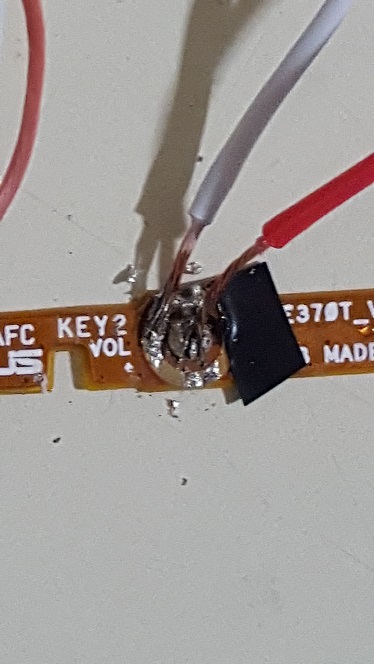
So, the tip on my soldering iron is broken which made this pretty hard. That being said, I still got this working. Pictures just to show that it can be really messy, but still work.
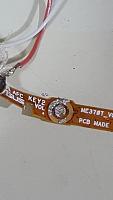

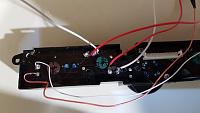
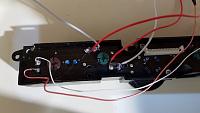
On the navi buttons. The left is the MENU. The middle is the SETUP DOWN. The right is SETUP UP.
Here is a video that demonstrates the buttons.


On the navi buttons. The left is the MENU. The middle is the SETUP DOWN. The right is SETUP UP.
Here is a video that demonstrates the buttons.
The following users liked this post:
zsameer (05-12-2015)
05-12-2015, 06:20 AM
#64
So, the tip on my soldering iron is broken which made this pretty hard. That being said, I still got this working. Pictures just to show that it can be really messy, but still work.
Attachment 29472
Attachment 29473
Attachment 29474
Attachment 29475
On the navi buttons. The left is the MENU. The middle is the SETUP DOWN. The right is SETUP UP.
Here is a video that demonstrates the buttons.
2006 Acura TL - Rerouted buttons to be useful - YouTube
Attachment 29472
Attachment 29473
Attachment 29474
Attachment 29475
On the navi buttons. The left is the MENU. The middle is the SETUP DOWN. The right is SETUP UP.
Here is a video that demonstrates the buttons.
2006 Acura TL - Rerouted buttons to be useful - YouTube
did you connect the small white connector back into the navigation buttons? When i did the power button to the map/guide button everything worked till i plugged the connector and then it wont work. I had to cut one of the lines on the circuit board to make it work while that white connector was plugged in. Even though these buttons are no longer needed i do want them to illuminate with the lights. Let me know how yours is so i can plan on doing the volume buttons as well as this is really whats missing for me.
On another note, i couldn't get a stupid OTG cable done as it is really hard to solder the CAT 5 wires on the tiny pins so i kinda gave up on that after i burned a few connectors. The voltage converter didnt fix the charging issue even with that the charge started dropping while in use. I am giving power to the hub but still having the same issue. Whats weird is that some time it works ok and sometime it starts to discharge or wont charge while in use and i have to turn the screen off for it to charge.
05-12-2015, 08:00 AM
#65
Advanced
Thread Starter
did you connect the small white connector back into the navigation buttons? When i did the power button to the map/guide button everything worked till i plugged the connector and then it wont work. I had to cut one of the lines on the circuit board to make it work while that white connector was plugged in. Even though these buttons are no longer needed i do want them to illuminate with the lights. Let me know how yours is so i can plan on doing the volume buttons as well as this is really whats missing for me.
 . One day I'll work up the courage to venture down there in hopes to find it still alive. I hope I find it because I would like the lights back as well.
Take a look at this thread. You can read the whole thing, or look at the bottom of page 2 for wiring. It seems that wires 10 & 11 are for bulbs. I don't remember how small it is, but you could cut the other wires. Reconnect if ever needed.
On another note, i couldn't get a stupid OTG cable done as it is really hard to solder the CAT 5 wires on the tiny pins so i kinda gave up on that after i burned a few connectors. The voltage converter didnt fix the charging issue even with that the charge started dropping while in use. I am giving power to the hub but still having the same issue. Whats weird is that some time it works ok and sometime it starts to discharge or wont charge while in use and i have to turn the screen off for it to charge.
I've noticed that my battery drains when I use the backup camera with the Easycap app. That battery app I listed early helps to give you an idea of the power draw. It's not perfect, but it helps.
The following users liked this post:
zsameer (05-12-2015)
05-21-2015, 01:07 PM
#66
Funny thing that little white connector. When I initially started this project I dropped in into a black hole. Well, between the center console and passenger seat . One day I'll work up the courage to venture down there in hopes to find it still alive. I hope I find it because I would like the lights back as well.
Take a look at this thread. You can read the whole thing, or look at the bottom of page 2 for wiring. It seems that wires 10 & 11 are for bulbs. I don't remember how small it is, but you could cut the other wires. Reconnect if ever needed.
Yeah, you need a small tip for soldering that. This is why I haven't attempted it again. I need to buy a solder tip since my is broke.
I've noticed that my battery drains when I use the backup camera with the Easycap app. That battery app I listed early helps to give you an idea of the power draw. It's not perfect, but it helps.
. One day I'll work up the courage to venture down there in hopes to find it still alive. I hope I find it because I would like the lights back as well.Take a look at this thread. You can read the whole thing, or look at the bottom of page 2 for wiring. It seems that wires 10 & 11 are for bulbs. I don't remember how small it is, but you could cut the other wires. Reconnect if ever needed.
Yeah, you need a small tip for soldering that. This is why I haven't attempted it again. I need to buy a solder tip since my is broke.
I've noticed that my battery drains when I use the backup camera with the Easycap app. That battery app I listed early helps to give you an idea of the power draw. It's not perfect, but it helps.
So i finally got this working too. On my first try i ended up burning the ribbon cable with my cheap walmart soldering iron. Ordered a new flex cable and got it to work. I used the setup and zoom buttons because for some reason if i connected the wires the way you did on your setup none of the buttons would work. anyways thanks for your help and idea. Also the wires are correct color for the lights for the buttons. Instead of cutting the cables, i just bent the pins down.
11-07-2015, 11:58 AM
#67
1st Gear

Join Date: Nov 2015
Age: 34
Posts: 1
Likes: 0
Received 0 Likes
on
0 Posts
So im thinking about doing this to my TL and would still like access to the radio. When the battery dies or is replaced you've gotta re-enter the code to activate the radio. Have you figured out a way around that without the navi screen?
 11-16-2015, 05:10 PM
#70
Intermediate

Join Date: Nov 2015
Age: 31
Posts: 30
Likes: 0
Received 0 Likes
on
0 Posts
was gonna pay to get my nav fixed but.... Im doing this instead lol. Couple questions though, does the adapter allow you to upload to the tablet via usb? and how does Maps work without a connection ?! I'm guessing with it being rooted it allows it to as long as your maps are updated


Thread
Thread Starter
Forum
Replies
Last Post
asahrts
Member Cars for Sale
0
09-04-2015 05:55 PM