When you click on links to various merchants on this site and make a purchase, this can result in this site earning a commission. Affiliate programs and affiliations include, but are not limited to, the eBay Partner Network.
[DIY] Installing a Rear View Camera (With Diagrams)
Are Tired of Not Being able to see when you reverse? Tired of Constantly Searching Google for a Guide thats not There? Have No Fear!! My Guide Is Here!
Welcome All to my 3rd Gen Rear View Camera Installation Guide! and my First ever DIY.
I apologize as there are not many pics as i wanted to take.
Lets get Started! By the end of this guide your car should look alittle something like this!
*WARNING* PROJECT ETA: AT LEAST 2-4 HRS (For Experienced People that want to do everything Neat and Nice)
This Method i used because i wanted Multiple Video inputs, AKA My Phone Mirrored on the Screen as Well as Rear Cam.IF YOU REALLY HATE CAR WORK AND DONT WANT TO GET DIRTY AND TIRED USE THE "NAVIKS UNIT WTIH THE CAMERA IN THE LINK BELOW. ITS 4X MORE EXPENSIVE BUT 300X MORE EASY.
What You Need: Wireless Transmitter and Reciever:
url=http://www.amazon.com/Esky-Wireless-Transmitter-Receiver-Vehicle/dp/B00RVIZQMG?ie=UTF8&psc=1&redirect=true&ref_=oh_aui _detailpage_o00_s00]Amazon.com: Esky Wireless Color Video Transmitter and Receiver for Vehicle Backup Camera / Front Car Camera: Cell Phones & Accessories[/url]
STEP 1:
- Open Trunk and Remove Top Cover. Its held on by 10-12 Screws with Caps.
Use a Philips Screw Driver to Remove the Screws (Theyre not actually Tight)
then use your Flat Head, and Pry the Clips.
*DISCONNECT THE TRUNK PLUG TO TURN OFF TRUNK LIGHT TO PREVENT BATTERY DRAIN*
STEP 2:
- Use your hand to PUSH one of the License Plate lights forward tell it comes out. THIS WILL GIVE YOU SPACE TO ROUTE IN THE CAMERA WIRE.
STEP 3:
Splice Either Reverse Lights Positive and Negative Wire.
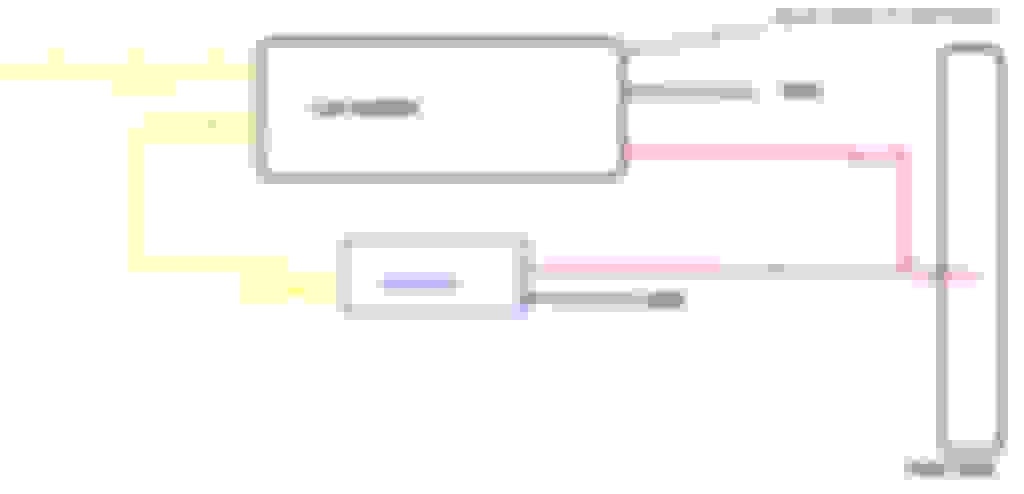
STEP 4: (DIAGRAM)
Wire your transmitter and Camera Together.
Then Wire to the Lighting
STEP 5:
Turn the Car Power on (Key Pos II). Step on the Brakes and Go into reverse. Make sure the Transmitters light Turns On.
STEP 6:
Route the Wires Through the License plate light and Screw the Camera above the License plate. Push license plate light back in.
STEP 7:
Route the Wiring Behind Trunk nicely, and Zip tie.
Reconnect Trunk Switch Wire! *PLEASE ZIP TIE THE TRANSMITTER! THEY HAVE MIXED REVIEWS AND IF THEY GO BACK YOU HAVE TO GO THROUGH A TON OF WORK TO GET THEM. IF YOU CAN SOMEHOW ROUTE IT TO ALWAYS STICK OUT THE TRUNK OR TIGHTEN THEM IN ORDER TO PREVENT WEAR DUE TO MOVEMENT*
STEP 8:
Put trunk Cover back together. (ANNOYING AS F...)
STEP 9:
DECIDE WHERE YOU WANT THE CAMERA. (If you're me and you wanted the extra Screen and the BMW Sort of look (lol).. you can mount it where i did by Drilling a Hole on the Clamp and then through the Dash) *WARNING WHAT I DID WAS EXTREMELY DIFFICULT AND I HATE A ROUGH TIME*
STEP 10:
Find your Wire Routing Path. I routed it Behind the Side trim and Under the Kick Panel.
STEP 11: WIRE THE LCD (DIAGRAM)
STEP 12:
Turn the Power on (Pos II)
Make sure the Screen Turns on.
Step on the Brake and Put in Reverse. The Camera should show up ^_^
STEP 13:
Mount Everything! and BOOM! You are now Finished!!
I hope you all enojyed this DIY. I had a very difficult time finding a diy so i hope this helps the 3rd Gen owners!
Nicely done! Good DIY if I do say so myself. I have been looking into back up cameras for a few weeks now, I just haven't pulled the trigger yet lol...
How much different would wiring it all up be if I did this but preferred not to have a 2nd screen?
Do you know or have info on how to wire it to be displayed on the factory Nav screen only while in reverse? **I have a 06 6MT!**
Thanks!
Like I mentioned in the beginning of the post you can buy a kit that can attach it to the regular screen from the back of the DVD.
I at first wanted that as well but then settled for the outside screen it was much cheaper. (I kinda regret it now but not really)
As far as I've read if you wana make a harness yourself I couldn't find much on it. And I think 07 has a different DVD player then 06 so it's even more of a gamble. I've opened and check the back of the player myself.
- UPDATE - Its been almost 2 Years Everything is working fine. 1 Transmitter failed so i manually wires the camera to the screen from the trunk. No more Transmitters
 05-04-2016, 11:38 PM