

The RR Journals: Replacing License Plate Bulbs 3G Garage #G-052
 12-23-2004, 09:13 AM
#1
Not a Blowhole
Thread Starter
The RR Journals: Replacing License Plate Bulbs 3G Garage #G-052
Replacing the license plate bulbs:
OK, I just went through this, and yu can benefit from my pain.
Equipment needed:
1) Bulb of your choice - I used white WLED-6's.
2) Old credit card or Honda Trim Kit tools
3) Long noise pliers
4) Small flat-blade screwdrive
5) Phillips screwdriver
Procedure:
Loosen the trunk lid liner mousehide and trim - it does not have to be completely removed as suggested in the manual.
1) The hardest part is all the "pop" type plastic retainers. These are the kind that have a center plastic pin that pushes into an expanding collar on the inside that retains the clip. You have to pop up the center section to allow the retainer to be removed without damage. I used the Honda trim tool set (see previous RR Journal for description and ordering info). You can use a credit card to pry up the center section without damaging it. Once you have done so, the long nose pliers may be used around the outer section of the retainer to pop it out. Put it in a safe place - retainers have a way of migrating to the 4th dimension.
Remove all of them.
2) Loosen the trunk lid pull down handle insert. This is done by removing one Phillips screw, and then using the flat plade to press in on the retainer clips on either side of the handle. Retain the screw per above. The handle insert does not have to be completely removed.
3) Remove the trunk lid "dampers". These are 2 approx 1/2" x 3" rubber rectangles running along the same edge as the trunk lockset. DO NOT JUST PRY or YANK ON THEM! I did, and damaged one (I used clear silicone glue to secure it later). Here is the inside skinny:
They are retained by 3 rubber fasteners per side. The outside retainer has star-shaped "wings" on the outside to make a strong alignment with the holes. The other two have slotted edges that enter a graduated hole (2), and then slide into the narrower part of the graduated hole to make a good seal. Remove these by first pushing the rectangle to the outside, freeing the 2 retainers which should then work loose. Then carefully pry out the "star" retainer with the trim tool or pliers.
4) You do NOT have to remove the lockset or the 2 adjustable trunk lid bumpers!
5) You should now have adequate clearance to replace the bulbs - pull down the mousehide lid cover.
6) You do not need to remove the electrical connections to the bulb socket. They attach to the license plate clear lenses by simple clips - just push on the ends carefully with the flat blade screwdriver and they will pop free.
7) Remove and replace the bulbs - since they can be finicky with those little wire connectors, it is a good idea to test their mechanical integrity and lighting continuity before replacing in the lens by carefully aligning and pressing until they "click". If they both light, you are in business.
8) Replace all the things you removed and you are in business.
Enjoy!!

The following users liked this post:
alltrull (05-31-2015)
12-23-2004, 09:14 AM
#2
Team Nighthawk MechE

You da SAGE as always...
Great info... Was thinking of ordering the replacement bulbs and now that I know what TO DO... It'll be on my to-do list...
THANKS for the info!

Great info... Was thinking of ordering the replacement bulbs and now that I know what TO DO... It'll be on my to-do list...
THANKS for the info!
12-23-2004, 11:24 AM
#3
Instructor

Join Date: Jul 2004
Location: Edmonton, AB
Age: 44
Posts: 163
Likes: 0
Received 0 Likes
on
0 Posts
I'm not quite the guru that Road Rage is, but here's my two cents. I have done a bunch of minor mods on my car which have included popping off door panels etc. so I'm not a complete clown.
I've actually replaced the licence plate bulbs twice without any damage. It is a bitch, but all of a sudden it seems to work. I simply removed the plate, popped the covers to the right and snapped them out of the frame. Changing the lights is easy. The only difficult part is snapping the covers back into the frame. With some masseuring, I got them back in in three stages. Don't forget to swear profusely, it helps tremendously.
I've actually replaced the licence plate bulbs twice without any damage. It is a bitch, but all of a sudden it seems to work. I simply removed the plate, popped the covers to the right and snapped them out of the frame. Changing the lights is easy. The only difficult part is snapping the covers back into the frame. With some masseuring, I got them back in in three stages. Don't forget to swear profusely, it helps tremendously.
Originally Posted by Road Rage
Replacing the license plate bulbs:
OK, I just went through this, and yu can benefit from my pain.
Equipment needed:
1) Bulb of your choice - I used white WLED-6's.
2) Old credit card or Honda Trim Kit tools
3) Long noise pliers
4) Small flat-blade screwdrive
5) Phillips screwdriver
Procedure:
Loosen the trunk lid liner mousehide and trim - it does not have to be completely removed as suggested in the manual.
1) The hardest part is all the "pop" type plastic retainers. These are the kind that have a center plastic pin that pushes into an expanding collar on the inside that retains the clip. You have to pop up the center section to allow the retainer to be removed without damage. I used the Honda trim tool set (see previous RR Journal for description and ordering info). You can use a credit card to pry up the center section without damaging it. Once you have done so, the long nose pliers may be used around the outer section of the retainer to pop it out. Put it in a safe place - retainers have a way of migrating to the 4th dimension.
Remove all of them.
2) Loosen the trunk lid pull down handle insert. This is done by removing one Phillips screw, and then using the flat plade to press in on the retainer clips on either side of the handle. Retain the screw per above. The handle insert does not have to be completely removed.
3) Remove the trunk lid "dampers". These are 2 approx 1/2" x 3" rubber rectangles running along the same edge as the trunk lockset. DO NOT JUST PRY or YANK ON THEM! I did, and damaged one (I used clear silicone glue to secure it later). Here is the inside skinny:
They are retained by 3 rubber fasteners per side. The outside retainer has star-shaped "wings" on the outside to make a strong alignment with the holes. The other two have slotted edges that enter a graduated hole (2), and then slide into the narrower part of the graduated hole to make a good seal. Remove these by first pushing the rectangle to the outside, freeing the 2 retainers which should then work loose. Then carefully pry out the "star" retainer with the trim tool or pliers.
4) You do NOT have to remove the lockset or the 2 adjustable trunk lid bumpers!
5) You should now have adequate clearance to replace the bulbs - pull down the mousehide lid cover.
6) You do not need to remove the electrical connections to the bulb socket. They attach to the license plate clear lenses by simple clips - just push on the ends carefully with the flat blade screwdriver and they will pop free.
7) Remove and replace the bulbs - since they can be finicky with those little wire connectors, it is a good idea to test their mechanical integrity and lighting continuity before replacing in the lens by carefully aligning and pressing until they "click". If they both light, you are in business.
8) Replace all the things you removed and you are in business.
Enjoy!!
OK, I just went through this, and yu can benefit from my pain.
Equipment needed:
1) Bulb of your choice - I used white WLED-6's.
2) Old credit card or Honda Trim Kit tools
3) Long noise pliers
4) Small flat-blade screwdrive
5) Phillips screwdriver
Procedure:
Loosen the trunk lid liner mousehide and trim - it does not have to be completely removed as suggested in the manual.
1) The hardest part is all the "pop" type plastic retainers. These are the kind that have a center plastic pin that pushes into an expanding collar on the inside that retains the clip. You have to pop up the center section to allow the retainer to be removed without damage. I used the Honda trim tool set (see previous RR Journal for description and ordering info). You can use a credit card to pry up the center section without damaging it. Once you have done so, the long nose pliers may be used around the outer section of the retainer to pop it out. Put it in a safe place - retainers have a way of migrating to the 4th dimension.
Remove all of them.
2) Loosen the trunk lid pull down handle insert. This is done by removing one Phillips screw, and then using the flat plade to press in on the retainer clips on either side of the handle. Retain the screw per above. The handle insert does not have to be completely removed.
3) Remove the trunk lid "dampers". These are 2 approx 1/2" x 3" rubber rectangles running along the same edge as the trunk lockset. DO NOT JUST PRY or YANK ON THEM! I did, and damaged one (I used clear silicone glue to secure it later). Here is the inside skinny:
They are retained by 3 rubber fasteners per side. The outside retainer has star-shaped "wings" on the outside to make a strong alignment with the holes. The other two have slotted edges that enter a graduated hole (2), and then slide into the narrower part of the graduated hole to make a good seal. Remove these by first pushing the rectangle to the outside, freeing the 2 retainers which should then work loose. Then carefully pry out the "star" retainer with the trim tool or pliers.
4) You do NOT have to remove the lockset or the 2 adjustable trunk lid bumpers!
5) You should now have adequate clearance to replace the bulbs - pull down the mousehide lid cover.
6) You do not need to remove the electrical connections to the bulb socket. They attach to the license plate clear lenses by simple clips - just push on the ends carefully with the flat blade screwdriver and they will pop free.
7) Remove and replace the bulbs - since they can be finicky with those little wire connectors, it is a good idea to test their mechanical integrity and lighting continuity before replacing in the lens by carefully aligning and pressing until they "click". If they both light, you are in business.
8) Replace all the things you removed and you are in business.
Enjoy!!
12-23-2004, 11:51 AM
#4
 12-23-2004, 01:21 PM
#6
Advanced

Join Date: Aug 2004
Location: Dublin, CA
Age: 50
Posts: 56
Likes: 0
Received 0 Likes
on
0 Posts
I tried pulling from the outside, but I couldn't get the bulb receptacles to clear the license plate trim. I tried like heck and only got one bulb receptacle thru. I ended up going through the trunk. To me it seemed much easier, just time consuming.
12-23-2004, 06:45 PM
#7
Not a Blowhole
Thread Starter
Originally Posted by rexwui
I tried pulling from the outside, but I couldn't get the bulb receptacles to clear the license plate trim. I tried like heck and only got one bulb receptacle thru. I ended up going through the trunk. To me it seemed much easier, just time consuming.
Trending Topics
01-16-2005, 10:20 PM
#8
Advanced

Join Date: Sep 2004
Location: Richmond, BC
Age: 62
Posts: 50
Likes: 0
Received 0 Likes
on
0 Posts
Well, I managed to get one out and the bulb changed - that took perhaps 10 minutes. I spent about one and a half hours trying to get it back in - with no luck, so I guess tomorrow night I'll be going in from the inside.
Unless anyone can offer advice on how to get it in past thr trim.
If I get the right backing lights soon, then I'll do them all at once with the liner out.
Do people find teh 6 LED bulbs are bright enough for the license plate - seems much duller than the stock bulbs.
Unless anyone can offer advice on how to get it in past thr trim.
If I get the right backing lights soon, then I'll do them all at once with the liner out.
Do people find teh 6 LED bulbs are bright enough for the license plate - seems much duller than the stock bulbs.
01-18-2005, 08:04 AM
#9
Acurazine Addict
Join Date: Jun 2004
Location: Honolulu, HI
Age: 41
Posts: 318
Likes: 0
Received 0 Likes
on
0 Posts
Great info! I just ordered a pair of PIAA reverse lights and 9LEDs for the license plate. Will be installing them all at once. Thanks again for the post RR.
 01-18-2005, 06:09 PM
#13
Not a Blowhole
Thread Starter
Originally Posted by PeterGrant
This is with white 6-LEDs
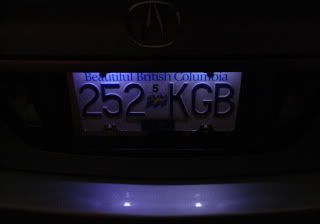
Just for the record, this digipic makes the effect look much bluer - it is actually a very realistic, dry white light. Looks good.
 09-03-2005, 04:20 PM
#16
Burning Brakes
Join Date: Jan 2005
Location: Stockton, CA
Age: 36
Posts: 806
Likes: 0
Received 0 Likes
on
0 Posts
I'm sorry to revive such a old thread but can somebody tell me the difference between 9 leds and 6 leds. And are there any more pics? And is the six led really more dull than stock? that would be bad...
09-04-2005, 05:41 PM
#17
Not a Blowhole
Thread Starter
I do not know how one could say the 6LED is "more dull" (duller?) than stock. Dull usually referes to shine - I think the proper word is brightness, right? The yellow OE light may or may not be "brighter", but it is far less legible
The 6-LED passed the Virginia State Police supported Inspection prgram for my TL, and I am inclined to make it bright enough to pass that, and not one nano-lumen brighter. I am not in the mood to provide Smokie with any more opportunity to yank my plate than is required by law and practice, are you?
The 6-LED passed the Virginia State Police supported Inspection prgram for my TL, and I am inclined to make it bright enough to pass that, and not one nano-lumen brighter. I am not in the mood to provide Smokie with any more opportunity to yank my plate than is required by law and practice, are you?
09-08-2005, 10:45 PM
#18
Burning Brakes
Join Date: Jan 2005
Location: Stockton, CA
Age: 36
Posts: 806
Likes: 0
Received 0 Likes
on
0 Posts
Has anyone seen the license plate lights of the new lexus gs? That's really what I'm looking for. Would those be more like 6's or 9's? They seemed pretty bright and damn awesome too.
Thanks in advance to anyone who can help me decide!
Thanks in advance to anyone who can help me decide!
09-13-2005, 02:50 AM
#19
Team Anthracite Member
license plate light fixture... issues...
I attempted to replace my license plate light with a while 9LED bulb from the OUTSIDE. I dislodged the light by pressing to the right, just like the outside covering says. I couldn't not get it around the trim so I am going to try from inside. BUT, my question is once your dislodge the light cover from the outside, can you ever get it to stick again. It just is a lot looser now, then it was before i shifted it to the right.. You guys have any advice? 
09-13-2005, 06:57 PM
#20
Not a Blowhole
Thread Starter
Originally Posted by Sigwill24
I attempted to replace my license plate light with a while 9LED bulb from the OUTSIDE. I dislodged the light by pressing to the right, just like the outside covering says. I couldn't not get it around the trim so I am going to try from inside. BUT, my question is once your dislodge the light cover from the outside, can you ever get it to stick again. It just is a lot looser now, then it was before i shifted it to the right.. You guys have any advice?
09-13-2005, 07:02 PM
#21
WDP Director of R & D

Originally Posted by Sigwill24
I attempted to replace my license plate light with a while 9LED bulb from the OUTSIDE. I dislodged the light by pressing to the right, just like the outside covering says. I couldn't not get it around the trim so I am going to try from inside. BUT, my question is once your dislodge the light cover from the outside, can you ever get it to stick again. It just is a lot looser now, then it was before i shifted it to the right.. You guys have any advice?
You may feel it was more secure during removal due to the foam seal sticking from the original install etc.
Cheers
09-13-2005, 11:15 PM
#22
Chief
Join Date: Nov 2004
Location: Mission Valley, CA
Age: 49
Posts: 296
Likes: 0
Received 0 Likes
on
0 Posts
I'm not sure what you're talking about as far as the LEd's flickering. Maybe if you purchased a high quality LED bulb you wouldn't have that problem. I have the Super LED White light bulbs from PIAA and they are awesome. 
09-14-2005, 05:01 AM
#23
WDP Director of R & D
Originally Posted by TL-CrAzIe-05
I'm not sure what you're talking about as far as the LEd's flickering. Maybe if you purchased a high quality LED bulb you wouldn't have that problem. I have the Super LED White light bulbs from PIAA and they are awesome.
Not that it matters but the LED's I used are the same as 98% of everyone else on this board. Out of the 4 or 6 LED's per "bulb", over time one or two of the LED's would either not work or flicker. Sure the manufacturer sent replacements but due to not really liking the look I just stuck the incandescent bulbs back in.
Besides, due to the fact all this took place 20 months ago, PIAA's probably were not even available yet......
Glad you enjoy yours.
 way to search. Mine are fine after a couple months.......
 11-25-2008, 05:05 PM
#26
Safety Car
resurrection:
may i ask WHERE you guys got your license plate leds? part #194 correct? I've gone through 2 sets already - both burn out (flicker then go out)
help?
may i ask WHERE you guys got your license plate leds? part #194 correct? I've gone through 2 sets already - both burn out (flicker then go out)
help?
11-25-2008, 05:47 PM
#27
^^ I believe Subbuzz got his from Vleds. I just bought a couple, so I'll see how long it last. You have to pay tax if you buy from vleds lol, but if you put in miata for the coupon code you get a 10% discount, not sure if it still works. Did for me when i bought them last week.
This is what I got
http://www.v-leds.com/Shop/Control/P...id/0/SFV/32481
This is what I got
http://www.v-leds.com/Shop/Control/P...id/0/SFV/32481
 yup,v-led's and after almost a year still no prob's.........
 10-19-2009, 06:01 AM
#30
04TL4L
sorry for bump but are VLED's still the best choice? I want some nice bright white led's.. i think this is going to be my first DYI I'll be brave enough to do.
11-18-2009, 01:27 PM
#31
I just changed my bulbs through the inside and it took no longer than 10 minutes. The hardest part was probably realizing that the lic. plate lights don't turn on with the parking lights, lol. This was while testing if I got the polarity correct on the LEDs.
What I did was:
unscrew the trunk handle,
pop off only the 5 clips on the trunk cover (the 5 fastening the section of the cover where the lights are),
maneuver the cover out of the way (didn't need to remove the 2 rubber blocks),
install bulbs - test polarity,
reverse process.
What I did was:
unscrew the trunk handle,
pop off only the 5 clips on the trunk cover (the 5 fastening the section of the cover where the lights are),
maneuver the cover out of the way (didn't need to remove the 2 rubber blocks),
install bulbs - test polarity,
reverse process.
02-19-2010, 10:32 AM
#32
5th Gear

Join Date: Feb 2010
Posts: 5
Likes: 0
Received 0 Likes
on
0 Posts
What were the exact type of LED bulbs you used for your licence plate?
Thanks!
my email: lecce_a@hotmail.com
10-17-2010, 02:59 PM
#34
5th Gear

Join Date: Jul 2010
Location: Oregon
Posts: 5
Likes: 0
Received 0 Likes
on
0 Posts
Thanks for this post and thanks for the website! It is great.
I replaced my license plate lights using the instructions at the start of this post in about 10 minutes! Thanks again!
I replaced my license plate lights using the instructions at the start of this post in about 10 minutes! Thanks again!
10-17-2010, 03:21 PM
#35
Race Director
iTrader: (8)
10-17-2010, 10:17 PM
#36

I literally swore and cursed profanity installing these..after about 25minutes of just getting the covers to pop off and put back in..my finger/thumb being all numbed I finally got this to work. Really not sure why they made it like that. If I would have known it would have been easier to have just gotten it from the inside trunk.
02-26-2011, 01:10 PM
#37
Instructor
Just completed this for my TL. And I would like to add the following to the thread>>>>>F-$%##!, S-#$$##!, G-$$@ D-#@!,
M-*&#* F-&@( #((#&(#&!!!!!!!!!!!!!!!
Why in the frackin heck do engineers make things to daymn hard to put back in? I was about ready to break out the dremal and MAKE them do what I wanted. But after breathing deeply, and giving it one more try BAM! got it.
M-*&#* F-&@( #((#&(#&!!!!!!!!!!!!!!!
Why in the frackin heck do engineers make things to daymn hard to put back in? I was about ready to break out the dremal and MAKE them do what I wanted. But after breathing deeply, and giving it one more try BAM! got it.
07-04-2012, 12:37 PM
#38
Volvo Defector
Just used these instructions and took me 15 minutes to swap out my reverse bulbs with CREE LED's. The credit card trick worked great on the retainers. I took out all 5 retainers to pull the trunk liner all the way back. The only thing i was fuzzy on in the instructions were the rectangular lid dampers but I figured it out.
You have to pop out the left corner of the left one first, then it slides to the driverside to slide out the other two nubs. The right one is the opposite, popout the passenger side corner first, then slide it to the right and it comes out.
You have to pop out the left corner of the left one first, then it slides to the driverside to slide out the other two nubs. The right one is the opposite, popout the passenger side corner first, then slide it to the right and it comes out.
10-11-2012, 11:32 PM
#39

im not sure if i did something wrong, but i followed the steps and manage to even remove the bulb casing completely (from the wires, and from the plastic holder) but the bulb wont come out of its own casing no matter how hard i yank on it. i've wiggled it around also and it just doesnt come out.
anyone had this issue before?
thanks
anyone had this issue before?
thanks
10-12-2012, 11:10 AM
#40
Drifting
im not sure if i did something wrong, but i followed the steps and manage to even remove the bulb casing completely (from the wires, and from the plastic holder) but the bulb wont come out of its own casing no matter how hard i yank on it. i've wiggled it around also and it just doesnt come out.
anyone had this issue before?
thanks
anyone had this issue before?
thanks
if you have rubber gloves (like the disposable latex ones), use that, it will come off easy. if it still doesnt, wrap some masking tape around the bulb and with the gloves, try again. that should get the bulb out.