

Replacing Cruise Control Switch 2007-2008 TL
 06-19-2014, 09:03 PM
#1

Replacing Cruise Control Switch 2007-2008 TL
In the 2004-2006 model the button clusters on the steering wheel are modular. You can simply replace one cluster without having to replace the entire harness. In the 07 and 08 model they were nice enough to wire everything together so you have to replace the whole harness to the tune of $160. (part 35880SEPA21Z if you would prefer to go that way)
However if you know how to solder, you can replace just the switch itself for about $6. This is a guide on how to do so.
Tools needed:
10mm socket/wrench to disconnect the battery before starting
Torx T30 bit
Phillips head screwdrivers of varying sizes (PH 1 or similar will be the smallest)
Soldering Iron
De-soldering pump and/or de-soldering braid
Flux
Solder
You will also need a DPDT Latching ON-ON switch. I couldn't find an exact replacement, so I ordered one with matching post spacing and modified it to fit my needs. I recommend ordering two because they are so cheap and it won't change the shipping costs. That way if you accidentally damage one, you have another on hand.
Link to the switch I ordered from Mouser Electronics.
The manufacturer part number is GPBS-850L. This is a common part sold by other companies such as DigiKey and Allied.
Step 1: Remove the steering wheel
CubanLynx84 wrote an excellent guide in the garage so I will skip those steps.
Link to F-168 Steering wheel removal
Make sure you disconnect the battery first!!!
I had to use a steering wheel puller to remove the wheel.
Once you get the wheel removed come back to this guide.
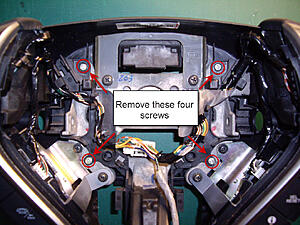
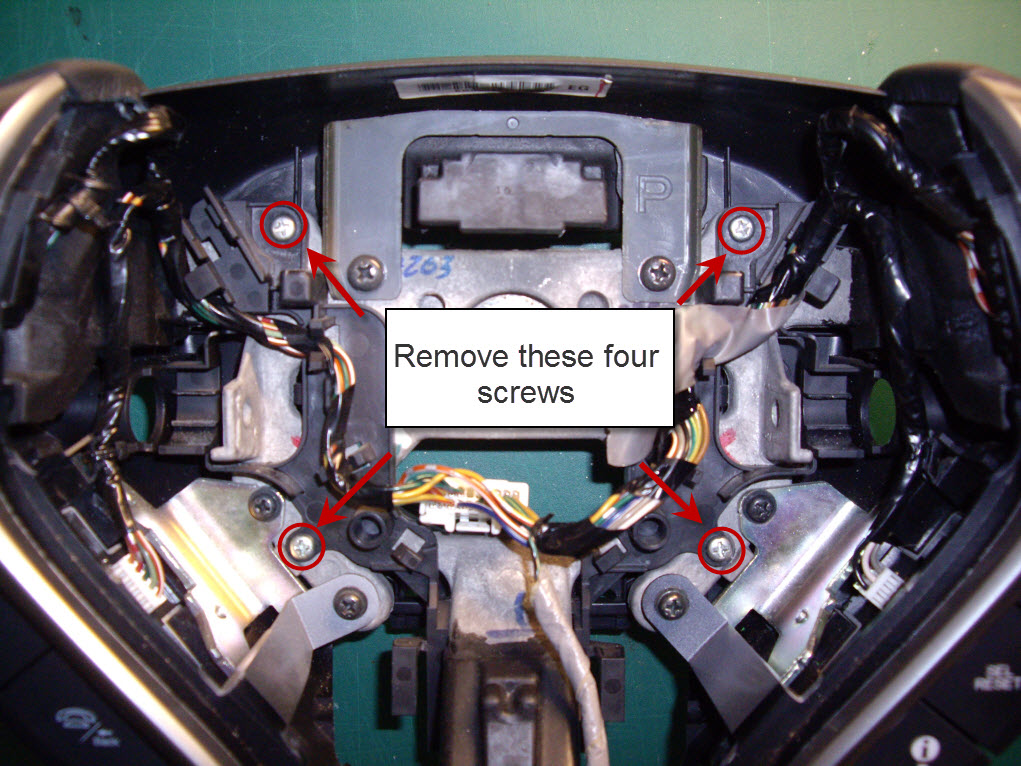
Step 2
Remove these screws and pull off the back cover. Also pull off the cover on the back of the select/reset/up/down cluster on the right side of the wheel.
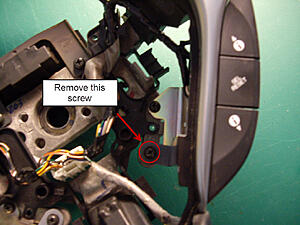
Step 3
Remove this screw and turn the steering wheel over.
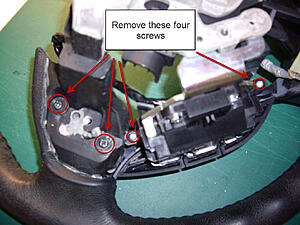
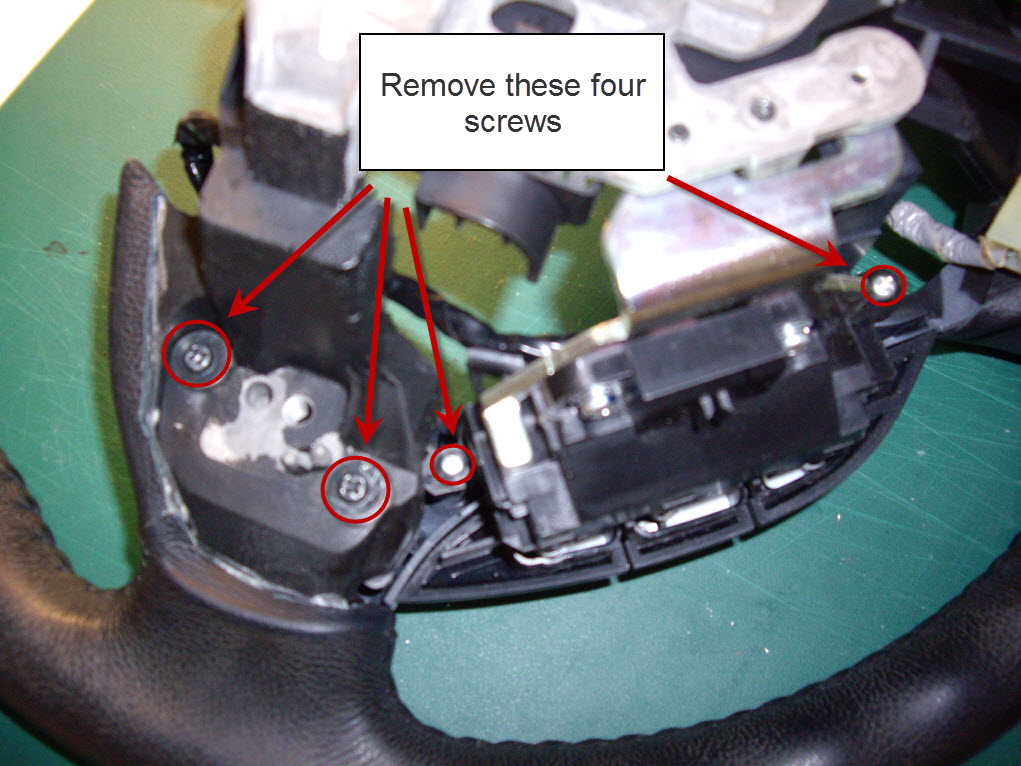
Step 4
Remove these four screws to release the button cluster from the wheel. (Sorry for potato quality picture)
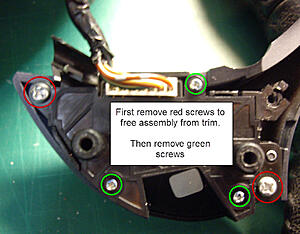
Step 5
With the cluster freed from the steering wheel, remove the two screws in red first. This will free the cluster form the trim. Then remove the three screws in green.
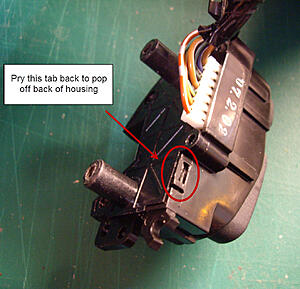
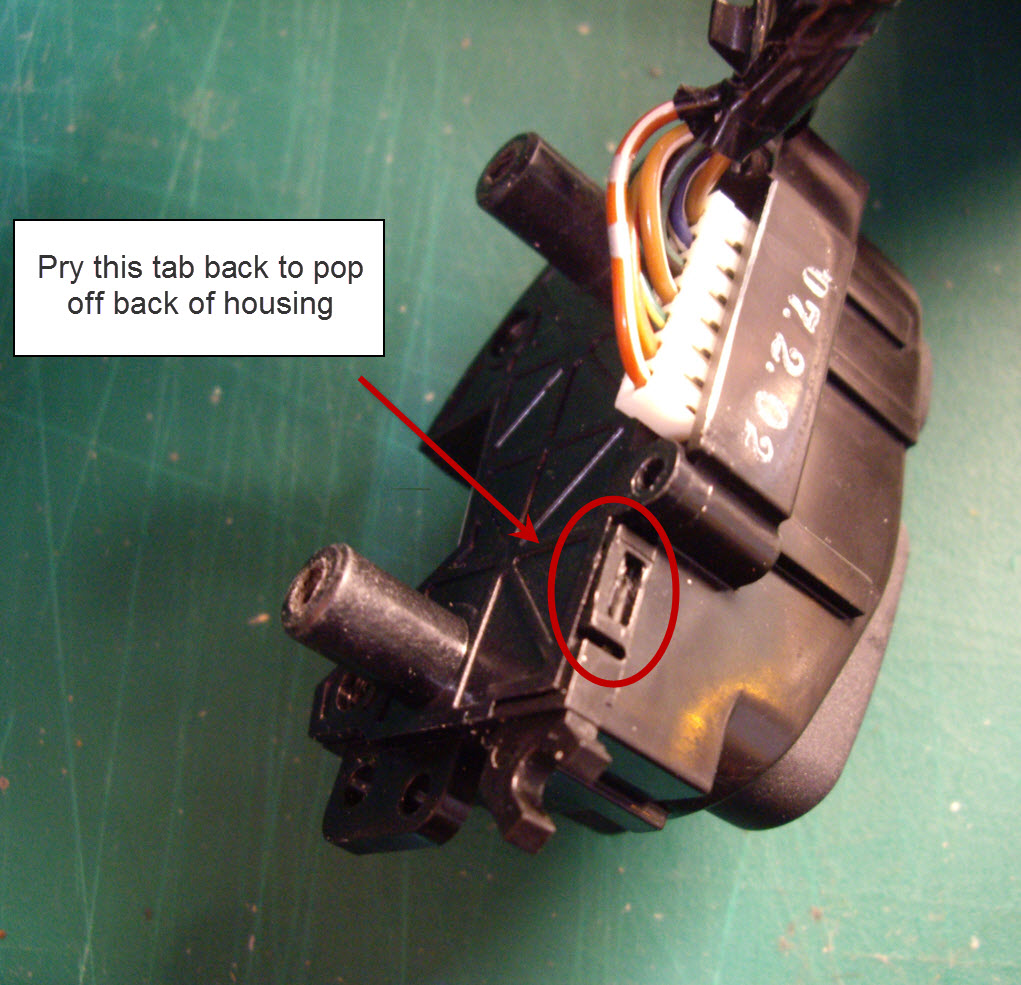
Step 6
The button cluster can now be popped open. Pry back the tab circled in red and use one of the screw posts to pull the back off.
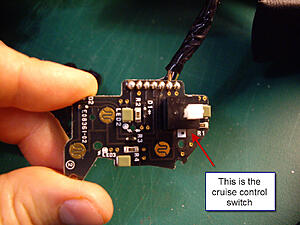
Step 7
Now you can pull out the switch control board. There is a piece of grey rubber covering it. Gently lift this off to expose the board.
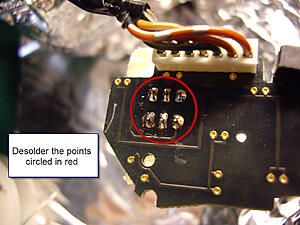
Step 8
On the back of the board there are six posts you will need to desolder to free the switch. I recommend wrapping your wheel in aluminum foil to protect against solder splashes or an accidental drop of the soldering iron.
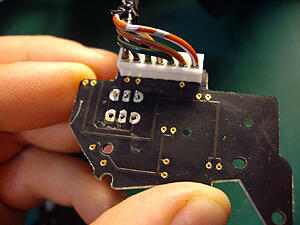
Step 9
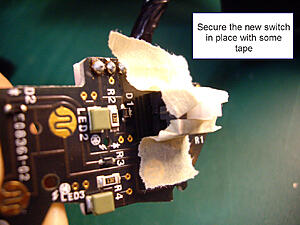
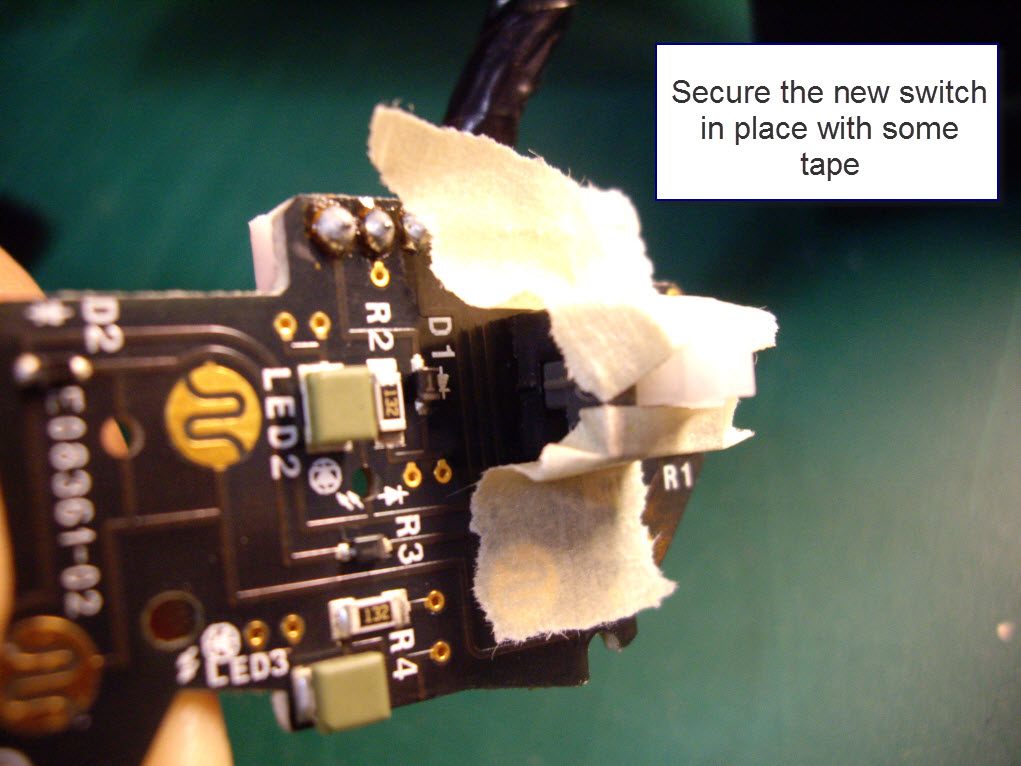
Be sure you have the switch oriented correctly before inserting it into the board. I believe the unlatched position should be ON to the top two pins and the latched position should be ON to the bottom two. However I have lost my original switch and can't verify that is correct. Just use a volt meter to determine the continuity on the original switch and the replacement and insert accordingly. Secure the new switch in place with some tape and solder it in place.
Step 10
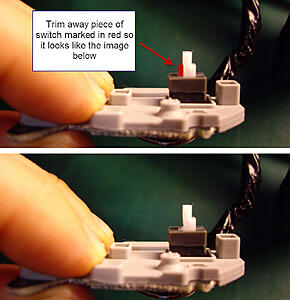
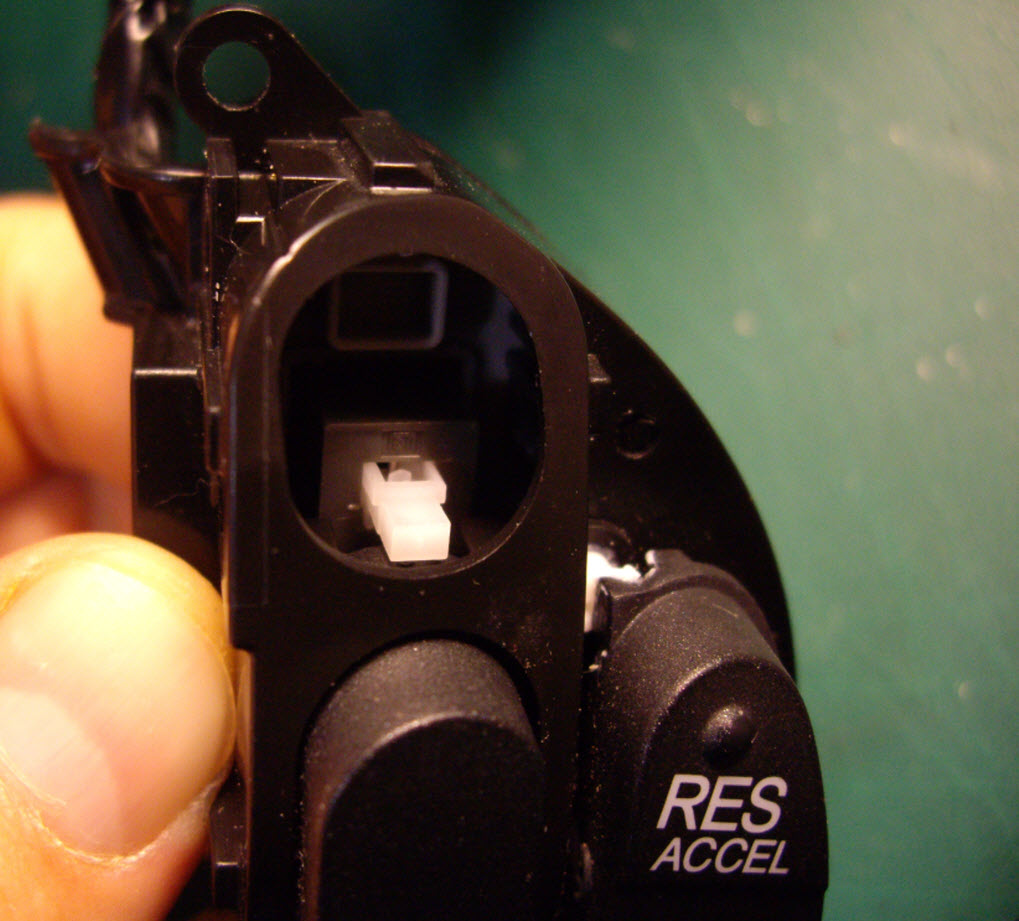
The original switch's push button was offset toward the top and the replacement has the button in the middle. You will need to modify the switch so that it does not block the cancel button. Cut away the piece marked in red. It should then just barely clear the cancel button.
Step 11
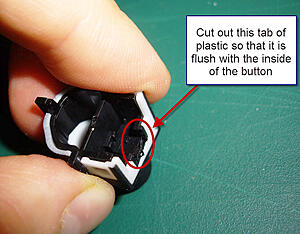
Next you will need to modify the cruise control on/off button cover itself. Because the push button now sits lower, you have to cut out a piece of plastic from the cover to give it clearance. Trim out the black piece of plastic circled in red until it is flush with the inside where the old push button used to rest.
Step 12
Reassemble everything in reverse order, reconnect the battery, and confirm your new button works.
However if you know how to solder, you can replace just the switch itself for about $6. This is a guide on how to do so.
Tools needed:
10mm socket/wrench to disconnect the battery before starting
Torx T30 bit
Phillips head screwdrivers of varying sizes (PH 1 or similar will be the smallest)
Soldering Iron
De-soldering pump and/or de-soldering braid
Flux
Solder
You will also need a DPDT Latching ON-ON switch. I couldn't find an exact replacement, so I ordered one with matching post spacing and modified it to fit my needs. I recommend ordering two because they are so cheap and it won't change the shipping costs. That way if you accidentally damage one, you have another on hand.
Link to the switch I ordered from Mouser Electronics.
The manufacturer part number is GPBS-850L. This is a common part sold by other companies such as DigiKey and Allied.
Step 1: Remove the steering wheel
CubanLynx84 wrote an excellent guide in the garage so I will skip those steps.
Link to F-168 Steering wheel removal
Make sure you disconnect the battery first!!!
I had to use a steering wheel puller to remove the wheel.
Once you get the wheel removed come back to this guide.
Step 2
Remove these screws and pull off the back cover. Also pull off the cover on the back of the select/reset/up/down cluster on the right side of the wheel.
Step 3
Remove this screw and turn the steering wheel over.

Step 4
Remove these four screws to release the button cluster from the wheel. (Sorry for potato quality picture)
Step 5
With the cluster freed from the steering wheel, remove the two screws in red first. This will free the cluster form the trim. Then remove the three screws in green.

Step 6
The button cluster can now be popped open. Pry back the tab circled in red and use one of the screw posts to pull the back off.
Step 7
Now you can pull out the switch control board. There is a piece of grey rubber covering it. Gently lift this off to expose the board.

Step 8
On the back of the board there are six posts you will need to desolder to free the switch. I recommend wrapping your wheel in aluminum foil to protect against solder splashes or an accidental drop of the soldering iron.


Step 9
Be sure you have the switch oriented correctly before inserting it into the board. I believe the unlatched position should be ON to the top two pins and the latched position should be ON to the bottom two. However I have lost my original switch and can't verify that is correct. Just use a volt meter to determine the continuity on the original switch and the replacement and insert accordingly. Secure the new switch in place with some tape and solder it in place.
Step 10
The original switch's push button was offset toward the top and the replacement has the button in the middle. You will need to modify the switch so that it does not block the cancel button. Cut away the piece marked in red. It should then just barely clear the cancel button.

Step 11
Next you will need to modify the cruise control on/off button cover itself. Because the push button now sits lower, you have to cut out a piece of plastic from the cover to give it clearance. Trim out the black piece of plastic circled in red until it is flush with the inside where the old push button used to rest.

Step 12
Reassemble everything in reverse order, reconnect the battery, and confirm your new button works.


The following 3 users liked this post by woowoo:
06-20-2014, 09:10 AM
#4
I had a bad habit of always leaving the cruise control on even when I wasn't using it. Eventually the locking mechanism in the switch failed. I could still engage the cruise if I held the cruise button down.
06-20-2014, 09:46 AM
#5
I couldn't find one at the time. The only one I see now is $50 plus shipping. I was already ordering fuses for a different project so adding the switch only cost me $0.55. Either way you have to pull the wheel so it boils down to what you're more comfortable doing.
07-10-2016, 08:13 PM
#6
5th Gear

I did happen to route an airbag wire incorrectly when installing the steering wheel and when I went to pull the wheel back off (read:yank), the coil spring / ribbon cable reel came apart on me. What a nightmare! No searching on here, Google, YouTube, etc came up with instructions on how to actually wind that thing back up. So, I et it sit over night, slept on it, ponder it the next morning...removed it from the car and went after it on my bench and got it back together! Thank God!
So thanks for the write-up!!
07-10-2016, 08:22 PM
#7
Trending Topics
08-11-2016, 11:05 PM
#8

I came across a video showing older accord cruise switch replacement and Mouser part # 688-SPPH120400 seemed to be the original replacement.
It also looks like almost a perfect fit for one you have shown,
Mine '08 TL switch gave up on me few days ago. It looks like going to be a common problem, likely this switch is just not reliable.
Will try to order both parts from Mouser and see which one could be a good fit when find couple of hours to pull my steering wheel.
By the way - do you think it is necessary to pull it? Looks like there are only 4 screws in the back and if you rotate steering wheel you may be able to get to them.
I messed up once before a coil spring on the older TL, threw off stability steering wheel position sensor by messing with the steering column, so thinking it maybe worthwhile to stay safe if possible.
Thanks for the great post, really helps! Saved me a lot of guess time and I now know what needs to be done!
08-12-2016, 05:10 AM
#9
Nice find on the mouser part. That looks like it exactly.
You could potentially get to those 4 screws by yanking the back cover to the side, but would be very difficult. You're likely to do more harm than good that way. Plus, then your having to solder inside your car.
You could potentially get to those 4 screws by yanking the back cover to the side, but would be very difficult. You're likely to do more harm than good that way. Plus, then your having to solder inside your car.
12-16-2018, 02:05 PM
#10

I came across a video showing older accord cruise switch replacement and Mouser part # 688-SPPH120400 seemed to be the original replacement.
It also looks like almost a perfect fit for one you have shown,
Mine '08 TL switch gave up on me few days ago. It looks like going to be a common problem, likely this switch is just not reliable.
Will try to order both parts from Mouser and see which one could be a good fit when find couple of hours to pull my steering wheel.
By the way - do you think it is necessary to pull it? Looks like there are only 4 screws in the back and if you rotate steering wheel you may be able to get to them.
I messed up once before a coil spring on the older TL, threw off stability steering wheel position sensor by messing with the steering column, so thinking it maybe worthwhile to stay safe if possible.
Thanks for the great post, really helps! Saved me a lot of guess time and I now know what needs to be done!
It also looks like almost a perfect fit for one you have shown,
Mine '08 TL switch gave up on me few days ago. It looks like going to be a common problem, likely this switch is just not reliable.
Will try to order both parts from Mouser and see which one could be a good fit when find couple of hours to pull my steering wheel.
By the way - do you think it is necessary to pull it? Looks like there are only 4 screws in the back and if you rotate steering wheel you may be able to get to them.
I messed up once before a coil spring on the older TL, threw off stability steering wheel position sensor by messing with the steering column, so thinking it maybe worthwhile to stay safe if possible.
Thanks for the great post, really helps! Saved me a lot of guess time and I now know what needs to be done!

The following users liked this post:
csmeance (10-13-2019)

Thread
Thread Starter
Forum
Replies
Last Post
rockyboy
2G RDX (2013-2018)
171
08-04-2024 10:35 AM
cycdaniel
1G TSX Performance Parts & Modifications
8
12-17-2019 10:58 AM
Skirmich
2G TL (1999-2003)
37
09-15-2015 06:41 PM
spoiler900
5G TLX Photograph Gallery
11
09-11-2015 09:39 PM