
DIY: Blacked/Cleared Headlights 3G Garage #G046
 07-03-2011, 10:09 PM
#401

Does anyone have a royal blue car? I'm thinking about clearing the headlights, but am not sure if blacking them out will match right. Just straight chrome might look best, maybe with some carbon fiber in the back part of the headlight? Not sure as I've only seen black and white cars with this mod.
 07-04-2011, 10:13 PM
#403
Intermediate

i actually do need new ones cuz theres a crack in it, its small but its enough to f*** up my headlight. havent found any online gonna call the dealership tomorrow, sure theyll want to sell me a whole headlight
07-04-2011, 10:26 PM
#404
Race Director
iTrader: (8)
You can't buy just the lens brand new, sorry.
The only way you can buy just the lens is if someone takes apart their headlights and decides to part it out.
This has been done, but is really really rare.
The only way you can buy just the lens is if someone takes apart their headlights and decides to part it out.
This has been done, but is really really rare.
07-12-2011, 11:31 AM
#405

Hello All,
Definately nice mod regarding these clearin/blacking out the headlights..
I have just ordered a OEM headlight for practice.. and hopefully be successful at it..
couple of questions though,
1. After the initial baking for 20 minutes, Are there any screws which are retaing both parts of the headlights or do I just pry open it ??
2. What tabs need to be removed - if there are any ?
3. What tool will i be using to pry open the headlight ?
4. Has anyone put in the LED strip (new benz/audi style) while the headlights are opened ??
If so, is there enough space inthe headlight for this strip?
Thanks for any replies and advices.
Chet.
08-27-2011, 01:12 PM
#407
Hello All,
Definately nice mod regarding these clearin/blacking out the headlights..
I have just ordered a OEM headlight for practice.. and hopefully be successful at it..
couple of questions though,
1. After the initial baking for 20 minutes, Are there any screws which are retaing both parts of the headlights or do I just pry open it ??
2. What tabs need to be removed - if there are any ?
3. What tool will i be using to pry open the headlight ?
4. Has anyone put in the LED strip (new benz/audi style) while the headlights are opened ??
If so, is there enough space inthe headlight for this strip?
Thanks for any replies and advices.
Chet.
Definately nice mod regarding these clearin/blacking out the headlights..
I have just ordered a OEM headlight for practice.. and hopefully be successful at it..
couple of questions though,
1. After the initial baking for 20 minutes, Are there any screws which are retaing both parts of the headlights or do I just pry open it ??
2. What tabs need to be removed - if there are any ?
3. What tool will i be using to pry open the headlight ?
4. Has anyone put in the LED strip (new benz/audi style) while the headlights are opened ??
If so, is there enough space inthe headlight for this strip?
Thanks for any replies and advices.
Chet.
1. After the headlight has been heated up, take a flat head and stick it between the front lens and the back housing, at the corner of the headlight (the fog light corner that's closest to your license plate when on the car). Wiggle the flat head so there's enough room for the very edge of your fingers, so that you can pry them open. There are no screws.
Pull apart at the corner so the end result looks like this: the diffuser corner is the last part of the headlight to be separated.

The trickiest part of this whole ordeal is removing the diffuser from the trim. The trim is very thin and fragile so make sure the plastic securing the diffuser to the trim is fully removed. Work on them one by one and make sure you can push a sharp object through the hole to separate them.

2. There are no "tabs" I'm not sure what you're talking about. Once the front lens and back housing are separated, there are screws that are holding the plastic trim to the front lens. There are 3 of them (one holds the bezel, one holds the diffuser, and one holds the entire trim).
3. See 1.
4. I have done this and it takes a lot of time fitment wise, it was a long time ago, see pics below. I wouldn't advise it because 95% of the people who put some sort of light inside the headlight, always has them burn out. It's a PITA.


Don't throw it back into the oven because the projector lens will just fog up and create water spots. You can heat up the front lens to soften the silicone, and then use a heat gun. Brute force is the best way to press them together. Then apply a sealant (more silicone) around the edges so there are no leaks.
The following 2 users liked this post by bforbrian:
single_dad_73 (08-27-2011),
Undying Dreams (04-29-2012)
09-02-2011, 08:14 PM
#408
10th Gear

Join Date: Aug 2011
Posts: 11
Likes: 0
Received 0 Likes
on
0 Posts
i wish someone nears me know how to reseal the headlight, because thats the only part im scared of doing, because im afraid im going to mess up on it :/
and i dont want to ruin my tl headlight and have to purchase a whole new set
and i dont want to ruin my tl headlight and have to purchase a whole new set
 09-17-2011, 01:20 AM
#410
Instructor
i just did this today... let me tell u it was a PITA ! maybe cuz i used a heat gun for the project but i had no choice. oven stopped working lol it too about 30 min for me to remove the bumper and another 30 for headlight removal. i broke some pieces inside lol but fixed it with epoxy. i blacked out the chrome n put my ZKW-R lenses in. light output is brighter but didnt notice a big diff in color band. i think i needed to mess with the shield correct? but overall it looks good. took all day to finish though. one thing for sure is take ur time , make sure ur not planning on doing things later that day cuz it will take a while.
09-17-2011, 09:54 AM
#412
Race Director
iTrader: (8)
09-22-2011, 07:28 AM
#413
This is off topic I know, but did you make the front plate bracket or buy it?? In VT we need a front plate just like NY, that bracket looks good!!!
1. After the headlight has been heated up, take a flat head and stick it between the front lens and the back housing, at the corner of the headlight (the fog light corner that's closest to your license plate when on the car). Wiggle the flat head so there's enough room for the very edge of your fingers, so that you can pry them open. There are no screws.
Pull apart at the corner so the end result looks like this: the diffuser corner is the last part of the headlight to be separated.
The trickiest part of this whole ordeal is removing the diffuser from the trim. The trim is very thin and fragile so make sure the plastic securing the diffuser to the trim is fully removed. Work on them one by one and make sure you can push a sharp object through the hole to separate them.
2. There are no "tabs" I'm not sure what you're talking about. Once the front lens and back housing are separated, there are screws that are holding the plastic trim to the front lens. There are 3 of them (one holds the bezel, one holds the diffuser, and one holds the entire trim).
3. See 1.
4. I have done this and it takes a lot of time fitment wise, it was a long time ago, see pics below. I wouldn't advise it because 95% of the people who put some sort of light inside the headlight, always has them burn out. It's a PITA.
Don't throw it back into the oven because the projector lens will just fog up and create water spots. You can heat up the front lens to soften the silicone, and then use a heat gun. Brute force is the best way to press them together. Then apply a sealant (more silicone) around the edges so there are no leaks.[/QUOTE]
11-04-2011, 03:57 PM
#414

bump...
doing this tonight.. does the turn signal run and blink amber? do I need to replace it with one that looks clear and blinks amber? what size bulb is it? headed to the store in a few
also, does it matter how long you wait before you put them back together and back in the car?
doing this tonight.. does the turn signal run and blink amber? do I need to replace it with one that looks clear and blinks amber? what size bulb is it? headed to the store in a few
also, does it matter how long you wait before you put them back together and back in the car?
Last edited by gogators22; 11-04-2011 at 04:10 PM.
11-04-2011, 06:38 PM
#416
How long should I wait after I paint to put them back together and how long should I wait before I put them back in the car?
11-04-2011, 07:51 PM
#417
I did all mine within an 8 hour period. That taking them out, painting, sealing them, installing back in the car. I'd probably advise you to let the butyl harden over night while the headlights are clamped tight, then install the next day, leave the bulbs out and the projector cover off to let the fumes escape. Just make sure they're not anywhere very dusty so nothing get inside the headlights.
11-04-2011, 08:24 PM
#418
Race Director
iTrader: (8)
The only reason why it blinks orange is because the amber diffuser.
Best bet is to get LEDs.
I have Type-S diffusers, so it's clear and shows you the true colour of the bulb - an ugly pale white colour.
Incandescant on left, LED on right:
 11-04-2011, 10:25 PM
#420
Race Director
iTrader: (8)
11-05-2011, 03:40 AM
#421
3rd Gear

Join Date: Nov 2007
Age: 43
Posts: 3
Likes: 0
Received 0 Likes
on
0 Posts
7 hours later, just finished. What a pita!!!!!!!!!!!!!
Hope I got the projectors lined up right, doubtful. Hope I got the seal water tight, doubtful. I broke a couple fake chrome pieces hope nobody notices. They look alright however. I'll post pix sometime tomorrow . Goodnight! :'(
Hope I got the projectors lined up right, doubtful. Hope I got the seal water tight, doubtful. I broke a couple fake chrome pieces hope nobody notices. They look alright however. I'll post pix sometime tomorrow . Goodnight! :'(
11-05-2011, 06:51 PM
#422
ok............. finally home after completing this at a friend's house.
not the best pics, but the sun was being a bish and I couldn't get a great angle of both at the same time.
Here is one of them before:

and after:

I don't recommend doing this at night, because I got tired and it was cold outside so the paint didn't want to stick or dry. I think they look pretty good, just hope they don't get condensation when I wash it or when it rains
not the best pics, but the sun was being a bish and I couldn't get a great angle of both at the same time.
Here is one of them before:
and after:
I don't recommend doing this at night, because I got tired and it was cold outside so the paint didn't want to stick or dry. I think they look pretty good, just hope they don't get condensation when I wash it or when it rains
11-05-2011, 06:59 PM
#423
Race Director
iTrader: (8)
Good job!
Post more pictures in the daylight =)
Post more pictures in the daylight =)
The following users liked this post:
gogators22 (11-05-2011)
11-05-2011, 09:36 PM
#424
Thanks, problem is that now my driver's side projector is pointed too high, and the only way I can fix it is by taking them apart again. fuck my lifeeeeeeeeeeeeeeeeeeeeeeeeeeeeeeeeeeeeeeeeeeeeeee eeeeee
and not sure about the passenger's side yet, because I have a bad ignitor. afraid the left one will be too high and the right one too low. starting to second guess ever messing with my lights
and not sure about the passenger's side yet, because I have a bad ignitor. afraid the left one will be too high and the right one too low. starting to second guess ever messing with my lights
11-05-2011, 11:26 PM
#426
 11-05-2011, 11:37 PM
#427
Race Director
iTrader: (8)
You won't be able to see your turn signals since there's nothing the light can reflect on so that's bad lol
See for yourself heheh
See for yourself heheh
11-05-2011, 11:43 PM
#428
11-06-2011, 12:29 AM
#429

you can purchase amber LED or switchback bulbs. but no matter what, it doesn't matter what type of bulb you use, your turn signal is still gonna be kinda dark because it has no chrome to reflect light off of.
the chrome is there to reflect more light, and the diffuser is there to make all the light look combined together for a clean look.
taking the amber diffuser off is fine, but if you take the amber diffuser off you should leave the chrome as-is to help with the lighting.
switchbacks - http://www.ebay.com/itm/7443-DUAL-CO...ht_3956wt_1269
amber leds
you will need 2 of these, price you see is for 1. keep in mind, these are only "68" LEDS - http://www.ebay.com/itm/7440A-Super-...ht_1884wt_1269
these are "96" LEDs. i am not sure if this price is for 1 LED bulb or 2. - http://www.ebay.com/itm/7443-AMBER-Y...ht_3930wt_1269
since you don't have a chrome reflector i think the more LEDs = win for you
Last edited by vietxquangstah; 11-06-2011 at 12:41 AM.
The following users liked this post:
gogators22 (11-06-2011)
11-06-2011, 12:47 AM
#430
here's a alternative to ebay. http://autolumination.com/7443_7440.htm
also when you switch to LEDs you will experience hyperflashing. this means the turn signal will blink at a much faster rate which can cause the leds to fail early. a fix would be using load resistors. read here https://acurazine.com/forums/showpos...15&postcount=1
also when you switch to LEDs you will experience hyperflashing. this means the turn signal will blink at a much faster rate which can cause the leds to fail early. a fix would be using load resistors. read here https://acurazine.com/forums/showpos...15&postcount=1
The following users liked this post:
gogators22 (11-06-2011)
11-06-2011, 01:09 AM
#431
here's a alternative to ebay. http://autolumination.com/7443_7440.htm
also when you switch to LEDs you will experience hyperflashing. this means the turn signal will blink at a much faster rate which can cause the leds to fail early. a fix would be using load resistors. read here https://acurazine.com/forums/showpos...15&postcount=1
also when you switch to LEDs you will experience hyperflashing. this means the turn signal will blink at a much faster rate which can cause the leds to fail early. a fix would be using load resistors. read here https://acurazine.com/forums/showpos...15&postcount=1
11-06-2011, 10:39 AM
#433
11-06-2011, 02:49 PM
#434
Race Director
iTrader: (8)
at the top there's a hole with an indicator "up down" with arrows i believe.
11-22-2011, 10:13 AM
#435
Advanced
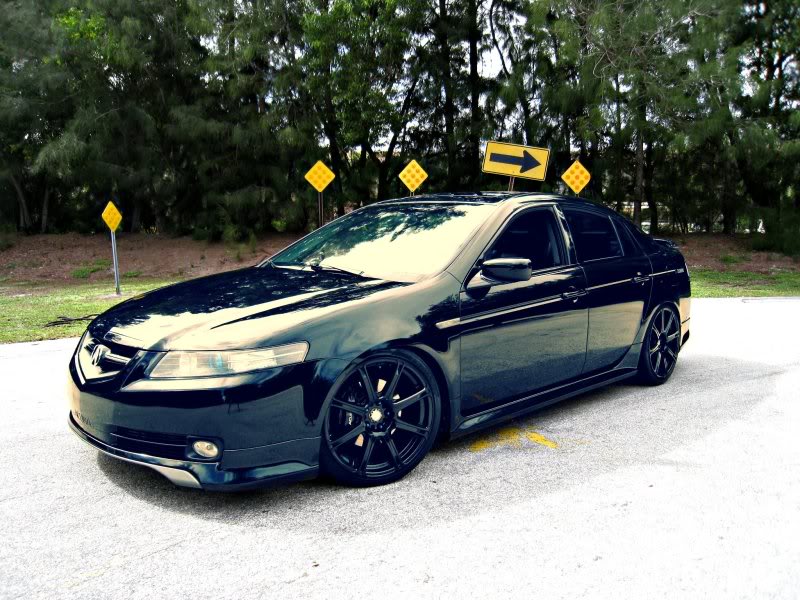
Today I've done blacking out my headlights. It looks awesome. I have carbon fiber hood. It gives style to black headlights. My car's color is Silver.
Thanks for DIY. appreciate.
Thanks for DIY. appreciate.


The following 2 users liked this post by rockstar143:
erzhan89 (11-23-2011),
Undying Dreams (07-28-2012)
11-22-2011, 02:03 PM
#439

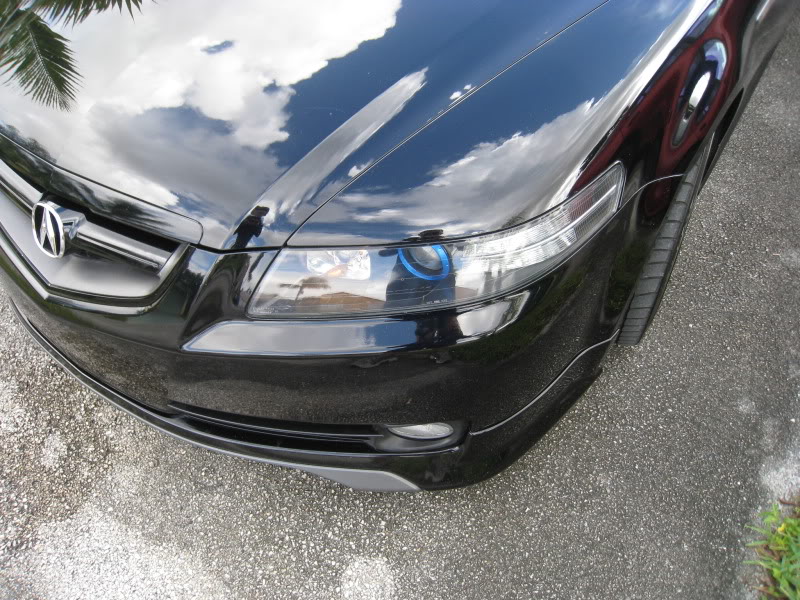
^ i like the blue ring Rockstar!
I really need to do my headlights as well. It the only thing that doesnt really flow well with the mods i have.
Do you guys think it matters when to clear the headlights? hotter vs cooler weather
I was planning to mod mine in the spring once it gets warm but if its okay to do during the colder season, i would start asap
11-23-2011, 03:32 AM
#440
Advanced

this is how I did

I decided only to black headlights, without removing yellow glass on turn signal.. otherwise, police will give me a toll for that.

I didnot wash my car last one month
that's why it's so dirty..