

A-122: DIY - 105k Service: Timing Belt, Water Pump, Spark Plugs, Thermostat *PICS*
 06-16-2011, 12:50 PM
#241
Race Director
@Majofo
Heh, actually, I only got it half done in the time I had day before yesterday (everything off, water pump replaced). Went back at it yesterday evening and ran into something that has led me to stop and ask for some advice. Please be gentle as I've only done a timing belt twice before and they were both Honda inline four-cylinder engines; i.e. I've never done a V6 before, perhaps my understanding of the mechanics is f'd up.
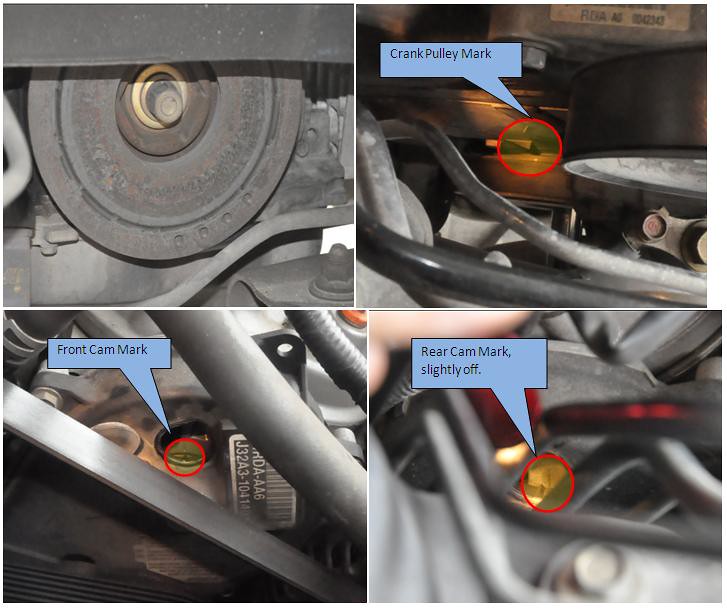
I followed the instructions from AllDataDIY.com while removing the timing belt, and only came across your instructions while looking for info on the difficulty of removing the crankshaft pulley. AllData's instructions TB removal instructions said to verify the front camshaft and crankshaft pulleys were at TDC before removal of the crankshaft bolt; I stupidly followed these instructions instead of verifying the position of both camshaft pulleys, and this came to bite me in the ass while installing the new TB. Step five of your instructions much more wisely state to check the position of all three. How I wish I had come across your instructions BEFORE I 'bump'd' the crankshaft bolt. When it came time to reinstall the TB I verified the position of the front camshaft pulley and noticed it had moved forward during the 'bumping' process, as had the crankshaft pulley. I rotated the front camshaft pulley to TDC, and moved on to the rear camshaft pulley. I simply noted that the rear camshaft pulley wasn't at TDC, but didn't mark where it was in relation to TDC when I started to correct its position. I rotated the rear camshaft and was surprised when it didn't come to TDC in the same number of turns as the front camshaft pulley; thinking I had merely miscounted the number of rotations I simply continued to rotate it until it stopped at TDC. Well, it never stopped at TDC, and herein lies my question. The front camshaft pulley(CSP) has marked spokes 1 - 6 for each cylinder. When rotating the CSP's they each come to rest in three positions. By this I mean that during the manual rotation of the CSP it naturally stops rotating at three positions due, I think, to springs being released or no longer compressed by bumps on the camshaft. On the front CSP these stopping points are marked "1," "2," and "3" with "1" being TDC. These markings correspond to every 2nd spoke of the six-spoke pulley, or every 120�. The rear CSP likewise comes to rest every 120�, however these resting spots do not correspond to the TDC mark. The resting spots are 60� past TDC, 180� past TDC, and 60� before TDC. Shouldn't the rear camshaft come to a resting point where the TDC mark on the pulley aligns with the TDC mark on the rear half of the TB cover, as is the case for the front CSP? This, at least, is my working assumption. As such, I'm disconcerted that the rear CSP never comes to rest with the TDC marks aligned. To align these marks I'd have to stop the rotation between stopping points and attempt to mount the belt. This would be quite hazardous as a slight move of the CSP will cause it to suddenly and rapidly rotate forward.
Because of my working assumption that the rear CSP should come to rest at a point where the TDC marks are aligned, I think the CSP was installed incorrectly at the factory. Or am I smoking crack? Should the alignment marks of the rear CSP indeed come in between the natural stopping points of the CSP rotation cycle?
You probably understand my concern as not getting this right will cause severe damage to the motor. I'd appreciate some input on this!
Heh, actually, I only got it half done in the time I had day before yesterday (everything off, water pump replaced). Went back at it yesterday evening and ran into something that has led me to stop and ask for some advice. Please be gentle as I've only done a timing belt twice before and they were both Honda inline four-cylinder engines; i.e. I've never done a V6 before, perhaps my understanding of the mechanics is f'd up.
I followed the instructions from AllDataDIY.com while removing the timing belt, and only came across your instructions while looking for info on the difficulty of removing the crankshaft pulley. AllData's instructions TB removal instructions said to verify the front camshaft and crankshaft pulleys were at TDC before removal of the crankshaft bolt; I stupidly followed these instructions instead of verifying the position of both camshaft pulleys, and this came to bite me in the ass while installing the new TB. Step five of your instructions much more wisely state to check the position of all three. How I wish I had come across your instructions BEFORE I 'bump'd' the crankshaft bolt. When it came time to reinstall the TB I verified the position of the front camshaft pulley and noticed it had moved forward during the 'bumping' process, as had the crankshaft pulley. I rotated the front camshaft pulley to TDC, and moved on to the rear camshaft pulley. I simply noted that the rear camshaft pulley wasn't at TDC, but didn't mark where it was in relation to TDC when I started to correct its position. I rotated the rear camshaft and was surprised when it didn't come to TDC in the same number of turns as the front camshaft pulley; thinking I had merely miscounted the number of rotations I simply continued to rotate it until it stopped at TDC. Well, it never stopped at TDC, and herein lies my question. The front camshaft pulley(CSP) has marked spokes 1 - 6 for each cylinder. When rotating the CSP's they each come to rest in three positions. By this I mean that during the manual rotation of the CSP it naturally stops rotating at three positions due, I think, to springs being released or no longer compressed by bumps on the camshaft. On the front CSP these stopping points are marked "1," "2," and "3" with "1" being TDC. These markings correspond to every 2nd spoke of the six-spoke pulley, or every 120�. The rear CSP likewise comes to rest every 120�, however these resting spots do not correspond to the TDC mark. The resting spots are 60� past TDC, 180� past TDC, and 60� before TDC. Shouldn't the rear camshaft come to a resting point where the TDC mark on the pulley aligns with the TDC mark on the rear half of the TB cover, as is the case for the front CSP? This, at least, is my working assumption. As such, I'm disconcerted that the rear CSP never comes to rest with the TDC marks aligned. To align these marks I'd have to stop the rotation between stopping points and attempt to mount the belt. This would be quite hazardous as a slight move of the CSP will cause it to suddenly and rapidly rotate forward.
Because of my working assumption that the rear CSP should come to rest at a point where the TDC marks are aligned, I think the CSP was installed incorrectly at the factory. Or am I smoking crack? Should the alignment marks of the rear CSP indeed come in between the natural stopping points of the CSP rotation cycle?
You probably understand my concern as not getting this right will cause severe damage to the motor. I'd appreciate some input on this!
From my experience, the rear CS is finicky and doesn't like to stay at TDC while the belt is off. It can/will flip right/left about 30 degrees based on valve spring pressure. Just gently turn it back to TDC.
I'd get the crank at TDC first, and then move the CS's to TDC. You shouldn't have to turn either CS more than 30 degrees or so to get back to TDC.
And your car wouldn't run or would run extremely rough if the crank was off TDC, so no, it wasn't off. Good luck!

The following users liked this post:
JD TL-S (03-19-2015)
06-16-2011, 02:23 PM
#242
Chapter Leader (Southern Region)
Thread Starter
Yeah that damn rear camshaft.. always a tooth or so.. I had to roll it back as well.
06-19-2011, 02:57 PM
#243
N00b Extraordinaire
I actually had more paragraphs. I use NoScript, and evidently forgot to temporarily enable scripting for acurazine.com while I was on it, which caused the message editor to behave strangely.
Thanx for the advice on CS. I was just a bit confused. I figured that if the front CS was at TDC without the springs under load, that the rear should be also. Nope. I talked to my mechanic and he told me that it isn't unusual for one or both CS to be under spring load when at TDC.
Thanx for the advice on CS. I was just a bit confused. I figured that if the front CS was at TDC without the springs under load, that the rear should be also. Nope. I talked to my mechanic and he told me that it isn't unusual for one or both CS to be under spring load when at TDC.
06-19-2011, 03:11 PM
#244
N00b Extraordinaire
I used a breaker bar to hold the rear CS in place; of course it took a spare set of hands. Another thing I did was set both CS' and the crank to approximately one tooth counter-clockwise before TDC; as I mounted the belt I rotated each pulley to TDC to take up the slack I had left. This made it easier to put the belt on and have it properly tightened.
07-01-2011, 10:04 PM
#245
Burning Brakes
iTrader: (1)
I just finished putting the car back together after doing this project and for the most part things seem ok, however, I'm running into one problem.
There is a constant chatter coming from the center of the timing housing (I'd say right above the crank pulley). I'm thinking it may have something to do with contact between the auto tensioner and the adjuster. (see below)
Now, here's the background:
1) Idle seems ok at about 800 rpm's
2) No CEL
3) Was not able to get a torque wrench on the 2 bolts for the auto tensioner so I just tightened with a 12-point elbow wrench
4) I did tighten the adjuster so that the bottom lip was flat against the auto-tensioner - however, once everything was buttoned back up and I pulled the pin on the tensioner, I did not inspect to see what it looked like after that
5) There are no leaks - engine coolant seems to be held in to the new water pump so I think that seal is good and do not see the pump as a potential issue
6) I did drop a single bolt for the timing covers which went unaccounted for - never was able to find it...the search continues. I would see this as a long stretch for why I get this chatter though
7) The chatter does become more pronounced a bit between idle and 1500 rpm's it seems more pronounced, however, it is always there even at 3-5k although it is much much harder to hear because the engine is significantly louder at that point.
I used a brand new timing kit from Prestige Acura with the addition of a timing belt idler pulley as well.
I'm currently letting the car cool down so I can start disassembling everything again, but in the meantime does anyone have any thoughts on this?
I'm 99% sure it is coming from within the timing assembly and definitely in the lower/central area of the lower timing cover.
07-02-2011, 12:09 AM
#246
Race Director
^^^Hard to say...The chatter could be from a loose/improperly tensioned timing belt or it could also be the drive belt autotensioner or pulley/s. Did you use the correct torque spec for the drive belt AT? It has proven to be sensitive to overtightening. More than one AT has been ruined by TFAR (That Feels About Right).
07-02-2011, 02:40 AM
#247
Burning Brakes
iTrader: (1)
Yep, once the car cooled down and I got back in there I saw the collar bolt for the adjuster was on too tight so the tensioner was never able to move the adjuster to eat up the slack.
Then on top of that I found I had left too much slack leading up to the adjuster.
I disassembled everything, reset the auto tensioner and re-aligned everything and I'm expecting a much better result this time. All my TDC's lined up this time after I pulled the AT pin.
I'm eager to get the rest of it buttoned up so I can try it out again in the morning.
Thanks
07-02-2011, 02:35 PM
#248
Burning Brakes
iTrader: (1)
Yep, loosening the collar bolt on the adjuster to let the tensioner actually do what it's supposed to do did the trick - gee, big surprise. 
Works perfectly now. Car is running quieter, stronger, and more responsively than it has in 2 years.
Special thanks again to Majofo for this awesome write-up and all the little caveats about the install on this particular vehicle that people have contributed throughout the thread.
Works perfectly now. Car is running quieter, stronger, and more responsively than it has in 2 years.
Special thanks again to Majofo for this awesome write-up and all the little caveats about the install on this particular vehicle that people have contributed throughout the thread.
The following users liked this post:
JD TL-S (03-19-2015)
09-05-2011, 01:40 AM
#249

After reading the tools required i said to myself...I got this. After reading the rest of the post I was like WTF. I am mechanically inclined, but this seems way out of my league. I picture myself forgetting a part or a seal or having extra screws when i'm done. Great write up but i'd rather tackle this with someone who has done this before before i attempt it and have to tow it to a garage to finish it. Cudos to all who complete this task
09-05-2011, 01:56 AM
#250
Early Shifter
iTrader: (2)
Having a knowledgeable person there with you will greatly help the learning process. You do all the work and let them give you insight. 
No shame in that!
Then when next time comes around you're confident!
No shame in that!
Then when next time comes around you're confident!
10-04-2011, 09:46 PM
#251
2nd Gear

Join Date: Oct 2011
Age: 38
Posts: 2
Likes: 0
Received 0 Likes
on
0 Posts
Started working on this tonight. I'm at step 3 and having a problem removing the belt tensioner assembly. I removed the 1 bolt at the bottom but the assembly isn't coming loose. Do I need to remove the bottom pulley bolt? I thought there might be another bolt at the top hidden behind the front TB cover but realized it's nearly impossible to remove without removing the belt tensioner.
10-04-2011, 09:58 PM
#252
Chapter Leader (Southern Region)
Thread Starter
Started working on this tonight. I'm at step 3 and having a problem removing the belt tensioner assembly. I removed the 1 bolt at the bottom but the assembly isn't coming loose. Do I need to remove the bottom pulley bolt? I thought there might be another bolt at the top hidden behind the front TB cover but realized it's nearly impossible to remove without removing the belt tensioner.
10-04-2011, 10:19 PM
#253
Race Director
10-05-2011, 09:26 AM
#254
Why are you guys removing the whole drive-belt tensioner? The Helms manual just says remove the belt only...
It's step 6 on page 6-14. Download the whole manual from the other thread. If you have that, you won't need to follow these bone-head write-ups. They just become tools to assist you.
I've done this on a Honda Pilot and you definitely didn't have to remove the tensioner.
It's step 6 on page 6-14. Download the whole manual from the other thread. If you have that, you won't need to follow these bone-head write-ups. They just become tools to assist you.
I've done this on a Honda Pilot and you definitely didn't have to remove the tensioner.
10-05-2011, 09:33 AM
#255
Race Director
Why are you guys removing the whole drive-belt tensioner? The Helms manual just says remove the belt only...
It's step 6 on page 6-14. Download the whole manual from the other thread. If you have that, you won't need to follow these bone-head write-ups. They just become tools to assist you.
I've done this on a Honda Pilot and you definitely didn't have to remove the tensioner.
It's step 6 on page 6-14. Download the whole manual from the other thread. If you have that, you won't need to follow these bone-head write-ups. They just become tools to assist you.
I've done this on a Honda Pilot and you definitely didn't have to remove the tensioner.
Come back when you've tried it on a TL and then you'll know. Thanks for playing....NOT!
Last edited by nfnsquared; 10-05-2011 at 09:38 AM.
The following users liked this post:
Majofo (10-05-2011)
10-05-2011, 10:04 AM
#256
Chapter Leader (Southern Region)
Thread Starter

 10-05-2011, 12:55 PM
#259
Chapter Leader (Southern Region)
Thread Starter
You can't remove the cover without removing the tensioner. I spent over an hour fucking with the cover trying to push back the tensioner before I figured it out. It took me less than 3 minutes to remove the tensioner and pull the cover.
I guess you'd suggest removing the power steering pump to do this job as well. Bonehead.
I guess you'd suggest removing the power steering pump to do this job as well. Bonehead.
10-05-2011, 01:13 PM
#260
Race Director
10-18-2011, 04:34 PM
#261

Thanks!
Purchased the materials on ebay $187.95
Ordered the thermostat and an extra battery terminal(not worth it)from Delray Acura - ~$30.
Purchased the 50mm Honda CP holder tool on Amazon - $16.
If you haven't repalced the idler and tensioner pulleys on the serpentine belt, buy them and replace them. I had the tensioner go out about 80k and thought Acura replaced both, they didn't and the idler had grease oozing out and was about to give. They're another $15 or so from Delray Acura, if your originals have made it this far save yourself some trouble and just replace them. Lucky for me the NAPA house brand was identical, though it cost $40 instead of $15.
The work took a total of about 14 hours. 6 of those hours consisted of multiple tool runs(1. extra breaker bar, 2. renting a 200 ft. pound electric impact, 3. borrowing an air compressor and 250 ft. pound impact gun, 4. tracking down a suitable idler pulley for the serpentine belt) trying to get the CP bolt off. And I really did not rush, mostly because I don't like slicing my fingers open on sharp engine materials.
Our final solution to the CP bolt:
1. Lodge breakerbar with the Honda 50mm CP holder against the tie rod(breaker bar should be pointing directly towards the back of the car). I do not belive the pressure is enough to hurt the tie rod, especially if you aren't using an impact wrench.
2. Get a small propane torch and heat up CP bolt. The 50mm CP holder will sort of contain the fire to the immediate area. Be very cautious of things that can burn including any PB or WD40 you've sprayed or car parts. Having a hose handy isn't a terrible idea. Heat it up for 3-5 minutes.
3. While the bolt is good and hot go at it with the breaker bar with the 19mm deep socket. After the pop, turn it a couple times then let everything cool.
The drive belt tensioner wasn't listed in the Acura manual, but the images do show it removed. I wouldn't have noticed if it wasn't for Majofo's warnings and probably would have spent a good part of the evening tugging on TB covers.
The old belt looked great,other than the fact that we cut it in half to remove it. One thing I did notice is the old belt had stretched so even though it looked great it needed to be replaced. The rear cam gear was 1-2 deg towards the firewall when the others were lined up. When we installed the new belt we turned the gear towards TDC and it fell in place on the belt.
The battery terminal trick is pointless when replacing both bearings and the tensioner. Don't bother. Grinding the end isn't necessary if you go through with it.
BIG THANKS to Majofo for the tutorial and everyone else in this thread for asking all the right questions. It really helped me decide to do it myself.
Originally Posted by theimportexperts ebay store
(1) Timing Belt (14400-RCA-A01) - Made by MBL
(1) Timing Belt Tensioner Bearing (14510-RCA-A01) - Made by Koyo
(1) Timing Belt Idler (14550-RCA-A01) - Made by Koyo
(1) Water Pump (19200-RDV-J01) - Made by Aisin
(1) Water Pump O'Ring
(1) Hydraulic Tensioner (14520-RCA-A01) - Made by Aisin
(1) Timing Belt Tensioner Bearing (14510-RCA-A01) - Made by Koyo
(1) Timing Belt Idler (14550-RCA-A01) - Made by Koyo
(1) Water Pump (19200-RDV-J01) - Made by Aisin
(1) Water Pump O'Ring
(1) Hydraulic Tensioner (14520-RCA-A01) - Made by Aisin
Purchased the 50mm Honda CP holder tool on Amazon - $16.
If you haven't repalced the idler and tensioner pulleys on the serpentine belt, buy them and replace them. I had the tensioner go out about 80k and thought Acura replaced both, they didn't and the idler had grease oozing out and was about to give. They're another $15 or so from Delray Acura, if your originals have made it this far save yourself some trouble and just replace them. Lucky for me the NAPA house brand was identical, though it cost $40 instead of $15.
The work took a total of about 14 hours. 6 of those hours consisted of multiple tool runs(1. extra breaker bar, 2. renting a 200 ft. pound electric impact, 3. borrowing an air compressor and 250 ft. pound impact gun, 4. tracking down a suitable idler pulley for the serpentine belt) trying to get the CP bolt off. And I really did not rush, mostly because I don't like slicing my fingers open on sharp engine materials.
Our final solution to the CP bolt:
1. Lodge breakerbar with the Honda 50mm CP holder against the tie rod(breaker bar should be pointing directly towards the back of the car). I do not belive the pressure is enough to hurt the tie rod, especially if you aren't using an impact wrench.
2. Get a small propane torch and heat up CP bolt. The 50mm CP holder will sort of contain the fire to the immediate area. Be very cautious of things that can burn including any PB or WD40 you've sprayed or car parts. Having a hose handy isn't a terrible idea. Heat it up for 3-5 minutes.
3. While the bolt is good and hot go at it with the breaker bar with the 19mm deep socket. After the pop, turn it a couple times then let everything cool.
The drive belt tensioner wasn't listed in the Acura manual, but the images do show it removed. I wouldn't have noticed if it wasn't for Majofo's warnings and probably would have spent a good part of the evening tugging on TB covers.
The old belt looked great,other than the fact that we cut it in half to remove it. One thing I did notice is the old belt had stretched so even though it looked great it needed to be replaced. The rear cam gear was 1-2 deg towards the firewall when the others were lined up. When we installed the new belt we turned the gear towards TDC and it fell in place on the belt.
The battery terminal trick is pointless when replacing both bearings and the tensioner. Don't bother. Grinding the end isn't necessary if you go through with it.
BIG THANKS to Majofo for the tutorial and everyone else in this thread for asking all the right questions. It really helped me decide to do it myself.
 10-18-2011, 05:47 PM
#263
Righty tighty, lefty loosey. The only bolt I've come across with reverse threads is the Serpentine belt tensioner bolt, but it had arrows indicating the direction.
The following users liked this post:
JD TL-S (03-19-2015)


The following users liked this post:
JD TL-S (03-19-2015)
The following users liked this post:
JD TL-S (03-19-2015)
10-21-2011, 07:25 PM
#268
I just removed the auto-tensioner to get the belt off. If your installing a new auto-tensioner, then no worries. If your reusing the old tensioner, then just use a c-clamp to compress it and stick a drill bit through the hole to lock it in. When your ready, pull the drill bit to tension the belt.
11-03-2011, 12:45 PM
#269
Intermediate

Join Date: Jul 2010
Location: Toronto, ON Canada
Age: 39
Posts: 30
Likes: 0
Received 0 Likes
on
0 Posts
Hi, I am a owner of 2004 TL and try to do this hard job by myself LOL.
Before I ask technical stuff I just want to find out how much did you spend to buy all the parts? Because I am in Canada and when I ask a price of timing belt, water pump, tensioner, and spark plugs to a dealership in Canada they said about $700 inc taxes.
So..... I would be appreciated if you could tell me how much you paid for the parts.
Thanks!!
11-03-2011, 12:56 PM
#270
I suggest you get the Gates kit. The one marked TCKWP329 includes the belt, water pump, hydraulic tensioner, tensioner bearing and idler bearing. Everything in the kit is OEM except for the water pump (gates brand instead of Yamada). I think Rock Auto had the best deal ($176 + postage).

After that, all you need is like 2 gallons of Honda Type-2 coolant (~$30 at the dealer), and new NGK laser iridium plugs (~$50 from advanced auto w/ coupon).
After that, all you need is like 2 gallons of Honda Type-2 coolant (~$30 at the dealer), and new NGK laser iridium plugs (~$50 from advanced auto w/ coupon).
Last edited by 94eg!; 11-03-2011 at 12:59 PM.
11-07-2011, 12:33 AM
#272

I didnt see a response to this question, not sure if there is a light weight pully but i'd like to know?
I am starting to do all the research for the 105K job on my 2005 TL, it currently has 94k on it and i'm trying to create a list of things to do. I know a guy who i trust and he said he would do the TB job for 400 labor and 300 parts for TB WP and idler, i think i can buy the parts myself and get alot more for my money and also have him install my parts.
So far I have a list of parts (please let me know if i'm missing something?
1) Timing belt kit (GATES Part # TCKWP329 PowerGrip Premium OE Timing Belt Component Kit W/Water Pump; 5 Components (1 Belt, 2 Tensioners, 1 Idler, 1 Water Pump) 219.79
2) NGK Part # 6994 {#IZFR6K11, IZFRK} Premium Iridium 9.82
3) Engine air filter and Cabin filter
4) radiator flush
5) transmission fluid flush
6) valve adjustment
7) and gastkets (valve cover gasket etc, i'm not sure which i need)
and some performance stuff
8) SS brake lines
9) dot 4 brake fluid
10) Rear sway bar
11) sway bar bushing links( i forget what its called, it is written down somewhere in my email, i need to look it up.
Anything else i am forgetting or missing? any advise or input is greatly appreciated.
11-07-2011, 12:43 AM
#273
takin care of Business in
iTrader: (5)
Join Date: Jan 2008
Location: Kansas City, MO
Age: 40
Posts: 30,994
Received 4,732 Likes
on
4,064 Posts
^^^ your missing the serpentine belt...
GATES has one on Amazon for like 30 bucks...
GATES has one on Amazon for like 30 bucks...
11-07-2011, 12:50 AM
#275
takin care of Business in
iTrader: (5)
Join Date: Jan 2008
Location: Kansas City, MO
Age: 40
Posts: 30,994
Received 4,732 Likes
on
4,064 Posts
^^^ didnt know that
also ask the dealer....I paid the dealer $450 for the job....I bought everything online (including the Coolant) and it was around $400-450ish....so I was done in a total of $900
Spark plugs/Engine oil/Tranny Flush/Brake Fluid change/PS flush I did myself....
also you might wanna look into this thread:
https://acurazine.com/forums/3g-tl-problems-fixes-114/recommended-service-interval-items-not-manual-832621/
The following users liked this post:
JD TL-S (03-19-2015)
11-07-2011, 08:32 AM
#276
The proper way to lighten the rotating assembly of the engine is via the flywheel.
11-07-2011, 09:36 AM
#277
takin care of Business in
iTrader: (5)
Join Date: Jan 2008
Location: Kansas City, MO
Age: 40
Posts: 30,994
Received 4,732 Likes
on
4,064 Posts
^^^ 3G TL's (plural and not Type -S only...) are internally harmonic balanced....
a lightweight STOCK diameter pulley will do nothing but great things to ur car...I have one since 70K miles....no problems....
a lightweight STOCK diameter pulley will do nothing but great things to ur car...I have one since 70K miles....no problems....
11-07-2011, 10:26 AM
#278
The OEM pulley is definitely a harmonic damper. That is clearly evident by the rubber ring connecting the two halves of the pulley (see below). I don't know what "internal" damping your referring to (if there is such a thing). The TL does have a dual-mass flywheel to help absorb shock before hitting the transmission. But that's not going to control flex in the crank. Especially since half of that mass is bolted directly to the crank.
 11-07-2011, 10:37 AM
#279
takin care of Business in
iTrader: (5)
Join Date: Jan 2008
Location: Kansas City, MO
Age: 40
Posts: 30,994
Received 4,732 Likes
on
4,064 Posts
^^^ my bad...i read it as the crank pulley is the "harmonic balancer"....and we know the engine is internally balanced....
yes the crank pulley is the harmonic damper....
but either way I have had no problems what so ever using the stock diameter UR pulley for 70K miles over 3 odd years
yes the crank pulley is the harmonic damper....
but either way I have had no problems what so ever using the stock diameter UR pulley for 70K miles over 3 odd years