When you click on links to various merchants on this site and make a purchase, this can result in this site earning a commission. Affiliate programs and affiliations include, but are not limited to, the eBay Partner Network.
I had dash cam on my previous rdx. mounted behing rear view mirror, now since 19' rdx has some mind of sensor behind rear view mirror, my understanding is on the left side if you're looking it from inside the car, just wondering if it also have sensor on the right side, cause i notice little small hole on the right right side, don't know if that also part on the build in sensor. Just don't want to block sensor when i mount the dash cam. anybody know?
I certainly would not mount it on the left where it would block that sensor, which I'm fairly certain is part of the auto dimming mirror control. I mounted mine (SG9663DC) in the center of the windshield directly under the camera/sensor housing. Can't be seen from the driving position but still readily accessible and can see the various indicator light by cocking my head to the side a bit.
I certainly would not mount it on the left where it would block that sensor, which I'm fairly certain is part of the auto dimming mirror control. I mounted mine (SG9663DC) in the center of the windshield directly under the camera/sensor housing. Can't be seen from the driving position but still readily accessible and can see the various indicator light by cocking my head to the side a bit.
yes definitely not on left side, I am thinking of mounting it on the right side, which is ok for me, so you think its ok on the side?, and there's no sensor there?
yes definitely not on left side, I am thinking of mounting it on the right side, which is ok for me, so you think its ok on the side?, and there's no sensor there?
I don't see why you shouldn't. I'm a bit OCD about having mine as close to the vehicle center line as possible so it would not be my first choice.
I don't see why you shouldn't. I'm a bit OCD about having mine as close to the vehicle center line as possible so it would not be my first choice.
What camera is it?
Thinkware F750, that I have from my previous RDX, I agree with you I also like to mount it right in middle like before still worry if it interfered with the sensor ..
Where are you accessing power to run these cameras?
I am going to run it up and a long the front part roof liner, and down to left pillar, slip the cable between weather strip, and down to fuse box, use fuse tap, to tap in to appropriate terminal..
I mounted mine of the right side of the entire rear-view mirror assembly, then ran the wires across the headliner and down the passenger-side pillar. Since my dashcam (VIOFO A119S) was USB powered, I simply plugged it into the USB charger port on the bottom storage area. Running flawlessly for about 2 weeks now and does not interfere with any of the safety features in the vehicle.
I mounted mine of the right side of the entire rear-view mirror assembly, then ran the wires across the headliner and down the passenger-side pillar. Since my dashcam (VIOFO A119S) was USB powered, I simply plugged it into the USB charger port on the bottom storage area. Running flawlessly for about 2 weeks now and does not interfere with any of the safety features in the vehicle.
So its confirm there's no sensor at all on the right side of rear view mirror, because that is exactly where I am going to mount mine, thanks all.
That's where I am thinking to mount my dash cam,...
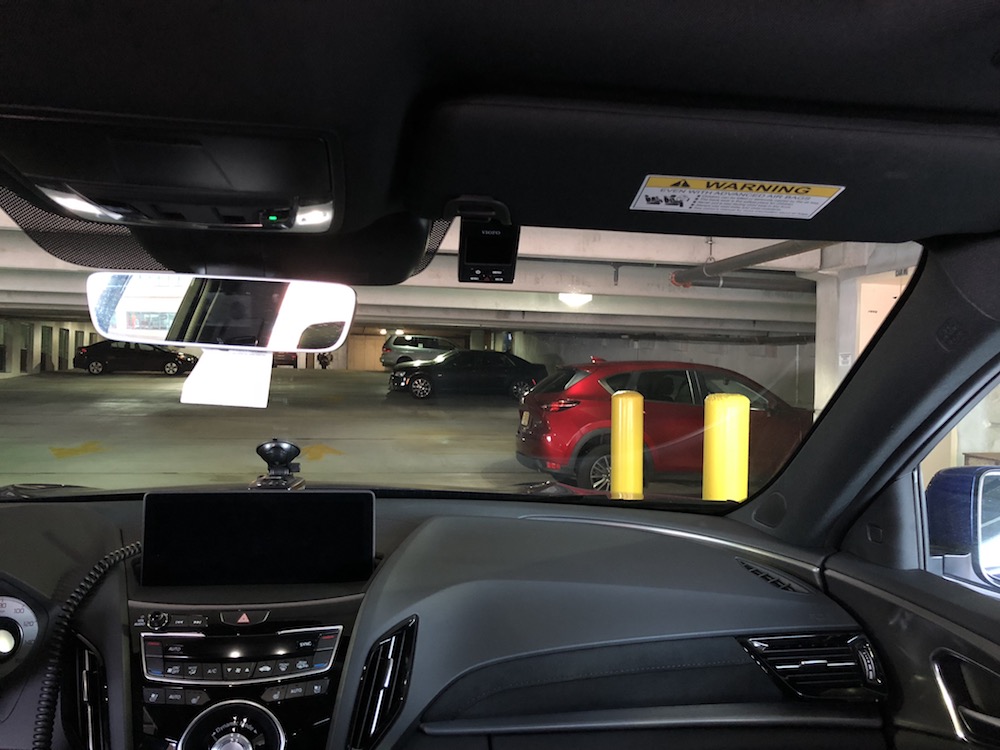
Here's where I mounted my SG9663DC, center of the windshield directly behind the RVM - it's almost exactly the same size as the Viofo. Sorry about the last two, camera decided to focus independently of where I intended.
Exterior - Head On
---------------------------------------------------
Exterior - Left Front
-----------------------------------------------
Interior - Left
----------------------------------------------
Interior from driver position
--------------------------------------------
This won't interfered with RVM? cause I think there's a sensor on the left side and right side (if looking from interior)
It's mounted directly in front of the center of the RVM. Sensor on the driver side (probably for the auto dim feature) is totally clear as is the passenger side. I don't know what the small hole on the passenger side is but it looks to be just that - a small hole. I'm guessing it's for air venting, it's too small for any type of automotive sensor I'm aware of. I thought it might be for a microphone but that's located in the sensor housing proper.
It's mounted directly in front of the center of the RVM. Sensor on the driver side (probably for the auto dim feature) is totally clear as is the passenger side. I don't know what the small hole on the passenger side is but it looks to be just that - a small hole. I'm guessing it's for air venting, it's too small for any type of automotive sensor I'm aware of. I thought it might be for a microphone but that's located in the sensor housing proper.
I did some experiment by blocking the passenger side RVM, I found out right a way that when using Navigation it actually giving me a wrong direction, so if my home right direction is toward North, by blocking it, it direct me to opposite direction which is South, but soon as I removed the cover Navigation work properly..at first I thoughts what the hell..
I did some experiment by blocking the passenger side RVM, I found out right a way that when using Navigation it actually giving me a wrong direction, so if my home right direction is toward North, by blocking it, it direct me to opposite direction which is South, but soon as I removed the cover Navigation work properly..at first I thoughts what the hell..
That makes no sense at all unless there's a compass in the mirror or sensor housing close by and you blocked it with something that causes magnetic interference. In my case where I have the camera and GPS antenna mounted hasn't caused any abnormal operation that I've been able to detect.
That makes no sense at all unless there's a compass in the mirror or sensor housing close by and you blocked it with something that causes magnetic interference. In my case where I have the camera and GPS antenna mounted hasn't caused any abnormal operation that I've been able to detect.
I know it doesn't make sense, but what I did is cover the half side behind RVM (passenger side) with piece of paper hold it using transparent tape..
I know it doesn't make sense, but what I did is cover the half side behind RVM (passenger side) with piece of paper hold it using transparent tape..
Whatever caused your issue must be unique to your vehicle or something specific you're doing.
I just made a couple of trips with the entire front of the passenger side RVM covered and had no issues. Navigation worked, auto dim worked - even deviated from the route and the system recalculated a new one as it always has. Set a new destination while in route to the original and that worked as it should. All visual and audio turn directions were correct.
Don't know what else to say about this.
Thanks for conforming, yes maybe something else causing it, so in this case it safe to just mounting it in windshield in front of right side RVM then..
@MI-RDX did you hardwire your dash cam, if yes, which fuse you tap it in to?.
Not yet.
I didn't want to do anything that might 'upset' the electronics given the number of people having issues of one sort or another so for the time being I'm just using the 12V accessory outlet or one of the USB ports.
So far I've not had any problems except one of my cameras is a bit particular about it's power supply and won't work reliably using the USB ports for power, but it will work using a 12V to 5V converter. Same camera acts the same way in other vehicles so it's nothing to do with the RDX.
Oh ok, so I just use my cigarette lighter plug that come with my dash cam.
Just traded in my 2017 Subaru Forester XT Touring for a RDX Advance. I removed the dual front/rear Blackvue dash cam set up to install into the RDX. Once the cables and mounting pads I ordered come in, I plan to get it reinstalled. If none of you have ever bought or used the Blackvue brand, it does cost a bit more but well worth the extra dollars. Blackvue and Thinkware are the two best cams on the market and I highly recommend. Have a Blackvue in my Audi too and it's a great piece of equipment.
Just traded in my 2017 Subaru Forester XT Touring for a RDX Advance. I removed the dual front/rear Blackvue dash cam set up to install into the RDX. Once the cables and mounting pads I ordered come in, I plan to get it reinstalled. If none of you have ever bought or used the Blackvue brand, it does cost a bit more but well worth the extra dollars. Blackvue and Thinkware are the two best cams on the market and I highly recommend. Have a Blackvue in my Audi too and it's a great piece of equipment.
I am planning on my having my 2-channel Blackvue 750s and PowerMagic Pro installed shortly after picking up my RDX (I can't wait for this Thursday to arrive).
I just finished mounting a VIOFO A119S at dead centre in front of the mirror mount as shown above in MI-RDX's post.
I ran the USB cable along the windshield headliner and then stopped to figure out the best path down the passenger side A pillar. I was quite worried about the airbag symbol embossed on the upper A pillar cover and the possibility of an airbag being mounted all along the length of the A pillar. I hooked the top of the cover at the seam and pulled it back a bit and thought it looked like bare metal under the seam so I crossed the air pillar at that point.
Then I ran it down to the pillar under the edge of the black door seal, jinked it over to a crevice that runs along the dashboard edge, and then on top of a kick panel in the passenger foot well.
I'm still a bit tentative about the A pillar airbag location. I've been trying to find a detailed diagram of the RDX's airbag locations.
If you remove the A-Pillar cover the airbag is in plain sight. Just be sure to run the wire behind the airbag so that it's fully out of the way in use of a deployment. I have done this on every car I have ever owned when running power for cams and radar detectors when an airbag was in play.
I have yet to do it on an RDX but all "Japanese" type cars are generally the same. I usually peel away the rubber door surround trim and just pull gently until the clips snap out. I really don't imagine it being much different on this vehicle. When my cables come in, I'll tackle this and hope they'll be here before next weekend.
I believe they use this specific clip because of the airbag deployment.
In earlier Hondas-Acuras you used hit the top of the trim where this clip is with a mallet (without much force) to actually brake the clip. You had to replace that one also....
I believe they use this specific clip because of the airbag deployment.
In earlier Hondas-Acuras you used hit the top of the trim where this clip is with a mallet (without much force) to actually brake the clip. You had to replace that one also....
I think I'm going to live (and die?) dangerously and just tuck the cable in the seam between the A-pillar and headliner. If the air bag deploys with sufficient force to break the clip(s), displace both the A and B (and possibly C?) pillar covers and the headliner itself I doubt the little added resistance from a cable held in place by the weather seal is going to adversely affect performance.
I think I'm going to live (and die?) dangerously and just tuck the cable in the seam between the A-pillar and headliner. If the air bag deploys with sufficient force to break the clip(s), displace both the A and B (and possibly C?) pillar covers and the headliner itself I doubt the little added resistance from a cable held in place by the weather seal is going to adversely affect performance.
+1
I installed my dashcam in my previous car which also has side curtain airbags. There was no need to remove the A-pillar trim pieces when running the cabling. The "difficult" part of the installation was the routing of the cable for the rear camera, which is the reason why I am having it professionally installed this time around.

 08-19-2018, 04:08 PM