Long term storage - Battery tender connection
 06-10-2018, 11:07 AM
#1
Advanced
Thread Starter

Long term storage - Battery tender connection
My MDX was purchased to replace my winter vehicle. After enjoying that new car feeling for 6 weeks, I'm putting the new MDX in storage until October as I did previously with my Explorer. This morning I opened the hood of the MDX to connect my battery tender. The engine compartment is a bit unusual in that only a positive (red) port of the traditional battery was visible. I connected the positive battery tender connection to the red battery port. I had no negative port to connect the negative battery tender connection and the battery tender failed to launch into maintenance mode.
Anyone have some information to connect a battery tender to the MDX engine compartment battery?
Many thanks.
Anyone have some information to connect a battery tender to the MDX engine compartment battery?
Many thanks.
 06-10-2018, 12:37 PM
#2
mrgold35
I saw some OBDII connections on Amazon to jump a vehicle or connect to a battery tender. I haven't researched to see what is needed for Acura vehicles since I can still see the terminals of all my current Acura's.
.
.
 06-10-2018, 03:44 PM
#3

My MDX was purchased to replace my winter vehicle. After enjoying that new car feeling for 6 weeks, I'm putting the new MDX in storage until October as I did previously with my Explorer. This morning I opened the hood of the MDX to connect my battery tender. The engine compartment is a bit unusual in that only a positive (red) port of the traditional battery was visible. I connected the positive battery tender connection to the red battery port. I had no negative port to connect the negative battery tender connection and the battery tender failed to launch into maintenance mode.
Anyone have some information to connect a battery tender to the MDX engine compartment battery?
Many thanks.
Anyone have some information to connect a battery tender to the MDX engine compartment battery?
Many thanks.
The following users liked this post:
JSakaBuck (06-10-2018)
06-11-2018, 10:31 AM
#4

I installed a battery tender quick-connect to my MDX. It easily bolts to the factory battery clamps. I zip-tied the end to the battery hold-down bar, and it sticks out the left side of the battery. I can now pop my hood and quickly connect my tender without having to fuss with alligator clips or any plastic panels.
06-12-2018, 07:10 AM
#5
Advanced
Thread Starter
I installed a battery tender quick-connect to my MDX. It easily bolts to the factory battery clamps. I zip-tied the end to the battery hold-down bar, and it sticks out the left side of the battery. I can now pop my hood and quickly connect my tender without having to fuss with alligator clips or any plastic panels.
https://www.amazon.com/Battery-Tende.../dp/B000NCOKZQ
https://www.amazon.com/Battery-Tende.../dp/B000NCOKZQ
Many thanks!
06-12-2018, 08:32 AM
#6
I did what p07r0457 did to install the quick connect, but I left something out: the ring connectors fit under the nuts that tighten the battery cable clamps, but those nuts don't come completely off their bolts. So with a pair of wire cutters, I cut out about one-sixth or so of the ring connector (Iike cutting out a piece of pie), and with the nut loosened pushed them over the bolt and then re-tightened the bolt. In short, I cut the connectors into something between a ring and a "U". If you're going to use the alligator clamps instead, I'd use the lift eye rather than the radiator frame. Tell me if any of this is unclear.
The following users liked this post:
JSakaBuck (06-13-2018)
06-12-2018, 08:50 AM
#7
I did what p07r0457 did to install the quick connect, but I left something out: the ring connectors fit under the nuts that tighten the battery cable clamps, but those nuts don't come completely off their bolts. So with a pair of wire cutters, I cut out about one-sixth or so of the ring connector (Iike cutting out a piece of pie), and with the nut loosened pushed them over the bolt and then re-tightened the bolt. In short, I cut the connectors into something between a ring and a "U". If you're going to use the alligator clamps instead, I'd use the lift eye rather than the radiator frame. Tell me if any of this is unclear.
The following users liked this post:
JSakaBuck (06-13-2018)
Trending Topics
06-12-2018, 09:09 AM
#8
I would enjoy seeing a photograph of your connections. I attempted to install the ring connectors last night, without success. The alligator clip method worked somewhat. The positive connection went fine, but I ended up clipping the negative clip to the metal frame for the radiator. I'm not sure that will hold up long-term. As of this morning, it was still working. I prefer the ring connectors with the quick connect, but I'm having a brain-fart moment on getting the rings on the battery posts.
Many thanks!
Many thanks!
Here's a picture of my charger connected to the quick-connect. Again, no trim removal is required. I do have to leave the hood up while the charger is connected, but I consider that a good thing -- I park in an enclosed garage, so no worry of vandalism, and leaving the hood up ensures neither my wife nor I will attempt to drive off without first removing the charger.

The following pictures were taken after removing the front bulkhead cover and the fresh air intake tube. I didn't photograph removal of the trim pieces, but if you need more detail then let me know.
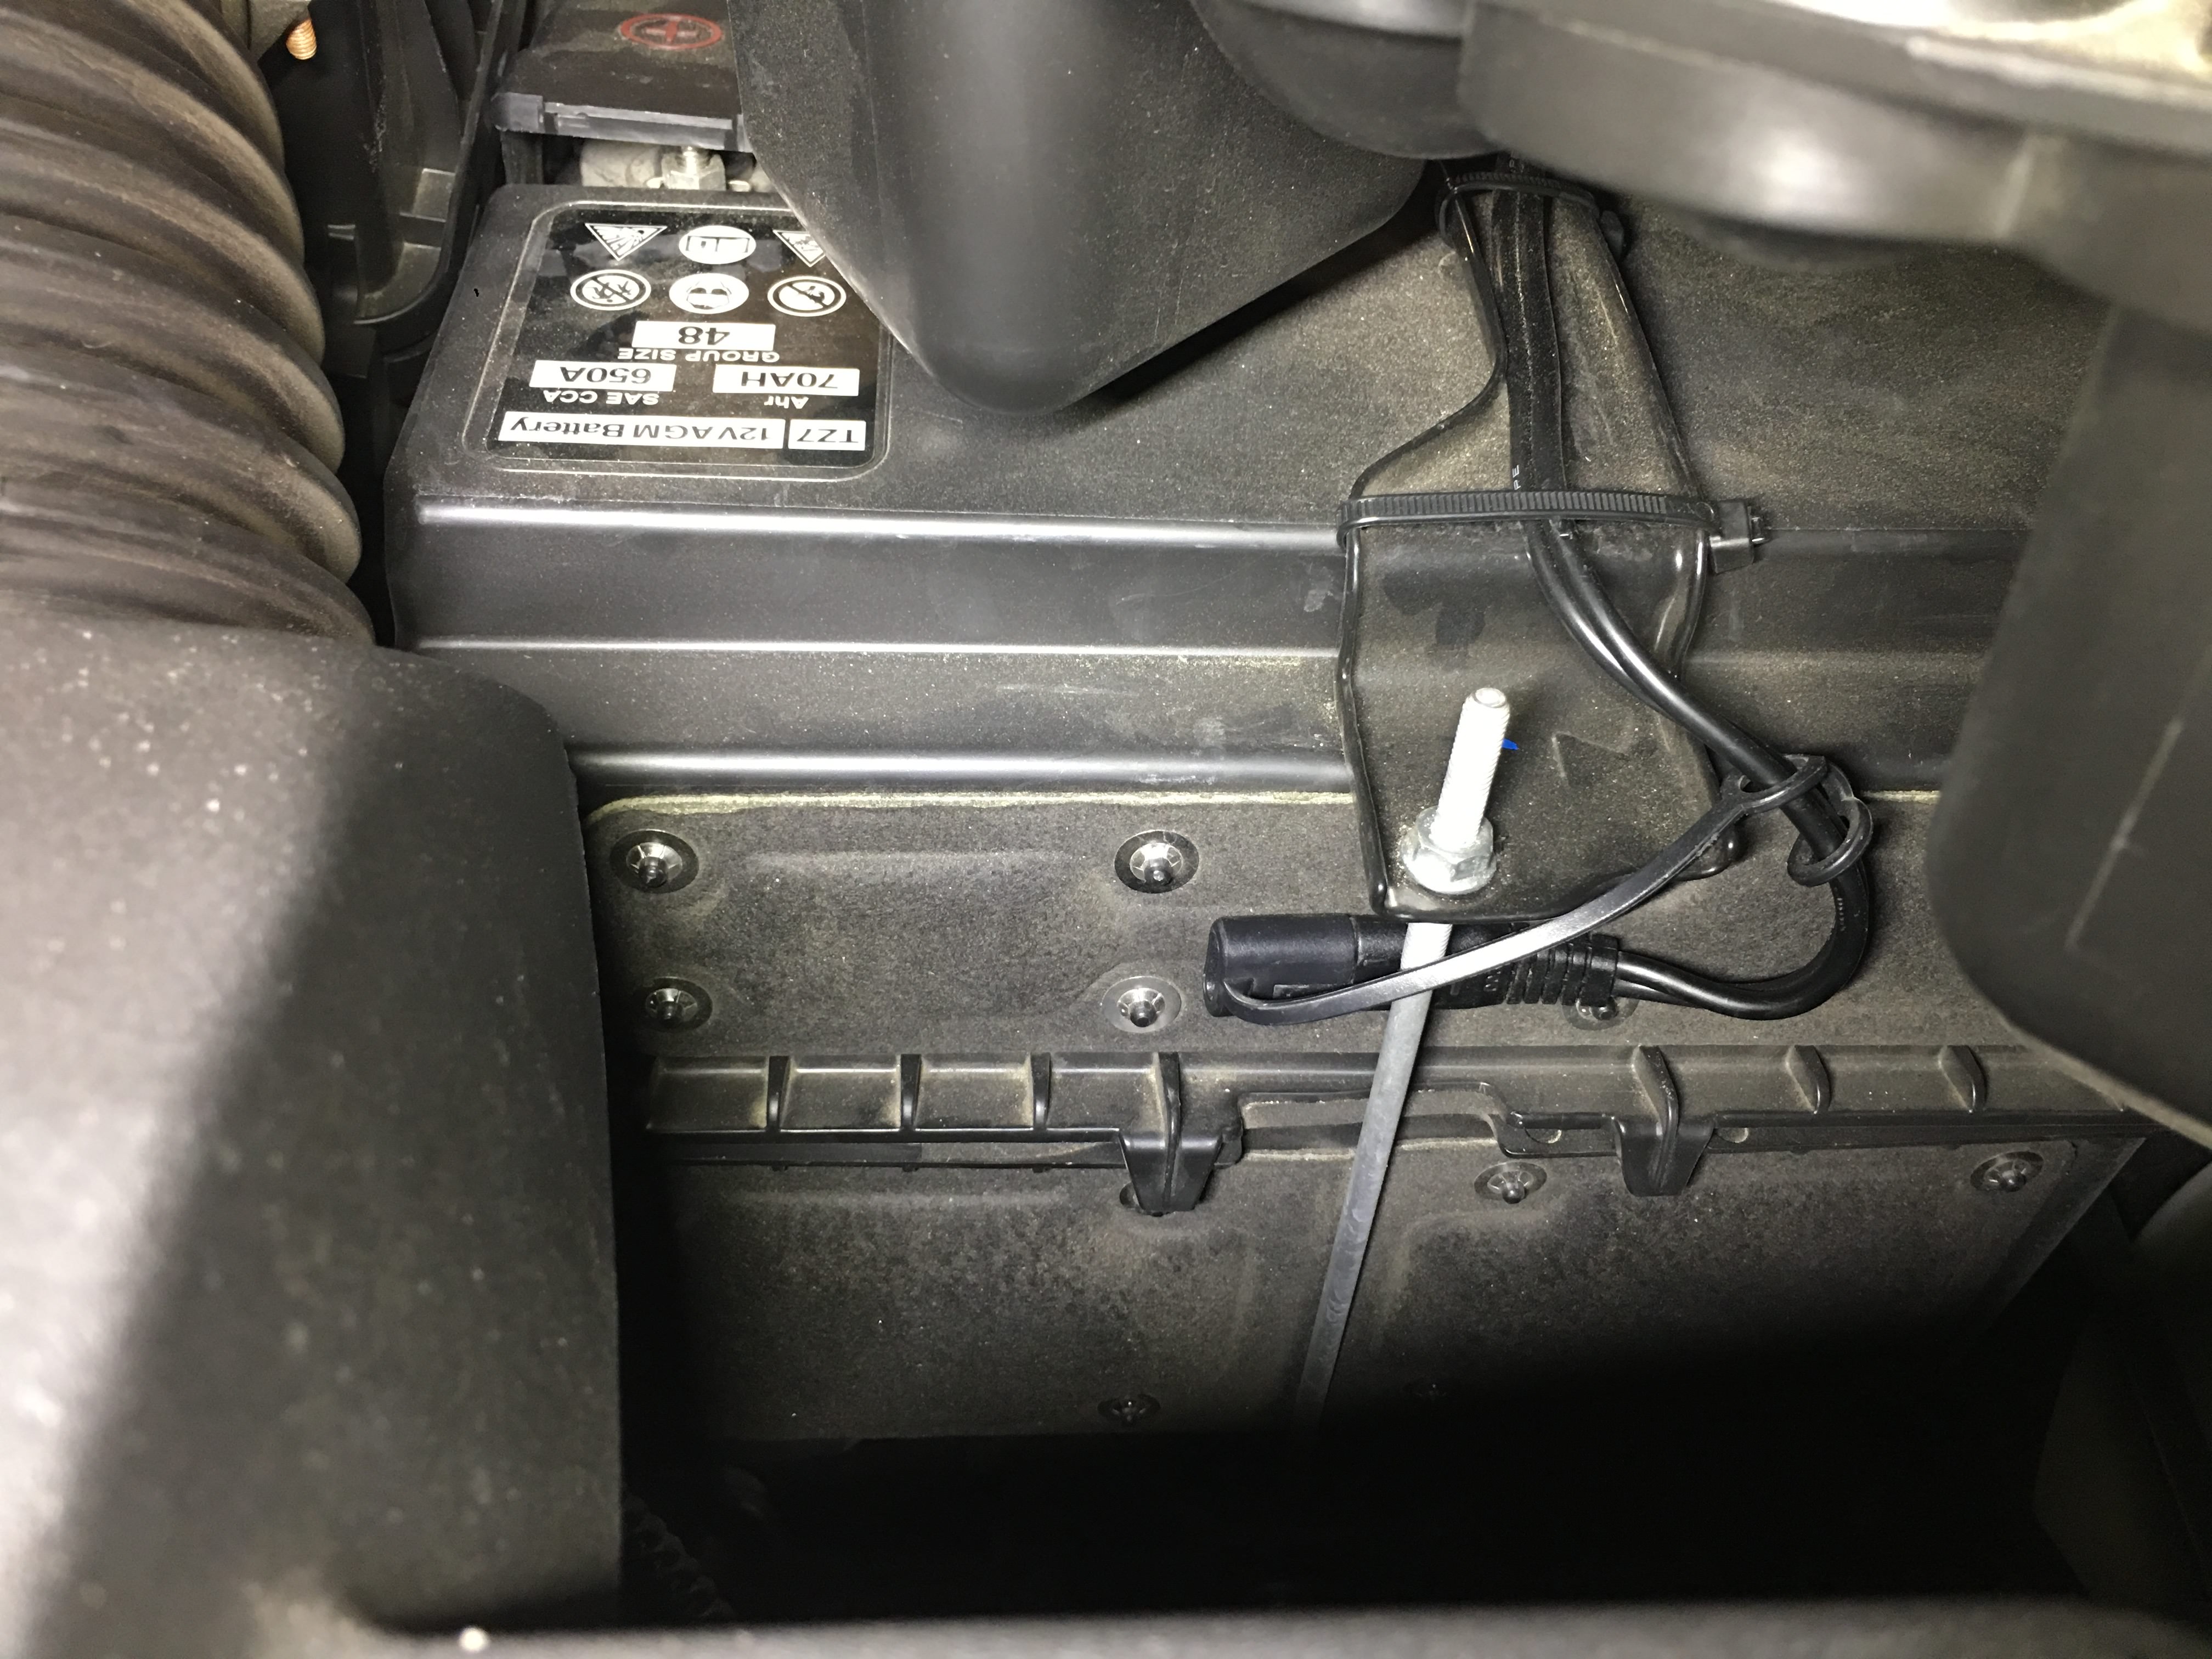
Here's a picture showing the battery with the tender quick-connect installed. I zip-tied the quick-connect wiring along the top of the battery tie down strap, and followed the existing wiring to the positive and negative terminals.
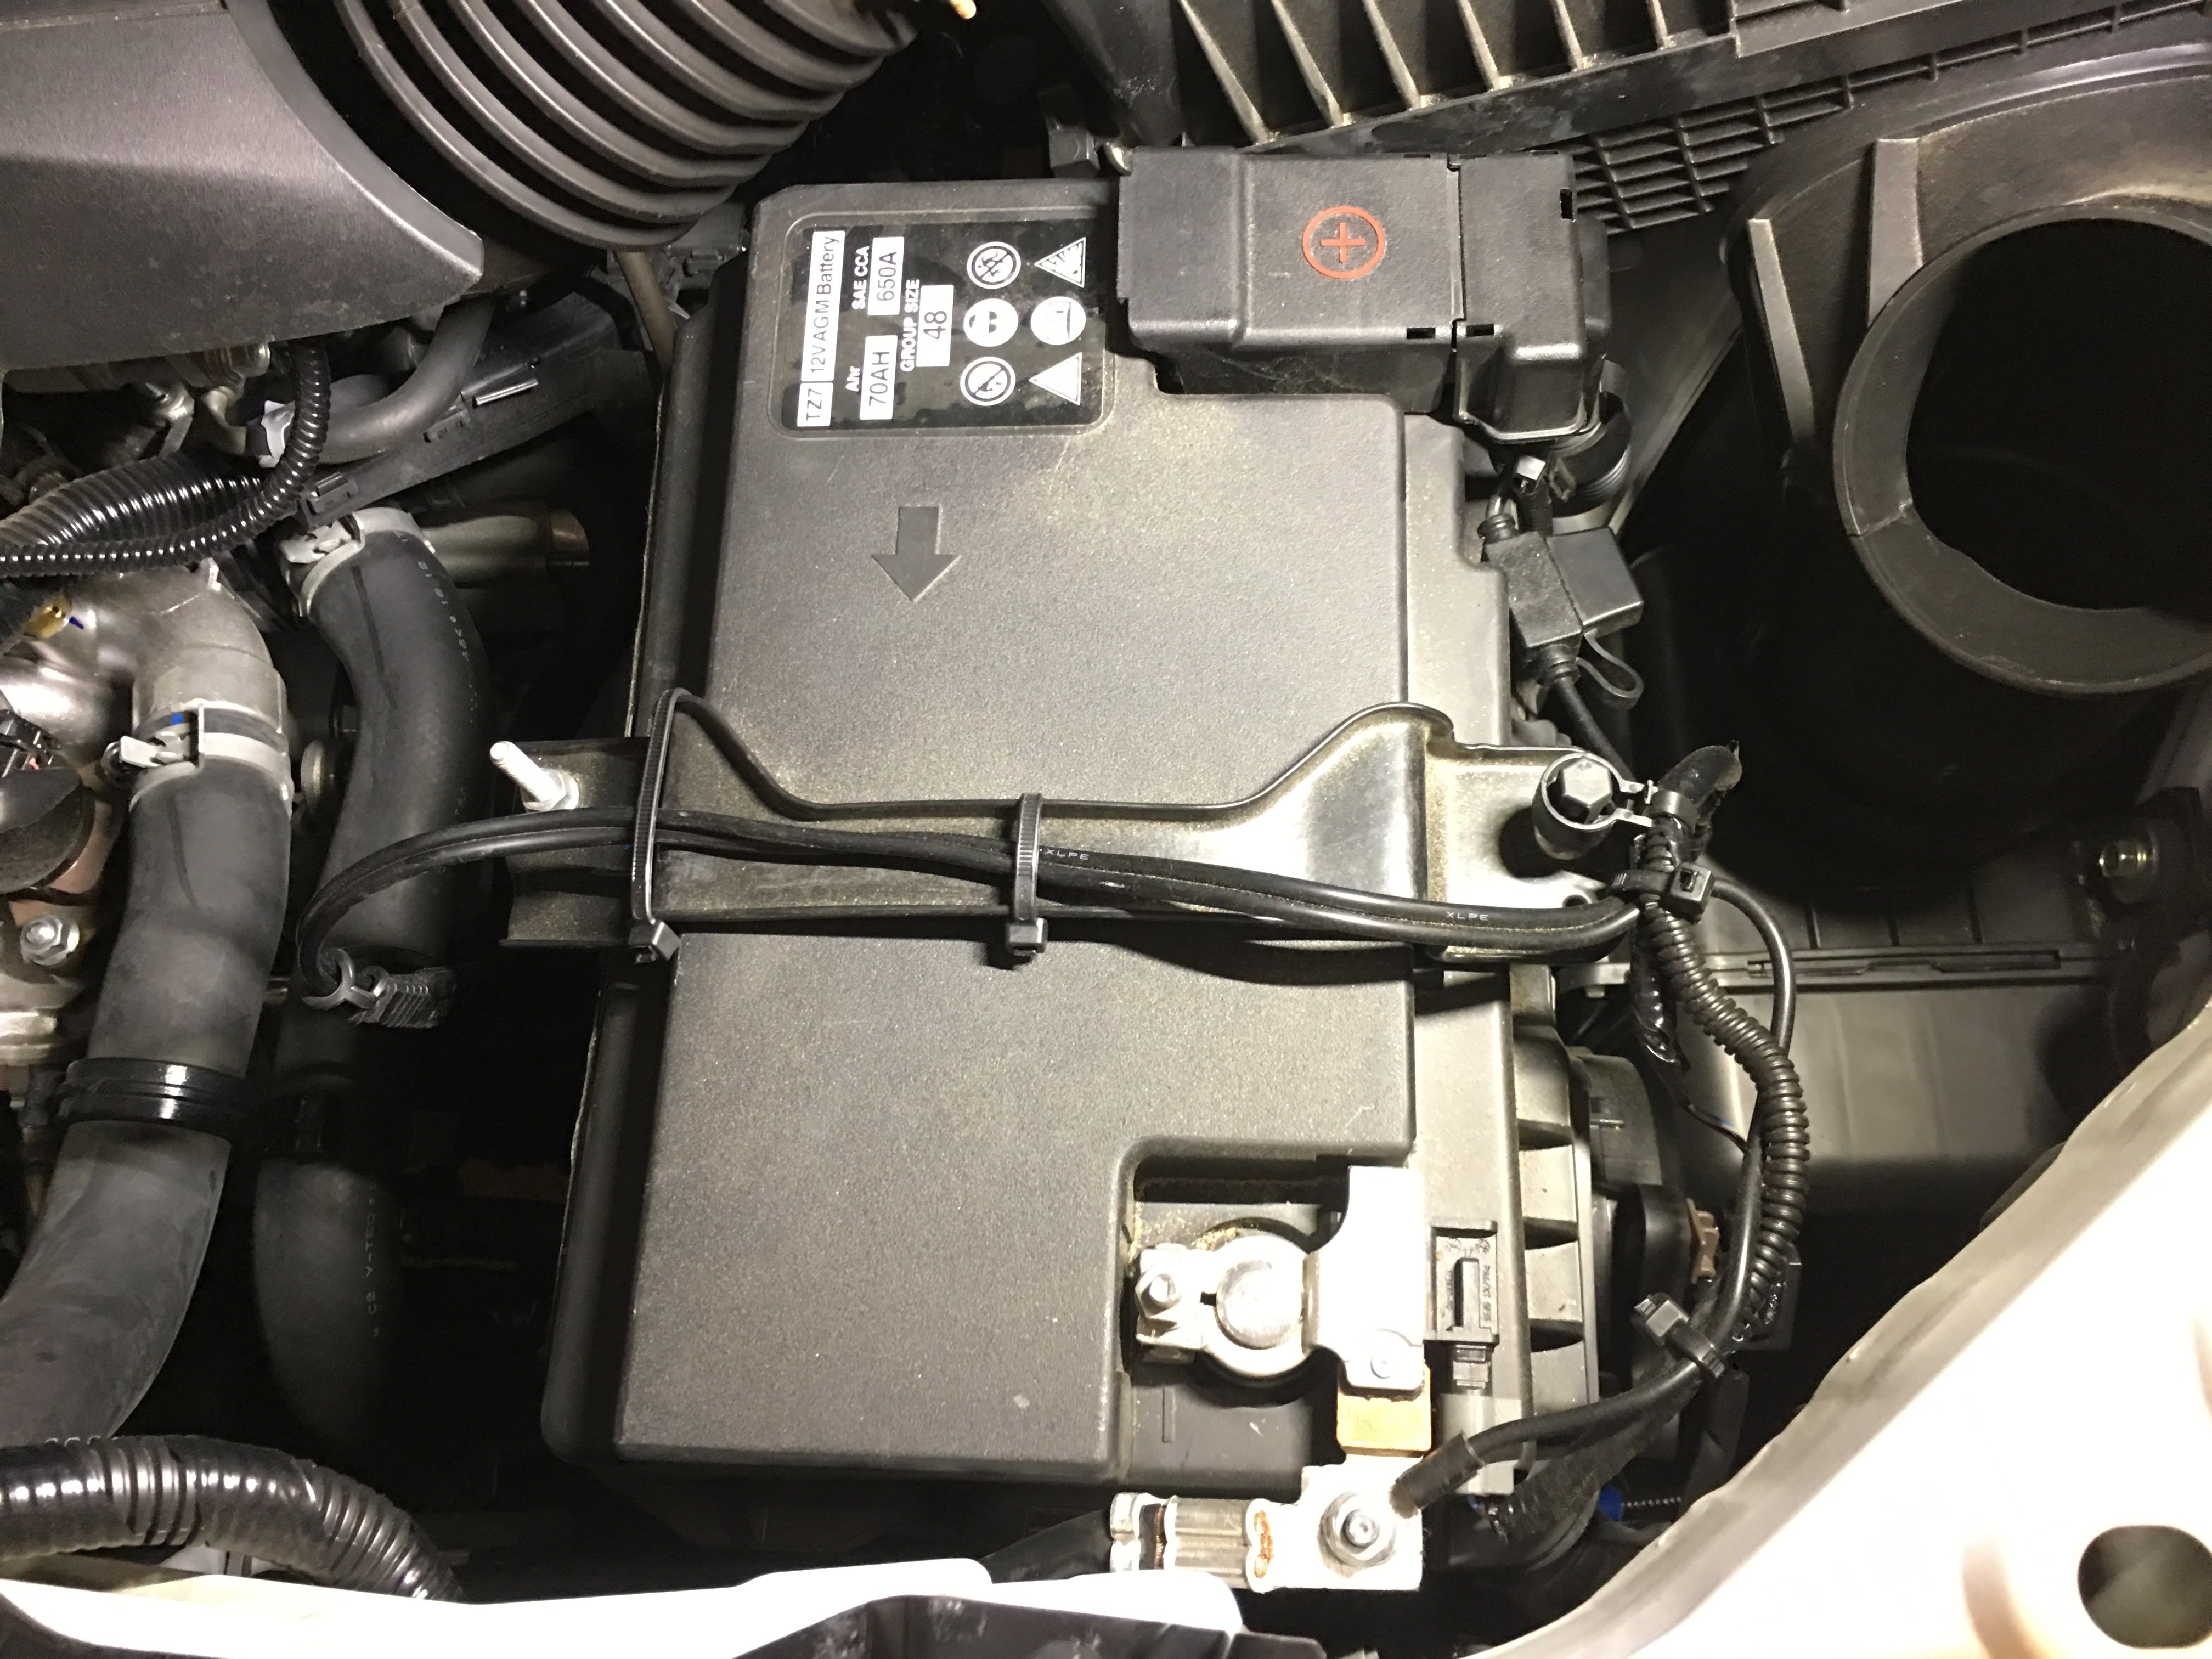
And here's the shot you probably have been waiting for. I added some arrows to show which nut I removed to install the battery tender ring terminals. I did not have to cut the terminals. I did bend the positive ring terminal at 90 degrees, however, so that the factory positive clamp cover would fit. This wasn't a big deal -- I just removed the nut, put the ring terminal on the bolt, and re-torqued the nut. With everything securely together, I then pushed down on the base of the ring terminal and bent it downward to follow the routing of the factory wires.

The following users liked this post:
JSakaBuck (06-13-2018)
06-13-2018, 06:48 AM
#9
Advanced
Thread Starter
All I can say is, "WOW". I can't thank everyone enough for helping see the light on what should be a simple installation. I just wasn't visualizing what I needed to do, but with p07r0457's photos, I'll be able to complete a better installation. The trick I was missing was removing the trim pieces (bulkhead cover and air intake). I'm assuming they just pull off and can be easily re-installed. Also, I was also stymied by the fact that the battery terminal screws don't completely unscrew from the battery posts. The last photos shows me that you don't have to use the screw post I was attempting to use.
You guys are the best.
Many thanks!
You guys are the best.
Many thanks!
06-13-2018, 08:18 AM
#10
p0, thanks for the photos. I used the battery posts themselves by cutting the O-rings, but your approach would have been better. But I did not know what those "contraptions" attached to the two battery posts were, so what are they?
06-13-2018, 08:40 AM
#11
If you do lose any clips, the part numbers are:
91547-TZ5-A02 (pin that attaches to front bulkhead cover)
91548-TZ5-A02 (retainer that attaches to chassis)
Removing the fresh-air inlet of the intake is easy, too. You'll need a Phillips #2 screwdriver. There are two plastic screws that are visible on the front of the inlet. Unscrew these (careful -- they're plastic). Once the screws are removed, the base pins can be pulled out. Then you can simply grab the fresh-air inlet and pull upward and towards the front of the vehicle. The only thing holding it on, at this point, is a rubber boot that will slide off.
Installation of the fresh-air-intake is the reverse of removal.
Installation of the front bulk-head cover is straightforward. Check the underside of the cover to ensure all the pins are in place and fully seated. Then align the cover. Starting at one end, gently push down on the cover and work your way to the other end to seat all of the pins.
The following users liked this post:
JSakaBuck (06-14-2018)
06-13-2018, 08:43 AM
#12
On the positive terminal, the stud that I used is where a positive cable is attached to the fused portion of the battery terminal.
The following users liked this post:
JSakaBuck (06-14-2018)
06-13-2018, 09:26 AM
#13
Okay, thanks again. I'm accustomed to the old-style, simple battery connectors!

Thread
Thread Starter
Forum
Replies
Last Post
gavriil
Health & Fitness
7
07-05-2018 12:35 PM