Aftermarket HU options?

 02-01-2014, 01:03 PM
#82

Good luck on the new job Firebrand...work from home is pretty sweet..I get to do it about one day per week although whatever spare time I have is usually eaten up by the laundry monster 
What model year shroud did you wind up getting? Mine is the 2009 which brings the extra thorny issue of having to remove a curved, clear lens without destroying the shroud....I think the 2010/2011 shrouds have a straight square lens which may be easier to remove but more on that another day when we get there.
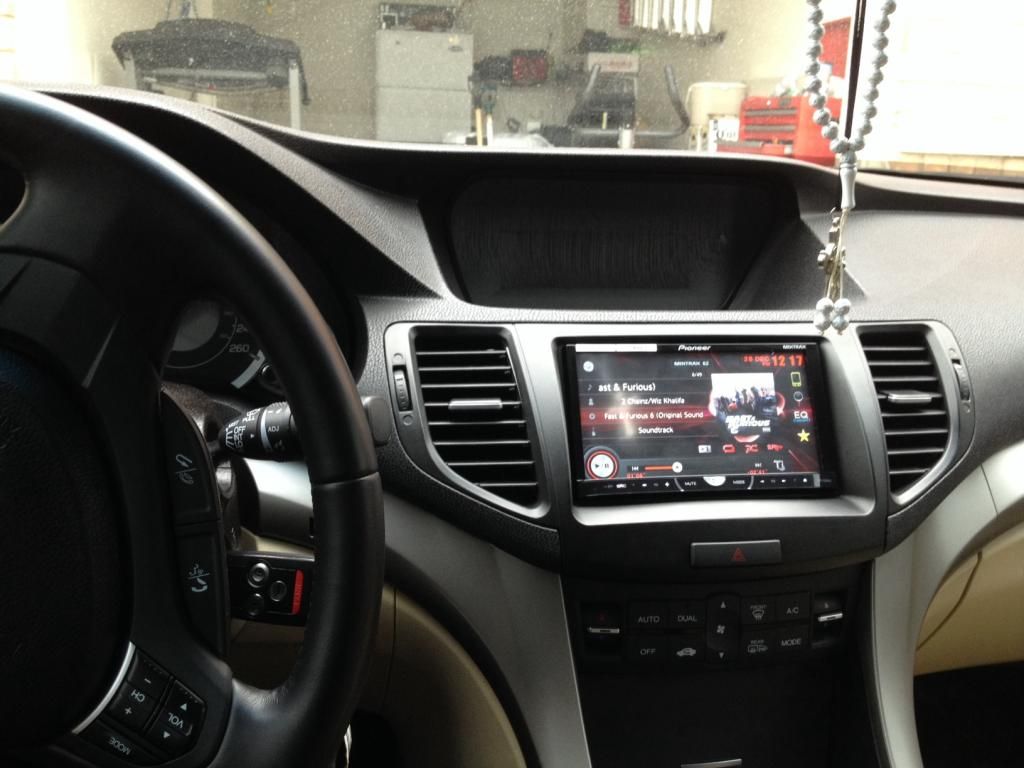
I did another fit up today and she sat right back into the dash just fine! The key is to remove the tripbox....just let it dangle and it'll find its own level like water...eventually everything works itself into place. Now its a matter of running the cables back behind the dash but no time for that today (or probably for a couple weeks). I guess I'll just tuck the power box with the SD card up into the dash somewhere or use double sided tape in some convenient location....also need to run the camera cable and the speaker line so I don't want to install this thing before all the cables are run.
Anyway, got a cruddy photo to show the fitup today...my camera was malfunctioning for some reason.
BTW...the Nav voice works fine with the supplied speaker and allows simultaneous nav and radio which I like....I could not get the nav to pump through the aux audio input.
What model year shroud did you wind up getting? Mine is the 2009 which brings the extra thorny issue of having to remove a curved, clear lens without destroying the shroud....I think the 2010/2011 shrouds have a straight square lens which may be easier to remove but more on that another day when we get there.
I did another fit up today and she sat right back into the dash just fine! The key is to remove the tripbox....just let it dangle and it'll find its own level like water...eventually everything works itself into place. Now its a matter of running the cables back behind the dash but no time for that today (or probably for a couple weeks). I guess I'll just tuck the power box with the SD card up into the dash somewhere or use double sided tape in some convenient location....also need to run the camera cable and the speaker line so I don't want to install this thing before all the cables are run.
Anyway, got a cruddy photo to show the fitup today...my camera was malfunctioning for some reason.
BTW...the Nav voice works fine with the supplied speaker and allows simultaneous nav and radio which I like....I could not get the nav to pump through the aux audio input.
Last edited by ArtJ; 02-01-2014 at 01:07 PM.
The following 2 users liked this post by ArtJ:
BlackNsexy2010 (02-01-2014),
firebrand13 (02-01-2014)
 02-01-2014, 02:25 PM
#84
I think you may have an easier time with the 2010 but please post pics when you get it.....I think what I'm gonna do with the 2009 shroud is rout most of the lens out with a Dremel 561 cutting bit then switch to a sanding drum so I can get a precision grind right down to the edge....that's the theory anyway
02-01-2014, 02:50 PM
#85
Hey one other item I forgot to mention in the last post is that when I swapped back to the OEM display it displayed 72 degrees when I started the car so the P81 must in fact be setting the system to 72, not just showing it on the display.....I kinda like that.
02-01-2014, 08:41 PM
#87

Firebrand where did you get your shroud from? Art nice to see the progress..we finally have some decent weather this weekend... Im hoping you're right and by the time I'm ready someone has an easy solution.. Or I may just create one
02-01-2014, 09:45 PM
#88
Yeah a good day today in NJ Justin...great weather but I had a carpentry job to finish up in the house so only had about 15 minutes on the TSX. I'm not too hopeful for a commercial solution since the accord probably outsells the TSX by 10 to 1 so guess we gotta keep plugging away......in reality I think this will all seem easy after the bugs are worked out and your installation will be clean.
Random thought....one thing I didn't check today is if the oem radio menu items show up on the P81 screen, i.e. bass, treble, etc.
Random thought....one thing I didn't check today is if the oem radio menu items show up on the P81 screen, i.e. bass, treble, etc.
02-02-2014, 08:36 AM
#89
Yeah I didn't get out of work till late yesterday either.. I'm hoping to get my speakers done today.. And you're right.. It doesn't seem the market is there for us.. But we'll see... Maybe we can create the market... I see a little opportunity... And yeah that's interesting.. I never even thought of those controls..I'm also not worried because I have an aftermarket system.
Did u end up getting the same camera you posted up off ebay?
Did u end up getting the same camera you posted up off ebay?
02-02-2014, 11:39 AM
#90
Yes I did order that camera but I just remembered the Chinese new year so it could be a while before it shows up...most manufacturers and distributors take a couple weeks off this time of year....that will delay my cable pulling but at least I know it will be warm enough to do by the time the box gets here....in the meantime I'll ruminate on where to put the little power box and the Nav speaker.
02-05-2014, 05:06 PM
#92
I had some time tonight to attack the lens issue....I used a Dremel cutting bit to remove 90+% of the plastic lens...its a rough cut...the main idea is to get most of the plastic removed so you can get a sanding/grinding wheel in there to precisely remove more material down to the edge.....the blue tape is used as a reference line so I don't go beyond and do damage too close to the edge. I switched to a mini drum sanding attachment and got the bottom edge nice and clean.....I'll move on to the other sides later in the week and post some additional pics of the progress.....this is not a particularly technical process but you have to stay 100% focused on what you're doing and wear safety glasses because there's hot plastic flying everywhere....lots 'o fun!
Last edited by ArtJ; 02-05-2014 at 05:13 PM.
02-07-2014, 01:45 PM
#95
.......done!
Now for some touch-ups and maybe a coat of matte-black....this shroud is kinda glossy and my 2011 dash is matte.
Edit....just saw bagwell's question: It's possible that you could cut the non-nav shroud but I would be concerned about the screw positions and the screen cutout....the nice thing about the nav version is the screen cutout fits the P81 screen perfectly...also the screw posts are in the right spot for holding the P81 to the shroud. I gotta admit it's a bit of work but this is a custom project by its nature.
Last edited by ArtJ; 02-07-2014 at 01:49 PM.
02-07-2014, 09:38 PM
#99
Wow, that looks great! I received my shroud the other day (it was $275 +free shipping on ebay). The 2010 does not have the plastic cover like yours, but it still has a plastic cover. The 2010 and later has the flat plastic up against the screen, if that makes any sense. It was far easier to remove than yours (just unscrew several screws and slide it out - except mine has been taken apart before and someone screwed the screws!), however now there is a space between the hood and the back plate, whereas your hood and back plate look like they meet up perfectly. You almost need a 2009 back plate with a 2010+ hood for the least amount of work. I will need to get felt or plastidip or something to cover up the spaces mine has.
I still need to grind down the back piece like you did first, then mine is ready to go. I truly think if we can get one of these to an audio store for re-fabrication, we could get a group buy going for other TSX'ers. I know there is a lot of interest, but the work involved is shying people away. (Though I've done this all with a toddler in my midst, so... doable I think for everyone else!)
I still need to grind down the back piece like you did first, then mine is ready to go. I truly think if we can get one of these to an audio store for re-fabrication, we could get a group buy going for other TSX'ers. I know there is a lot of interest, but the work involved is shying people away. (Though I've done this all with a toddler in my midst, so... doable I think for everyone else!)
02-07-2014, 09:43 PM
#100
oh and for Bagwell's post, just like Art says, you can use your stock non-nav shroud... but I would think there would be a bit more work involved. You would literally only be able to use the hood from the shroud and nothing else. You would need to fabricate the black "shoulder" pieces the meet up to the screen. Not to mention, fitting the new back plate and the P-81 in to the stock hood. It might be cheaper in the long run and it might be doable, but it wouldn't be easier IMHO.
02-08-2014, 07:19 AM
#101
Hey Firebrand that's great news about the 2010 shroud.....I gotta tell you it wasn't any picnic grinding out that 2009 lens. I guess the gap you now have is the result of removing the flat lens but I would think you could fill the space easily with some pieces of light plywood that you can get at most hobby shops maybe even Michael's. One audio shop in NJ quoted me a minimum of $600 (probably more like $800) to fabricate a custom bezel!
02-08-2014, 10:34 AM
#102
Forgot to mention one other thing in my prior post to bagwell....the plastic used in the bezel is about 1/8 inch thick and it's very very tough to cut so you really want to stay away from cutting if you can help it....I used a Dremel cutting bit to remove the bulk of the lens and was really surprised at how difficult it was to cut this stuff accurately. Normally a Dremel 561 bit will go through anything without difficulty so I was kinda shocked at what I encountered when cutting this stuff.....the upside is it's very easy to remove material with a sanding drum but you'll have to make rounded corners in places you previously had square corners.....but that might be kind of a nice custom look IMHO.
02-08-2014, 09:07 PM
#103
Man I've been trying to finish my speakers .. I'm doing crazy hours now so only get Sundays to myself.. And with our recent weather I haven't been very successful lol.. Idk why but I can't seem to make my spacers for my front speakers to work.. After I get that done. I think this will be next
02-09-2014, 07:42 AM
#104
Firebrand..post up some pics please..
Art.. Fine..I guess most of this can be done in doors anyway so I guess I'll start lol.. Where did you buy yours? .. I want to make sure I have no skulls..which vendor ..you can pm me if you want
Art.. Fine..I guess most of this can be done in doors anyway so I guess I'll start lol.. Where did you buy yours? .. I want to make sure I have no skulls..which vendor ..you can pm me if you want
02-09-2014, 08:48 AM
#105
Just giving you a hard time Justin....Jersey thing
I bought mine from Amazon....I paid $330.00 + NJ tax so it was a pretty good deal I thought.....plus they have a liberal return policy so you can always ship stuff back to them within 30 days if you need to.
It's like 99% indoor work but what's kill'n me now is I'd like to hit the shroud with a couple coats of matte-black to match the dash but 60 degrees is a long way off right now and we have more snow on the way tonight
The following users liked this post:
BlackNsexy2010 (02-09-2014)
02-09-2014, 08:57 AM
#106
Hahaha.. Yeah i think ill pick it up.. I'm tired of working on the speakers. I have no energy left.. I'd rather just pay someone at this point.., but . I know I must not give up.. The harder the challenge the greater the victory..haha
I know man.. Stupid snow.. And Thursday too ..
I know man.. Stupid snow.. And Thursday too ..
02-09-2014, 11:42 AM
#107
I will post pics today. It occurred to me that I could reuse the plastic piece I removed, but I would have to dremel the center out. Plus, I was not dainty when removing it, so there are some obvious scratches etc. I think I like the idea of adding something to it to make it look like a stock shroud, rather than just adding the plastic piece back... and it just occurred to me, I wonder if one of the other units has something I can steal for this... hmmmm.... well, anyway on to my "one step forward, two steps back" of yesterday
I worked on it more yesterday and did a test install... WHITE SCREEN! It's like studying for a test really hard and only missing 1 point to pass. Are you stoked that you only missed 1 point or are you pissed that you didn't pass after all of that studying? I am of the latter... so that's what this chick is doing today: taking it back apart - carefully - to check all of my internal connections. Hopefully, something is loose and easily fixed. Otherwise, I have two choices: (a) scrap it (b) buy a new one, place it in my pretty shroud, and install it. I received my iPod cord and my external half din DVD player, plus I already have the rear view camera from one of the other units... so clearly (b) would be my choice. Too close now.
I will upload my pics shortly...
I worked on it more yesterday and did a test install... WHITE SCREEN!
It's like studying for a test really hard and only missing 1 point to pass. Are you stoked that you only missed 1 point or are you pissed that you didn't pass after all of that studying? I am of the latter... so that's what this chick is doing today: taking it back apart - carefully - to check all of my internal connections. Hopefully, something is loose and easily fixed. Otherwise, I have two choices: (a) scrap it (b) buy a new one, place it in my pretty shroud, and install it. I received my iPod cord and my external half din DVD player, plus I already have the rear view camera from one of the other units... so clearly (b) would be my choice. Too close now.I will upload my pics shortly...
02-09-2014, 11:50 AM
#108
Firebrand.....I think I know what your problem is....there are 2 flex cables connecting the screen to the circuit board....the large one drives the screen itself and the small cable drives the "touch" functionality of the screen. It sounds like the larger of the 2 cables pulled out of the connector on the circuit board.....the connectors have small locks on them which you need to spread apart with your fingers as you re-insert the flex cables (gently)...that should do the trick.
The following users liked this post:
firebrand13 (02-09-2014)
02-09-2014, 11:57 AM
#109
That is exactly what I think and hope. I hate that I have to take it all the way apart after getting it nicely tucked in, but I would rather have to take it apart for this tiny thing than have to purchase a whole new unit. I was going to take it apart last night, but I decided some time and space would be appropriate after working on it for the bulk of the day.
02-09-2014, 12:26 PM
#111
oh that's right! I forgot that yours had the power "issue" when you first installed it.
Here are a few of the million pics I have taken thus far.
TSX stock Nav Unit prior to demolition:

disassembled (here is where you can see the space that the plastic screen leaves. Also, a few additional holes in the back plate itself. I figure I can cover this with material of some sort and all will be well in the world):

Rear of disassembled stock:

Front face of re-assembly (I feel I should also comment, the bulk of the defacing of the back plate was there prior to my disassembly. When I purchased this unit used, the seller did not state it had already been taken apart):

Rear of reassembly (here is where I realized my plug is not facing the same direction as stock - it must have been one of the other units that faced the same way as stock):

In retrospect, I shouldn't have buttoned it all up anyway, considering I want to add something to cover that space... so, maybe this is a blessing. We'll see quite soon!
Here are a few of the million pics I have taken thus far.
TSX stock Nav Unit prior to demolition:
disassembled (here is where you can see the space that the plastic screen leaves. Also, a few additional holes in the back plate itself. I figure I can cover this with material of some sort and all will be well in the world):
Rear of disassembled stock:
Front face of re-assembly (I feel I should also comment, the bulk of the defacing of the back plate was there prior to my disassembly. When I purchased this unit used, the seller did not state it had already been taken apart):
Rear of reassembly (here is where I realized my plug is not facing the same direction as stock - it must have been one of the other units that faced the same way as stock):
In retrospect, I shouldn't have buttoned it all up anyway, considering I want to add something to cover that space... so, maybe this is a blessing. We'll see quite soon!
Last edited by firebrand13; 02-09-2014 at 12:36 PM.
The following users liked this post:
ArtJ (02-10-2014)
02-09-2014, 12:55 PM
#112
O man.. I wonder who will have theirs finished first.. Lol... Fire looking good.. I want to add the DVD too.. Why did you get the iPod cable? Is this so you have two inputs?
Btw hope the new job is going well
I ordered a 2010 .. Can't wait to start
Btw hope the new job is going well
I ordered a 2010 .. Can't wait to start
02-09-2014, 01:38 PM
#114
Hey BlacknSexy! I totally thought I was going to be most of the way done yesterday, until the white screen :-/ I have disassembled again but I don't see any obvious disconnect. So I have set it aside again, for now. I need to think about what I am going to cover this back plate with and gather up the patience to work on the white screen issue.
The new job is going well so far... lots of reading, training, and tests (100% on the first four tests, woot woot). And yep, that's a 1099! I always do a quick run through as early in the year as I am able, to see if I owe or if I get a refund. I think I have everything and will be able to file within the next few weeks... in all my free time. HA.
I got the iPod cable in order to use a bit more of the unit's utility. Plus it will free up my stock USB (and, thus, the center console). This is not a necessity, as stock works perfectly fine with this unit (unlock the accord, with that one you had a dead stock USB after install). The other thing I am curious of is if this will still charge my iPod, like the stock USB.
02-09-2014, 01:39 PM
#115
Firebrand....if I'm reading your photos properly I see an opportunity for perfection....it appears that the clear lens and black "sidewing" pieces are actually one molded piece of plastic that you removed....is it possible that you can put the piece on a chop saw with a fine tooth blade and precisely cut the black sidewing pieces off? If so, you could just remount the sidewings to their usual location, give the whole assembly a shot of black paint and it'll look good as new.
The following users liked this post:
firebrand13 (02-09-2014)
02-09-2014, 01:52 PM
#116
yes, that is definitely one of the options that has crossed my mind since I removed it... the path of least resistance if I want a material to cover the scratches and fill the space.
For reference, that piece is not screwed in: It has glue on all sides that hold it down and it sits snug against the screws (you can see the remaining 3 screws in pic #3 above).
For reference, that piece is not screwed in: It has glue on all sides that hold it down and it sits snug against the screws (you can see the remaining 3 screws in pic #3 above).
02-09-2014, 02:33 PM
#117
I need to correct myself, the plastic piece is screwed in, but the two screws holding it in are part of the screws that also hold the shroud together. In other words, if you have gotten the shroud in to at least two pieces, then you have already removed the screws that hold in this plastic screen.
Art, what is the S/N on the back of your unit? I am curious how to tell if one is getting a new unit or one of the older ones with the skulls. My S/N is P81ACRD-11H0188.
Art, what is the S/N on the back of your unit? I am curious how to tell if one is getting a new unit or one of the older ones with the skulls. My S/N is P81ACRD-11H0188.
02-09-2014, 02:49 PM
#118
Right....that's pretty much how my unit goes together as well....the 4 screws in the back keep the screen-frame and the hood together. You may find that you have to disconnect the tripbox to seat the whole shebang in the dashboard....if that's not the case for you please let me know the trick
We're not that far off in S/N's....I wonder how many of these things they're selling.
We're not that far off in S/N's....I wonder how many of these things they're selling.
02-09-2014, 04:41 PM
#119
$147
http://www.ebay.com/itm/2010-Acura-TSX-Information-Info-Display-Screen-OEM-LKQ/191036211755?_trksid=p2047675.c100011.m1850&_trkparms=aid%3D222008%26algo%3DSIC.MOTORS%26ao%3D1%26asc%3D20140107083349%26meid%3D4723422268032869703%26pid%3D100011%26prg%3D20140107083349%26rk%3D0%26rkt%3D10%26sd%3D310867383003
http://www.ebay.com/itm/2010-Acura-TSX-Information-Info-Display-Screen-OEM-LKQ/191036211755?_trksid=p2047675.c100011.m1850&_trkparms=aid%3D222008%26algo%3DSIC.MOTORS%26ao%3D1%26asc%3D20140107083349%26meid%3D4723422268032869703%26pid%3D100011%26prg%3D20140107083349%26rk%3D0%26rkt%3D10%26sd%3D310867383003