
Painted Engine Cover / Tinted Taillights (many pics)
 12-18-2008, 10:34 AM
#1
Painted Engine Cover / Tinted Taillights (many pics)
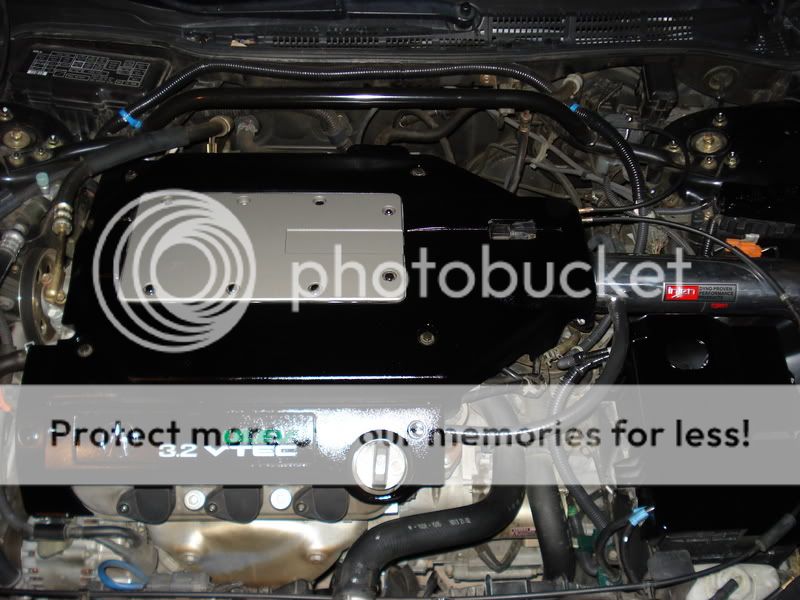
Just finished painting the engine cover with Dupli-Color MetalCast, like everyone else, but my red doesn't look like everyone elses. I think I might have to coat it again because it seems spotty and the black shows through in some areas. The red is a deeper, more maroon red. The Taillights were done with VHT Night shade and came out great! enjoy.


 12-18-2008, 11:26 AM
#4
try just using primer.. maybe 2-3 coats so that its even.. then the metalcast paint 2-3 coat that are EVEN and then once it dries..
try about.. 3-4 clear an it'll come out nice and shiney.. maybe i'll take a picture of mine when i get home..
make sure they are even coats...
after clear coat.. maybe even do 2000 grit wetsand and then polish it and wax it.
 12-18-2008, 11:39 AM
#5
some??
try just using primer.. maybe 2-3 coats so that its even.. then the metalcast paint 2-3 coat that are EVEN and then once it dries..
try about.. 3-4 clear an it'll come out nice and shiney.. maybe i'll take a picture of mine when i get home..
make sure they are even coats...
after clear coat.. maybe even do 2000 grit wetsand and then polish it and wax it.
12-18-2008, 11:54 AM
#6
-Arsenic-
The reason your engine cover looks like that is because;
A-you didnt use any of the silver basecoat
B-you didnt use enough of the silver basecoat
C-you must have even coats. its very splotchy.
You should not be able to see ANY black after the silver basecoat. The basecoat has to completely cover it before you can spray the red.
A-you didnt use any of the silver basecoat
B-you didnt use enough of the silver basecoat
C-you must have even coats. its very splotchy.
You should not be able to see ANY black after the silver basecoat. The basecoat has to completely cover it before you can spray the red.
12-18-2008, 12:12 PM
#7
The reason your engine cover looks like that is because;
A-you didnt use any of the silver basecoat
B-you didnt use enough of the silver basecoat
C-you must have even coats. its very splotchy.
You should not be able to see ANY black after the silver basecoat. The basecoat has to completely cover it before you can spray the red.
A-you didnt use any of the silver basecoat
B-you didnt use enough of the silver basecoat
C-you must have even coats. its very splotchy.
You should not be able to see ANY black after the silver basecoat. The basecoat has to completely cover it before you can spray the red.
Trending Topics
12-18-2008, 01:05 PM
#9
That's exactly what i thought. Well can you take the time to write a detailed DIY on how you did YOURS. I know theres a thread for the DIY engine cover, but i dont care about that one. I want to know how YOU did it, if you dont mind. Thanks Volly
 12-18-2008, 02:01 PM
#12
I think that may have been the problem, I didn't clean it through enough, I didn't want to wash it, because I didnt want to wait for it to dry. I'm very impatient, but I think I learned my lesson, lol. What should I wash it with?
12-18-2008, 02:01 PM
#13
12-18-2008, 02:12 PM
#14
No. It's all in the same can. http://www.duplicolor.com/products/metalcast.html
just use it like regular spray paint.
here.. taken from the DIY thread..
Ok here is what you need to do.
As for paint, you can use what ever you want. Heat paint is NOT necessary (mines been painted for a few years now and it looks just like the day i bought it). As for what type, thats up to you. I personally think that color matching your car is the best color.
As for prep,Wash it good with something like dawn to degrease it. get a 3M Scuff pad for sanding and sand it with that. the scuff pad will get in between all the rough spots. Then Prime the whole thing. I used high build primer (can be found in a spray can) and sprayed it with that to help make it as smooth as possible, then painted it.
as for the finish, unless its a paint thats designed to have a clear sprayed over it you dont clear it.
Where ever you heard or read about the paint evaporating into the engine and hurting it is wrong. It wont hurt it.
to make your life alot easier take the cover off
 12-18-2008, 04:52 PM
#19
1. scuff everything down with a 3M scuff pad
2. spray on some sandable primer (2 coats)
3. sand down the primer till smooth
4. apply metalcast ground coat (2-3 coats) - the silver paint that make the metalcast what it is
5. apply metalcast base coat (2-3 coats)
6. let dry
7. apply clear coat
spray the cover with a distance of a foot between the can of paint and cover. spray light and even coats, and use sparingly.
I didnt even finish one can, I had so much left over, i painted the other covers ie fuse covers.
12-18-2008, 05:03 PM
#20
Pro
Just finished painting the engine cover with Dupli-Color MetalCast, like everyone else, but my red doesn't look like everyone elses. I think I might have to coat it again because it seems spotty and the black shows through in some areas. The red is a deeper, more maroon red. The Taillights were done with VHT Night shade and came out great! enjoy.
The cover looks good, but your going to have to re-do it again.
Why didn't you just tint the Taillights???

 12-30-2008, 02:12 PM
#27
Here is the Re-Attempt. I sanded down the first try...washed it, sanded again and again until the plastic was as smooth as glass. Sprayed primer on it, sanded that down again. Sprayed the base coat of Metalcast (3 light coats). It was shiny silver. Sprayed the Red MetalCast (3 light coats). This is what I get...


how does that look like this?
There has gotta be something you are not explaining to me?
I'm getting so frustrated with the whole thing.
how does that look like this?
There has gotta be something you are not explaining to me?
I'm getting so frustrated with the whole thing.
12-30-2008, 02:51 PM
#28
Senior Moderator
You need to be applying thin EVEN coats. It should never look splotchy.
12-30-2008, 03:09 PM
#31
Senior Moderator
Why buy a new one. Something doesnt seem right. Even thin even coats should look better than the last pics you posted. If thats thin even coats you arent applying enough. You need to be applying enough paint that it is even (not heavy and light) but doesnt run. Those pics dont look like you even painted any thing (the last ones)
12-30-2008, 03:14 PM
#32
1. u need to roughen up the plastic
2. apply primer (not black) about 2-3 coats
3. paint in evenly coats, start off lightly and end at a medium coat. paint until u like how it looks. always paint in straight lines and spray past the part your painting than start spaying before u go on the plastic.do that horizontally and vertically.
4. let cure
5. apply clear coat like u did with the paint
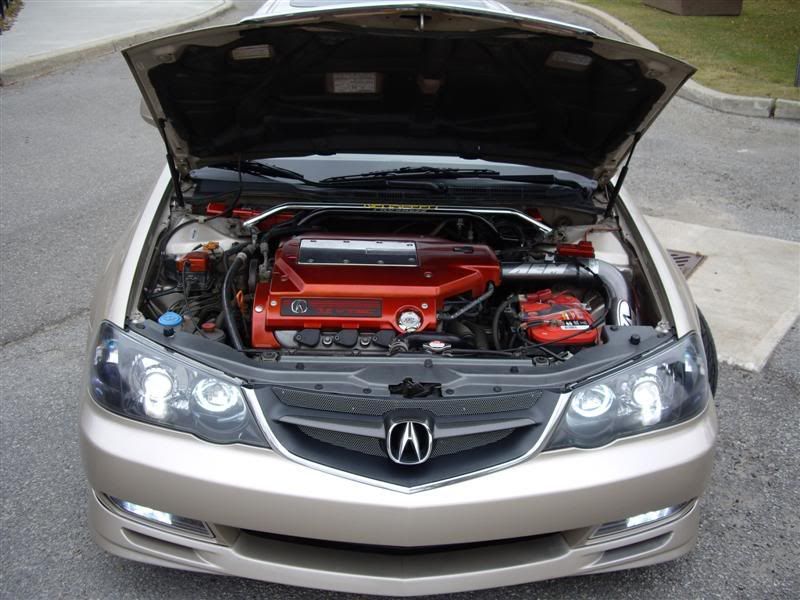
this is how mine turned out.

o yea, adding the final touch

i tinted my lights with vht nightshade too. if u clear coat them you will have a shiny finish. if u leave them like i did, when i detail my car i buff and wax my tails also and that leaves like a nice shiny coat on them and they still havent faded after 1.5years.
2. apply primer (not black) about 2-3 coats
3. paint in evenly coats, start off lightly and end at a medium coat. paint until u like how it looks. always paint in straight lines and spray past the part your painting than start spaying before u go on the plastic.do that horizontally and vertically.
4. let cure
5. apply clear coat like u did with the paint
this is how mine turned out.
o yea, adding the final touch
i tinted my lights with vht nightshade too. if u clear coat them you will have a shiny finish. if u leave them like i did, when i detail my car i buff and wax my tails also and that leaves like a nice shiny coat on them and they still havent faded after 1.5years.
12-30-2008, 03:19 PM
#33
I think im gonna buy a new one anyways, because there's no way i'm sanding it down again and trying again. If I do it again, it will be on a fresh piece. Thanks for all the advice, I guess I just suck with a paint can  . Maybe I can find someone at the car meet im going to this Sunday to help me out.
. Maybe I can find someone at the car meet im going to this Sunday to help me out.
12-30-2008, 03:56 PM
#34
T-Swzy
Join Date: Jun 2007
Location: Saint Paul, MN
Age: 36
Posts: 2,575
Likes: 0
Received 0 Likes
on
0 Posts
did you sand it with 2500-3000 grit when you were done and buffed it to a shine with some polish? i did that to my b pillars and it worked out real good. dont know how much different the paints are tho

Thread
Thread Starter
Forum
Replies
Last Post
TLDude876
Car Talk
134
12-28-2016 03:18 PM
sockr1
Car Parts for Sale
22
10-01-2015 01:31 AM
wusty23jd
3G TL Audio, Bluetooth, Electronics & Navigation
4
09-24-2015 11:41 AM