
'03 ebp tl-s
 09-07-2013, 11:50 PM
#41
Instructor
Thread Starter
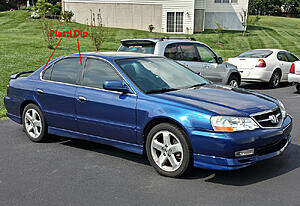
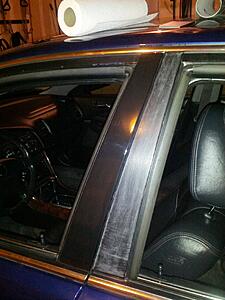
Apologies for the dirt. But behold, plasti dip


The following users liked this post:
nats007 (10-29-2013)
The following users liked this post:
hamburglar490 (10-29-2013)
09-26-2013, 12:13 PM
#44

man I really dig everything you've done with it so far, keep up the good work. I have an 03 NBP Type S and Im the original owner and its in much need of some love, curious as to where you got the hood supports?... seen a few on ebay but wasnt sure of the quality of them.
The following users liked this post:
hamburglar490 (10-29-2013)
09-27-2013, 12:04 AM
#45
Instructor
Thread Starter
man I really dig everything you've done with it so far, keep up the good work. I have an 03 NBP Type S and Im the original owner and its in much need of some love, curious as to where you got the hood supports?... seen a few on ebay but wasnt sure of the quality of them.
And sorry to disappoint you guys but I'm just not a fan of lowering lol
10-17-2013, 05:43 PM
#46
Instructor
Thread Starter
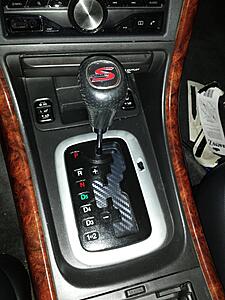
Finally got around to wrapping the inside of the shifter with carbon fiber. Somebody did it on the forum and I liked the way it looked. Didn't come out too bad for my first ever attempt with vinyl.

 10-25-2013, 01:45 AM
#47
Instructor
Thread Starter
Trunk light was pretty dim so I went ahead and put a strip of LEDs in. Came out better than expected.
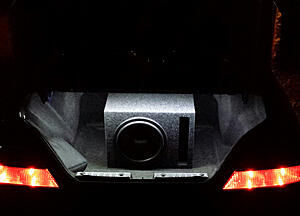
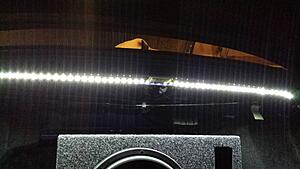
Comparison with a stock bulb in a '04 TL
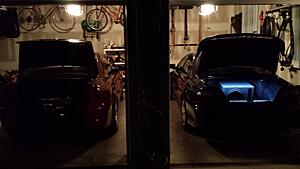


Comparison with a stock bulb in a '04 TL
 10-28-2013, 10:04 AM
#48
Advanced
Wow those LED's look amazing in the trunk. I was thinking about doing that myself along with putting LED strips under the dashboard and under the back of the front seats. Where did you get the strip from?
How is your plasti-dip holding up? I'm still debating on whether to plasti-dip or but carbon fiber vinyl over the pillars.
How is your plasti-dip holding up? I'm still debating on whether to plasti-dip or but carbon fiber vinyl over the pillars.
The following users liked this post:
hamburglar490 (10-29-2013)
10-28-2013, 12:24 PM
#49
Instructor
Thread Starter
Wow those LED's look amazing in the trunk. I was thinking about doing that myself along with putting LED strips under the dashboard and under the back of the front seats. Where did you get the strip from?
How is your plasti-dip holding up? I'm still debating on whether to plasti-dip or but carbon fiber vinyl over the pillars.
How is your plasti-dip holding up? I'm still debating on whether to plasti-dip or but carbon fiber vinyl over the pillars.
Also, I did the under the dashboard lighting you're talking about with really dim amber lighting, looks great. Advice, do NOT make it very bright. I used the same strip I linked to above but in amber (I believe they call it yellow) and cut it so i had 6 LEDSs in each footwell. Looked good but at night it was really distracting. Cut off half so I had 3 on each side and it's much nicer, just like a mood light that you only see when it's night as opposed to lighting up the whole cabin lol.
As for the plasti-dip, it's holding up fine, but I'm not really liking the matte black appearance of the B-Pillars so I just ordered some 3M gloss black vinyl. So IMO opinion, go with the vinyl.
The following users liked this post:
the-G-ride (10-29-2013)
10-29-2013, 09:50 AM
#50
Advanced
Thanks! I used this LED strip (http://www.amazon.com/gp/product/B00...?ie=UTF8&psc=1). Pretty good price and seems to be good quality, sure is bright lol. Just cut it to length then tap into the trunk light power.
Also, I did the under the dashboard lighting you're talking about with really dim amber lighting, looks great. Advice, do NOT make it very bright. I used the same strip I linked to above but in amber (I believe they call it yellow) and cut it so i had 6 LEDSs in each footwell. Looked good but at night it was really distracting. Cut off half so I had 3 on each side and it's much nicer, just like a mood light that you only see when it's night as opposed to lighting up the whole cabin lol.
As for the plasti-dip, it's holding up fine, but I'm not really liking the matte black appearance of the B-Pillars so I just ordered some 3M gloss black vinyl. So IMO opinion, go with the vinyl.
 I was going to use two LED strips, one that is connected to the light on the door so that when you open the door, the bright white LEDs come on to light up the footwell area and one strip as ambient lighting. I don't know if to do blue or amber though for the ambient lighting.
 I'll most likely wait until spring time to do the pillars, its getting cold now
 . I'm gunna go with the vinyl though and propably carbon fiber. Dunno if it'll look cheesy or not, but I want to wrap the pillars, door handles and grille all in vinyl.


The following users liked this post:
hamburglar490 (10-29-2013)
10-29-2013, 03:52 PM
#52
Instructor
Thread Starter
Thanks. That's a really good price on the LEDs. I thought it was going to be way more expensive. The LED strips I see in parts stores are about triple that price for half that length. Seeing as how I have amazon prime, this just might become my weekend project. I was going to use two LED strips, one that is connected to the light on the door so that when you open the door, the bright white LEDs come on to light up the footwell area and one strip as ambient lighting. I don't know if to do blue or amber though for the ambient lighting.
I'll most likely wait until spring time to do the pillars, its getting cold now . I'm gunna go with the vinyl though and propably carbon fiber. Dunno if it'll look cheesy or not, but I want to wrap the pillars, door handles and grille all in vinyl.
I was going to use two LED strips, one that is connected to the light on the door so that when you open the door, the bright white LEDs come on to light up the footwell area and one strip as ambient lighting. I don't know if to do blue or amber though for the ambient lighting. I'll most likely wait until spring time to do the pillars, its getting cold now
. I'm gunna go with the vinyl though and propably carbon fiber. Dunno if it'll look cheesy or not, but I want to wrap the pillars, door handles and grille all in vinyl. . And that's actually a pretty cool idea about wiring one strip up to the door light, might have to try that when I get some time lol. Let me know how that goes. It's getting cold here too but I'm gonna try and get my gloss black vinyl on my pillars before it gets too bad, can't stand that matte black
11-01-2013, 11:19 PM
. And that's actually a pretty cool idea about wiring one strip up to the door light, might have to try that when I get some time lol. Let me know how that goes. It's getting cold here too but I'm gonna try and get my gloss black vinyl on my pillars before it gets too bad, can't stand that matte black
11-01-2013, 11:19 PM
#53
Instructor
Thread Starter
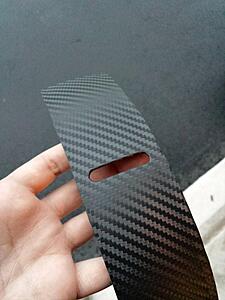
Just put the vinyl on my b-pillars. No idea what I was thinking with the plasti-dip. This is definitely the way to go.
One Done.
After I finished
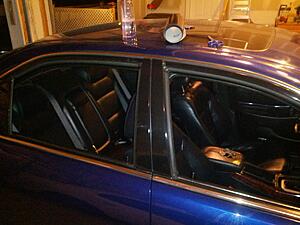
One Done.

After I finished
 11-02-2013, 03:45 PM
#55
Instructor
Thread Starter
11-02-2013, 04:58 PM
#56
Over time the vinyl will fade. And can get bubbles. Removing the pillars isn't hard.
Remover the rubber seal from the door. And I think its was 4 screws/bolts 2 top and 2 bottom. there is a diy for it somewhere.
If it gives you issues later on its better to remove them and either wrap them completely. Hydro dip them or good old fashioned paint
Remover the rubber seal from the door. And I think its was 4 screws/bolts 2 top and 2 bottom. there is a diy for it somewhere.
If it gives you issues later on its better to remove them and either wrap them completely. Hydro dip them or good old fashioned paint
11-02-2013, 05:20 PM
#57
Instructor
Thread Starter
Over time the vinyl will fade. And can get bubbles. Removing the pillars isn't hard.
Remover the rubber seal from the door. And I think its was 4 screws/bolts 2 top and 2 bottom. there is a diy for it somewhere.
If it gives you issues later on its better to remove them and either wrap them completely. Hydro dip them or good old fashioned paint
Remover the rubber seal from the door. And I think its was 4 screws/bolts 2 top and 2 bottom. there is a diy for it somewhere.
If it gives you issues later on its better to remove them and either wrap them completely. Hydro dip them or good old fashioned paint

But thanks for the tip, maybe when these fade I'll try paint
11-12-2013, 11:37 PM
#58
Race Director
iTrader: (8)
Nice progress!
Vinyl > Plasti-dip
Vinyl > Plasti-dip
11-13-2013, 10:34 PM
#59
Instructor
Thread Starter
12-22-2013, 01:18 AM
#60
Instructor
Thread Starter
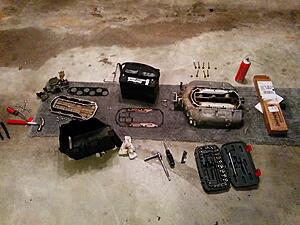
Installing the Outlaw Engineering ThermoBlock spacers...


The following users liked this post:
hamburglar490 (01-15-2014)
01-15-2014, 07:16 PM
#63
Instructor
Thread Starter
And today I clayed and compounded the hood. The rest of the car will be done eventually lol. The claying really makes a world of difference.

The following users liked this post:
hamburglar490 (01-18-2014)
02-03-2014, 02:19 PM
#65
Instructor
Thread Starter
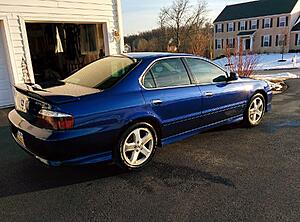
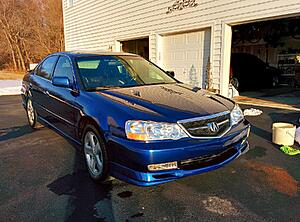
Finally got warm enough to wash my car and polish it
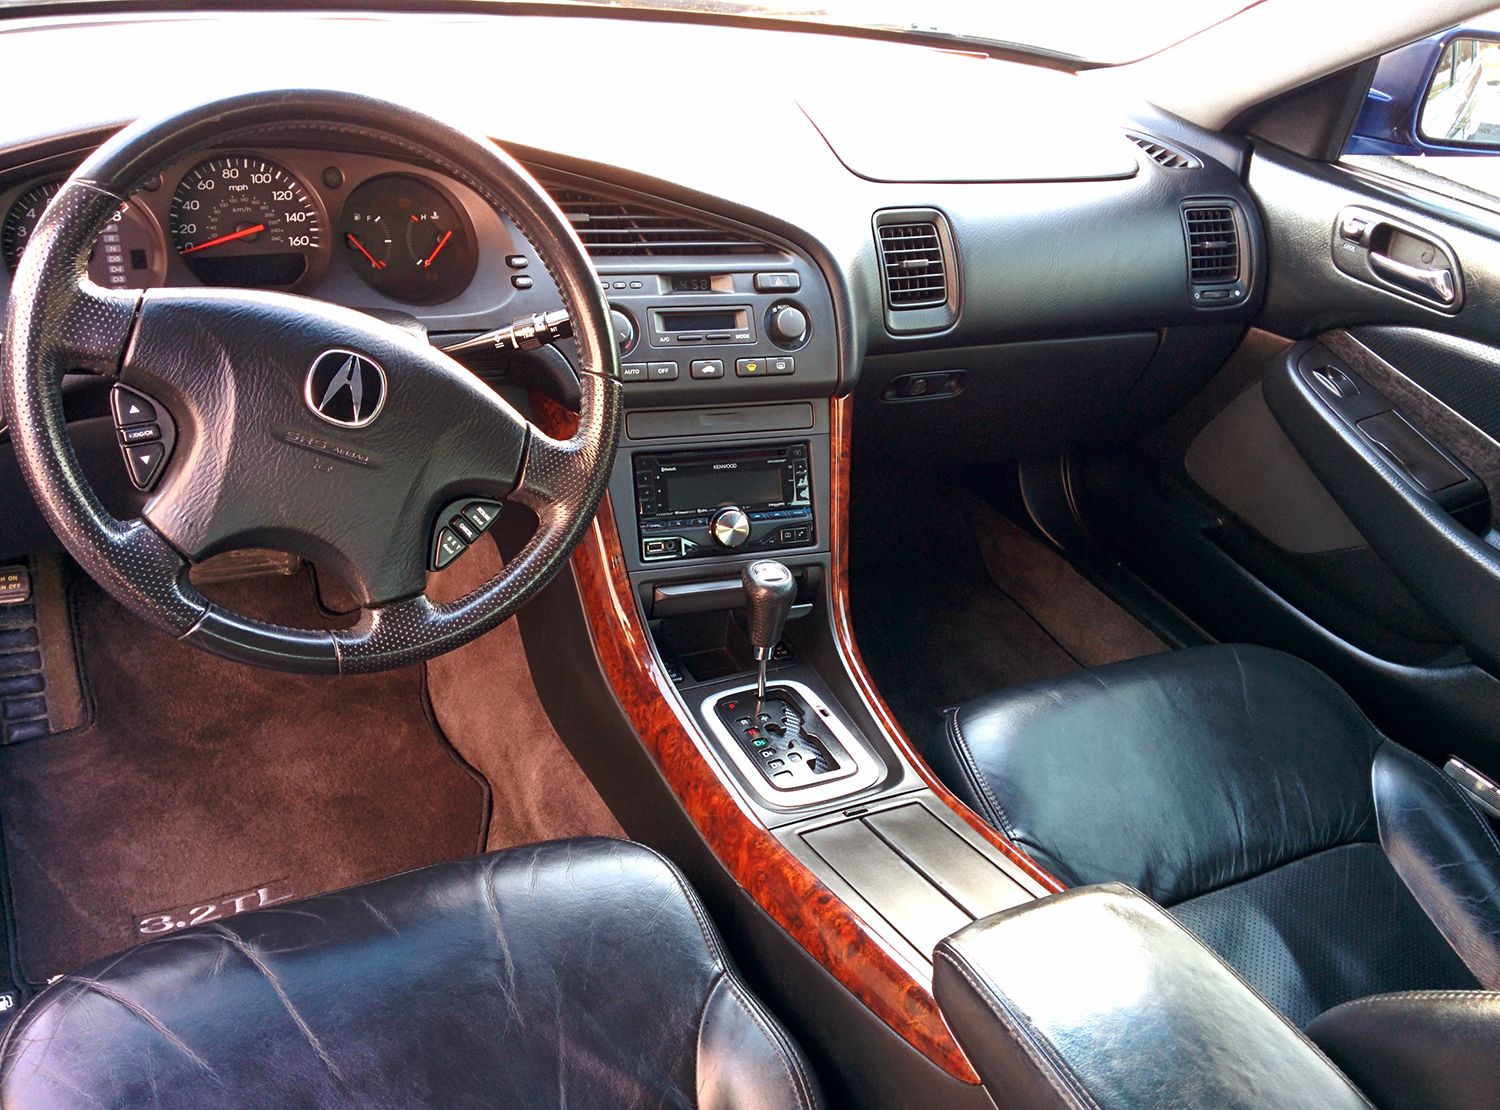
And this is an updated image of the interior. Hated the smokey black woodgrain that was on the type-s, so I got the regular instead. Also didn't like the type-s speedo so I got the base version of that.


And this is an updated image of the interior. Hated the smokey black woodgrain that was on the type-s, so I got the regular instead. Also didn't like the type-s speedo so I got the base version of that.
The following users liked this post:
mugenspire (11-02-2014)
02-07-2014, 01:18 PM
#66

VERY CLEANNNNNN!!!! Makes me wanna go polish mine. The weather been so crappy here that I've just been driving her and not even washing it. Can't wait for all this snow to be over. Smh
The following users liked this post:
hamburglar490 (02-08-2014)
02-08-2014, 01:17 PM
#67
Dude awesome!
That first shot of the results of the clay looks great!
And you liked the base cluster? You shoulda asked me to trade lol.
And HairyMonkey its just really takes a bit of heat. Think of it as a deluxe textured heavy duty sticker. I have removed some of mine and have had literally no reside left over.
The following users liked this post:
hamburglar490 (02-08-2014)
02-08-2014, 06:36 PM
#68
Instructor
Thread Starter
Dude awesome!
That first shot of the results of the clay looks great!
And you liked the base cluster? You shoulda asked me to trade lol.
And HairyMonkey its just really takes a bit of heat. Think of it as a deluxe textured heavy duty sticker. I have removed some of mine and have had literally no reside left over.
That first shot of the results of the clay looks great!
And you liked the base cluster? You shoulda asked me to trade lol.
And HairyMonkey its just really takes a bit of heat. Think of it as a deluxe textured heavy duty sticker. I have removed some of mine and have had literally no reside left over.
02-14-2014, 10:27 PM
#69
Instructor
Thread Starter
Finally decided to tackle the ugliness that is my roof. Looks pretty good!
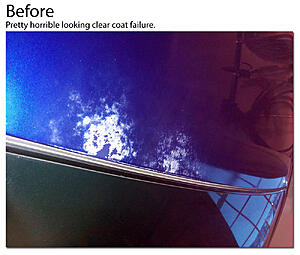
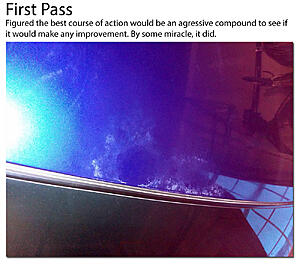
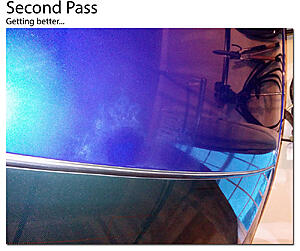
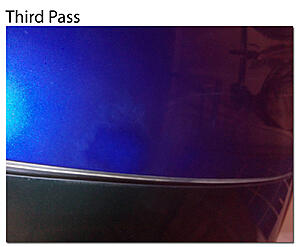
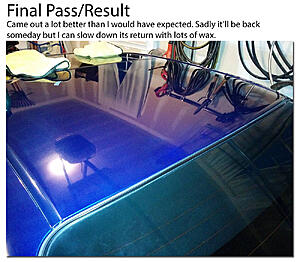


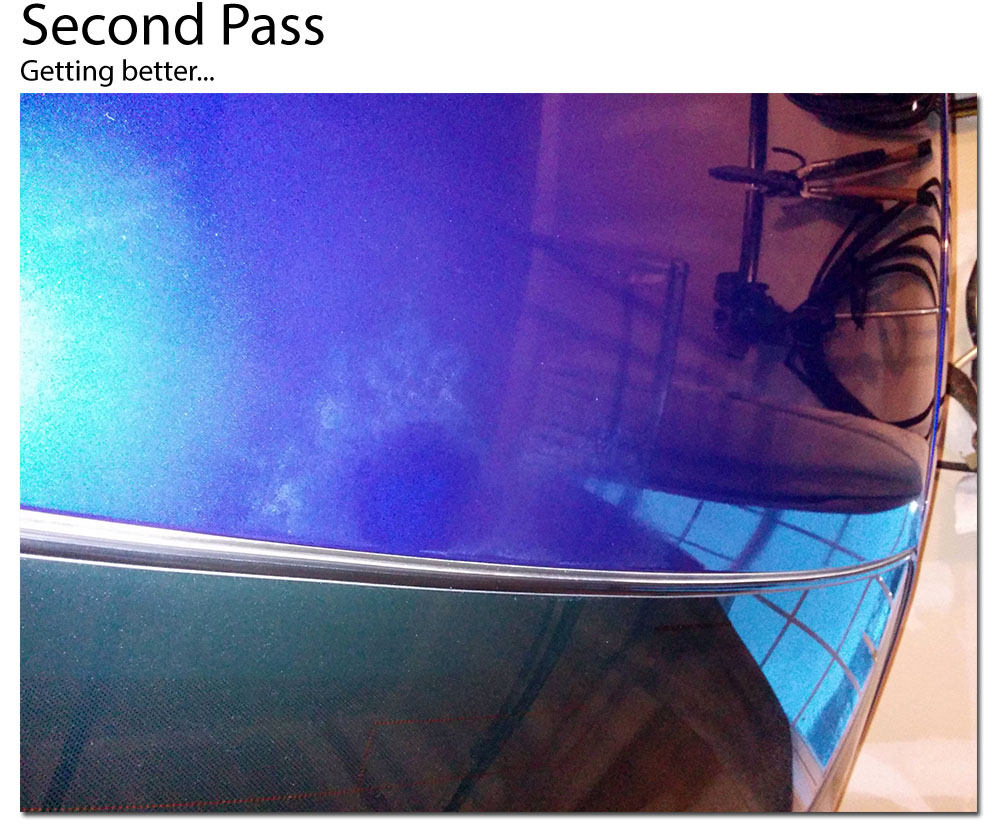


Last edited by hamburglar490; 02-14-2014 at 10:34 PM.
02-15-2014, 08:31 AM
#70
Safety Car
If you keep it up hopefully it will not come back. A lot of people don`t know what claying and then applying a couple of coats of wax does the paint job of their car. Not only will it get out the imperfections but leave you with a great finish.
Shh, don`t tell anyone.
Shh, don`t tell anyone.
The following users liked this post:
hamburglar490 (02-15-2014)
02-15-2014, 04:09 PM
#72
Instructor
Thread Starter
If you keep it up hopefully it will not come back. A lot of people don`t know what claying and then applying a couple of coats of wax does the paint job of their car. Not only will it get out the imperfections but leave you with a great finish.
Shh, don`t tell anyone.
Shh, don`t tell anyone.
Spent roughly 12 hours detailing it the past 2 days and it's definitely worth it. Dreading having to take it outside in the snow though...And I'll post a new picture later today hopefully if I can finish what I'm trying to do with the door panel
02-15-2014, 09:13 PM
#73
Instructor
Thread Starter
Making some slow progress on this. Gonna wrap all the woodgrain trim inside the car with a brushed aluminum vinyl. Absolutely love the way this door turned out. Baby steps....

The final product


The final product

The following users liked this post:
hamburglar490 (02-16-2014)
02-16-2014, 09:25 AM
#75
Safety Car
The best way to do the pillars is to mask them off with tons off newspapers and paint them with a primer/paint black gloss paint. Scuff up the pillars with a 200-300 grit sandpaper before hand.
Otherwise your interior and exterior looks good.
Otherwise your interior and exterior looks good.
The following users liked this post:
hamburglar490 (02-16-2014)


 10-30-2014, 08:09 PM
#77
Instructor
Thread Starter
10-31-2014, 08:19 AM
#78
How does one reverse polarize the LED's for the clock and AC and such?

Thread
Thread Starter
Forum
Replies
Last Post
MetalGearTypeS
3G TL Audio, Bluetooth, Electronics & Navigation
6
08-29-2016 08:28 PM
LogicWavelength
3G TL Photograph Gallery
33
11-01-2015 09:38 AM