
AEM V2 install
 04-22-2012, 09:32 PM
#1
AEM V2 install
Just finally finished installing my new intake. It was harder than I thought it would be mostly because for some reason it took me a while to find the second resonator bolt then the intake wouldn't line up at first. Took a bit of telling myself remain calm and remembering I haven't turned a wrench in years and never on a foreign car. If cooler heads would have prevailed I most likely would have found that bolt sooner. Had the bumper mostly ready to pop off when I decided to follow the bolt to the outside edge of the resonator. I'm not sure where I became so closed minded but I should have saw it sooner. What really got me goin was the mouth and face full of dirt and road crap that I got pullin down splash guard that kinda set the tone for a bad install. I'm happy w the product and love the sound and the little bit of pep it's added to my car just wish the bracket was welded a bit more accurately. I'll post some pics tomorrow! Thanks for reading.
 04-23-2012, 06:40 AM
#3
Yes a learning experience indeed. Younger me would have broken something for sure. Whatever was closest. I just walked away 10 mins and then went back to work. Driving this morning I probably doubled my normal gas use listening to the sounds.
04-23-2012, 09:49 AM
#4
Senior Moderator
Just finally finished installing my new intake. It was harder than I thought it would be mostly because for some reason it took me a while to find the second resonator bolt then the intake wouldn't line up at first. Took a bit of telling myself remain calm and remembering I haven't turned a wrench in years and never on a foreign car. If cooler heads would have prevailed I most likely would have found that bolt sooner. Had the bumper mostly ready to pop off when I decided to follow the bolt to the outside edge of the resonator. I'm not sure where I became so closed minded but I should have saw it sooner. What really got me goin was the mouth and face full of dirt and road crap that I got pullin down splash guard that kinda set the tone for a bad install. I'm happy w the product and love the sound and the little bit of pep it's added to my car just wish the bracket was welded a bit more accurately. I'll post some pics tomorrow! Thanks for reading.

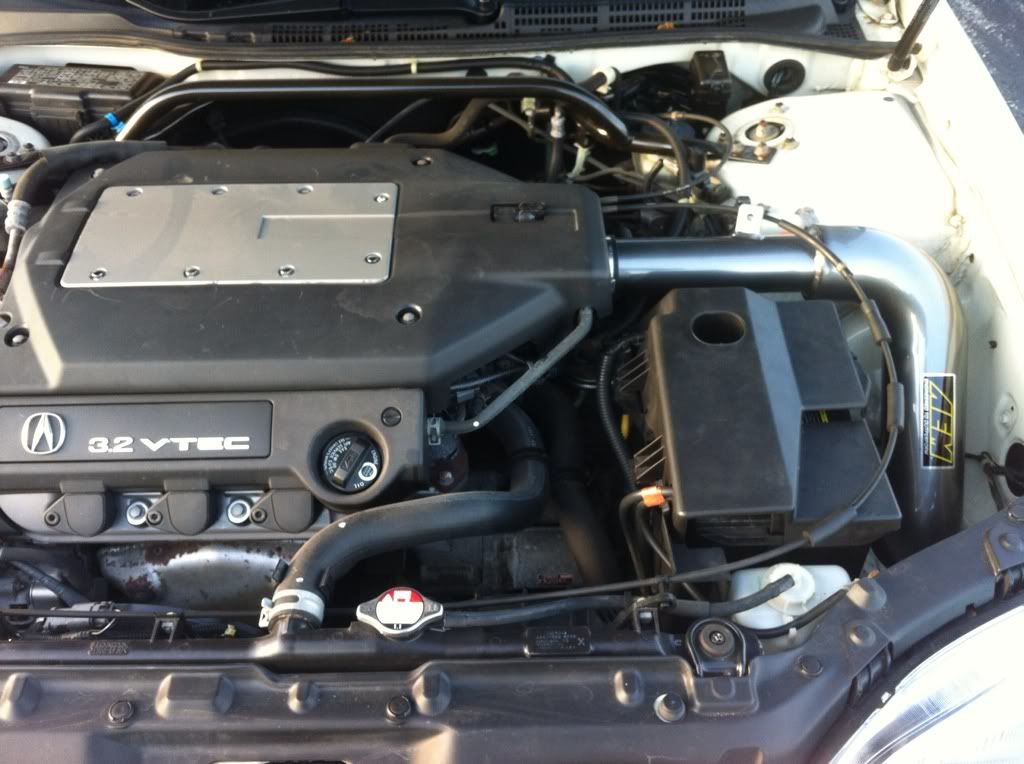

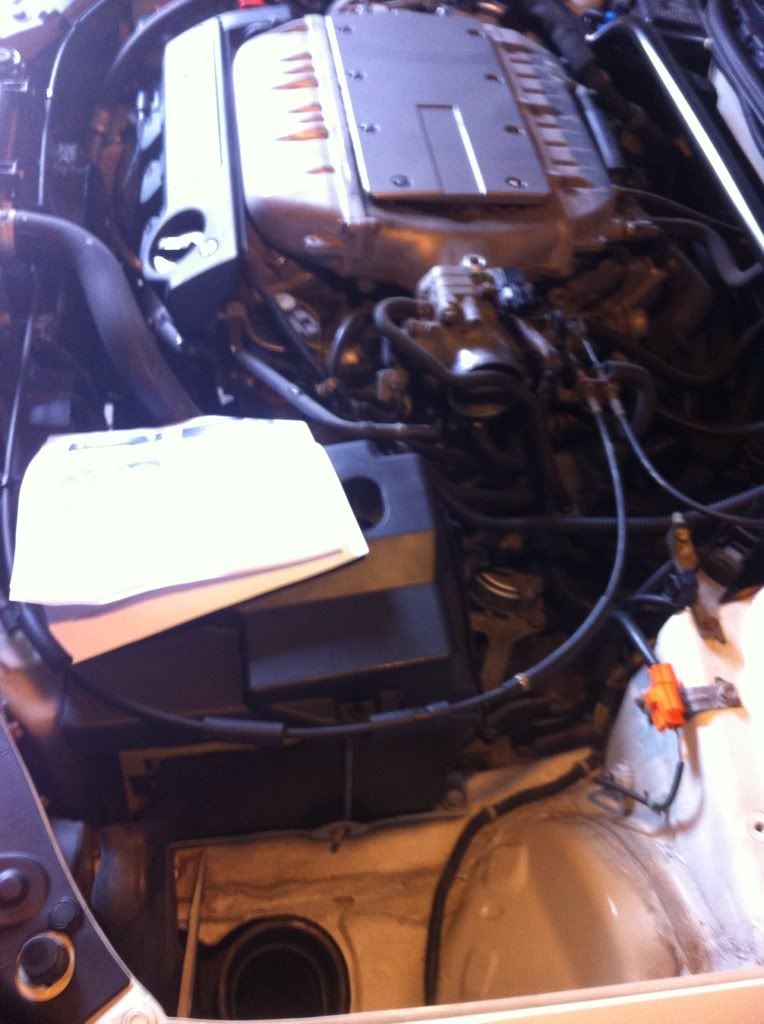 here's a couple pics from the install.
Trending Topics

 06-12-2012, 10:51 PM
#11
I really hate that mounting location for the V2. It killed my install, as that hole was damaged in a previous accident. It was never repaired properly (shitty shop). 10 years later, it bites me in the ass.
Zip ties still holding strong though.
Zip ties still holding strong though.
06-23-2012, 05:29 PM
#13
Flagship Aspec
06-26-2012, 10:52 AM
#14
Intermediate
Join Date: Apr 2012
Age: 35
Posts: 47
Likes: 0
Received 0 Likes
on
0 Posts
Looks good 
I was looking at a Injen for mine, the base model and the Type S are different model numbers, but they seem to have the same layout, is there something different about them?
I have a Type S but I just saw a Injen intake on sale, but it has the manufacturer number for the base model.
Thanks
I was looking at a Injen for mine, the base model and the Type S are different model numbers, but they seem to have the same layout, is there something different about them?
I have a Type S but I just saw a Injen intake on sale, but it has the manufacturer number for the base model.
Thanks
07-01-2012, 12:36 AM
#16
10th Gear

Join Date: Mar 2012
Location: east bay area
Age: 46
Posts: 12
Likes: 0
Received 0 Likes
on
0 Posts
03 tl type s injen intake
fyi to anyone who purchase injen or intakes that instruct you to remove the bumper. DON'T do it, go in throughout the wheel well so much easier
07-01-2012, 02:26 AM
#17
TL-P resonator is much larger than the TL-S one. Either way, taking the bumper off takes all of 10 minutes of easy peezy work.
07-01-2012, 10:35 AM
#18
Moderator
For the Vac Tube in the Rear I used a Plastic T and used the vac Line on top of the TB (The One used for Seafoam) So its easy to go back stock in any Case.
Last edited by Skirmich; 07-01-2012 at 10:41 AM. Reason: TYPOS, USING IPHONE.
07-01-2012, 11:08 AM
#19
With my TL-P I got the resonator out right by the drives side front wheel. I think it took maybe 4 push pins to pop out and there was more than enough room. Taking the bumper off would have made it a lot easier to get the bolt out that's closer to the front of the car. It's well hidden if u don't know where to look for it.
09-18-2012, 01:28 PM
#20
Advanced

I was planning to get the aem v2 within the next couple weeks, and I have a few questions, so any answers would be great.
I have already done the resonator delete, and I see a few of you talking about this on here. Am I a step ahead of the game or do I need to reinstall the resonator with the v2?
Also, I was wondering about any possible damage or wear on the engine. Is there any danger or are those internet rumors.
Also, does the v2 actually give you an extra 3-10 hp?
Help with gas mileage?
I have seen so many different answers out there that I figured I would just go straight to the people who aren't trying to sell me something, if you know what I mean.
Thank you so much.
09-18-2012, 01:45 PM
#21
Get it, you won't regret it. With the resonator out the install will be a breeze. You'll still need to remove the driver front wheel and pop out the 4 or so pins to pull splash guar down and install the filter and tighten the bolt on the mounting bracket. Other than that you have it made w no resonator to deal w.
09-18-2012, 03:17 PM
#22
Advanced
Get it, you won't regret it. With the resonator out the install will be a breeze. You'll still need to remove the driver front wheel and pop out the 4 or so pins to pull splash guar down and install the filter and tighten the bolt on the mounting bracket. Other than that you have it made w no resonator to deal w.
09-18-2012, 03:32 PM
#23
Moderator
4-10 HP well leave it in the Lows 10.. but it Can vary from Region.
If you got Cold Climates all Around perhaps yeah you could get 10 HP. But If you live in Places where is +75 all Year well leave it at 5-7HP.
I didnt remove the wheel just turn it Inside (Ex: All Right) and you should have enough Clearance to remove the Splash Guard enough to Install the Bolt. You can Also remove the Wheel but its completely Optional.
If you Already deleted the Res then you are Ahead of the Installation. Removing the Res is a Must to Install the AEM V2.
 09-19-2012, 03:01 AM
#27
B A N N E D

I got splash guards but I dont know if I would trust it in a flood or the snow really my Tl doesn't like the rain as much and I know the front end has been replace minus the front core support, still got stock factory bumper support. I of course have to drive it in the rain tho because the tl is my daily. I want a v2 as well!! but I have a fear of floods I had water get into my head light and blew out a ballast at the time I just got the tl I paid 300.00 for a brand new one from acura... Got that new headlight seals on that side that leaked. v2 is suppose to be the best cai you can get. I bet it sounds bad ass.
09-19-2012, 07:15 AM
#28
Unless you plan on driving into bumper deep water and idling the car you'll be fine. It rained like crazy 3 times the past 2 months. I'm talking falling swimming pools. I didn't have a single issue. Just don't be stupid about it and it's fine in all weather.
09-19-2012, 05:32 PM
#29
Advanced
I got splash guards but I dont know if I would trust it in a flood or the snow really my Tl doesn't like the rain as much and I know the front end has been replace minus the front core support, still got stock factory bumper support. I of course have to drive it in the rain tho because the tl is my daily. I want a v2 as well!! but I have a fear of floods I had water get into my head light and blew out a ballast at the time I just got the tl I paid 300.00 for a brand new one from acura... Got that new headlight seals on that side that leaked. v2 is suppose to be the best cai you can get. I bet it sounds bad ass.
09-19-2012, 06:12 PM
#30
Moderator

Listen to ALL the People in Here with CAIs and Search in the Forum for "CAI HYDROLOCK" I bet you are going to find just people concern about the same thing as you but not a Real Hydrolock becouse of CAIs.
Me Myself has a AEM V2 and Havent had an Issue in almost 2 years with alot of Raining. If you are that concern just buy the Anti-Splash Guard from Injen and the By-Pass system from AEM.

Thread
Thread Starter
Forum
Replies
Last Post
BoricuaTL
Car Parts for Sale
138
04-08-2016 01:08 PM
InFaMouSLink
Car Parts for Sale
7
10-27-2015 06:51 PM
Abe_Froman
Car Parts for Sale
1
09-16-2015 01:27 PM