
00 TL Projector Headlight project

 05-03-2007, 03:02 AM
#42
Instructor
Join Date: Feb 2007
Location: San Diego
Posts: 222
Likes: 0
Received 0 Likes
on
0 Posts
Originally Posted by fsttyms1
 05-03-2007, 12:15 PM
#43
Former Sponsor
Thread Starter
iTrader: (12)
Another update, mounted the projectors onto the reflectors and to headlights and the next step is shroud, aiming, final assembly and final mount  .
.
The bulbs, I had a fresh set of Osrams sitting with me so these would be going in the retrofit.


Lenses installed.

MMMMMMMMM CLEAR .
.

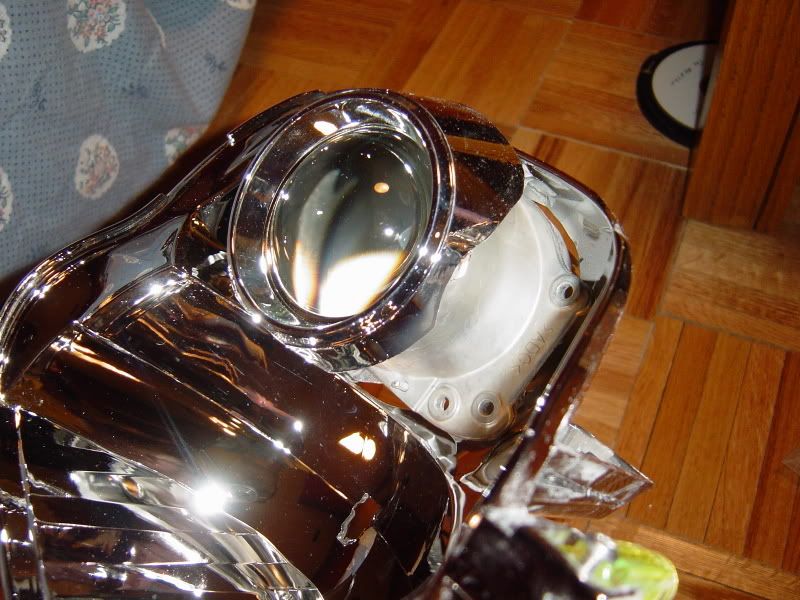
Projectors all cleaned up,lenses installed along with bulbs.


Mounted onto the reflector


Mounted to the headlight.


Driver side testing.


The color, just the right amount. This is close distance testing at longer distances the projector produces more color and is sharper.

The Cut off.

Passenger side cut off.

Another crazy idea, the CCFL halos came in today for my next retrofit so i said lets test them out.

Both lit, camera set at normal exposure lights off.

Lights on, just the CCFLs.

Lights off, just the CCFLs on and the exposure was set to the minimal because they were too bright for the camera to pick up.

. The bulbs, I had a fresh set of Osrams sitting with me so these would be going in the retrofit.
Lenses installed.
MMMMMMMMM CLEAR
.Projectors all cleaned up,lenses installed along with bulbs
.Mounted onto the reflector
Mounted to the headlight.
Driver side testing.
The color, just the right amount
. This is close distance testing at longer distances the projector produces more color and is sharper. The Cut off.
Passenger side cut off.
Another crazy idea
, the CCFL halos came in today for my next retrofit so i said lets test them out. Both lit, camera set at normal exposure lights off.
Lights on, just the CCFLs.
Lights off, just the CCFLs on and the exposure was set to the minimal because they were too bright for the camera to pick up.
05-03-2007, 01:16 PM
#44
Senior Moderator
Keep up the good work.
 05-03-2007, 04:45 PM
#46
Former Sponsor
Thread Starter
iTrader: (12)
Originally Posted by t0ast
The retrofit is amazing. Good idea using the screws for fine tuning the projector aim.
The CCFLs are for the 03 TL's highbeams?
The CCFLs are for the 03 TL's highbeams?
. I bought these off of ebay and i must say i love the quality of the product, just wow.


 05-04-2007, 06:17 AM
#50
Former Sponsor
Thread Starter
iTrader: (12)
Originally Posted by AznWayTL's


I Mean High Beam
Kris, In your case i would suggest you go with bi-xenons since you live in an area with constant run ins with deers. I suggest using E55 bi-xenons. They have one the best hi-beams in bi-xenon projectors and they are cheap. These projectors can be found in many cars such as the new maxima, BMW 5, 7. X3, X5 series, MB E class (hence the name E55), ML class and many more. Bi-xenon solenoid wiring is simple two wire, you can splice your current hi-beam wires and use that along side your halogen hi-beams. These are actually smaller projectors than the ones i am using so installing them would be easier. Here are a few pictures of a set i am selling on HIDplanet. Price ranges from 120~140.


 05-05-2007, 09:18 AM
#51
Former Sponsor
Thread Starter
iTrader: (12)
Shrouds
Ok i admit i love taking pictures . Here are some more, i spent some time cleaning up the TSX bezel to be used on my retrofit. Nice and shiny, I personaly am loving the way they look. I will be covering the side hole with a piece cut from the TSX bezel so it wont look out of place.
This is what a virgin TSX bezel looks like.

I am taking my time in forming these into the shape i want, if you shave extra then there is no turning back so its a constant back and forth process between test fitting and shaving.
Some cutting to begin with..


Some more cutting and test fitting. I wanted to use the second hole in the bezel and JB weld the fuzzy left over lenses just for cosmetic reasons. That way the headlights would have looked like they have two projectors in each headlight, granted only one projector in each headlight would have worked but it still would have looked cool, oh well may be be next time.

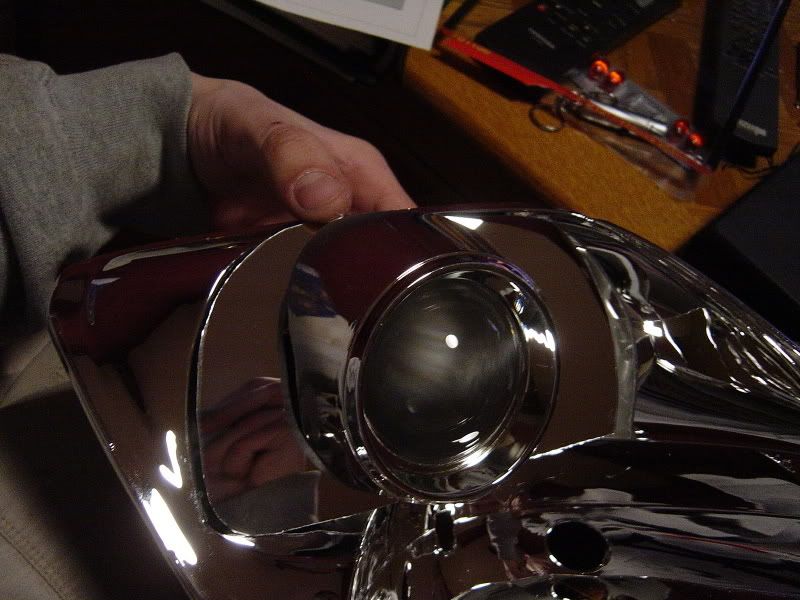
Close up of the lens with the shroud on, fits perfect .
.

and another one.

Some shots with the bezel on and the headlight cover on, the cover isnt properly set I just threw it on there to see what the final product will look like, personaly I like it


. Here are some more, i spent some time cleaning up the TSX bezel to be used on my retrofit. Nice and shiny, I personaly am loving the way they look. I will be covering the side hole with a piece cut from the TSX bezel so it wont look out of place. This is what a virgin TSX bezel looks like.
I am taking my time in forming these into the shape i want, if you shave extra then there is no turning back so its a constant back and forth process between test fitting and shaving.
Some cutting to begin with..
Some more cutting and test fitting. I wanted to use the second hole in the bezel and JB weld the fuzzy left over lenses just for cosmetic reasons. That way the headlights would have looked like they have two projectors in each headlight, granted only one projector in each headlight would have worked but it still would have looked cool
, oh well may be be next time. Close up of the lens with the shroud on, fits perfect
.and another one.
Some shots with the bezel on and the headlight cover on, the cover isnt properly set I just threw it on there to see what the final product will look like, personaly I like it
05-05-2007, 06:23 PM
#52
Senior Moderator
Nice. Thanks for the heads up with the E55 projectors. Ill definitely look into it this summer.
05-05-2007, 06:39 PM
#54
Former Sponsor
Thread Starter
iTrader: (12)
Originally Posted by fsttyms1
Nice. Thanks for the heads up with the E55 projectors. Ill definitely look into it this summer.
Originally Posted by BOSSIN$TL
would rx330-350 projectors fit in 2gTL housing
05-08-2007, 03:46 PM
#57

Gawd Damn, the time and effort put into this project, what a trooper. This appears to be a gratifying job. I am eager to see the final results. Hats off to your patience, innovation, and precision.
05-08-2007, 09:20 PM
#58
Former Sponsor
Thread Starter
iTrader: (12)
^^ Thanks man, Yeah it is a lot of work but i love doing it . Btw nice avatar, remove it before the mods do due to NWS rules.
On a more pertinent note, I mounted the lights on the car today and adjusted them, everything came out perfect. I'll be working on shrouds tomorrow and hopefully the car will be back on the road in a couple of days.
. Btw nice avatar, remove it before the mods do due to NWS rules. On a more pertinent note, I mounted the lights on the car today and adjusted them, everything came out perfect
. I'll be working on shrouds tomorrow and hopefully the car will be back on the road in a couple of days.
05-09-2007, 09:25 AM
#59
Senior Moderator
Sweet. Cant wait to see the finished product!
05-09-2007, 06:59 PM
#60
Former Sponsor
Thread Starter
iTrader: (12)
Ok, lights are done and are ready to be installed. Due to my stupidity I have to put off the project for another day before installing the lights. I took the factory lights off yesterday, installed the naked headlights on the car, adjusted them properly, did the shroud work today and sealed them at work. The plan was to come home and install the headlights on the car so the car can be back on the road again, once i got home i realized that i left all my tools, nuts and bumper pins at work. So it wont be till tomorrow till the car would be back on the road. Any how here are the pictures.
Factory lights, look at the age. The car came out of the dealership back in 99, so thats 8 years of roadware , not bad enh? Also i would like to mention that the car has 197,000 miles on the Odometer


Bumper is off!! The foglights are Sylvania X1010, I installed them 3 years ago and they are damaged as you can see, the glass is broken. Sylivania does not make the kit any more but mine are covered under warranty. I called them up a few days ago to get replacement lenses.


Lights are off!!

I am blind I am blind !!


After pulling the lights off of the car I took the ballast, rubber boot bulbs etc off of the original headlights to be used with the new ones.
Here is what an 8 year D2R bulb looks like Notice the burnt ceramic coating and whitish salt. HID bulbs loose their output over their life time and this one looks like its way past death .

After swapping all the parts this is how the headlights looked, the front...


The back, can you tell looking at the back that these are retrofitted headligths??


Lights on the car..


The above was around 4 o' clock, i had to wait till it was dark to do all the adjustment.
I love this image, lights are off but notice the blue color reflected back by the projector when i took the pic with flash on.

Initial fire up, brand new bulbs.

Cut off, its not all over the place but still not where i would like it to be.

After 5 minutes of adjustment, PERFECT output. (by the way this picture is taken at close distance, the wall is only 4 or so feet away from the car, all the adjustment was done at long distance against a flat white wall).

This picture was taken with exposure set at -2.0, thats why its yellow.

Todays work, trimmed and customized the bezels, which was a pain by the way. I had to cram them in the TL headlights, but i am happy with the results.


Another shot of the X1010 HID foglights, they have served well.

These new ones will be replacing the broken ones, which by the way still work the front glass is borken though so thats why i thought this would be a good time to replace them along with the headlights.

The turn/parking signal bulbs, amber

The above will be replaced by my favorite bulbs of all time, Sylvania Silverstar. These light up amber but are chrome with a bule tint when not lit they look great, specially on cleared headlights.

Factory lights, look at the age. The car came out of the dealership back in 99, so thats 8 years of roadware
, not bad enh? Also i would like to mention that the car has 197,000 miles on the Odometer Bumper is off!! The foglights are Sylvania X1010, I installed them 3 years ago and they are damaged as you can see, the glass is broken. Sylivania does not make the kit any more but mine are covered under warranty. I called them up a few days ago to get replacement lenses.
Lights are off!!
I am blind I am blind !!
After pulling the lights off of the car I took the ballast, rubber boot bulbs etc off of the original headlights to be used with the new ones.
Here is what an 8 year D2R bulb looks like
Notice the burnt ceramic coating and whitish salt. HID bulbs loose their output over their life time and this one looks like its way past death .After swapping all the parts this is how the headlights looked, the front...
The back, can you tell looking at the back that these are retrofitted headligths??
Lights on the car..
The above was around 4 o' clock, i had to wait till it was dark to do all the adjustment.
I love this image, lights are off but notice the blue color reflected back by the projector when i took the pic with flash on
.Initial fire up, brand new bulbs
.Cut off, its not all over the place but still not where i would like it to be
.After 5 minutes of adjustment, PERFECT output
. (by the way this picture is taken at close distance, the wall is only 4 or so feet away from the car, all the adjustment was done at long distance against a flat white wall). This picture was taken with exposure set at -2.0, thats why its yellow
.Todays work
, trimmed and customized the bezels, which was a pain by the way. I had to cram them in the TL headlights, but i am happy with the results. Another shot of the X1010 HID foglights, they have served well.
These new ones will be replacing the broken ones
, which by the way still work the front glass is borken though so thats why i thought this would be a good time to replace them along with the headlights. The turn/parking signal bulbs, amber
The above will be replaced by my favorite bulbs of all time
, Sylvania Silverstar. These light up amber but are chrome with a bule tint when not lit they look great, specially on cleared headlights.
05-09-2007, 09:21 PM
#61
Senior Moderator
Hot!
05-10-2007, 08:48 PM
#63
Former Sponsor
Thread Starter
iTrader: (12)
Project Complete
Well today after 15 days the project is finally over . I installed the headlights and here are the results.
Replacement X1010 Fogs installed, nice and clear lens compare that to the old broken ones posted earlier.


Regular HID bulbs are rated at 4100K, these fogs came with true Sylvania 5400Ks, light difference can significantly be noted. The fogs are much bluer and make the low beams look yellow.

Headlights installed.


Bumper installed.


Output pictures bulbs are new thats why they look so yellow but i am ok with it. When they color shift at around 100 hours of usage thats when they will be produce whiter light around 5000K rather than 4100K.


Cut off sharpness, car was alongside a wall notice the sharp cut off.

Some pictures with exposure set to the minimum.


This is waht the driver sees on the road. Lights are actually brighter they look dim due to the street light on the right being on.

Fairwell shot.

It was fun while it lasted. Here is a preview of things to come in the next few weeks . 03 TL with S2k projectors, CCFL halos and chrome finish .


. I installed the headlights and here are the results. Replacement X1010 Fogs installed, nice and clear lens compare that to the old broken ones posted earlier.
Regular HID bulbs are rated at 4100K, these fogs came with true Sylvania 5400Ks, light difference can significantly be noted. The fogs are much bluer and make the low beams look yellow
. Headlights installed.
Bumper installed.
Output pictures
bulbs are new thats why they look so yellow but i am ok with it. When they color shift at around 100 hours of usage thats when they will be produce whiter light around 5000K rather than 4100K. Cut off sharpness
, car was alongside a wall notice the sharp cut off. Some pictures with exposure set to the minimum.
This is waht the driver sees on the road. Lights are actually brighter they look dim due to the street light on the right being on.
Fairwell shot.
It was fun while it lasted
. Here is a preview of things to come in the next few weeks . 03 TL with S2k projectors, CCFL halos and chrome finish .
05-10-2007, 08:49 PM
#64
Former Sponsor
Thread Starter
iTrader: (12)
And here is a little video I made of the test drive .
http://video.google.com/videoplay?do...89041837434440
. http://video.google.com/videoplay?do...89041837434440
05-10-2007, 09:12 PM
#65
Senior Moderator
Pure Hotness. I definitely have to do this!!!
05-15-2007, 09:06 PM
#68
Safety Car
iTrader: (5)

Originally Posted by 02type-s
Damn dude, they look really good. I would love to have projectors but I don't have the patience...
05-16-2007, 05:02 AM
#69
Former Sponsor
Thread Starter
iTrader: (12)
Originally Posted by InspireTL
x2...I have to find someone who would do this for me...Sweet job man.
Patience rewards and surely it did in this case, output is 10 times better than the stock reflector set up and the whole front end looks way different than before, in a good way of course. You have to realize that I did this retro in 15 days and spend about 2 hours on it daily doing this and that, most of the time was spent figuring out how to get the projector mounted and being able to adjust it so everything is done right the first time rather than doing it over and over again. You would be surprised to know that i finished my quad projector retro in 2 days and three night, pictures are on first page. That retro was more challanging then any that i have ever done but since i had to meet a deadline i finished it in that short amount of time.
As I said all the info on the retro is there, i have posted a total of 144 pictures on the retro I think that should be enough to explain how to do it yourself
. I will have day time pictures and another video of lights in action this weekend.
05-30-2007, 10:50 AM
#70
HID Headlight Guru

Join Date: Jun 2006
Location: Mississauga, Ontario
Age: 37
Posts: 19
Likes: 0
Received 0 Likes
on
0 Posts
that bezel is kinda weird, maybe you should have left a little amber and a small led in there to make it a half functional side marker.
IT looks good and the projectors are awesome, but the bezel might be a little nicer if you cut off the bezel alone and used mirrored acrylic from the back to hide it all.
Ie
bezel
bezel + shroud
I have to agree with Jnc, retros take a while to work well and last after they have been installed. I have recovered a few butchered jobs where the retrofitter used cheap glues, terrible aiming which came apart after a few days.
Retros not only have to look good, aim properly but also be adjustable down the road in case the car is lowered, raised etc...
Do the job yourself, otherwise join hidplanet to find a local retrofitter who has worked on similar models to carry out the retro for you.
CM
05-30-2007, 11:28 AM
#71
wassup linux?? it's Tsxbeauty..haha..i agree with you on the bezel. It looks a little off with the bezel like that. IMO, I would just use one bezel. JNC, if you were to cut off the second bezel, would it actually cover the entire projector? Cuz it's hard to see, but it looks like it doesn't fully cover one side, the side that's closer to the turning light. Overall, good job though.
05-30-2007, 12:31 PM
#72
Former Sponsor
Thread Starter
iTrader: (12)
^^ Yeah i am not completely satisfied with the bezel either. For now i'll just leave it the way it is and may be later on down the road open it up and replace it with something else .
.
05-30-2007, 12:59 PM
#73
Originally Posted by JnC
^^ Yeah i am not completely satisfied with the bezel either. For now i'll just leave it the way it is and may be later on down the road open it up and replace it with something else .
.
05-30-2007, 01:24 PM
#74
Former Sponsor
Thread Starter
iTrader: (12)
^^ No its because of space issue. We dont have much space to work with in both the 99-01 TL and 02-03 TL. On the 03 TL retro i will be using AP2 S2K Bezels they work great as you can see in my quad projector retro, I used them on the TL projector which is 3 " in diameter but the AP2 bezels fit them fine.
06-01-2007, 01:32 PM
#76
Instructor
Join Date: Feb 2007
Location: San Diego
Posts: 222
Likes: 0
Received 0 Likes
on
0 Posts
Originally Posted by linuxglobal
that bezel is kinda weird, maybe you should have left a little amber and a small led in there to make it a half functional side marker.
IT looks good and the projectors are awesome, but the bezel might be a little nicer if you cut off the bezel alone and used mirrored acrylic from the back to hide it all.
Ie
bezel
bezel + shroud
I have to agree with Jnc, retros take a while to work well and last after they have been installed. I have recovered a few butchered jobs where the retrofitter used cheap glues, terrible aiming which came apart after a few days.
Retros not only have to look good, aim properly but also be adjustable down the road in case the car is lowered, raised etc...
Do the job yourself, otherwise join hidplanet to find a local retrofitter who has worked on similar models to carry out the retro for you.
CM
IT looks good and the projectors are awesome, but the bezel might be a little nicer if you cut off the bezel alone and used mirrored acrylic from the back to hide it all.
Ie
bezel
bezel + shroud
I have to agree with Jnc, retros take a while to work well and last after they have been installed. I have recovered a few butchered jobs where the retrofitter used cheap glues, terrible aiming which came apart after a few days.
Retros not only have to look good, aim properly but also be adjustable down the road in case the car is lowered, raised etc...
Do the job yourself, otherwise join hidplanet to find a local retrofitter who has worked on similar models to carry out the retro for you.
CM
06-01-2007, 03:20 PM
#77
HID Headlight Guru
Join Date: Jun 2006
Location: Mississauga, Ontario
Age: 37
Posts: 19
Likes: 0
Received 0 Likes
on
0 Posts
the retro above is on prelude, done by me (linux).
The acrylic is sold at most auto parts stores as a replacement mirror.
Its a mirrored plastic, mirror on the back, plastic on the front and its slightly flexible. It can be heated to shape it but its very tricky. Its easily used just flat.
Check walmart too in their small auto section.
Good luck
The acrylic is sold at most auto parts stores as a replacement mirror.
Its a mirrored plastic, mirror on the back, plastic on the front and its slightly flexible. It can be heated to shape it but its very tricky. Its easily used just flat.
Check walmart too in their small auto section.
Good luck
06-01-2007, 04:26 PM
#78
Instructor
Join Date: Feb 2007
Location: San Diego
Posts: 222
Likes: 0
Received 0 Likes
on
0 Posts
Originally Posted by linuxglobal
the retro above is on prelude, done by me (linux).
The acrylic is sold at most auto parts stores as a replacement mirror.
Its a mirrored plastic, mirror on the back, plastic on the front and its slightly flexible. It can be heated to shape it but its very tricky. Its easily used just flat.
Check walmart too in their small auto section.
Good luck
The acrylic is sold at most auto parts stores as a replacement mirror.
Its a mirrored plastic, mirror on the back, plastic on the front and its slightly flexible. It can be heated to shape it but its very tricky. Its easily used just flat.
Check walmart too in their small auto section.
Good luck
good call - im gonna check that out. Thanks~
 06-03-2007, 07:12 PM
#80
HID Headlight Guru
Join Date: Jun 2006
Location: Mississauga, Ontario
Age: 37
Posts: 19
Likes: 0
Received 0 Likes
on
0 Posts
Originally Posted by Muhtish
Petty Nice...how Much Would You Charge For Something Like That????? FOR THE 2001 TL THAT IS
Kinda sucks i dont a TL now
 but my retros are fully adjustable in rotation too.
 PM me for pricing or my email should be around here somewhere, otherwise im on hidplanet in the retrofitters section.
I dont want to take away from Jnc's work so hes gotta be ok with it first too. Just to play fair.
Thanks again for the interest, i will also have cf as a shroud if you have a cf hood etc... to match it all up. its a thin sheet of cf with adhesive... but its all cf.