
D.I.Y. Removing Door Panels & Wood Grain
 10-02-2007, 01:32 AM
#1
99TL-p 114K
Thread Starter
Join Date: Mar 2005
Location: South Florida
Age: 37
Posts: 1,455
Likes: 0
Received 2 Likes
on
2 Posts
So being that no one in this 2nd gen section has ever done a D.I.Y. for removing the door panels and wood grain on the TL, i just did this myself the other evening and I am pleased to have written up this decent guide for all the other members on this forum, who like me, might be wondering how to remove the door panels and wood grain. I hope everyone will enjoy this. 
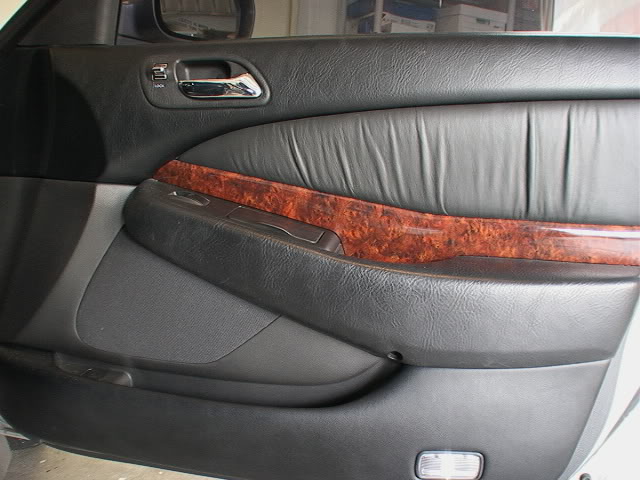
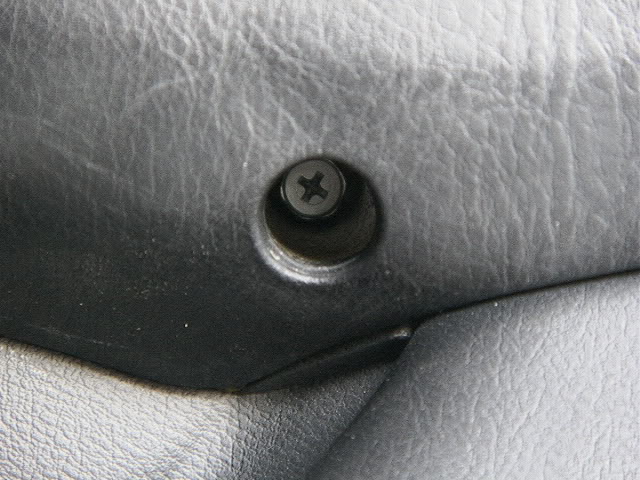
First i started with the right front door. There are two screws you need to remove before you can begin pulling the door panel away from the door itself. The first Screw is located behind the inside door handle. Remove that. The second screw is located on the side of the arm rest towards the bottom of it.
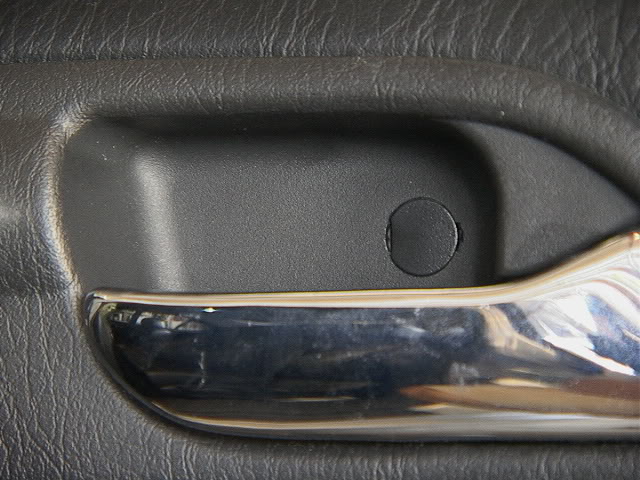
Take a small flat tip screw driver and wedge it in the gap on the right side of the little circle. Pry the circular flap open. Be careful not to scratch up any of the plastic unless you dont care. Take that screw out.
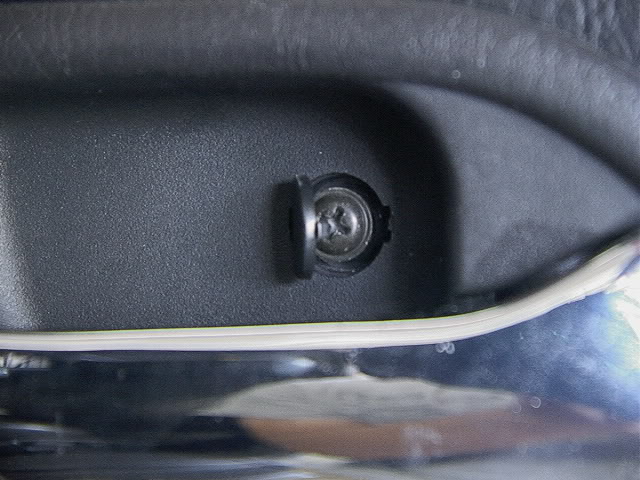
This screw is fairly deep inside the hole. A magnetic screw driver tip helps to pull the screw out of that hole after unscrewing it completely.
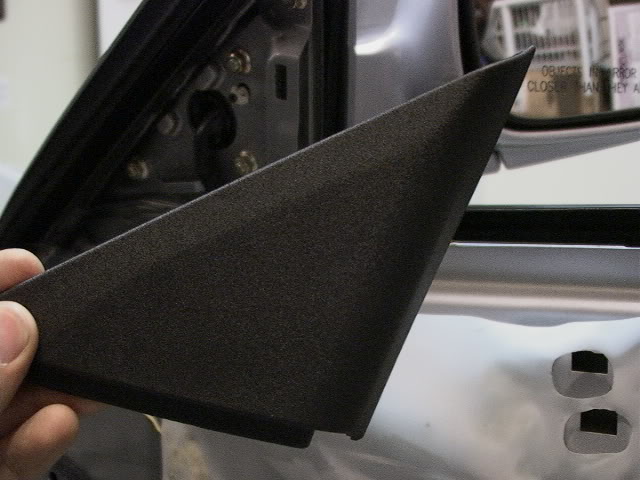
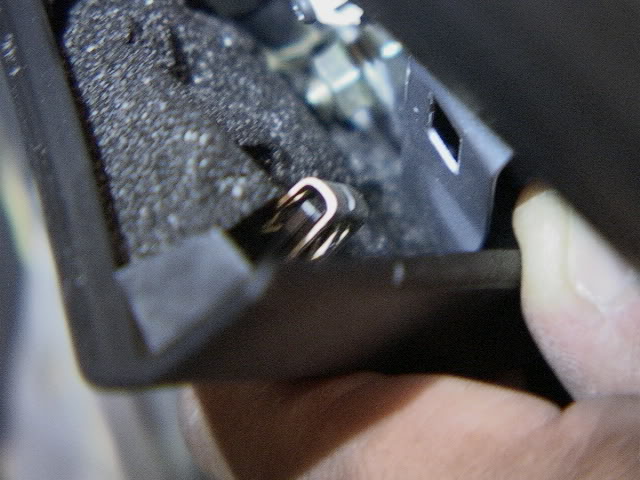
Now that you have both of those screws out, remove the triangular plastic black piece from the bottom left corner of your window. Try to get behind it with something so that you can pop it out. Be careful not to break the plastic piece that is attached inbetween the two metal prongs that hold that triangle piece on.
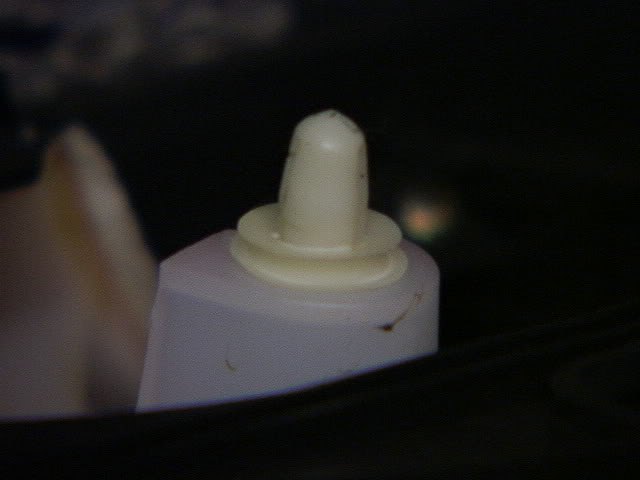
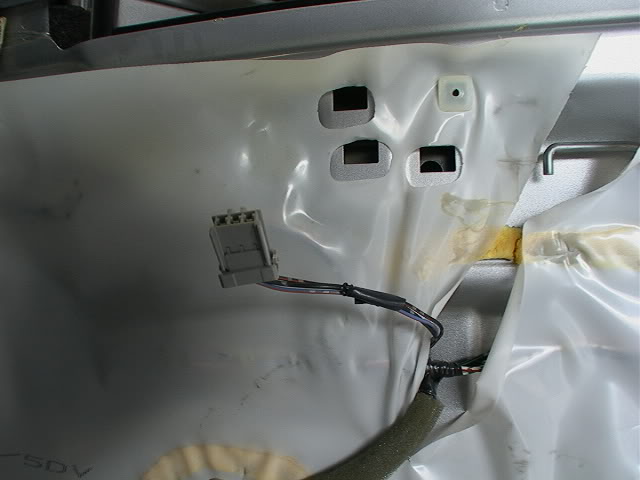
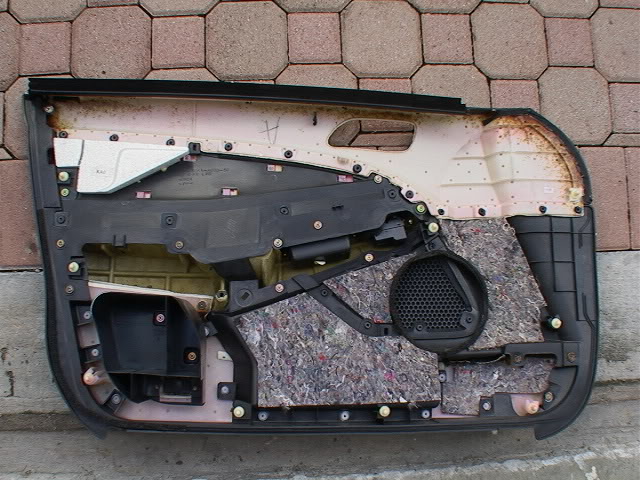
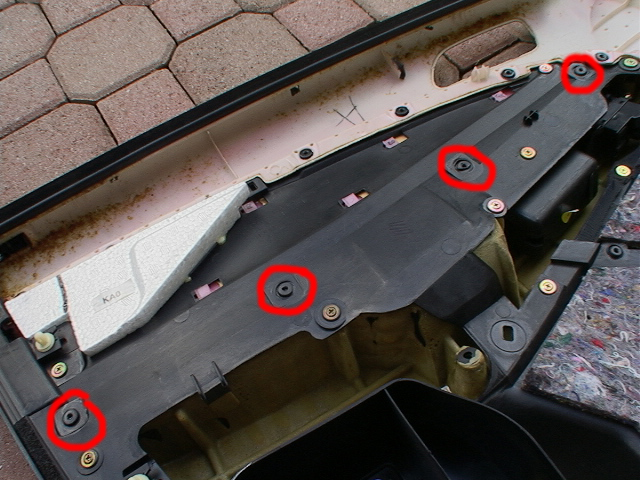
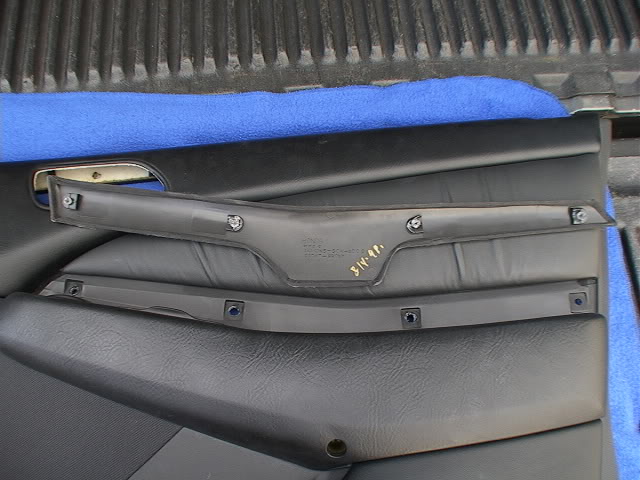
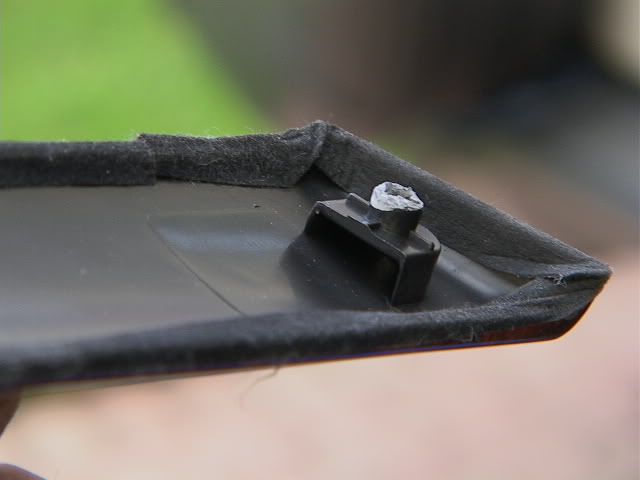
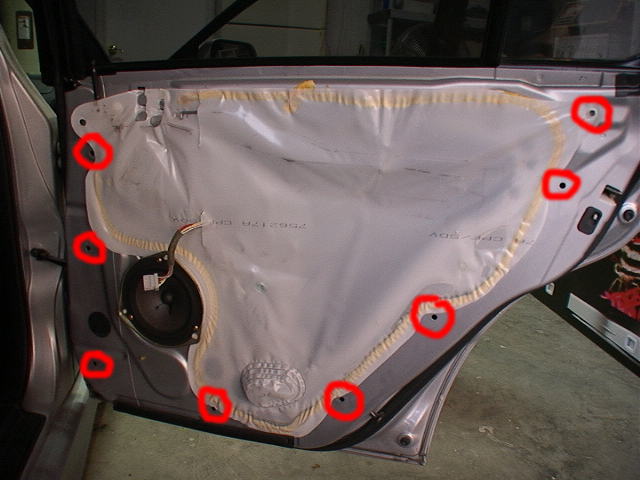
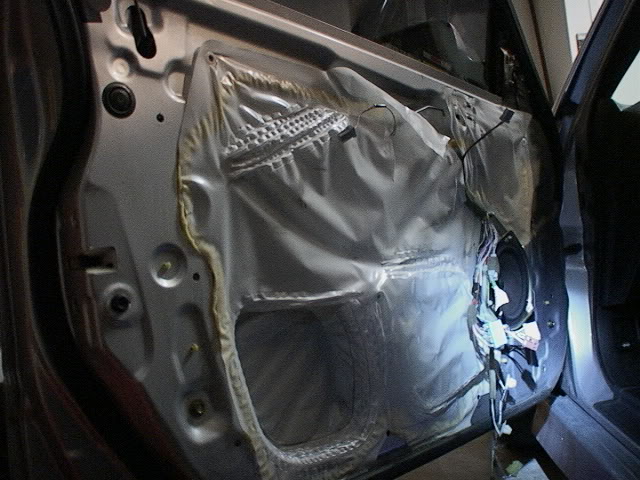
Now begin to pull on the door panel starting from the bottom and working your way up on both sides. Get your fingers under the panel at the bottom and pull on the panel in the middle at the bottom until you hear the sound of the white clip poping out of the slot. The pic below shows where all the white plug in clips are at behind the door panel. Dont be afraid to pull hard enough to get it to pop out. You wont break anything. Here is what the white plug in clips look like that you are pulling out...
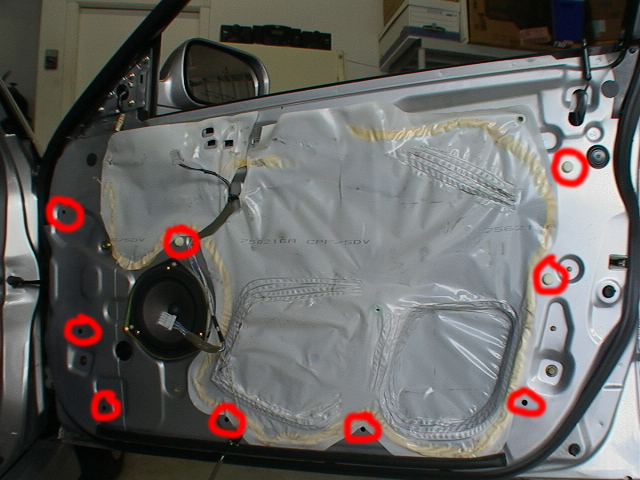

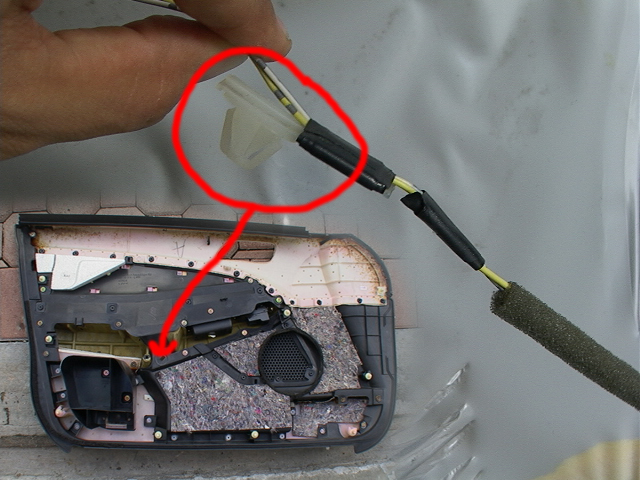
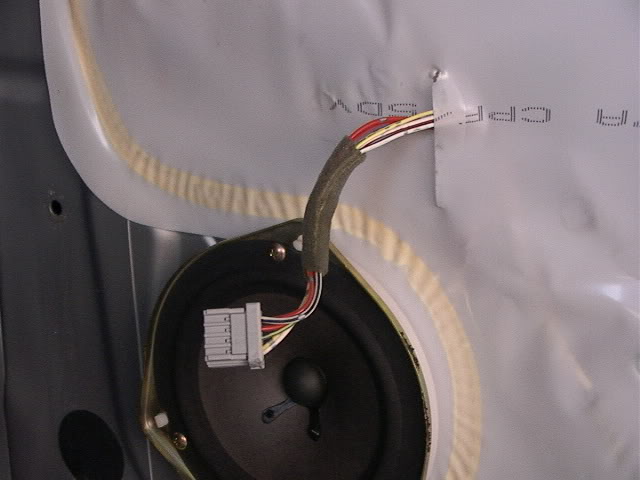
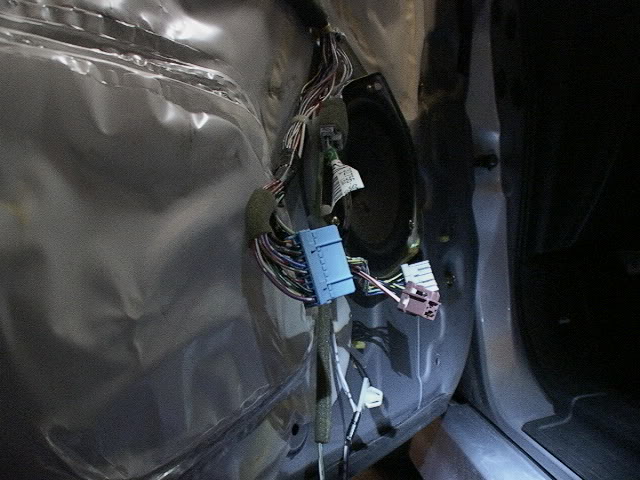
After getting all the clip poped out by pulling on the panel all the way around on bottom and both sides, your gona need to detach the cables for the power windows, power locks, and led light and also a spot where they attach the wire to the panel which can be seen in the red circle area with the arrow in the pic down below. You also need to pop the door hanle piece out and detach the metal rod from the handle thats behind the door panel. You'll see what i mean and figure it out when you do this.
Now that you have detached all that, you will be able to remove the panel away from the door completely and set it upsidedown.
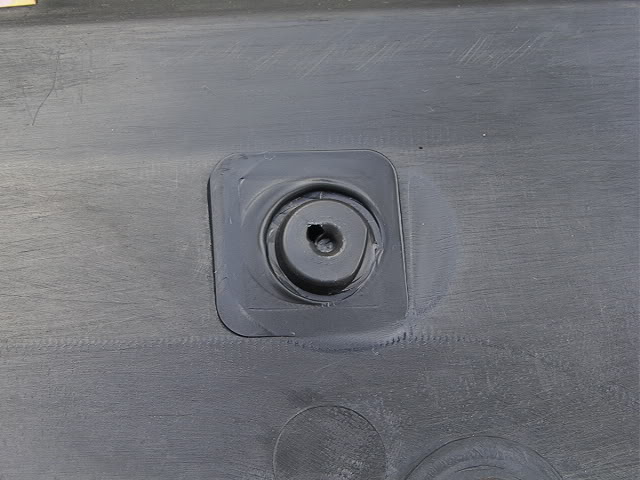
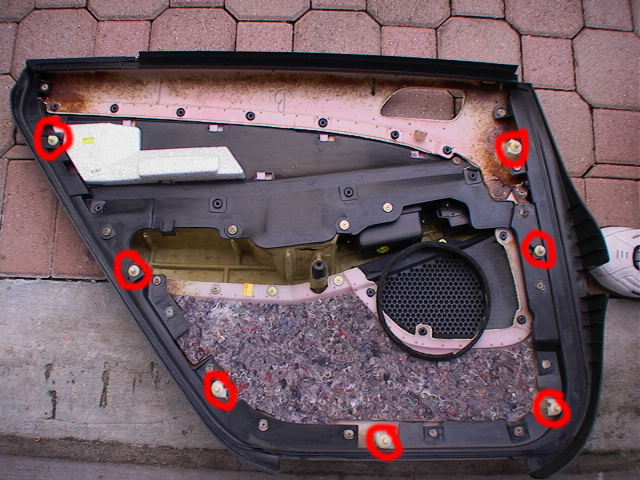
On the back side of the panel you will see where the wood grain piece is attached to the panel with plastic rivots, which are basically plastic pieces that have been melted to the wood grain atachment points. Because of this, you will have to drill out the the plastic rivots with either a drill and drill bit or you can actually do it by hand with just a drill bit, but it will take you wayy longer.
As you begin to drill, drill slowly, not fast because you dont want the drill to catch and slam through the plastic and drill through your wood grain. Drill nice and easy applying enough pressure to get through the thin layer of plastic until the drill pokes through and the wood grain becomes loose on that one particular point. You will know when it is.
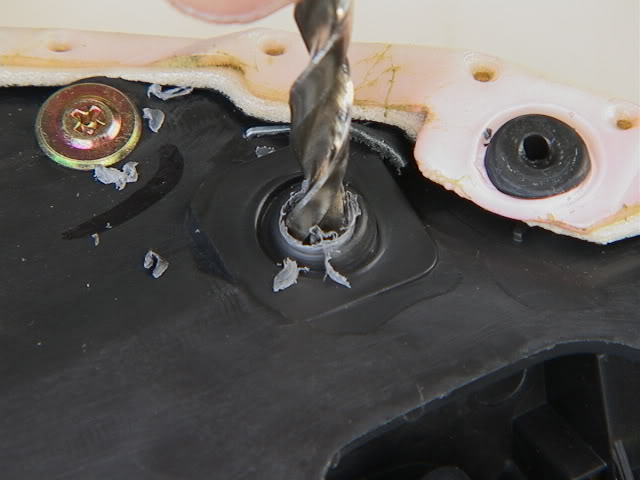
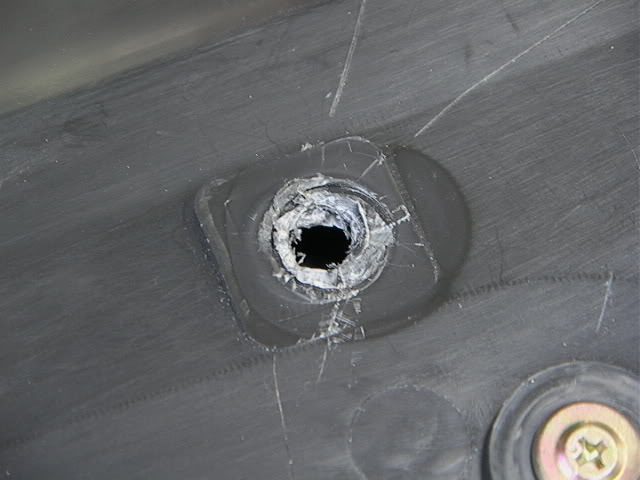
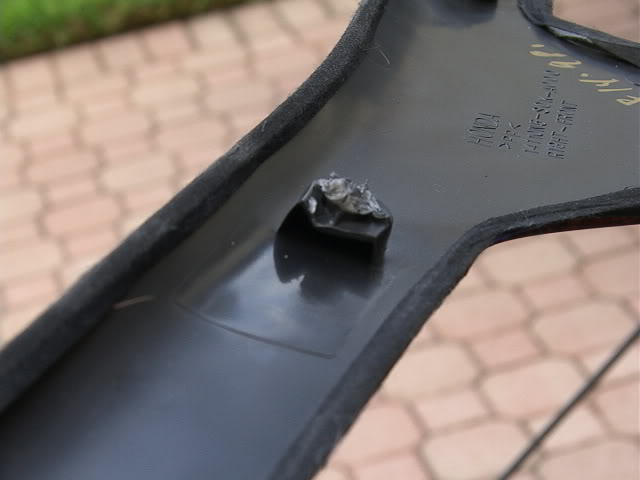
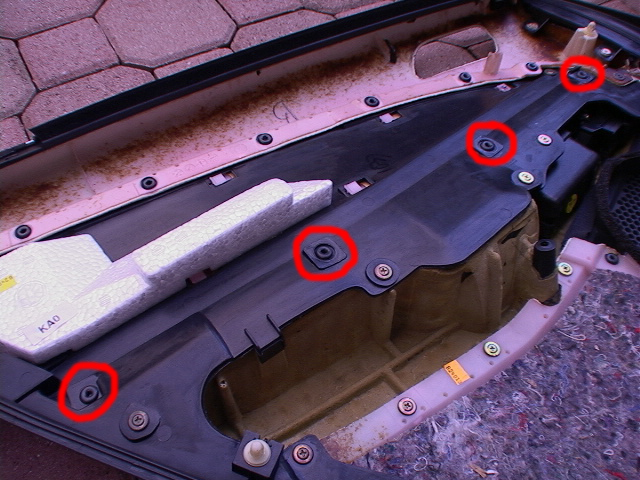
Here is what you gotta be careful not to drill too much into. Its ok to drill into it though because its gona get smushed and what not as you drill through, just dont go too far or else you gona destroy the entire nipple on the connection point of the wood grain.
Now that you have one wood grain piece out, your going to do the same process to the back door panels and the same drilling process to get the wood grain out. The back door panels are a little harder to get your fingers behind the edge of the panel to pull the clips out all the way around. There is also only one cable to disconnect and thats for the power window swtich.
Once you get to the driver side front door, your going to remove the panel the same way as the passenger front one, except your going to have to disconnect more cabels. You have to disconnect the cable for the power windows, power locks, security light, trunk switch, LED light. There are also two spots on the backside of the panel where they attach the length of the cable to the panel. Just pull those out. Once you have finished the fourth panel, now you will have all the wood grains out and can do whatever you want with them. The Center Console Wood grains are easiest to remove also, most people know how to take those out. Lift the arm rest up, and lift up on the ends of the wood grains that are right by the arm rest and each one will pop out, then just continue to lift following it all the way down to the other end. DONE.
Hope this can be a help for many.
First i started with the right front door. There are two screws you need to remove before you can begin pulling the door panel away from the door itself. The first Screw is located behind the inside door handle. Remove that. The second screw is located on the side of the arm rest towards the bottom of it.
Take a small flat tip screw driver and wedge it in the gap on the right side of the little circle. Pry the circular flap open. Be careful not to scratch up any of the plastic unless you dont care. Take that screw out.
This screw is fairly deep inside the hole. A magnetic screw driver tip helps to pull the screw out of that hole after unscrewing it completely.
Now that you have both of those screws out, remove the triangular plastic black piece from the bottom left corner of your window. Try to get behind it with something so that you can pop it out. Be careful not to break the plastic piece that is attached inbetween the two metal prongs that hold that triangle piece on.
Now begin to pull on the door panel starting from the bottom and working your way up on both sides. Get your fingers under the panel at the bottom and pull on the panel in the middle at the bottom until you hear the sound of the white clip poping out of the slot. The pic below shows where all the white plug in clips are at behind the door panel. Dont be afraid to pull hard enough to get it to pop out. You wont break anything. Here is what the white plug in clips look like that you are pulling out...
After getting all the clip poped out by pulling on the panel all the way around on bottom and both sides, your gona need to detach the cables for the power windows, power locks, and led light and also a spot where they attach the wire to the panel which can be seen in the red circle area with the arrow in the pic down below. You also need to pop the door hanle piece out and detach the metal rod from the handle thats behind the door panel. You'll see what i mean and figure it out when you do this.
Now that you have detached all that, you will be able to remove the panel away from the door completely and set it upsidedown.
On the back side of the panel you will see where the wood grain piece is attached to the panel with plastic rivots, which are basically plastic pieces that have been melted to the wood grain atachment points. Because of this, you will have to drill out the the plastic rivots with either a drill and drill bit or you can actually do it by hand with just a drill bit, but it will take you wayy longer.
As you begin to drill, drill slowly, not fast because you dont want the drill to catch and slam through the plastic and drill through your wood grain. Drill nice and easy applying enough pressure to get through the thin layer of plastic until the drill pokes through and the wood grain becomes loose on that one particular point. You will know when it is.
Here is what you gotta be careful not to drill too much into. Its ok to drill into it though because its gona get smushed and what not as you drill through, just dont go too far or else you gona destroy the entire nipple on the connection point of the wood grain.
Now that you have one wood grain piece out, your going to do the same process to the back door panels and the same drilling process to get the wood grain out. The back door panels are a little harder to get your fingers behind the edge of the panel to pull the clips out all the way around. There is also only one cable to disconnect and thats for the power window swtich.
Once you get to the driver side front door, your going to remove the panel the same way as the passenger front one, except your going to have to disconnect more cabels. You have to disconnect the cable for the power windows, power locks, security light, trunk switch, LED light. There are also two spots on the backside of the panel where they attach the length of the cable to the panel. Just pull those out. Once you have finished the fourth panel, now you will have all the wood grains out and can do whatever you want with them. The Center Console Wood grains are easiest to remove also, most people know how to take those out. Lift the arm rest up, and lift up on the ends of the wood grains that are right by the arm rest and each one will pop out, then just continue to lift following it all the way down to the other end. DONE.
Hope this can be a help for many.

The following users liked this post:
webmastir (03-12-2012)
10-02-2007, 01:55 AM
#3
99TL-p 114K
Thread Starter
Join Date: Mar 2005
Location: South Florida
Age: 37
Posts: 1,455
Likes: 0
Received 2 Likes
on
2 Posts
Originally Posted by Lo Pan
damn it, if only i saw this 8 hours ago. i had to mask off my wood trim and speakers
great stuff though man. thanks for your time and effort into putting up a great DIY.
great stuff though man. thanks for your time and effort into putting up a great DIY.

 10-02-2007, 08:33 AM
#6
Senior Moderator

Trending Topics
10-04-2007, 05:36 PM
#8
99TL-p 114K
Thread Starter
Join Date: Mar 2005
Location: South Florida
Age: 37
Posts: 1,455
Likes: 0
Received 2 Likes
on
2 Posts
Originally Posted by pnthr30
Nice write up....any pics of it with the woodgrain off?
10-04-2007, 06:26 PM
#10
99TL-p 114K
Thread Starter
Join Date: Mar 2005
Location: South Florida
Age: 37
Posts: 1,455
Likes: 0
Received 2 Likes
on
2 Posts
Originally Posted by dreem1er
very nice diy, but why did you remove the trim, are you planing paint?
10-04-2007, 07:25 PM
#13
99TL-p 114K
Thread Starter
Join Date: Mar 2005
Location: South Florida
Age: 37
Posts: 1,455
Likes: 0
Received 2 Likes
on
2 Posts
Originally Posted by dreem1er
ssm?
Im excited. Like i said, HOPEFULLY i get them back tonight. I cant stand driving without my panels in becase its so noisy inside my car when im driving since i have my panels off. Like riding in a metal shell lol.
10-04-2007, 07:31 PM
#14
Originally Posted by dvsxlt247
BINGO!! Im excited. Like i said, HOPEFULLY i get them back tonight. I cant stand driving without my panels in becase its so noisy inside my car when im driving since i have my panels off. Like riding in a metal shell lol.
Im excited. Like i said, HOPEFULLY i get them back tonight. I cant stand driving without my panels in becase its so noisy inside my car when im driving since i have my panels off. Like riding in a metal shell lol. ....either way can't wait to see the pics....
10-05-2007, 07:28 PM
....either way can't wait to see the pics....
10-05-2007, 07:28 PM
#17
99TL-p 114K
Thread Starter
Join Date: Mar 2005
Location: South Florida
Age: 37
Posts: 1,455
Likes: 0
Received 2 Likes
on
2 Posts
Originally Posted by dreem1er
pics 
Also, My wheels with tires are up for sale. See the link in my signature below for more details.
10-05-2007, 11:24 PM
#18
T-Swzy
Join Date: Jun 2007
Location: Saint Paul, MN
Age: 36
Posts: 2,575
Likes: 0
Received 0 Likes
on
0 Posts
one question, if i remove the white plastic thing that looks like a bag? is my window right behind it? cause i think there's a lot of moisture stuck in my window slot, it squeaks when i roll it and it rolls real slowly
 10-07-2007, 03:09 PM
#20
Originally Posted by dvsxlt247
Nope, no pics yet. Havent gotten them back yet. Im now hopeing to get them back maybe tommorow, my friends shop has been a lil crazy lately and he hasnt been able to fit my small job in, but he does wana get it done asap. So as soon as i get them back, ill put them in, and take pics. Im really excited, kills me to have to wait, but hes doin me a major favor.
10-07-2007, 05:22 PM
#21
99TL-p 114K
Thread Starter
Join Date: Mar 2005
Location: South Florida
Age: 37
Posts: 1,455
Likes: 0
Received 2 Likes
on
2 Posts
Originally Posted by dreem1er
is your friend willing to do me a favor....
10-07-2007, 05:24 PM
#22
99TL-p 114K
Thread Starter
Join Date: Mar 2005
Location: South Florida
Age: 37
Posts: 1,455
Likes: 0
Received 2 Likes
on
2 Posts
Originally Posted by Razzi
one question, if i remove the white plastic thing that looks like a bag? is my window right behind it? cause i think there's a lot of moisture stuck in my window slot, it squeaks when i roll it and it rolls real slowly
12-06-2007, 09:27 PM
#23
Punctuation Nazi
So, how do you re-attach the wood grain panels once you have drilled them out? I would like to do the same thing, but am concerned about re-installation.
Do you just use some short wood or sheetmetal screws with a large flat head?
Do you just use some short wood or sheetmetal screws with a large flat head?
12-06-2007, 10:35 PM
#24
Racer

Join Date: May 2006
Location: Toronto
Age: 44
Posts: 302
Likes: 0
Received 0 Likes
on
0 Posts
hmm..i have heard of people screwing them back in but i just Rhino glued them in and clamped them in place. Drove without the panels for a whole day until the Rhino glue set.
it was Crazy Noisy.
it was Crazy Noisy.
12-09-2007, 09:55 AM
#25
99TL-p 114K
Thread Starter
Join Date: Mar 2005
Location: South Florida
Age: 37
Posts: 1,455
Likes: 0
Received 2 Likes
on
2 Posts
Originally Posted by asujosh1
So, how do you re-attach the wood grain panels once you have drilled them out? I would like to do the same thing, but am concerned about re-installation.
Do you just use some short wood or sheetmetal screws with a large flat head?
Do you just use some short wood or sheetmetal screws with a large flat head?
 10-09-2008, 06:48 AM
#31
Racer

Join Date: Jul 2003
Location: boston, ma
Age: 49
Posts: 420
Likes: 0
Received 0 Likes
on
0 Posts
i cant wait to see pics, i have been thinking about doing this forever! any updates yet? How much do you think is reasonable for an autobody shop to charge to paint it all to match the exterior?
10-09-2008, 07:16 AM
#32
Senior Moderator
You should be able to do it for 20-30 bucks with a spray can and have it look really good.

 02-20-2012, 03:25 PM
#38
im not sure if i missed it in the reading but how did you reattach the wood trim piece to the door panel...im getting ready to do all the wood trim flat black and was wondering about how to reattach it????
great post btw, very thankful
great post btw, very thankful
 03-12-2012, 06:40 PM
#40
Senior Moderator
I used a 5 min epoxy. Just fill the holes that you drilled out with the wood back in place. It will bond it. I did that when i swapped the upper half of the door panels
The following users liked this post:
TL202 (08-18-2012)