When you click on links to various merchants on this site and make a purchase, this can result in this site earning a commission. Affiliate programs and affiliations include, but are not limited to, the eBay Partner Network.
Ever since I took deliver on our '06 RL I have had a persistent valve that seems to be loose. We have put almost 30,000 miles on the car since and I am coming up on another oil change soon. I know the dealer gets big bucks for this job.
Feeling that it would be an ideal time to take the valve covers off and check the lash, just how involved is this to get accomplished?
Is this an adjustment that has a "go-no go" clearance setting?
Is there an online manual that describes how to do this?
Will I need more than just valve cover gaskets?
Thank you for all your advice...the BB here is awesome.
talking about?? i have 166,000 miles on my RL never had any valve adjustment. it is automatic! this is not a 1975 plymouth duster... No one replied because you must not have a ACURA RL...???? MY, MY.
The manual talks about valve adjustment. Just b/c your car doesn't need it doesn't mean his doesn't.
Alfa, sorry I can't help you here as I don't know enough about the mechanics of a car. I would love to know what you find however. Post your findings if you get them somewhere else.
I did some digging and I found this diagram of the cylinder head. Part #9 is the tappet adjuster. This is what I am familiar with from my former CRX.
Just to clarify, if you look in the service manual, for each service to be done one of the options is to have the valves adjusted. In my case, there has been one or two that have been a constantly ticking.
what is the valve clearance setting?
Part #15 is called a "lost motion"...any one know what this part does? Is it a smog valve?
I have not done it on this car, but I have done it on my old integra, and several others. If you can expose the valves, you will need the correct size wrench for the locknut, screwdriver to make the adjustment, and I recall that a set of angled feeler gauges were neccesary for the integra- don't know about this one, but they are not expensive. Follow the service manuals procedure for getting each piston to correct spot, and check/adjust valve clearance. You should be turning the crank in 1/4 turn increments. Feeler should slip in and out with a bit of drag. You will get the feel of this as you do them. Not difficult, but time consuming.
Specs per Factory service manual:
Intake: .008-.009" .2-.24mm
Exhaust: .011-.013" .28-.32mm
Last edited by drolds72; 06-11-2011 at 09:12 AM.
Reason: .
On my CL I knew I needed an adjustment. My mechanic doubted me (like christopher1, but not as rude). In any case, he checked them and said he needed to do an adjustment, after all. Many new cars need them right off the line and the self-adjustment isn't enough. Alpha, I wish I could help but it sounds like you got it covered. Good luck!
On my CL I knew I needed an adjustment. My mechanic doubted me (like christopher1, but not as rude). In any case, he checked them and said he needed to do an adjustment, after all. Many new cars need them right off the line and the self-adjustment isn't enough. Alpha, I wish I could help but it sounds like you got it covered. Good luck!
No self adjusting components in the valve train that I am aware of. Rocker to valve lash is only adjustable part. Overhead cam design eliminated hydraulic lifters (which might be considered self adjusting..) and push rods.
I have adjusted valves on my CRXSi many times. It just requires patience and a "feel" of how the feeler guages are to slide in and out so you get it right. Some adjusters have a go-no go setting, but not on our cars. Consider this a long effort to check all the clearances not once but twice. I say twice because you might have missed one or the setting might have changed if you didn't get the cam on the point so you can measure the cam on the lobe bottom for a particular cylinder.
When the time comes I will document the effort in a photo description.
Just be thankful if you don't own an older Alfa Romeo where we have to adjust the valves every 12,000 miles and remove the cams to replace the shims.
How can you be sure of this? Do you know EVERY RL that has ever been tuned or worked on? That was my point. If the man thinks his valves need tuning, I'm pretty sure he would know better than you. Or do you work on RLs daily with an expert mechanic's knowledge? Maybe you do, and I will stand corrected. I won't hold my breath.
Is there a way I can post an audio file in here? l will record a sound byte of my RL at idle when hot and you can hear very pronounced the valve clattering. I really don't care if your car has never had a valve adjustment, mine needs it.
Why would it say in the service book to check the valves and make the customer pay for for 4 hours labor? That is the shop manual rate so that means a good mechanic will spend 1-2 hours adjusting the valves. There is also a valve cover kit and seals which requires 2 and it is a separate kit all to itself for valve adjustments. (PN 12030RJA-000)
Christopher1, I am not here to have a pissing match with you. You are lucky to have gone so long with out having to have the valves adjusted. Mine has clattered since I bought mine from the original owner. someone missed the issue at the dealer for a warranty ticket.
At 105,000 miles, I am doing my timing belt and adjusting the valves at the same time. The repair manual is spot on and has been very valuable in helping me get everything off.
As to the valve lash, the front cylinder head ( 4,5,6 ) the valves were loose as I thought. The intakes/exhausts were any where from .003 to .006 loose. That translated to about a 1/4 turn of the adjuster.
Putting in the valve cover gasket is straight forward as the gasket is keyed. Once you get the right slot started, the rest just follows through. There are two tabs that fold into the cover to provide tension so the gasket doesn't fall out.
You need a tube of Syl-glide to help you put in the plug seals. They are metal seals. You will have to knock them out with a punch and small plastic mallet. To install them put some Syl-glide on the sides and you can just about push them in by hand. Tap them in till they are flush. Then lube the inside of the seal. You will need a small thin screw driver to fold the lip over the spark plug tube. The old cover seals I cut off, then put a dab of Syl-glide on the new rubber seal, and it just popped right on.
What surprised me was the color of the intake plenum. It was very black on the egr side and brownish inside the plenum. The intakes were black also. I will be cleaning this extensively before reinstalling. I will look down the intake runners to see what the backside of the intake valves look like. If they are dirty, I might seriously consider doing the sea foam treatment,
I will post photos later when I get back to my office.
Now I am trying to get the back valve cover off. What a pain. There are 4 nuts that hold the torsion bar to the body that are 12mm nuts which are not easy to get to. Then there is the wiring harness for the injectors that goes over the cover which I will have to deal with when I try to get the cover off.
The rear cover came off with some effort, put the new seals in and cleaned it up. Then I went in and adjusted the valves. They were just as loose as the front cylinder head. It wasn't easy getting back there as I had to lay across the engine just so I could see. A good drop light helps a lot also. Once they were adjusted, getting the cover back on wasn't as straight forward as you would think. The plug tubes hung up on the seals, and so it requires a mirror to see how to get the seal over the lip with your fingers or a small flat tipped screw driver. Remember to put Syl-Glyde over the lips to make it easier to install.
The intakes on the intake plenum were black, so I cleaned the plenum up as best I could with solvent and washed it all out. It looks better but I still think some Intake cleaner is in store for the future. The back side of the valves looked great for the mileage.
Everything is ready to run, and I will know how quiet it will be after the timing belt is done. (another thread)
What I realized is that this engine has "roller cam rockers" which you will usually find in high performance or custom built engines. More power and uses less energy with roller rockers.
I put a couple miles on the car tonight before I am off to the dealer to deal with a crank bolt that refuses to come out. When I got back to the driveway and the engine was idling, it was sooo quiet! We shall see how the mileage is affected and performance, as we put some miles on the car.
Pictures as promised. Not a lot but enough to share around.
http://www.flickr.com/photos/alfadoctor/7738524372/
After you take the cover off of the plenum, this is what you will find after 104,000 miles. This shows the EGR section (far right) and the intake runners and EGR path to the various intake runners. In the brown channel is where the fumes go around to each intake runner and into a small port.
http://www.flickr.com/photos/alfadoctor/7738524500/This is the plenum cover as view from the bottom side. There is a thin rail that runs down the middle that is opened/closed by the valve at the end. All of the brown came off really easy with some spray carb cleaner. The soot from the EGR valve was cleaned up but it is like the inside of your kitchen oven after a major spill...very hard to clean up.
http://www.flickr.com/photos/alfadoctor/7738524604/This shows the intake ports after you remove the plenum and gasket. Notice how black they are after 104,000 miles. You can partially see the back side of the intake valves from a certain angle and a strong light. The edges of the intakes are razor sharp, so if you are cleaning around there with carb cleaner, be careful when you wipe up you don't get cut deep. I got a serious nick on my index finger wiping with a rag. They won't come expertly clean but cleaner than they are here.
Then injector fuel rail cover is shown on the top and bottom of the manifold.
http://www.flickr.com/photos/alfadoctor/7738524746/
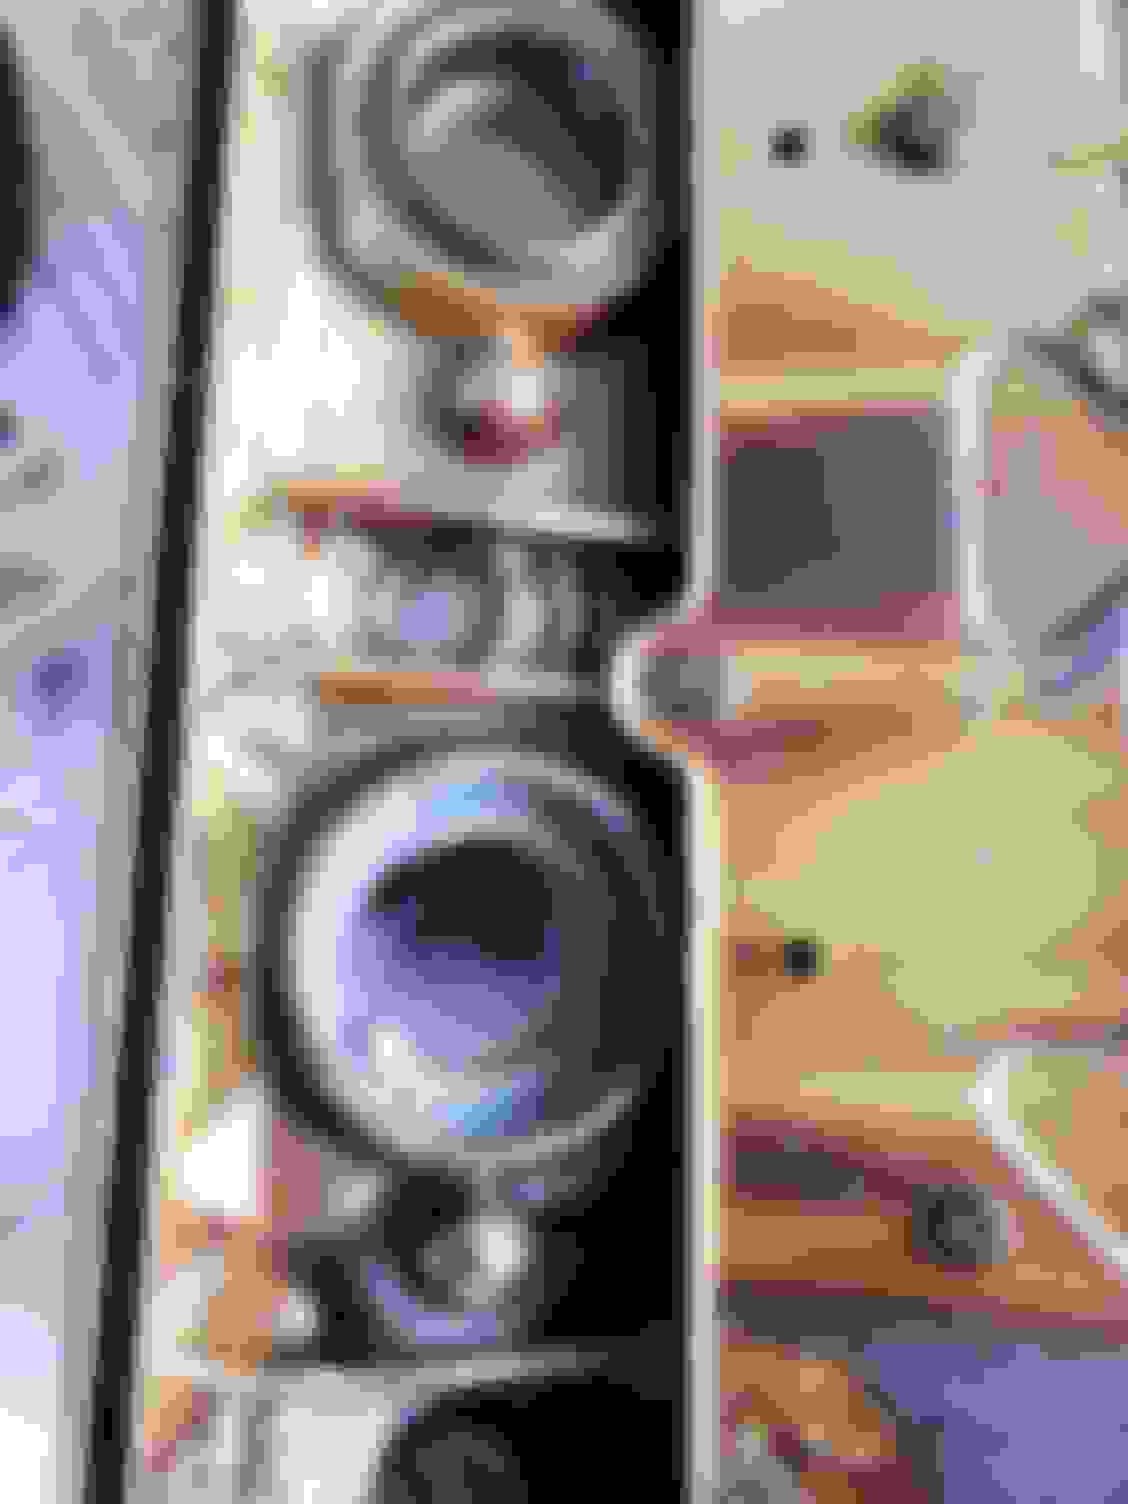
This is the front bank cylinder head (L-R 4,5,6) after you remove the valve cover. The cam is under the rollers. The intake rocker arms are at the top and the exhausts are at the bottom. The plug tubes are shown at the bottom of the cylinder head. Those rockers at the bottom are a pain to adjust as you have to work the feeler gauge in to the spring/rocker arm to measure and there is cylinder head interference.
The clearance is shown in the book as .009 in. intake and .012 in exhaust. If you roll the crank around and line up the holes in the timing cover hole as it is shown in the manual, you can adjust both intake and exhausts at the same time. The hardest part is getting the feel of the feeler gauge drag as you adjust the valves. Having owned a CRXSi and had to adjust the valves on several occasions it was easy enough for me to know what is the right feel of drag.
When you put the valve cover on you have to use a thin screwdriver or your fingers to roll the lip of the tube seals over so the cover can slide down and be ready to bolt on.
No one has had there RL valves adjusted. that was my point!!
Really? I had mine adjusted. My valves started ticking around 80K and when I did the timing belt at the dealership, they adjusted the valves. No more ticking, nice and quite. Also, the valve adjustment is listed as part of the 105,000 service. So to say no one has the RL valves adjusted is not accurate.
There were other posts above this that said they have never had their valves adjusted. I was just restating what they said. Whether or not they had it done at the Tbelt service, they would have to look at their receipt. When you look at the coupon service booklet, valve adjustments can be done at any service. Please don't shoot the messenger!
I believe there is no valve adjustment requirement for this car, just "as needed". Most cars may never need it. This is in the manual and confirmed by my trusted Honda mechanic. Forget about the Acura dealer's service schedule, it is overkill and wrong and there to lighten your wallet. Goes for any brand.
I received an email for this thread. If you open the hood of the car and look at the underside you will find a sticker there that gives the valve clearances. This engine does not have auto valve lifters. You must adjust the valves manually. You will need a screwdriver, a 10mm wrench and a set of feeler gauges. A good mechanic that knows how to adjust manual valves will knock this out in no time. The valves have to have a certain drag on them or you get them to tight or to loose in the adjustment. As you tighten the nut to hold the adjuster, it will want to tighten up. It takes some finesse to know how loose to set the adjuster so when you tighten the nut it comes to the correct clearance.
Yes, you don't need to do this very often, maybe 100K miles? Probably when the valves make a ticking sound is a good time to have this done.
If you change the spark plugs, this would be a good time to do this as you are not that far away from taking the valve covers off.
Not sure of your mechanic, take it to an Acura / Honda service shop and have it done.
I just did the valve cover gasket and spark plug seals on a 1997 Honda Accord for family and the gasket and seals were hardened and broke off. Needless to say, I am about to buy the valve cover gasket, spark plug seals, plenum gasket and manifold gasket and will be replacing them along with a valve adjustment. I called the dealership and they wanted $730 in WA. I can do this myself w/ aftermarket parts for less than $150, so that's what I intend on doing. The car has 168k.
For those interested in doing a valve adjustment, you might as well replace the gaskets below while the covers are off. GL! I ordered 11 of the washers but you only need 10. This is more of my own risk mitigation in case i screw up.
So while taking the valve covers off and replacing the spark plug seals I have found that the spark plug valve cover burned off. Do you guys know if I should buy new covers or just reuse?
Decided to just buy new valve covers, both front and back before they get discontinued. Going to cost me $410 shipped. Bad luck that it happened to both front and rear covers. At least I am doing the work myself so I am saving money on labor..Dealership wanted $850 for valve adjustment.
Going to work on the valve adjustment tomorrow but it appears the valves are extremely tight, no wonder my spark plugs and valve covers burned off from running too hot.
While you are in there that far, I would change the plugs, and check the ignition coils to see if there are any cracks or appearance of anomalies. You should swap the coils around so they are not in the same holes. I do it, but I can not remember what the reasoning is. Maybe someone will chime in. Get the platinum tipped plugs, they last longer and run better.
Check the ignition coil connections to make sure they are corrosion-free to ensure that you have good conductivity.
How does the intake manifold look? Use some spray carb cleaner or disc brake cleaner to clean up all that residue that builds up in there. Especially the ports where gases flow in and out.
Full of carbon. I plan on cleaning it. So, the dealership tells me the front valve cover is on back order and they don't know when it will be available. Should I gamble and buy a used one? All of the used ones I've seen have the spark plug seals in the cover so I cannot tell if it is damage like mine. I guess I dont have a choice.
How does the intake manifold look? Use some spray carb cleaner or disc brake cleaner to clean up all that residue that builds up in there. Especially the ports where gases flow in and out.
Should I remove the intake manifold and clean it or just leave it as is? full.of carbon
 06-09-2011, 11:18 PM