
rear vent outlet broken - need help ordering the right part
 05-22-2013, 06:38 PM
#1
Pro
Thread Starter
rear vent outlet broken - need help ordering the right part
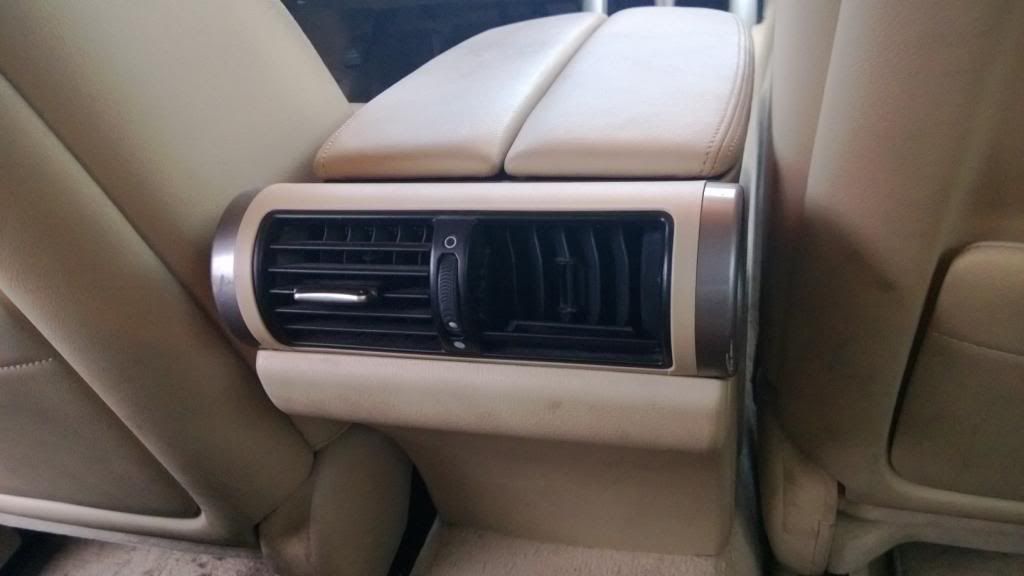
As u can see here, the rear air vent is broken. I tried to order the part on oemacuraparts but they give a choice of colors. I believe the vent outlets are all black no matter whats the interior color of the car. I'm a bit confused which to pick.

Part # 31.
Here's the page link
http://www.oemacuraparts.com/parts-c...bumper/console
 05-22-2013, 06:43 PM
#2
Drifting
You need the white cream ivory one. The vents themselves are black but the surrounding area is matched to your interior.
Edit: Just realized there are two different options for the ivory color too. Might want to PM Tim at OEMAcuraParts to figure out which one is for which years. They may have changed the hue slightly.
Edit: Just realized there are two different options for the ivory color too. Might want to PM Tim at OEMAcuraParts to figure out which one is for which years. They may have changed the hue slightly.
Last edited by BDoggPrelude; 05-22-2013 at 06:45 PM.
05-22-2013, 08:45 PM
#4
Senior Moderator
It comes with the ivory trim around the black vent. Both "white cream ivory" parts have the same part number and price. You can't go wrong.
05-22-2013, 09:09 PM
#5
Pro
Thread Starter
Do you think the silver/metallic rings on each side comes with it too or that's a different part by its own ?
05-22-2013, 09:19 PM
#6
Senior Moderator
Silver is separate. I missed the 2 in the part number. You want 023ZC. I'm 95% and twice on Sundays.
05-22-2013, 09:19 PM
#7
Drifting
OP, you could always pull of your current one and see what PN is stamped on the back of it too.
Trending Topics
05-22-2013, 09:28 PM
#8
Senior Moderator
The only option for grey is 023ZB.
07-27-2013, 07:36 PM
#11
Senior Moderator
The wheel opens and closes the vent. The silver tab directs the flow. Either way, it is all one piece, #31.
07-28-2013, 07:05 AM
#13
Senior Moderator
It is very likely you can do it as well as a dealer given your 4/10 mechanical ability. The diagram shows the silver trim covering a screw on the right side. Someone here has done it and explained before.
07-31-2013, 03:34 PM
#15
Ok the part I ordered (83403-SJA-003ZC) just arrived by FedEx. Now I have no clue how to install. Can anyone shed some light on how this thing is installed. I figured it can't be that hard considering it only came with two tiny screws.
Last edited by Toppatop; 07-31-2013 at 03:35 PM. Reason: Typo
08-01-2013, 08:22 AM
#18
Eureka!!! After twenty minutes of carefully tugging and pulling, I finally was able to remove the plastic around the vent unit and was able to replace the damaged vent piece. Now the backseat looks beautiful for those that are lucky enough to ride in the backseat. I can't post pics because I don't know how to but I'll try and explain how I did it.
1. The larger plastic cover on the front pops off (used a knife with sharp point to avoid bending edges with screw driver. But be very carful).
2. The two plastic pieces on left and right side has two screws. One in the middle and at the bottom. Then it should pop off with a little finess.
3. Remove the screw holding the vent in place. Should be one on each side. Then with a bit more finess gently remove the vent unit and replace with new then reverse your disassembly.
Hope this helps anyone with the same issue by the way the part number for this is 83403-SJA-003ZC
07-31-2015, 10:48 AM
#19
4th Gear

Join Date: Jul 2015
Posts: 4
Likes: 0
Received 0 Likes
on
0 Posts
Eureka!!! After twenty minutes of carefully tugging and pulling, I finally was able to remove the plastic around the vent unit and was able to replace the damaged vent piece. Now the backseat looks beautiful for those that are lucky enough to ride in the backseat. I can't post pics because I don't know how to but I'll try and explain how I did it.
1. The larger plastic cover on the front pops off (used a knife with sharp point to avoid bending edges with screw driver. But be very carful).
2. The two plastic pieces on left and right side has two screws. One in the middle and at the bottom. Then it should pop off with a little finess.
3. Remove the screw holding the vent in place. Should be one on each side. Then with a bit more finess gently remove the vent unit and replace with new then reverse your disassembly.
Hope this helps anyone with the same issue by the way the part number for this is 83403-SJA-003ZC
1. The larger plastic cover on the front pops off (used a knife with sharp point to avoid bending edges with screw driver. But be very carful).
2. The two plastic pieces on left and right side has two screws. One in the middle and at the bottom. Then it should pop off with a little finess.
3. Remove the screw holding the vent in place. Should be one on each side. Then with a bit more finess gently remove the vent unit and replace with new then reverse your disassembly.
Hope this helps anyone with the same issue by the way the part number for this is 83403-SJA-003ZC
08-01-2015, 08:16 PM
#20
Senior Moderator
What are you using to pry it? I found the best tool for interior pieces clipped on is your finger tips. Your RL isn't built differently, so I suggest pulling harder. Worst case, you break the piece and have to source a new one.
08-02-2015, 09:26 AM
#21
#1 the larger plastic doesn't pops off on my RL, I afraid it going to break with a little bit more pressure. Any suggestions
whoooooohoooo my first post - we just bought an '05 RL w/ 70k miles for 13k

Thread
Thread Starter
Forum
Replies
Last Post
mada51589
3G TL Problems & Fixes
79
05-03-2022 08:54 PM
darksky
3G TL Problems & Fixes
2
09-05-2015 03:11 AM