16+ LED headlight conversion for 13-15
 04-23-2018, 09:34 PM
#1
Instructor
Thread Starter
16+ LED headlight conversion for 13-15
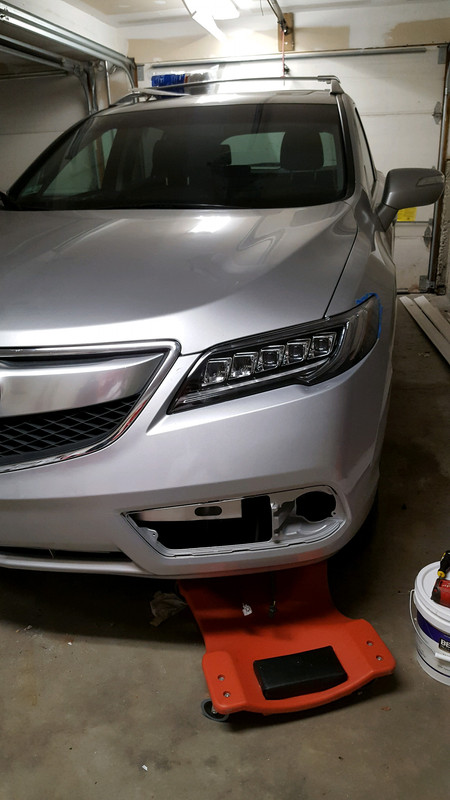
I'm in the process of switching over to the 16+LED headlights on my 13 base. The pinouts for the 16+ call for DRLs call for a signal wire from the high beams or parking sensor. I think this either dims the DRLs or shuts them off. For the guys with the 16+ RDXs, please answer what your headlights are doing so I can figure out wiring.
Do the DRL's dim or turn off when you have the parking lights on, low beam, high beam, or turn signal on?
Do they turn off when you flash the high beams? Do they ever turn off?
When using your Auto headlight on feature, do you get anything in your cluster showing the lights are on?
Do the DRL's dim or turn off when you have the parking lights on, low beam, high beam, or turn signal on?
Do they turn off when you flash the high beams? Do they ever turn off?
When using your Auto headlight on feature, do you get anything in your cluster showing the lights are on?

 05-08-2018, 10:59 PM
#3
2021 RDX A SPEC
DRLs are dim when parking brake is applied. They brighten once the parking brake is released
they stay on all the time but dimmed when low beams or high beams are engaged.
They are at full brightness with or without parking lights when no parking brake applied.
Green icon lights up when auto headlights kick In.
they stay on all the time but dimmed when low beams or high beams are engaged.
They are at full brightness with or without parking lights when no parking brake applied.
Green icon lights up when auto headlights kick In.
Last edited by Acura604; 05-08-2018 at 11:03 PM.
05-09-2018, 08:52 PM
#4
Instructor
Thread Starter
Thank you for replying!
The DRL plug has an input for the parking light. I dont see an input for the brake input. This must be done under the dash via the onboard dc-dc converter under there. There is an output for the DRL that goes somewhere. I need to figure out what this DRL output coming off the headlight is doing.
The DRL plug has an input for the parking light. I dont see an input for the brake input. This must be done under the dash via the onboard dc-dc converter under there. There is an output for the DRL that goes somewhere. I need to figure out what this DRL output coming off the headlight is doing.
05-12-2018, 12:08 AM
#5
2021 RDX A SPEC
my mistake... i noticed in the morning when i was warming up the car... the parking brake was engaged... but the DRLs were OFF. once i released the brake, they came ON. i'll test tomorrow.

Trending Topics
 07-17-2018, 07:25 PM
#9
Instructor
Thread Starter
Yes I did. I have everything working  . The only issue is the turn signals are hyperflashing due to the front turn signals being LED and having a lower resistance. Nothing a 50W 5-6 ohm resistor cant fix. Once I get some time I'll do a write up.
I found the oem plugs, terminals, leads, and weather proof plug for the unused holes through holes from another forum member. If anyone needs these I can give you his email. It made life so much easier having the right parts in a bag. Otherwise I had to figure out all all the part numbers for all the different parts.
. The only issue is the turn signals are hyperflashing due to the front turn signals being LED and having a lower resistance. Nothing a 50W 5-6 ohm resistor cant fix. Once I get some time I'll do a write up.I found the oem plugs, terminals, leads, and weather proof plug for the unused holes through holes from another forum member. If anyone needs these I can give you his email. It made life so much easier having the right parts in a bag. Otherwise I had to figure out all all the part numbers for all the different parts.
Last edited by awoc; 07-17-2018 at 07:27 PM.
07-17-2018, 10:29 PM
#10

Yes I did. I have everything working . The only issue is the turn signals are hyperflashing due to the front turn signals being LED and having a lower resistance. Nothing a 50W 5-6 ohm resistor cant fix. Once I get some time I'll do a write up.
I found the oem plugs, terminals, leads, and weather proof plug for the unused holes through holes from another forum member. If anyone needs these I can give you his email. It made life so much easier having the right parts in a bag. Otherwise I had to figure out all all the part numbers for all the different parts.
. The only issue is the turn signals are hyperflashing due to the front turn signals being LED and having a lower resistance. Nothing a 50W 5-6 ohm resistor cant fix. Once I get some time I'll do a write up.I found the oem plugs, terminals, leads, and weather proof plug for the unused holes through holes from another forum member. If anyone needs these I can give you his email. It made life so much easier having the right parts in a bag. Otherwise I had to figure out all all the part numbers for all the different parts.
The following users liked this post:
Cladman (11-19-2020)
 08-23-2018, 10:17 PM
#12
Instructor
Thread Starter
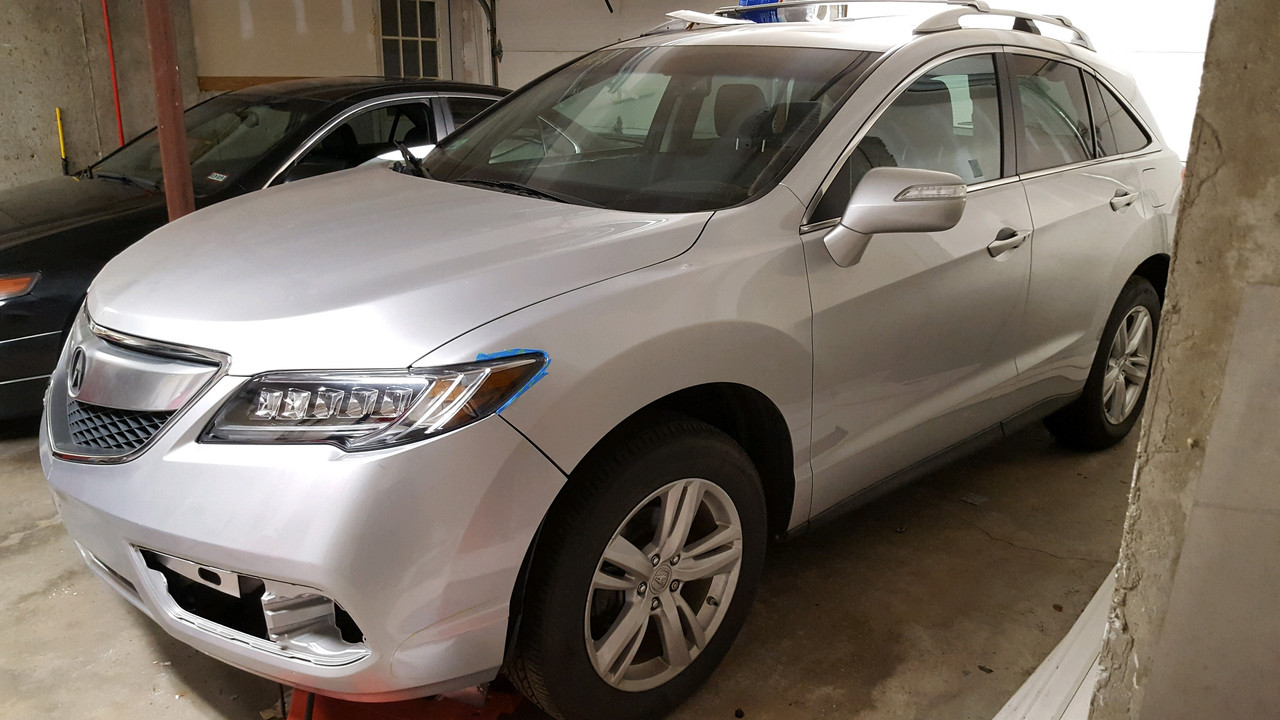
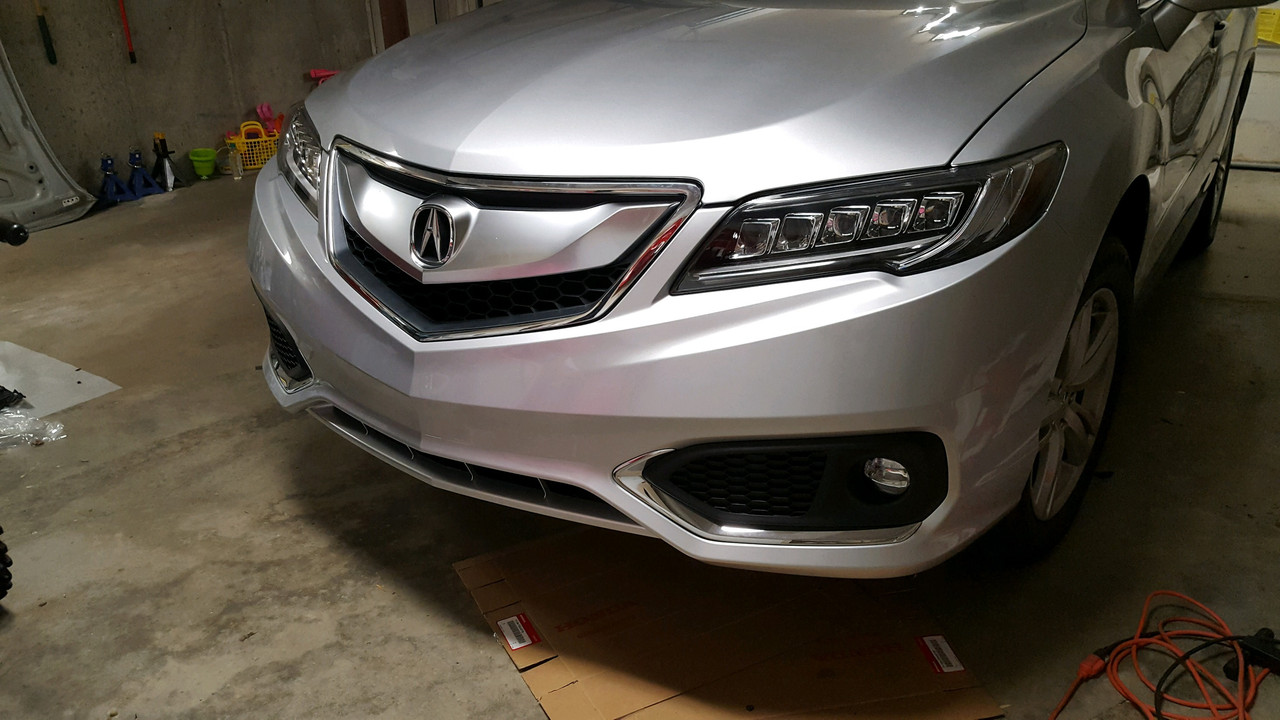
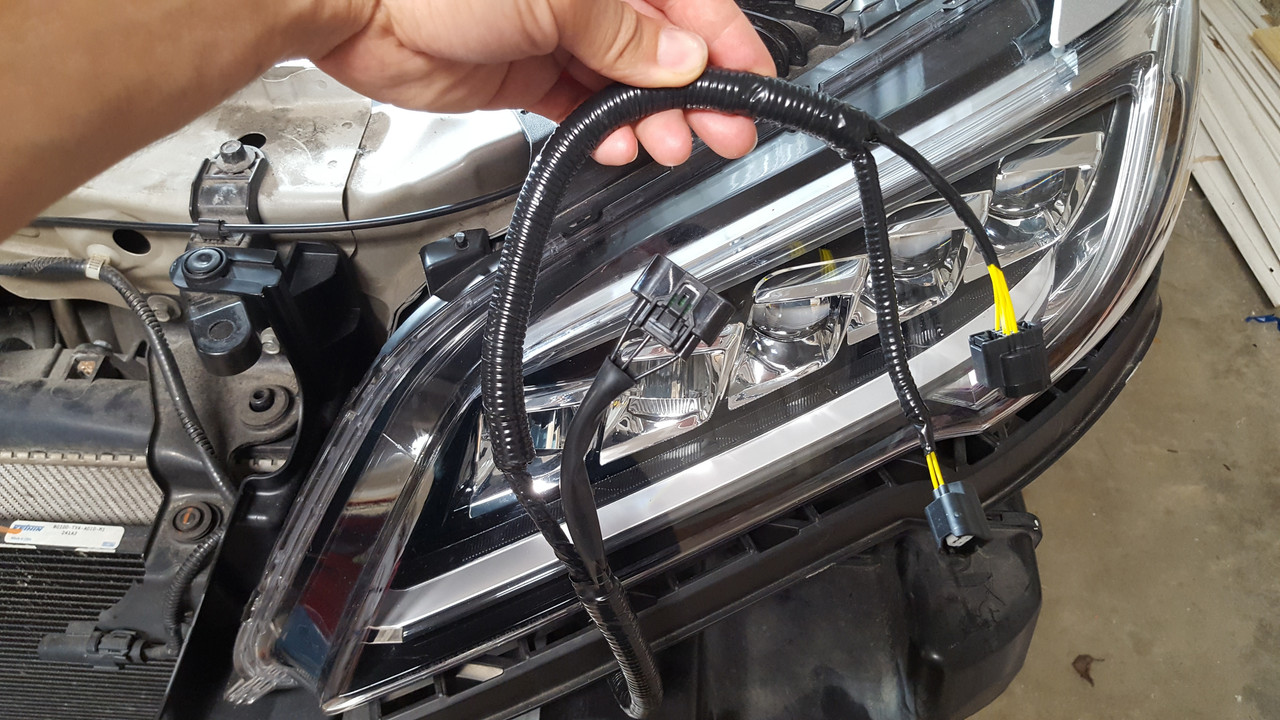
No body work needed. They fit right in just like the 13-15 headlights. I will post the wiring diagram once I have some time. If you need the wiring asap, just IM me, & give me your cell. I can send you some cell pics.
I've been testing resistance in the system, and what it takes to makes the turn signals stop hyperflashing. I found that a 6 Ohm 50W resistor works, but the resistor would heat up to 220F. Too much current going thru it. I then daisy chained a bunch of resistors I had to figure out the maximum resistance needed. That ended up being 60 Ohm. I ran a 60 Ohm 100W resistor, and everything seems happy. The 60 Ohm resistor doesnt heat up at all.

I also ended up changing the front end to the 16+, and did a fog light install since everything was apart.
I've been testing resistance in the system, and what it takes to makes the turn signals stop hyperflashing. I found that a 6 Ohm 50W resistor works, but the resistor would heat up to 220F. Too much current going thru it. I then daisy chained a bunch of resistors I had to figure out the maximum resistance needed. That ended up being 60 Ohm. I ran a 60 Ohm 100W resistor, and everything seems happy. The 60 Ohm resistor doesnt heat up at all.
I also ended up changing the front end to the 16+, and did a fog light install since everything was apart.
 12-15-2018, 10:29 PM
#15
Instructor
Thread Starter
Take the intake resonator off. It gets in the way of getting to the wiring of the left headlight.
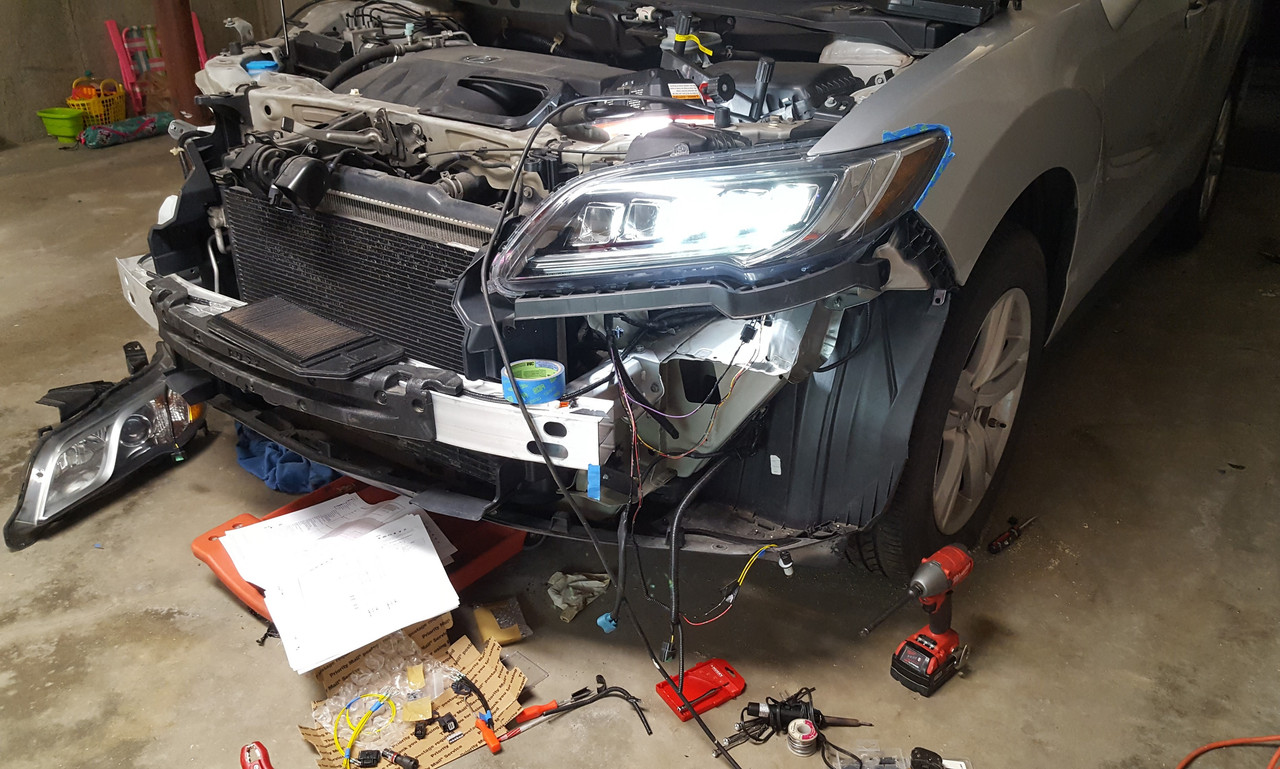
FYI The color of wires coming off the 13-15 harness matches the 16-18. So pay attention to where each wire goes before you cut the 13 plugs off.
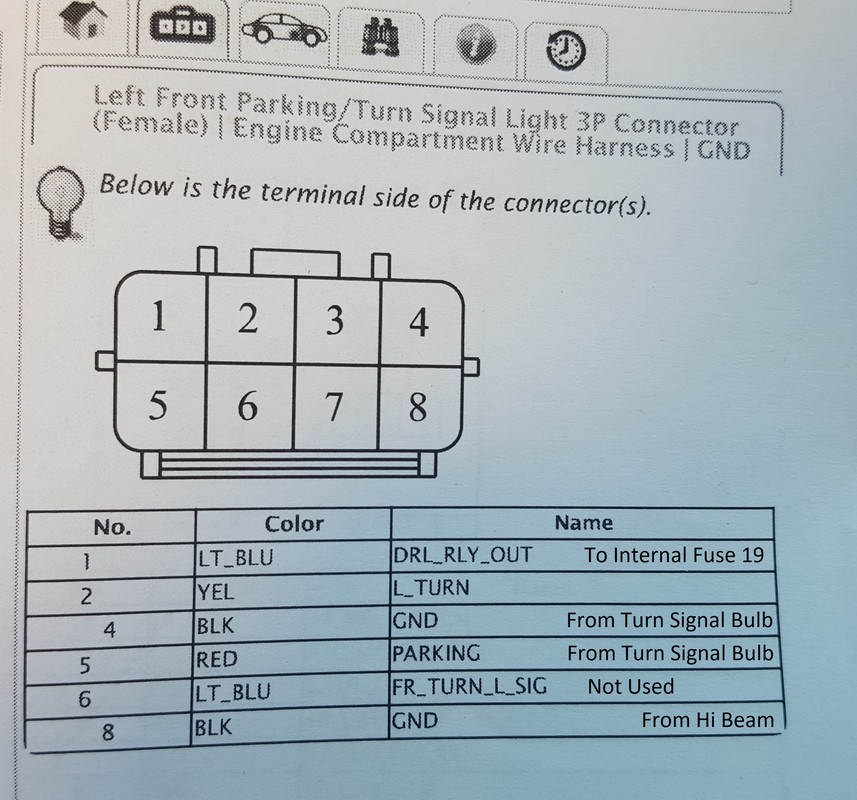
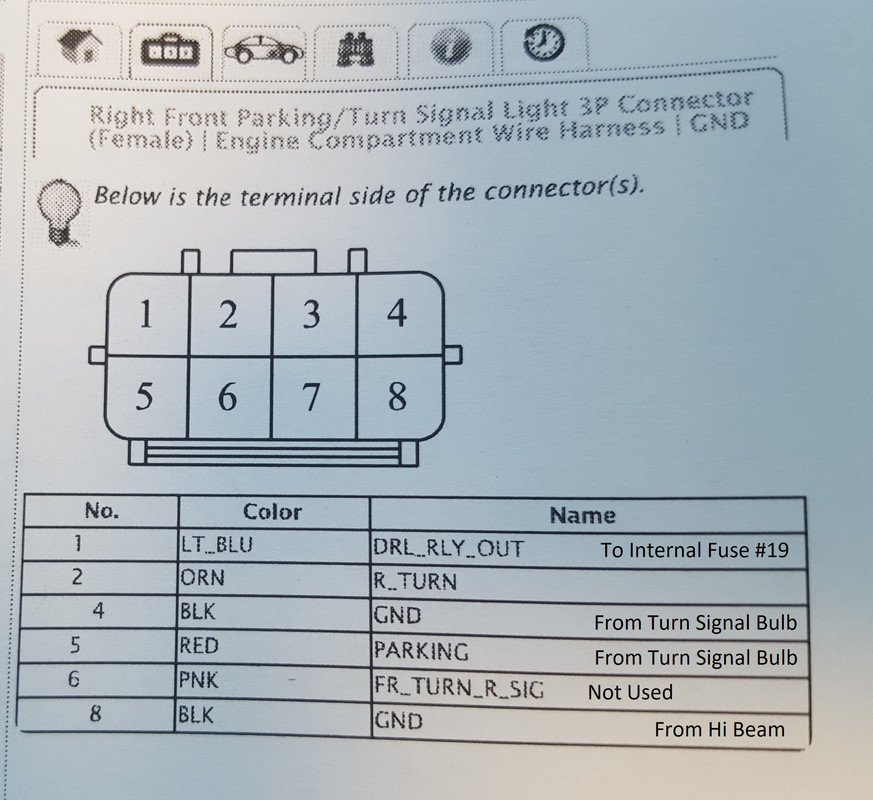
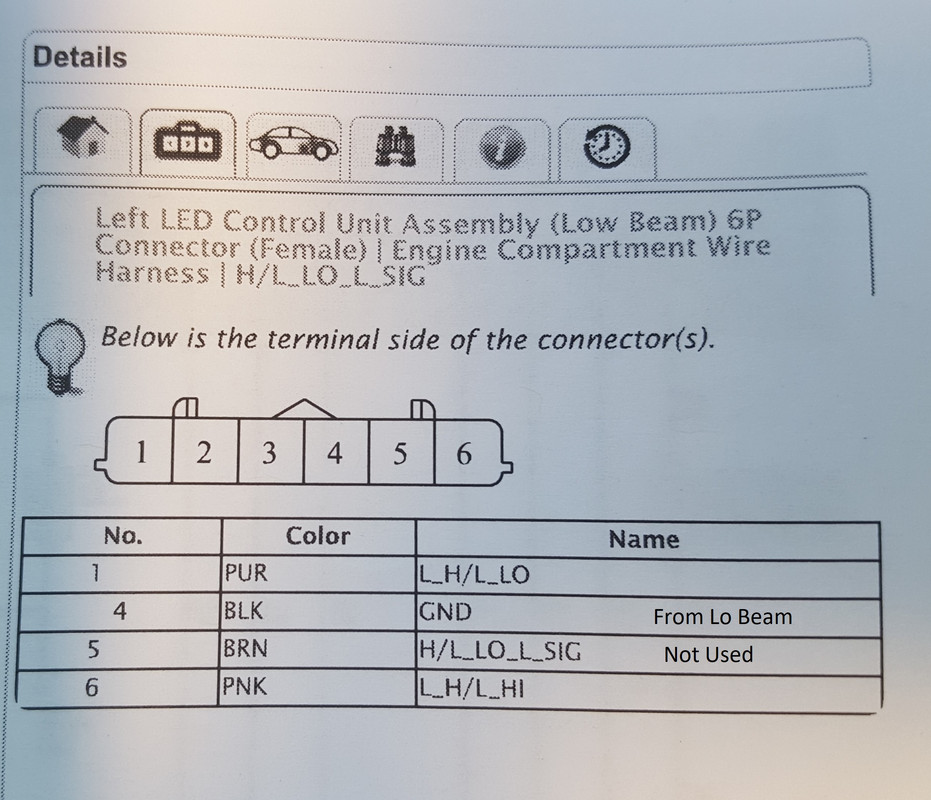
The Hi & Lo are the same pinouts for the right side. Except the right side has green wires for both the high and low beam. Pay attention to which one is which.
OEM plugs, rubber seals, and terminals. I dont have the PN for these, but I can direct you to the guy that sells the whole kit. You can buy all the plugs put together, and shipped to your door for way cheaper than getting them thru Honda.
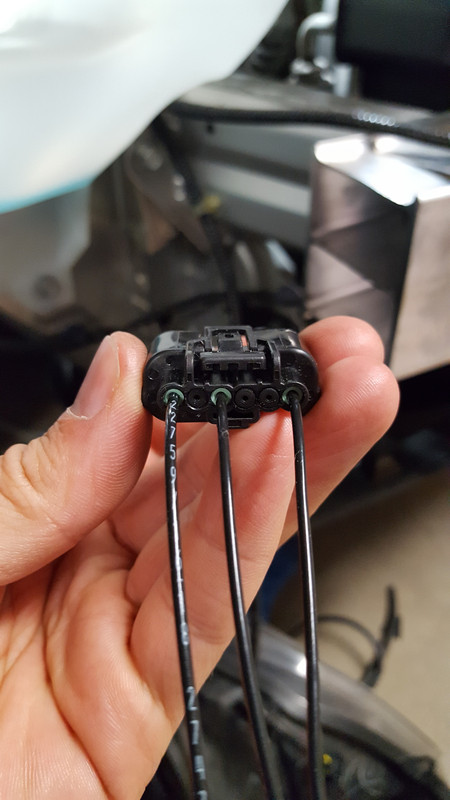
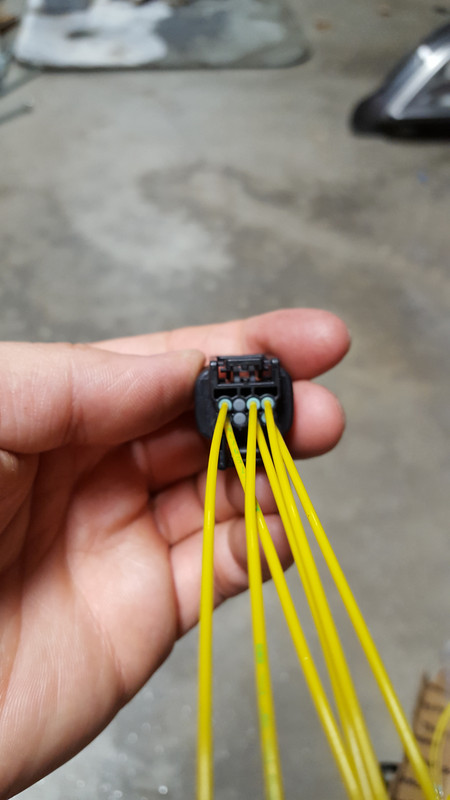
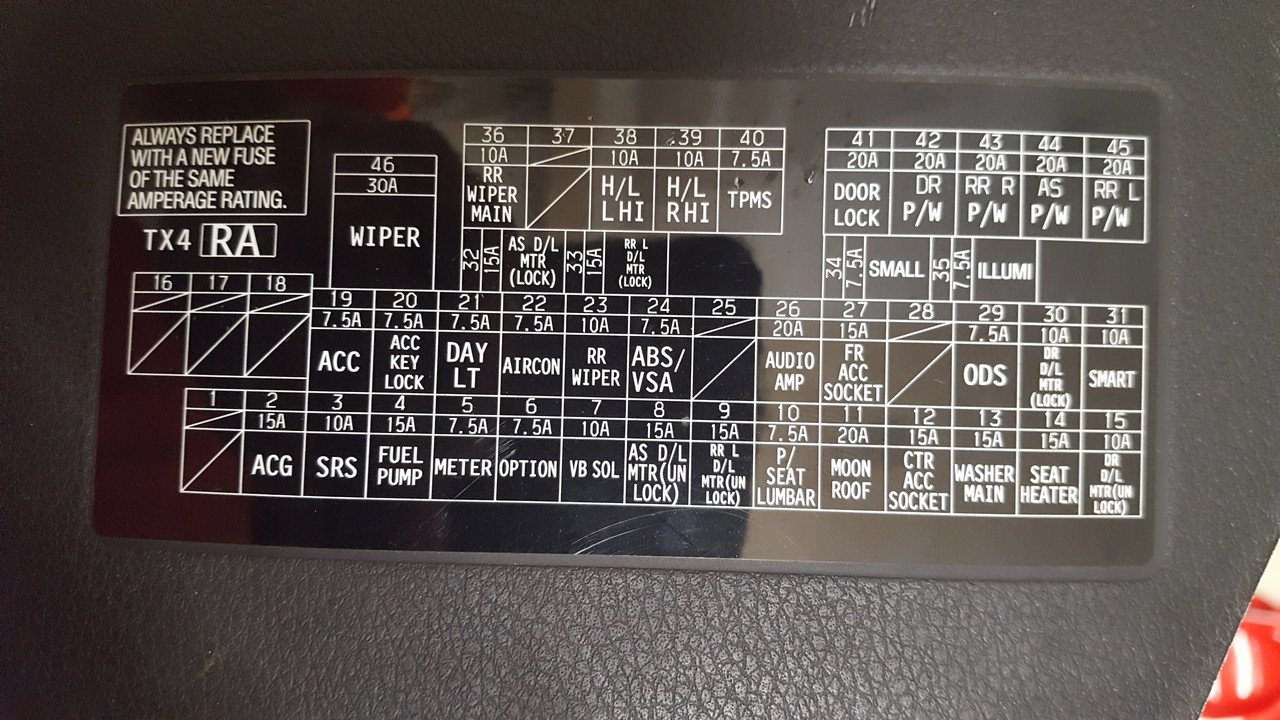
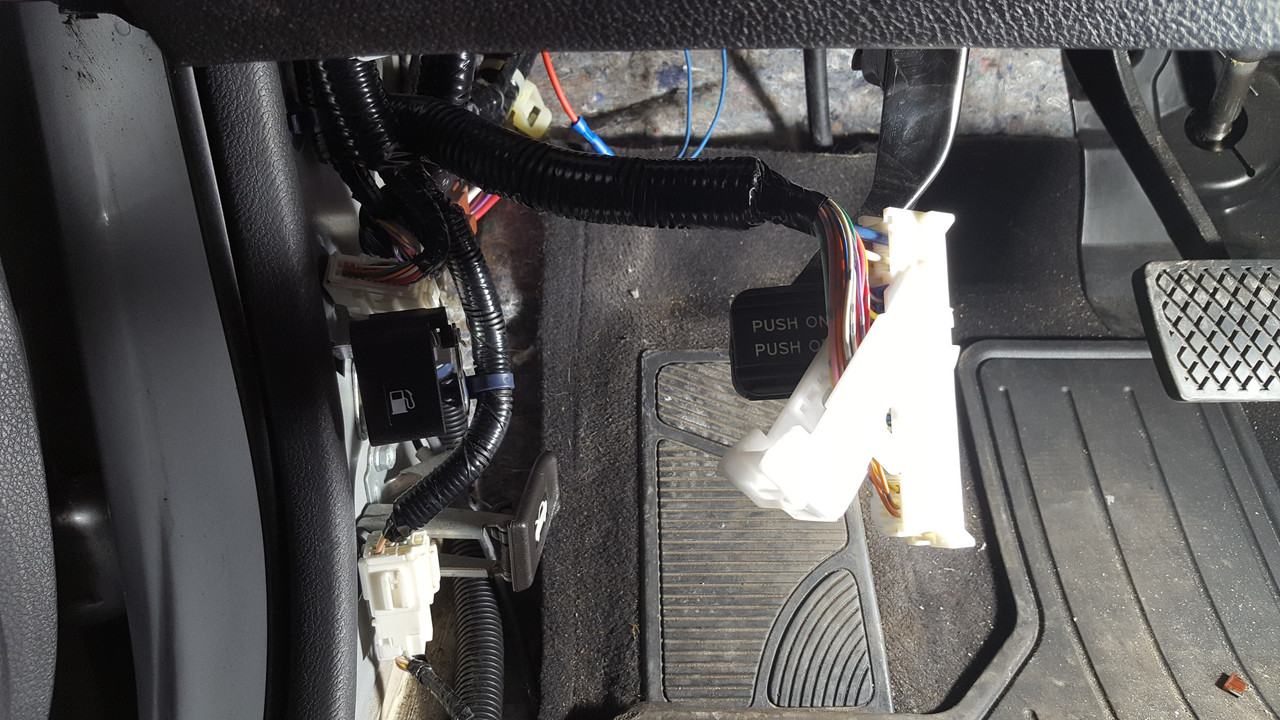
Use heat shrink that has the adhesive inside of it. Great for sealing away moisture. Dry fit all the wires into position before final solder. Light Blue wire shown here is for the DRL. Send one from each headlight under the battery and follow the OEM harness into a grommet on the firewall located next to the brake booster. This grommet leads to the internal fuse box.Poke the grommet with a coat hanger (or wire), while having the two blue wires are taped at the end of the metal hanger. The hanger/wire can then help pull/chase the blue DRL wires in. You'll need to tap into fuse #19 to power the DRL.

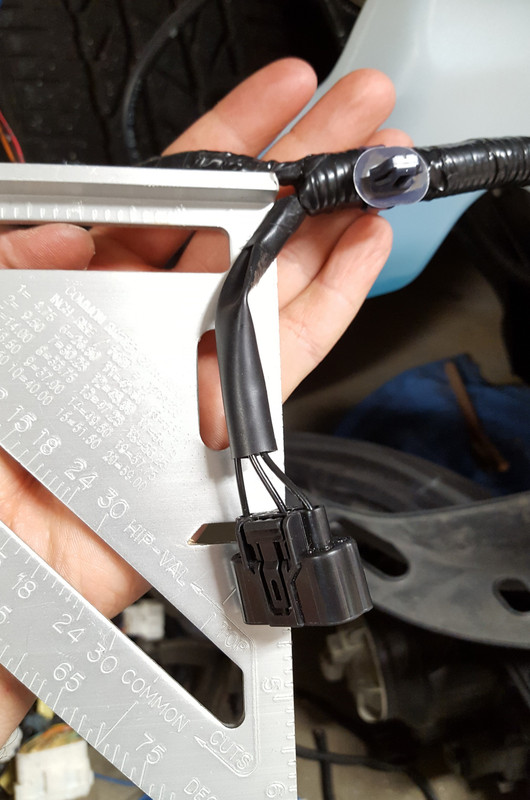
Limb lengths are the same for 13 or 18 headlights. These blue clips also mount to identical positions. Sleeve shown here was reused from 13 headlight's high beam. Again, fit everything before final solder. Get the limb lengths right.
Tap into fuse #19 via "Low Profile Mini Fuse Tap". Plenty of them on ebay, This will allow the accessory fuse to still operate properly, and power the DRL. Remove fuse #21, as this will make your LED flicker when you flash the high beams at someone. I found this the hard way. No way of getting around removing fuse #21, as its function and switching is tied into the fuse box. I didn't go back to figure out the lowest resistance to trigger the fuse box in thinking the fuse is still there without causing flash flickering. I don't have to, since everything I need to work, works just fine without fuse 21.

FYI The color of wires coming off the 13-15 harness matches the 16-18. So pay attention to where each wire goes before you cut the 13 plugs off.
The Hi & Lo are the same pinouts for the right side. Except the right side has green wires for both the high and low beam. Pay attention to which one is which.
OEM plugs, rubber seals, and terminals. I dont have the PN for these, but I can direct you to the guy that sells the whole kit. You can buy all the plugs put together, and shipped to your door for way cheaper than getting them thru Honda.
Use heat shrink that has the adhesive inside of it. Great for sealing away moisture. Dry fit all the wires into position before final solder. Light Blue wire shown here is for the DRL. Send one from each headlight under the battery and follow the OEM harness into a grommet on the firewall located next to the brake booster. This grommet leads to the internal fuse box.Poke the grommet with a coat hanger (or wire), while having the two blue wires are taped at the end of the metal hanger. The hanger/wire can then help pull/chase the blue DRL wires in. You'll need to tap into fuse #19 to power the DRL.
Limb lengths are the same for 13 or 18 headlights. These blue clips also mount to identical positions. Sleeve shown here was reused from 13 headlight's high beam. Again, fit everything before final solder. Get the limb lengths right.
Tap into fuse #19 via "Low Profile Mini Fuse Tap". Plenty of them on ebay, This will allow the accessory fuse to still operate properly, and power the DRL. Remove fuse #21, as this will make your LED flicker when you flash the high beams at someone. I found this the hard way. No way of getting around removing fuse #21, as its function and switching is tied into the fuse box. I didn't go back to figure out the lowest resistance to trigger the fuse box in thinking the fuse is still there without causing flash flickering. I don't have to, since everything I need to work, works just fine without fuse 21.
Last edited by awoc; 12-15-2018 at 10:32 PM.
The following users liked this post:
ArmchairArchitect (02-29-2024)
12-16-2018, 07:56 AM
#16
Instructor
Thread Starter
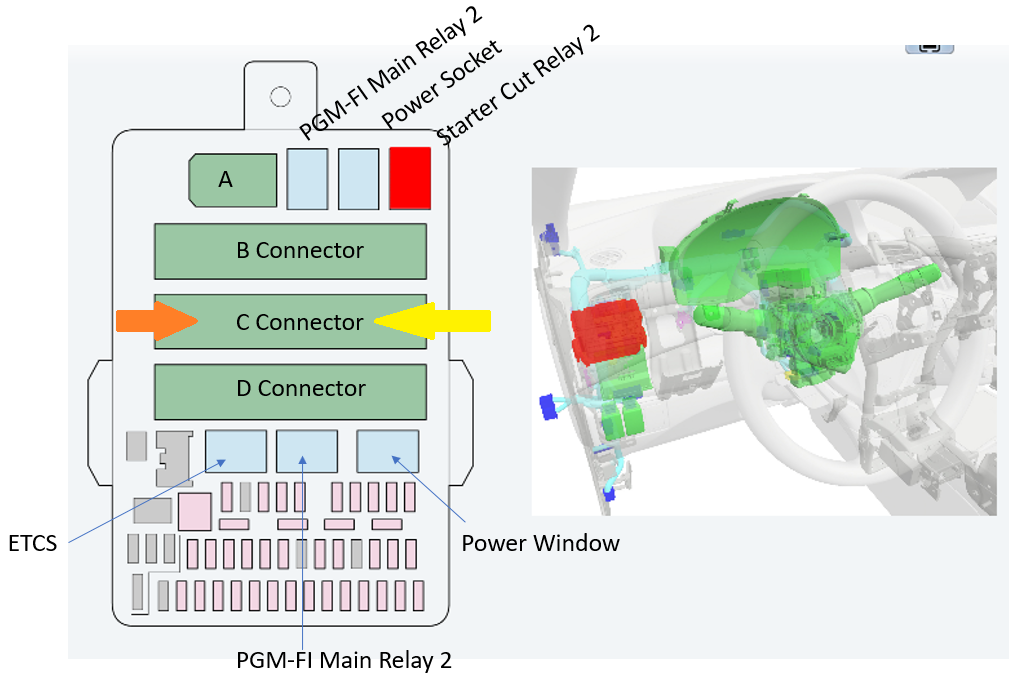
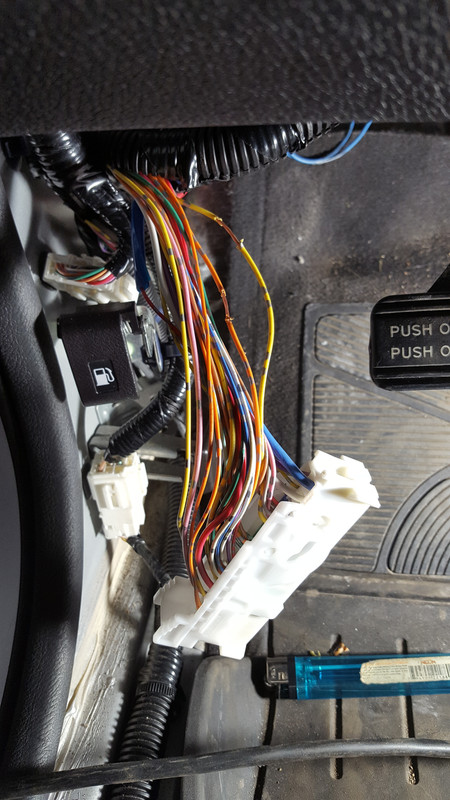
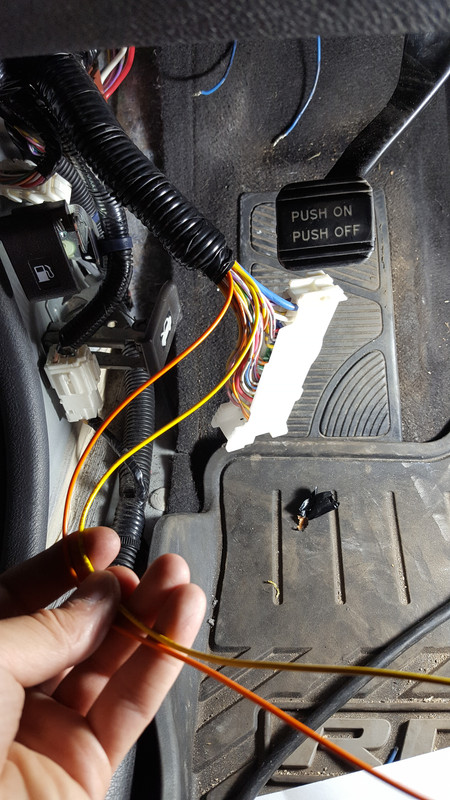
Since the 18 headlights use an LED strip for the turn signals, the resistance is lowered, and the turn signals will hyperflash without adding resistance back in the line. I chose to keep my resistors inside the cabin, and out of the weather. Plus the resistors are easily mounted on the dash's frame. Locate connector C in the internal fuse box, and cam it off.
These are the wires for left and right turn signals that need resistance.

Strip a section of insulation off. You'll need to solder a wire into this line for the resistor. Use the same color and gauge as the oem harness. Using a lighter and heating up the section, then quickly pinch out the hot section will do the trick. Wear gloves or the hot insulation will burn.
Tape the harness back up. Send the loose end of each wire to individual 60ohm resistors. The other end of the resistor goes to ground. I chose the dash frame, since the resistor can dissipate some heat onto the frame. I ended up going with a 100W resistor because it's what I had laying around. It's a bit overkill, but it doesn't heat up at all. Works great!
I think a 50W or smaller can be used, but I haven't tested it. The test involved leaving the turn signal on for 10+ minutes, and measuring the temperature of the resistor. The resistor's temp should comply with the manufacturer's operating temp.
Enjoy!
I would suggest finding a local electrical supply store. You'll need the same wire color, size, and corrugated insulation to finish the job.
These are the wires for left and right turn signals that need resistance.
Strip a section of insulation off. You'll need to solder a wire into this line for the resistor. Use the same color and gauge as the oem harness. Using a lighter and heating up the section, then quickly pinch out the hot section will do the trick. Wear gloves or the hot insulation will burn.
Tape the harness back up. Send the loose end of each wire to individual 60ohm resistors. The other end of the resistor goes to ground. I chose the dash frame, since the resistor can dissipate some heat onto the frame. I ended up going with a 100W resistor because it's what I had laying around. It's a bit overkill, but it doesn't heat up at all. Works great!
I think a 50W or smaller can be used, but I haven't tested it. The test involved leaving the turn signal on for 10+ minutes, and measuring the temperature of the resistor. The resistor's temp should comply with the manufacturer's operating temp.
Enjoy!
I would suggest finding a local electrical supply store. You'll need the same wire color, size, and corrugated insulation to finish the job.
Last edited by awoc; 12-16-2018 at 08:03 AM.
The following users liked this post:
altair47 (01-20-2023)
 12-31-2019, 01:08 PM
#18

You have done quite a superb job on your RDX. Could you please send the person's name and contact info who sells the OEM plugs, rubber seals and terminals as a kit?
Thank you in advance.
Thank you in advance.
The following users liked this post:
Cladman (11-19-2020)
01-02-2020, 08:32 PM
#19
Instructor
Thread Starter
Update your post and remove the double posting of pics please.
01-04-2020, 01:05 AM
#20

https://techinfo.honda.com/rjanisis/logon.aspx
Update your post and remove the double posting of pics please.
Update your post and remove the double posting of pics please.
01-11-2020, 09:43 AM
#21
https://techinfo.honda.com/rjanisis/logon.aspx
Update your post and remove the double posting of pics please.
Update your post and remove the double posting of pics please.

 01-24-2021, 01:29 PM
#24

I just purchased a 2014 RDX and am going to be doing the same thing. Would anyone mind to share an email address of the person who packages all required pigtails OR post part numbers, please? Thank you in advance. And thank you, awoc, for spelling out the process.
02-09-2021, 08:22 PM
#25
10th Gear

Join Date: Apr 2020
Age: 36
Posts: 13
Likes: 0
Received 0 Likes
on
0 Posts
https://techinfo.honda.com/rjanisis/logon.aspx
Update your post and remove the double posting of pics please.
Update your post and remove the double posting of pics please.
02-10-2021, 09:05 PM
#26
https://www.ebay.com/itm/254655731641
https://www.ebay.com/itm/362863485986
Along with some resistors. Ive confirmed those pigtails plug right into oem headlights. I'll be doing this swap very soon.
The following users liked this post:
awoc (07-03-2023)


 02-21-2021, 09:25 PM
#31
10th Gear
Join Date: Apr 2020
Age: 36
Posts: 13
Likes: 0
Received 0 Likes
on
0 Posts
I ordered these...
https://www.ebay.com/itm/254655731641
https://www.ebay.com/itm/362863485986
Along with some resistors. Ive confirmed those pigtails plug right into oem headlights. I'll be doing this swap very soon.
https://www.ebay.com/itm/254655731641
https://www.ebay.com/itm/362863485986
Along with some resistors. Ive confirmed those pigtails plug right into oem headlights. I'll be doing this swap very soon.
https://www.ebay.com/itm/254655731641
Do I order the female or male? Or bother?
Also I ordered this one on ebay...
https://www.ebay.com/itm/Headlight-R...72.m2749.l2649
Is this the same? Looks like it.
Again thank you
02-21-2021, 09:29 PM
#32
For this one below....
https://www.ebay.com/itm/254655731641
Do I order the female or male? Or bother?
Also I ordered this one on ebay...
https://www.ebay.com/itm/Headlight-R...72.m2749.l2649
Is this the same? Looks like it.
Again thank you
https://www.ebay.com/itm/254655731641
Do I order the female or male? Or bother?
Also I ordered this one on ebay...
https://www.ebay.com/itm/Headlight-R...72.m2749.l2649
Is this the same? Looks like it.
Again thank you
02-21-2021, 11:17 PM
#33
10th Gear
Join Date: Apr 2020
Age: 36
Posts: 13
Likes: 0
Received 0 Likes
on
0 Posts
You mentioned you purchased some resisters? Do you have a link to the ones you purchased?
02-22-2021, 05:17 AM
#34
Add a fuse:
Also, like stated by Awoc, make sure you have enough wire to run from fuse box under dash to each headlight for the DRL wire, as well as solder and shrink wrap for each connection you will make. Electrical tape and split wire tubing as well if you want it water proof, secure, and professional looking.
One thing that hasn't been mentioned until now, to my knowledge, is the side marker pigtail. The 16-18 headlights have a different connection than the 13-15 and I have yet to order that part. I was content to leave those off. It's just the amber light on the far outside parts of the headlights. Also, if you order your headlights from different sources, realize that there are two different kinds. Some 16-18 headlights are dark and some are light. The design is completely the same, but the dark ones appear to have a tint/film on them. The darker ones have brighter DRLs. I found this out the hard way and had to return one headlight. I ended up returning the dark one and sticking with the clear lens. We thought it would look better on a white vehicle.
02-22-2021, 11:34 PM
#35
10th Gear
Join Date: Apr 2020
Age: 36
Posts: 13
Likes: 0
Received 0 Likes
on
0 Posts
Resistors: https://www.amazon.com/CUTEQUEEN-TRA.../dp/B00DCULNXS
Add a fuse: https://www.amazon.com/gp/aw/d/B07TB...b_b_asin_title
Also, like stated by Awoc, make sure you have enough wire to run from fuse box under dash to each headlight for the DRL wire, as well as solder and shrink wrap for each connection you will make. Electrical tape and split wire tubing as well if you want it water proof, secure, and professional looking.
One thing that hasn't been mentioned until now, to my knowledge, is the side marker pigtail. The 16-18 headlights have a different connection than the 13-15 and I have yet to order that part. I was content to leave those off. It's just the amber light on the far outside parts of the headlights. Also, if you order your headlights from different sources, realize that there are two different kinds. Some 16-18 headlights are dark and some are light. The design is completely the same, but the dark ones appear to have a tint/film on them. The darker ones have brighter DRLs. I found this out the hard way and had to return one headlight. I ended up returning the dark one and sticking with the clear lens. We thought it would look better on a white vehicle.
I can�t thank you enough.
02-23-2021, 08:30 PM
#37
I would match the wire gauge that you'll be splicing into...not sure of the number. And you just need the tubing to go from the headlights to the firewall. I think mine was half or three quarter inch tubing that I used. Somewhere around there.
06-18-2021, 04:26 PM
#38

I have found everything else related to install. But I can�t find one of the smaller pigtails. There are 3 plugs behind the headlight assembly but you guys listed only 2 to purchase on ebay. Any help will be appreciated. Thanks
For this one below....
https://www.ebay.com/itm/254655731641
Do I order the female or male? Or bother?
Also I ordered this one on ebay...
https://www.ebay.com/itm/Headlight-R...72.m2749.l2649
Is this the same? Looks like it.
Again thank you
https://www.ebay.com/itm/254655731641
Do I order the female or male? Or bother?
Also I ordered this one on ebay...
https://www.ebay.com/itm/Headlight-R...72.m2749.l2649
Is this the same? Looks like it.
Again thank you
06-18-2021, 04:39 PM
#39
10th Gear
Join Date: Apr 2020
Age: 36
Posts: 13
Likes: 0
Received 0 Likes
on
0 Posts
I had to pause for a while on my install until I get funds.
06-18-2021, 08:44 PM
#40
be patient. Look on facebook marketplace. And watch out for the broken tabs syndrome. I found alot of em jacked up on ebay that are not worth the price tag if you got to fix em. And price is per headlight.