When you click on links to various merchants on this site and make a purchase, this can result in this site earning a commission. Affiliate programs and affiliations include, but are not limited to, the eBay Partner Network.
Radio Trim Removal / Cell Mount & Charger Installation
Hi everyone!
Without Android Auto built into the 2017 RDX, being happy with the usability of my phone while driving is important as I use it for Navigation & Spotify. I tend to be a bit of a neat freak so keeping the compartment open where the 12V Cigarette Socket is located triggers the OCD a bit.
I researched wireless charging, but I've never really liked them in the past. Placement of the phone in the mount must be spot on to get a charge going and it doesn't charge as fast as wired charging. Using Navigation & Spotify at the same time can consume a lot of power with Bluetooth, GPS and Cell Data all at the same time so it's possible that a wireless charger couldn't keep up. I'll occasionally host a Wi-Fi hotspot for my wife's phone, so even add another antenna into the mix.
I decided on a magnetic phone mount that is very small, very subtle. I didn't want to stick it to anything that isn't a smooth plastic due to future considerations with damage to the dashboard.
And I must say, for the money, I'm super happy with it. I stuck the metal "receiving end" on the inside of my phone case and it holds it surprisingly securely. It barely vibrates, and hasn't fallen off yet. Now I just needed a way to get the charging cable looking clean...
I only inflict non reversible damage to a vehicle as a last resort, so I wanted to see if I could run the charging cable through the air vents that are directly below & behind where my phone mounts. Not the most OEM / Classy solution, but worth a try.
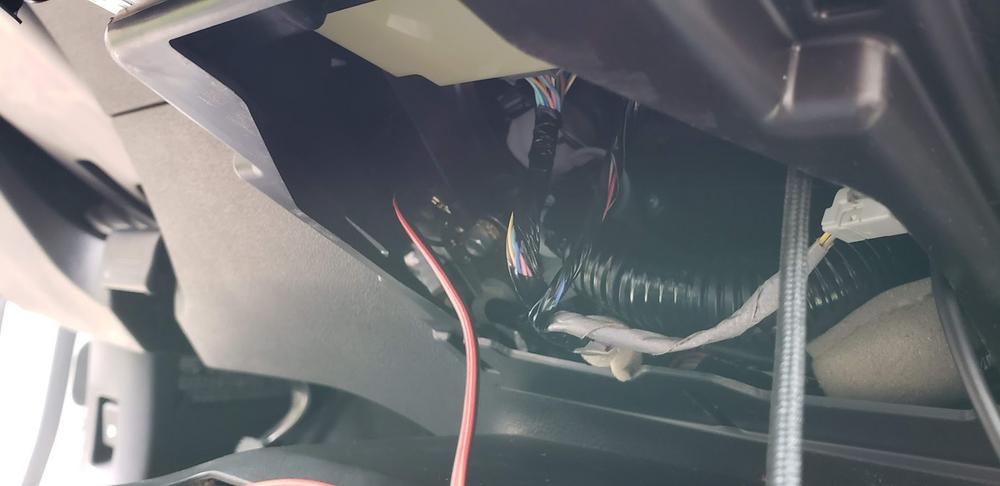
Today I built up the courage to pull the trim around the radio and see if there was a way to do it. I was "in the zone", so I didn't take as many photos as I would have liked.
It helps to pull the gear shifter all the way back. Any more room to work with is helpful. The car will beep at you non stop, so disconnect the battery first. (Disconnect ground)
There's a little plastic panel at the very bottom of the radio console. In the center of it is a little sensor that I thought might have been a retaining clip. It is not, and have no idea what it's for. Easily disconnect it after you get the panel off:
Use a plastic pry tool to pop this thing off. It comes off easily if you keep working your way around the outer edge with your tool and pulling at it where you figure the clips are. Go by feel.
In an awkward position, if you look upwards into the cavity you've exposed, you'll see 2 8mm bolts with a Phillips Head. Remove these. Don't Drop them. It sucks. Ask me how I know.
With these removed, you can start prying back on the seams of the radio bezel. Try to get a tool and then your fingers into the seam at the top, where it meets the flat piece below the upper screen. All of it will pop out at you fairly easily.
At this point, I had enough room to attempt to pull my charging wires through the vent. I got them through, and replaced the trim again as a test fit because I didn't know if the addition of the cables would not allow the trim to be reinstalled correctly. Matter of fact, it popped back together no problem and even cinches down on the charging cables a bit so that they won't fall back down inside the console. Bonus.
Very pleased with it. Good price, and has the right angle plug for an even cleaner look. It has a green LED in the plug which will make getting things connected at night easier. The LED shines brighter on one side, dimmer on the other. In use, the dimmer side is facing outward, so I'm pleased for that. The cable has a nice braid, yet is not as stiff as many options available. Also got a cheap Amazon Basics lighting cable for the wife's iPhone. Her next phone will have USB C, so I just went with the cheapest option for now.
It was easy to get the cables down to the bottom cavity. This is where I placed the charger.
When shopping for a charger, make sure it has Qualcomm 3.0... this means it can do fast charge and is actually compatible with most phones. Probably not compatible with Pixel Charge though. Also look for 18 watt output. The one I bought is capable of 36, so it'll fast charge 2 phones at once.
I plugged the charger into it and gave it a few wraps with Super 88 in case vibration would ever cause the two to become disconnected inside the console. I zip-tied it to a large bundle of cables to keep it secure. It seems you never need to look too far with this vehicle to find a Ground, and there's one in the cavity, with a 10mm bolt. I used an insulated fork spade u type crimp connector with heat-shrink.
I used a crimping butt connector and heat-shrink to extend the positive wire from the socket and used zip-ties to route it over to the fuse panel on the driver's side. I used another butt connector to add make the connection to an
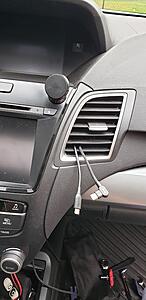
I'm extremely happy with the cleanliness of the install. When my phone is mounted, the right angle plug looks pretty slick and I can push the slack cable back into the air vent. I do wish I took more photos of the process, but hopefully my write-up contains enough detail for anyone liking my idea to give it a try.
Thank-you for reading this far, and I welcome any suggestions, feedback or constructive criticisms.
-jason
the ground I used.
i'll try to get a photo using another camera of my phone mounted up.
Rubinox wrote: "There's a little plastic panel at the very bottom of the radio console. In the center of it is a little sensor that I thought might have been a retaining clip. It is not, and have no idea what it's for."
Nice project write up! Just an fyi, I think the connector you're describing is for the little light bulb that illuminates the 'top' of the storage space.
Thanks! I hadn't noticed that! Didn't look very light bulb-y to me but now I'll be on the lookout.
Did you ever have any issues with the magnetic cell phone mount? I looked at the reviews from people that shared pictures and it appears to be a mix of positive and negative.
Did you ever have any issues with the magnetic cell phone mount? I looked at the reviews from people that shared pictures and it appears to be a mix of positive and negative.
Very happy with it. Holds the s9+ firmly with no vibration at all. I used rubbing alcohol to clean the area before I stuck it on. I stuck the metal piece to the inside of my case so one day when it's time to remove it I won't have any worries about applying some heat to get it off.
When my phone is mounted in landscape mode, (which is always) the left side makes contact with the dash approximately where "ACURA" is printed, so I suspect that helps with keeping it super stable with no vibration.
The swivel is very firm, and has no unintended movement.
All said, it hasn't encountered a sweltering hot interior yet, but if it does some day fall off, it won't be a big idea to reapply another pad of double-sided tape. I suspect the stuff in my toolbox is of a higher quality than came with the mount anyhow.
Definitely not a fan of the mounts that hook onto the air vents, but I've never tried them. This one is actually quite a bit smaller than I expected from the photos, and isn't particularly noticeable when not in use.
Then cables I installed are also working great and keeps everything looking super clean.
I should also add that the effectiveness of the adhesion depends on the surface you're mounting to. Luckily my first choice for placement has a smooth plastic finish so that definitely helps. I'd worry about it causing damage to any of the softer leathery looking stuff in the vehicle.
Did you ever have any issues with the magnetic cell phone mount? I looked at the reviews from people that shared pictures and it appears to be a mix of positive and negative.
In case you're still looking at options, I've recently found the 'perfect' vent mount. After trying several and finding each to be way too loose this one ( https://amzn.to/34yeTRu ) holds my phone cradle nice and solid. No vibration, no sagging. It's semi universal so if you already have a mount you like with a ball on the back it'll probably work with it. The mount is taller than most but works perfectly in the vent to the left of the Acura's steering wheel. Here's a photo or two:
Did you ever have any issues with the magnetic cell phone mount? I looked at the reviews from people that shared pictures and it appears to be a mix of positive and negative.
Originally Posted by Gadgetjq
In case you're still looking at options, I've recently found the 'perfect' vent mount. After trying several and finding each to be way too loose this one ( https://amzn.to/34yeTRu ) holds my phone cradle nice and solid. No vibration, no sagging. It's semi universal so if you already have a mount you like with a ball on the back it'll probably work with it. The mount is taller than most but works perfectly in the vent to the left of the Acura's steering wheel. Here's a photo or two:
What is this app of magic I see here?
btw I am super intrigued by your navtool installation but I'm going to hold off on ponying up the bucks for it.
What is this app of magic I see here?
btw I am super intrigued by your navtool installation but I'm going to hold off on ponying up the bucks for it.-jason
That app is called Car Launcher. There's a free and paid ($3.99) version. You can modify every single element on the screen. Toss things, move new things in, scoot them around. What you see in the photo is the basic 'Leather' theme that comes with the app but I've added the Acura logo, a speed readout, phone charge and I've tinkered with the music player a bit. If it intrigues you download the free version and play with it a little.
About the NavTool. I'd suggest holding off awhile before purchasing. There's a bad software issue that, in some situations, can keep the unit turned on even with the rest of the car shut down. It can (and does) drain your battery overnight. It's an issue the company 'should' have mentioned to me when I was trying to get support for several problems. Eventually I managed to troubleshoot and track down the issue which I reported to NavTool. Finally they admitted yep, it's a problem and they're working on it. I'll let you know when (if) the issue is resolved.
Eeeesh. Thanks for the heads up! I've seen many very mixed and negative reviews about navtool. Not a cheap gamble either... I do recall them being banned from Acurazine or perhaps another forum. I'm glad you got some response from them as I also heard that their customer service is very sub par...
Good luck with your troubleshooting... I hope you get it figured out. Given that this module has been around a while, I'm more than a little concerned, unfortunately...
I'll check out that app! Thanks. Something more customizable than simple Android Auto on the phone would be a welcome bonus. I've tried Waze a few times but felt pretty meh about it. Didn't feel like I was gaining anything over Google maps, and the map would often go blank while multitasking.
I really like the magnet mounts because of the convenience, but I recently got a phone with wireless charging and the metal back doesn't play nice with the Qi chargers.
Never fear, there's a solution for that problem too! Check out these adhesive metal rings. https://amzn.to/3di0rkr They stick to the back of your phone (or case) and will hold tight to your charger but the hole in the center allows your phone to charge. One downside, the rings can get pretty warm. I used them with a magnetic car charger for a couple of years with no issues. The link is just an example. There are quite a few vendors that sell them. Be sure to read reviews.
Rubinox wrote: "There's a little plastic panel at the very bottom of the radio console. In the center of it is a little sensor that I thought might have been a retaining clip. It is not, and have no idea what it's for."
Nice project write up! Just an fyi, I think the connector you're describing is for the little light bulb that illuminates the 'top' of the storage space.
Originally Posted by rubinox
Thanks! I hadn't noticed that! Didn't look very light bulb-y to me but now I'll be on the lookout. -jason
So I ended getting a wireless charger from Costco and it's been great so far, solid product: https://www.costco.ca/ubio-labs-univ...100523901.html Now I'm trying to find a cleaner way to connect the cable and am exploring taking apart the centre console. Can you take a picture of the small plastic panel that you removed before finding the the 2 screws?
So I ended getting a wireless charger from Costco and it's been great so far, solid product: https://www.costco.ca/ubio-labs-univ...100523901.html Now I'm trying to find a cleaner way to connect the cable and am exploring taking apart the centre console. Can you take a picture of the small plastic panel that you removed before finding the the 2 screws?
Thanks in advance!
I'm sorry, I somehow totally missed your post. Did you ever manage to get the dash opened up? I can take a photo when I get a chance, but that likely won't be too helpful. It does pop off fairly easily. It's the piece with the light in it that was mentioned above.
Once you get it off, you really get a better idea on your next move.

 09-15-2020, 01:22 AM