
Yungone501's- Excessive infatuation with the J-series


 01-28-2013, 07:49 PM
#122
Looking good
01-28-2013, 10:28 PM
#123
Strut tower painted to match manifold accent. I know, its a little lame to be posting but it came out so good that I figured why not? It was a slow day at work and I had some free time...and a can of ceramic paint.
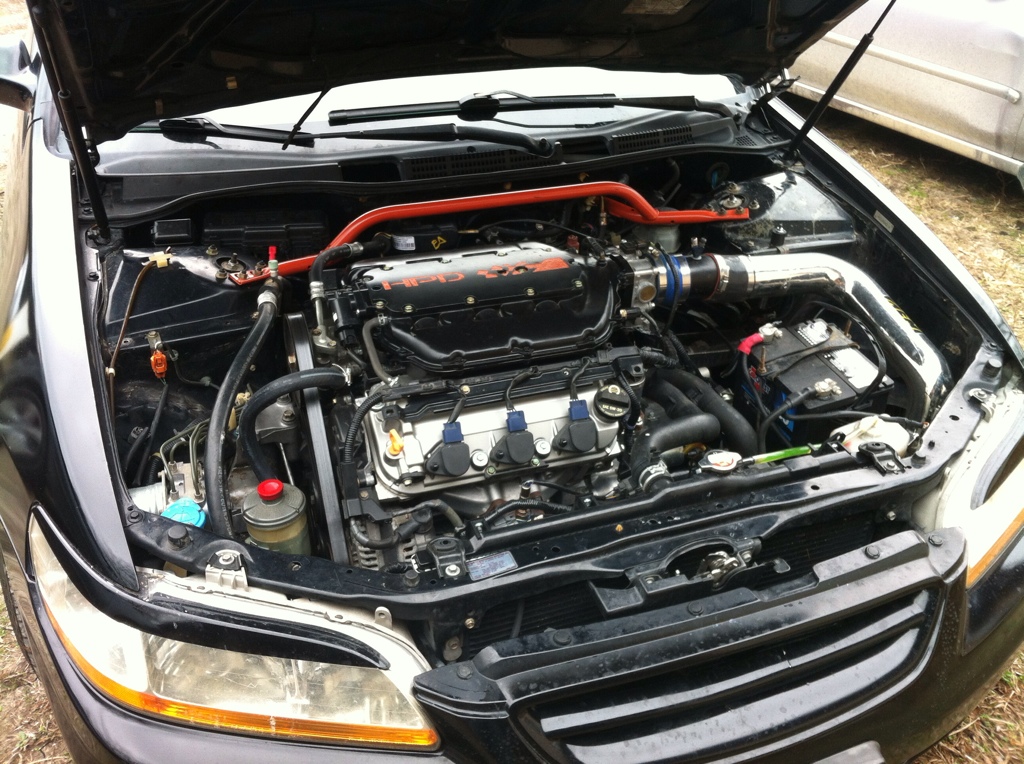
Oh and disregard my makeshift CAI...its a temporary piece. If you look close enough, it still has a nitrous nozzle still attached to it. I should probably remove that as its tempting...
Oh and disregard my makeshift CAI...its a temporary piece. If you look close enough, it still has a nitrous nozzle still attached to it. I should probably remove that as its tempting...
01-29-2013, 04:13 AM
#124
a 50 shot wont hurt right...lol
01-29-2013, 07:35 AM
#125
Senior Moderator
Sweet. I need to start looking for my wiring stuff.
01-29-2013, 11:57 AM
#126
Does this motor have a differnt belt routing than earlier j's ?
Looks weird seeing the long stretch between the power steering pump and the alt and no seperate ps belt.
I like the color matching of the strut bar,now you are going to have to re color the odd color piece's to blend in. Blacks and polished pieces and it's will be nice to look at.
Once you have run nitrous,in the back of your mind you will alway want to run it.
keep it.
01-29-2013, 12:10 PM
#127
Senior Moderator
Regional Coordinator
(Mid-Atlantic)
Regional Coordinator
(Mid-Atlantic)
iTrader: (6)
God I want this car
01-29-2013, 02:37 PM
#128
That's what everyone says...at first.
Ok.
Dang Mr. I Observe Everything I See, lol. Yes, it has the AC compressor deleted therefore the belt is routed in a manner where it can still be held under the belt tensioner.
You already have one. Just need a j35a8 and you're gtg!
Ok.
Does this motor have a differnt belt routing than earlier j's ?
Looks weird seeing the long stretch between the power steering pump and the alt and no seperate ps belt.
I like the color matching of the strut bar,now you are going to have to re color the odd color piece's to blend in. Blacks and polished pieces and it's will be nice to look at.
Once you have run nitrous,in the back of your mind you will alway want to run it.
keep it.
Looks weird seeing the long stretch between the power steering pump and the alt and no seperate ps belt.
I like the color matching of the strut bar,now you are going to have to re color the odd color piece's to blend in. Blacks and polished pieces and it's will be nice to look at.
Once you have run nitrous,in the back of your mind you will alway want to run it.
keep it.
You already have one. Just need a j35a8 and you're gtg!
02-02-2013, 05:05 PM
#129
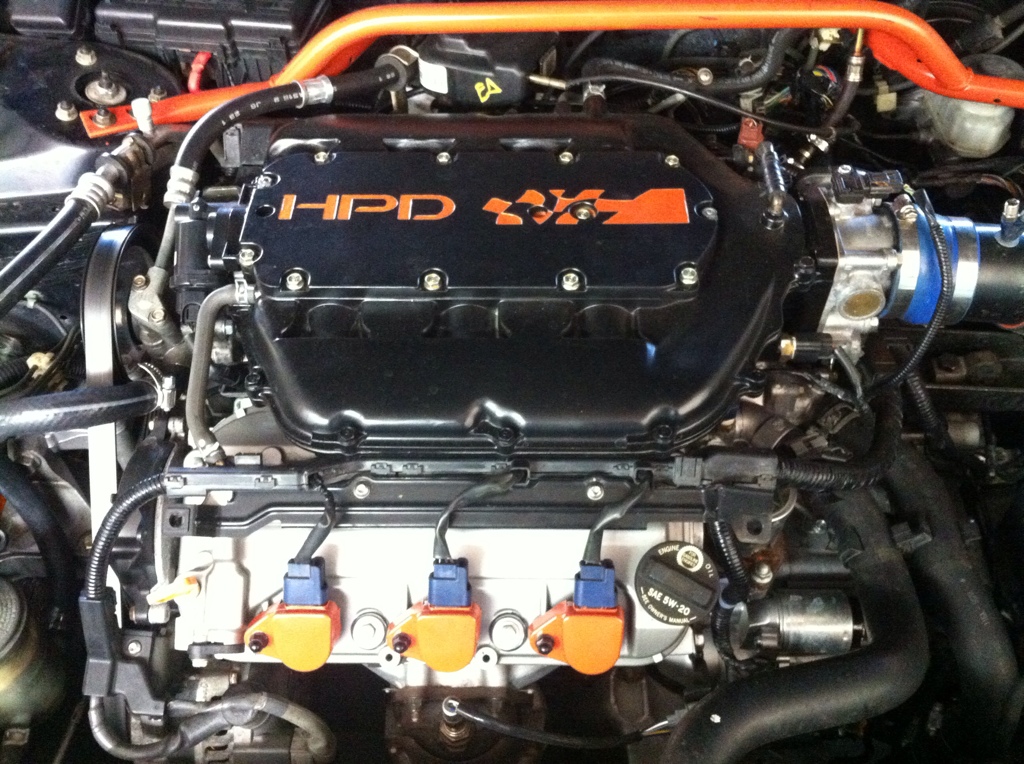
Coil packs painted to match.
Big plans fast approaching on adding turbo. Car will be taken to a shop next week to build the manifold and I'm going to do everything else. This is my first turbo build/setup so I will require help I'm sure along the way from those who are experienced and knowledgable.
Big plans fast approaching on adding turbo. Car will be taken to a shop next week to build the manifold and I'm going to do everything else. This is my first turbo build/setup so I will require help I'm sure along the way from those who are experienced and knowledgable.
02-03-2013, 11:24 AM
#133
I've already ordered Richies V3 PCDs and was able to order just half of them so that I could use them as the beginning of a turbo manifold. They're 304 stainless which is good because I want all of the hot charge tubing to be entirely stainless.
I think doing a turbo setup is going to be just as much work if not more than the j35a8 swap itself. There's a lot that goes into this stuff. But, it's ok. Old dudes like me need to have their fun too!
02-04-2013, 04:37 AM
#134
02-04-2013, 10:10 AM
#135
Senior Moderator
Regional Coordinator
(Mid-Atlantic)
Regional Coordinator
(Mid-Atlantic)
iTrader: (6)
02-07-2013, 07:12 PM
#136
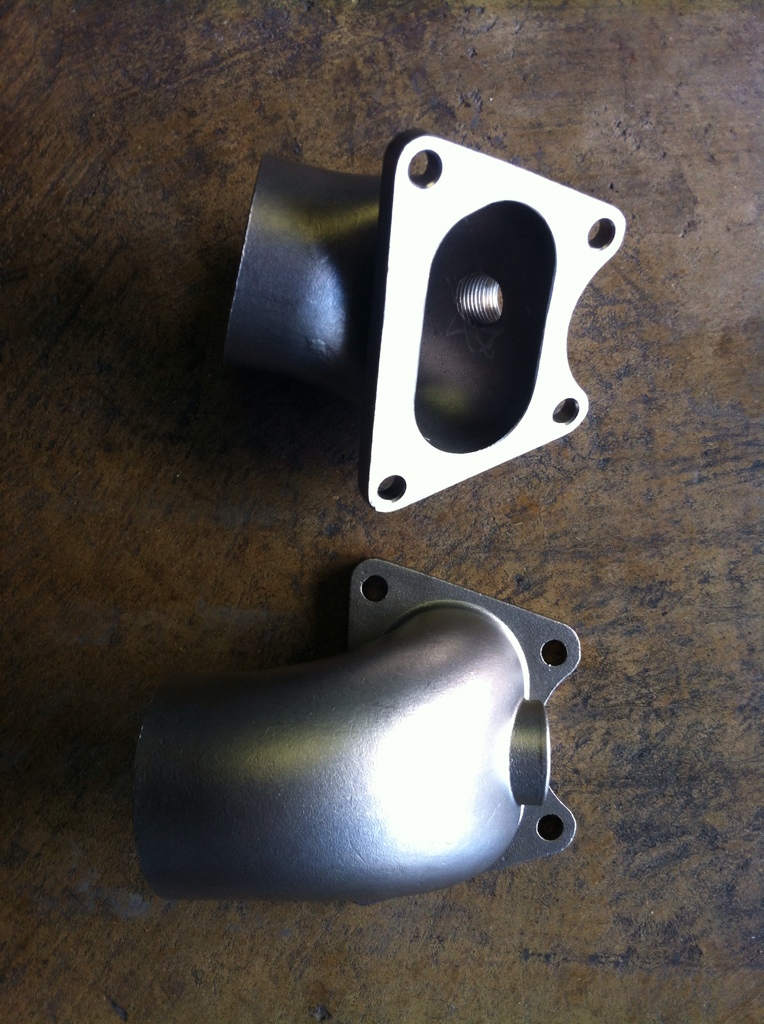
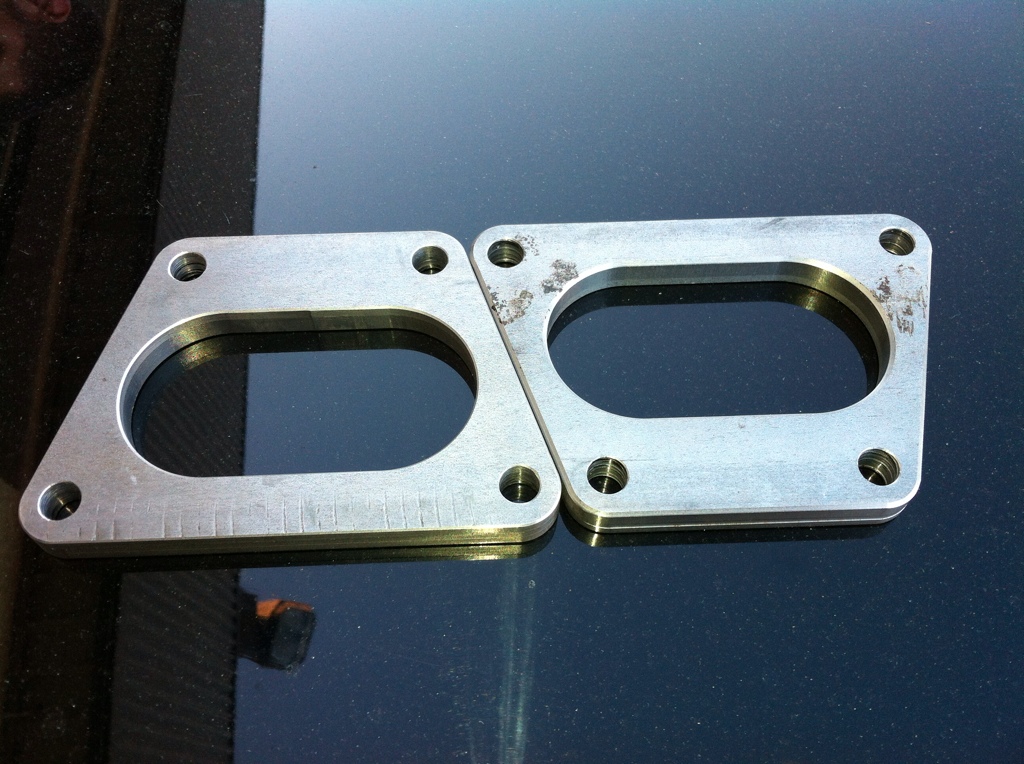
As mentioned, I had two choices on manifold design. The first option was Richies V3 PCDs that consisted of the upper portion only. The upper flange surprised me in its design quality as it was a cast piece...meaning it was made like an engine block is made. That's basically where molten steel is poured into a cast where it then cools to produce a solid, one piece structure which is generally better than welding multiple pieces of steel together which leaves more room for failure from cracked welds. That's the (biggest) advantage. What I don't like about them is that they are 304 stainless which is more prone to cracking from heat fluctuation. Here's a picture of what they look like...fitment was perfect.
02-08-2013, 04:23 AM
#139
As mentioned, I had two choices on manifold design. The first option was Richies V3 PCDs that consisted of the upper portion only. The upper flange surprised me in its design quality as it was a cast piece...meaning it was made like an engine block is made. That's basically where molten steel is poured into a cast where it then cools to produce a solid, one piece structure which is generally better than welding multiple pieces of steel together which leaves more room for failure from cracked welds. That's the (biggest) advantage. What I don't like about them is that they are 304 stainless which is more prone to cracking from heat fluctuation. Here's a picture of what they look like...fitment was perfect.
02-08-2013, 08:19 AM
#141
Was planing on doing this second part lastnight but ended up passing out after posting the PCD flange.
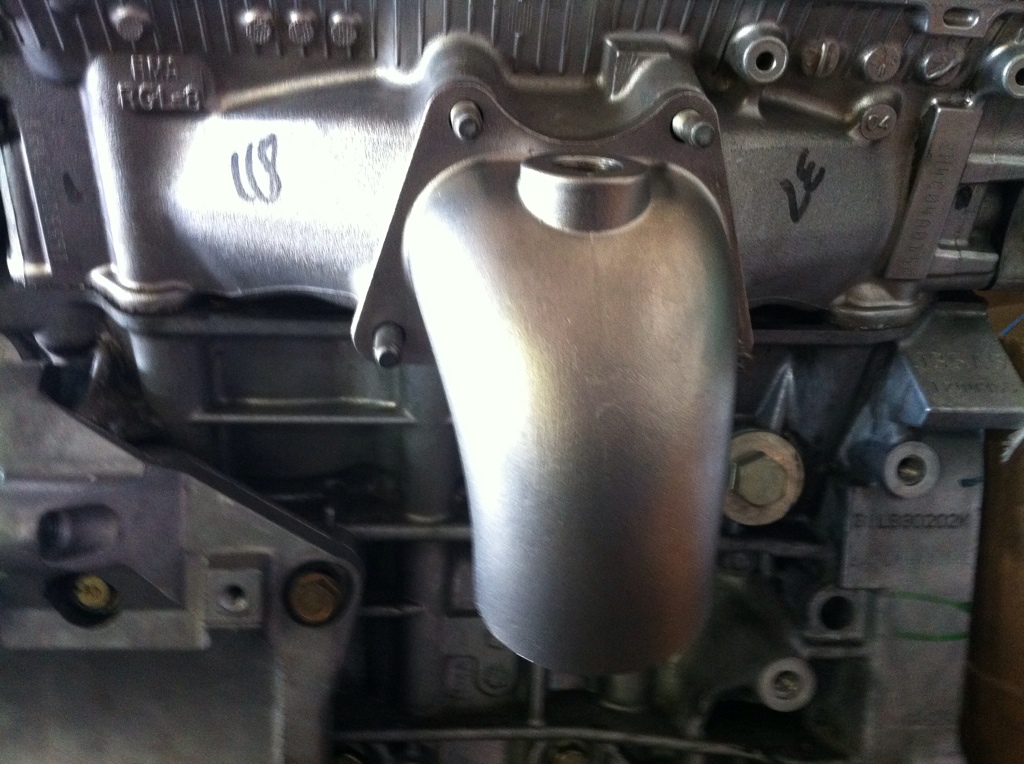
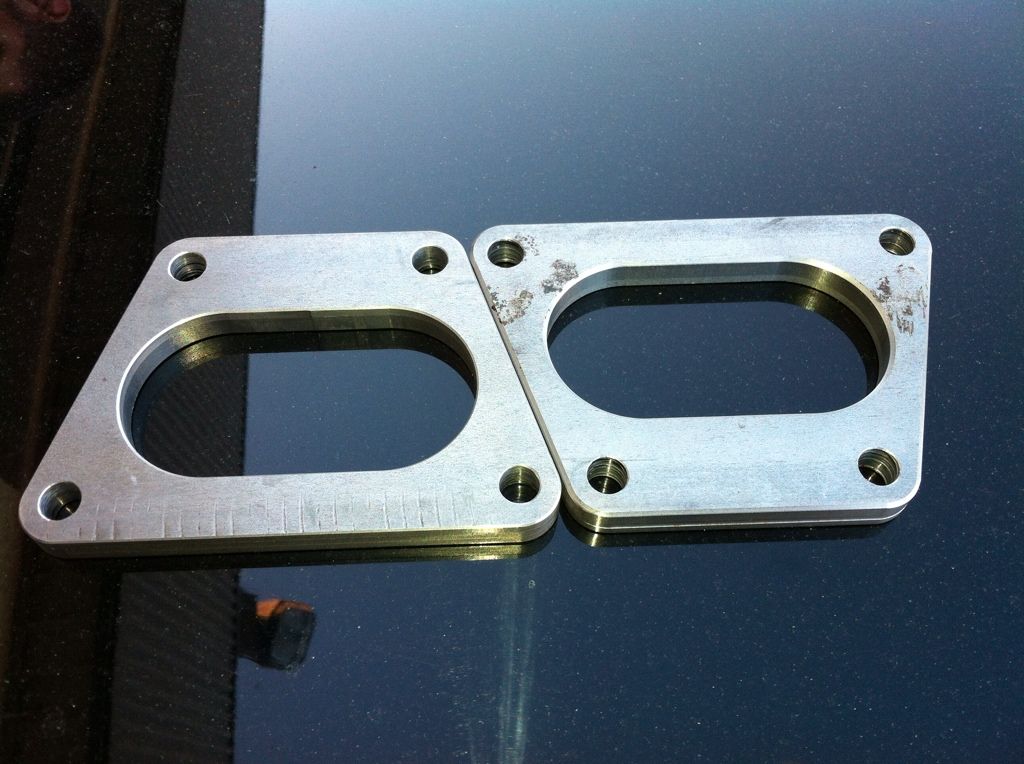
My second option is the one I may be leaning towards. The P2R flange is a mild steel piece that's approx 3/8" thick. It's meant to be the start of an exhaust manifold and allows flexibility to go any direction/route desired rather than a predetermined one. I found a company called Spin Tech Mufflers based out of Cali that bends/builds custom exhaust components and ordereded a set of 90 degree horizontal oval to round transitions. Even though the name describes what it does, I'll break that down. It's basically a 90 degree piece of tubing that will convert the oval shape of the exhaust port from the cylinder heads in to a round shape but also allows me to take a horizontal path straight from the head to where the turbo will be mounted (where battery currently sits). It's a 3.5" radius bend meaning it changes the direction of the tubing within that distance which is basically from the head to the bends elbow. Haven't received them yet but they will be here by Tuesday and I will post pictures then. Here's the P2R flanges:
My second option is the one I may be leaning towards. The P2R flange is a mild steel piece that's approx 3/8" thick. It's meant to be the start of an exhaust manifold and allows flexibility to go any direction/route desired rather than a predetermined one. I found a company called Spin Tech Mufflers based out of Cali that bends/builds custom exhaust components and ordereded a set of 90 degree horizontal oval to round transitions. Even though the name describes what it does, I'll break that down. It's basically a 90 degree piece of tubing that will convert the oval shape of the exhaust port from the cylinder heads in to a round shape but also allows me to take a horizontal path straight from the head to where the turbo will be mounted (where battery currently sits). It's a 3.5" radius bend meaning it changes the direction of the tubing within that distance which is basically from the head to the bends elbow. Haven't received them yet but they will be here by Tuesday and I will post pictures then. Here's the P2R flanges:
02-12-2013, 03:27 PM
#142
Instructor
Was planing on doing this second part lastnight but ended up passing out after posting the PCD flange.
My second option is the one I may be leaning towards. The P2R flange is a mild steel piece that's approx 3/8" thick. It's meant to be the start of an exhaust manifold and allows flexibility to go any direction/route desired rather than a predetermined one. I found a company called Spin Tech Mufflers based out of Cali that bends/builds custom exhaust components and ordereded a set of 90 degree horizontal oval to round transitions. Even though the name describes what it does, I'll break that down. It's basically a 90 degree piece of tubing that will convert the oval shape of the exhaust port from the cylinder heads in to a round shape but also allows me to take a horizontal path straight from the head to where the turbo will be mounted (where battery currently sits). It's a 3.5" radius bend meaning it changes the direction of the tubing within that distance which is basically from the head to the bends elbow. Haven't received them yet but they will be here by Tuesday and I will post pictures then. Here's the P2R flanges:
My second option is the one I may be leaning towards. The P2R flange is a mild steel piece that's approx 3/8" thick. It's meant to be the start of an exhaust manifold and allows flexibility to go any direction/route desired rather than a predetermined one. I found a company called Spin Tech Mufflers based out of Cali that bends/builds custom exhaust components and ordereded a set of 90 degree horizontal oval to round transitions. Even though the name describes what it does, I'll break that down. It's basically a 90 degree piece of tubing that will convert the oval shape of the exhaust port from the cylinder heads in to a round shape but also allows me to take a horizontal path straight from the head to where the turbo will be mounted (where battery currently sits). It's a 3.5" radius bend meaning it changes the direction of the tubing within that distance which is basically from the head to the bends elbow. Haven't received them yet but they will be here by Tuesday and I will post pictures then. Here's the P2R flanges:
 02-13-2013, 01:41 PM
#145

@yungone501
When you did the wiring for the car, what did you end up doing for the fuel pump control wires on the E plug? (Assuming of course that you didn't install the controller from the TL-S)
I'm considering attempting an ECU upgrade in my '05, but there are a few items like this on the newer ECUs that are putting me off a bit.
02-13-2013, 02:40 PM
#147
Instructor

 02-13-2013, 08:20 PM
#149
@yungone501
When you did the wiring for the car, what did you end up doing for the fuel pump control wires on the E plug? (Assuming of course that you didn't install the controller from the TL-S)
I'm considering attempting an ECU upgrade in my '05, but there are a few items like this on the newer ECUs that are putting me off a bit.
When you did the wiring for the car, what did you end up doing for the fuel pump control wires on the E plug? (Assuming of course that you didn't install the controller from the TL-S)
I'm considering attempting an ECU upgrade in my '05, but there are a few items like this on the newer ECUs that are putting me off a bit.
As for you, just so you know, running the FPC module is NOT required to run the motor of your TL but is necessary if you want a MIL free conversion. Not sure of the exact differences between the two (3g TL-S and TL) off the top of my head but any differences you notice, Id be happy to help or assist with any questions you may have. Just PM me if its gets too lengthy to keep the thread clean.
I will tell you that your conversion will be difficult and not so sure its possible because of the major differences between the transmissions...unless youre running a 6MT.
She's quite a lady, thanks.
Hello! Sure didnt...I dont have a scale in that range. Sorry. But I will say that the j35a8 must be ATLEAST 25lbs lighter in weight than a j32a2 fully assembled. The difference is primarily in the magnesium intake manifold. Not to mention other various points at which Acura went with lighter and stronger parts for this motor.
02-14-2013, 01:34 AM
#150
wait your on here..
his fab work and attention to detail is great. What are the dimension of the opening on the cast pieces(not at the flange) ?
his fab work and attention to detail is great. What are the dimension of the opening on the cast pieces(not at the flange) ?
02-14-2013, 10:39 AM
#151
Instructor
And thanks, I try

Not sure of dimension of cast piece off the top of my head
Last edited by HickamHatch; 02-14-2013 at 10:41 AM.
02-14-2013, 09:02 PM
#153
The following users liked this post:
gerzand (02-14-2013)
02-15-2013, 12:58 AM
#155
02-15-2013, 07:20 AM
#156
Btw, what's up your sleeve Atlas? Droppin' hints like bombs buddy.
02-15-2013, 07:32 PM
#157
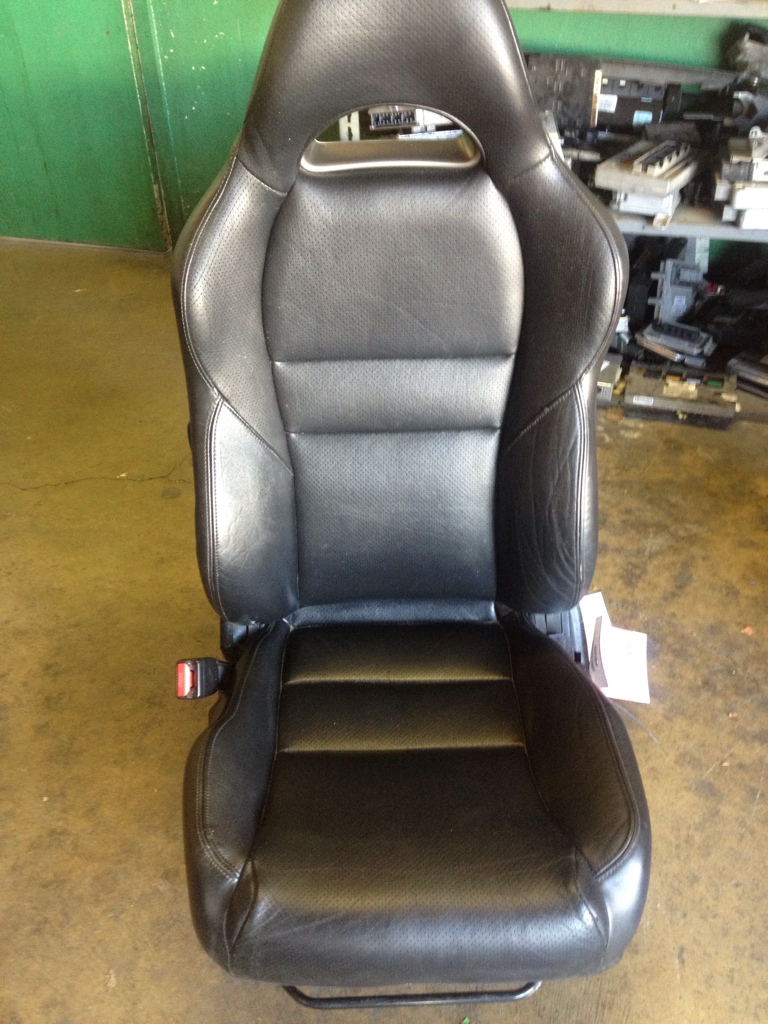
I'll be removing the UNsporty, heavy Accord cloth seats and installing a set of RSX Type S seats. Black leather and manual operation not only looks better but will save a little weight. I'll see about weighing them individually when exchanging them. The drivers seat (shown) cost me a whopping $48.
02-15-2013, 07:44 PM
#158
Forgot to add something:
The original intent of this thread was to modify a j35a6 (2nd gen j-motor) to work with the factory electronics of a 1st gen j-motor but kind of derailed upon the find of the j35a8 which then of course totally blossomed into an entirely new idea (the Accord).
Now that Mr Hickam has my dearly beloved, I began to feel very bored driving my wife's 4cyl. 1998 CL so I rekindled the original thought process here in the thread. I last ended with needing to modify the oil pump so that when mounted to the engine, it would properly seal and not leak oil. Shown below is that taking place and now I'm ready to move along to the next step:
Here's the same oil pump shown earlier in the thread but now with the mounting surface welded to match the j35a6's oil pumps mating surface.
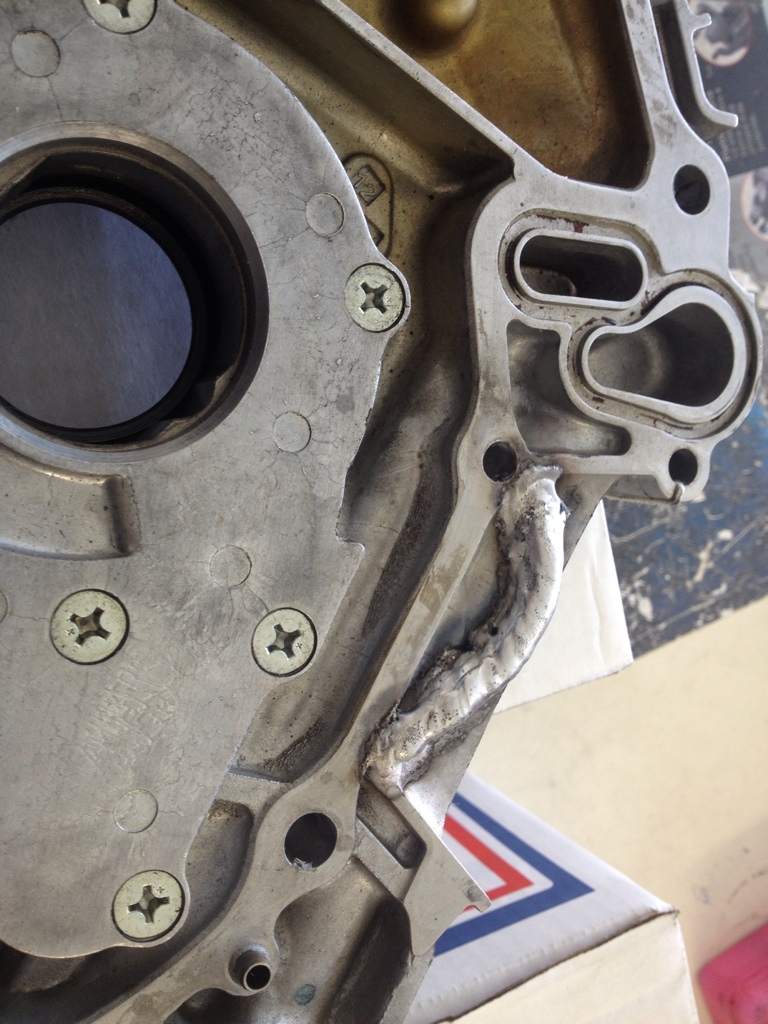
Next, I had the weld milled down to the mating surface itself and this enables me to finally mount the pump:
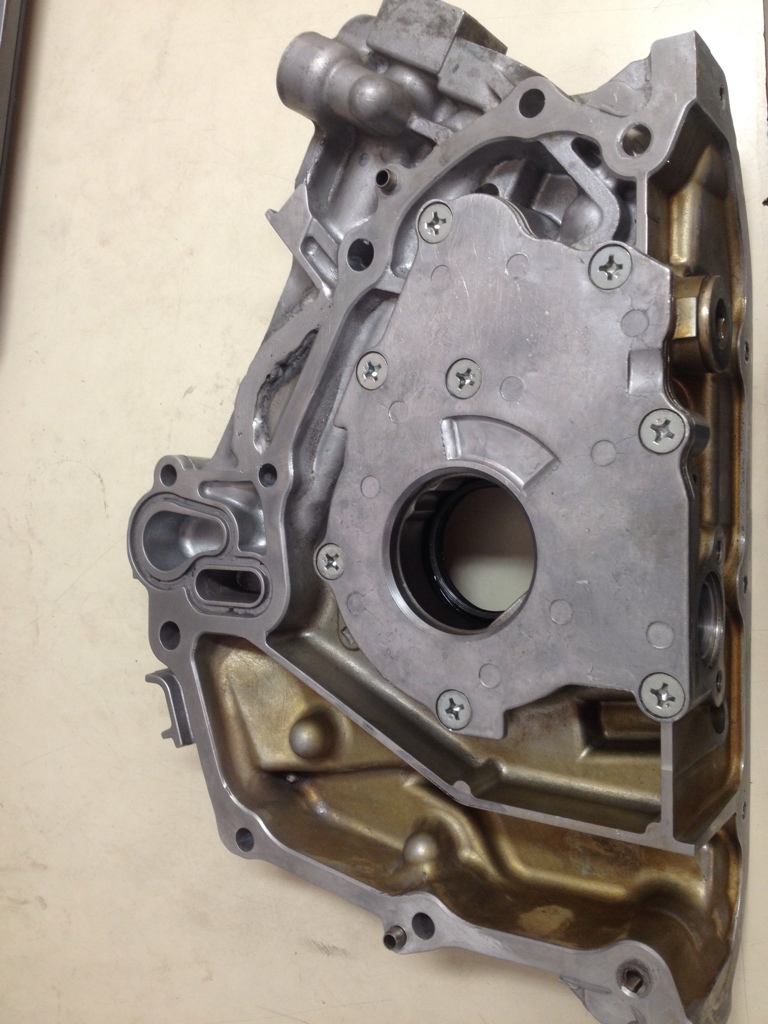
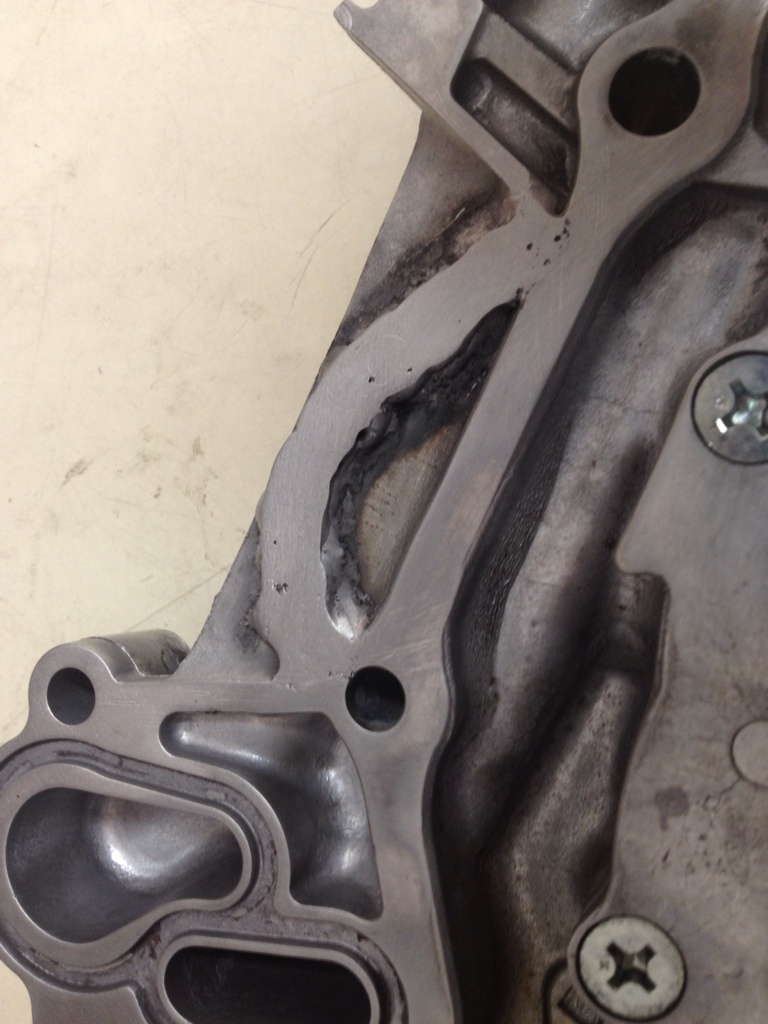
The original intent of this thread was to modify a j35a6 (2nd gen j-motor) to work with the factory electronics of a 1st gen j-motor but kind of derailed upon the find of the j35a8 which then of course totally blossomed into an entirely new idea (the Accord).
Now that Mr Hickam has my dearly beloved, I began to feel very bored driving my wife's 4cyl. 1998 CL so I rekindled the original thought process here in the thread. I last ended with needing to modify the oil pump so that when mounted to the engine, it would properly seal and not leak oil. Shown below is that taking place and now I'm ready to move along to the next step:
Here's the same oil pump shown earlier in the thread but now with the mounting surface welded to match the j35a6's oil pumps mating surface.
Next, I had the weld milled down to the mating surface itself and this enables me to finally mount the pump:
02-15-2013, 08:10 PM
#159
Senior Moderator