New Intercooler Core

 08-18-2004, 06:39 AM
#82
Suzuka Master
Thread Starter
Join Date: Sep 2000
Location: Woodstock, GA
Age: 53
Posts: 9,431
Likes: 0
Received 0 Likes
on
0 Posts
Originally Posted by allmotor_2000
Is that cup with the yellow handles part of the cooling system? 
 08-18-2004, 06:43 AM
#83
Suzuka Master
Thread Starter
Join Date: Sep 2000
Location: Woodstock, GA
Age: 53
Posts: 9,431
Likes: 0
Received 0 Likes
on
0 Posts
Originally Posted by Chemmech
Arg! Stop teasing me Steve! just kidding, it looks awesome  . Time to get a dyno before I do the install.
. Time to get a dyno before I do the install.

 08-18-2004, 10:22 AM
#88
Suzuka Master
Thread Starter
Join Date: Sep 2000
Location: Woodstock, GA
Age: 53
Posts: 9,431
Likes: 0
Received 0 Likes
on
0 Posts
Originally Posted by mrimage27
steve where do you put the liquid bottle? i know if you put it in the engine bay the water going to get hot, and the ic not going to cool
I'm in the process of installing a fuel cell in the trunk to act as the resevoir. This should be done int he next day or two and should increase the capability.
08-18-2004, 10:25 AM
#89
Pro
Join Date: Jan 2004
Location: us 'n a
Age: 44
Posts: 693
Likes: 0
Received 0 Likes
on
0 Posts
Originally Posted by scalbert
I'm in the process of installing a fuel cell in the trunk to act as the resevoir. This should be done int he next day or two and should increase the capability.
 08-19-2004, 06:03 AM
#91
Suzuka Master
Thread Starter
Join Date: Sep 2000
Location: Woodstock, GA
Age: 53
Posts: 9,431
Likes: 0
Received 0 Likes
on
0 Posts
It had better be a sealer bottle as it would be below the core level. If it is a sealed bottle, how do you get ice into it at the track??
The bottle ended up being a filling point so it needed to be higher up thus the current location. Plus, 10 degrees within ambient ain't too bad.
The bottle ended up being a filling point so it needed to be higher up thus the current location. Plus, 10 degrees within ambient ain't too bad.
08-19-2004, 12:00 PM
#93
08-23-2004, 10:35 AM
#96
Suzuka Master
Thread Starter
Join Date: Sep 2000
Location: Woodstock, GA
Age: 53
Posts: 9,431
Likes: 0
Received 0 Likes
on
0 Posts
Just a quick update on this. I had to take both units back to the machine shop for a slight change to the machining. I could have ground it myself but wanted the future units to be the same so I'll let the shop take notes and change the CNC program to accomidate.
It was just a slight change to give a bit more clearance of the rear fuel rail. I should have it back in a couple and will refit it then. I'll snap a few pics of it at that time too and poist them.
It was just a slight change to give a bit more clearance of the rear fuel rail. I should have it back in a couple and will refit it then. I'll snap a few pics of it at that time too and poist them.
08-23-2004, 01:27 PM
#98
13.68 @ 102.56

Join Date: Jul 2003
Location: Sorrento, FL
Age: 57
Posts: 567
Likes: 0
Received 0 Likes
on
0 Posts
Thanks for that very important attention to detail. I'm sure it all makes a possitive difference.
Keep up the good work Steve - the torch is in your hands.
Keep up the good work Steve - the torch is in your hands.
08-23-2004, 01:39 PM
#100
Suzuka Master
Thread Starter
Join Date: Sep 2000
Location: Woodstock, GA
Age: 53
Posts: 9,431
Likes: 0
Received 0 Likes
on
0 Posts
Originally Posted by rezurex
can't wait till this goes into production!
08-23-2004, 03:50 PM
#101
13.68 @ 102.56
Join Date: Jul 2003
Location: Sorrento, FL
Age: 57
Posts: 567
Likes: 0
Received 0 Likes
on
0 Posts
Originally Posted by scalbert
It is actually in production, these two are the first two production units.
Yes....and then they will go from production to helping us with our induction.
 08-29-2004, 02:28 PM
#102
Suzuka Master
Thread Starter
Join Date: Sep 2000
Location: Woodstock, GA
Age: 53
Posts: 9,431
Likes: 0
Received 0 Likes
on
0 Posts
And here is one of them installed. It fit very well and looks better than the old one since it isn't so tall. I went for a quick drive and it responded great. It was in the high 80's but was pulling hard and the throttle response was fantastic. Boost came on with just a tap of the throttle and the power was as good as I have felt considering the weather. I thought this new design would work well and it seems to be nearly perfect.
I also used polished acorn nuts to clean it up a little.
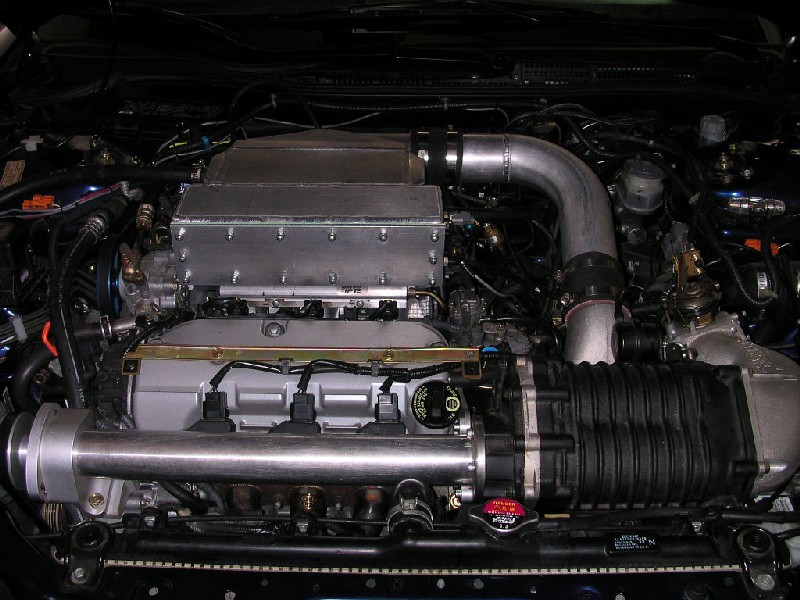

I also used polished acorn nuts to clean it up a little.

 08-30-2004, 07:05 AM
#106
Suzuka Master
Thread Starter
Join Date: Sep 2000
Location: Woodstock, GA
Age: 53
Posts: 9,431
Likes: 0
Received 0 Likes
on
0 Posts
Just FYI, the car feels fantastic with this new unit. I don't know if it is the combination of new plugs, driving it easy for two days and the new design, but regardless, it feels great.
It was warm this morning, in the mid 70'd but very humid, Humidity: 94%, Visibility: 3.0, miles, Pressure: 29.98 inches (taken from Weather.com ) and the car pulled very well. Much harder than I would have expected in these conditions.
It was warm this morning, in the mid 70'd but very humid, Humidity: 94%, Visibility: 3.0, miles, Pressure: 29.98 inches (taken from Weather.com
) and the car pulled very well. Much harder than I would have expected in these conditions.
08-30-2004, 10:48 AM
#108
Suzuka Master
Thread Starter
Join Date: Sep 2000
Location: Woodstock, GA
Age: 53
Posts: 9,431
Likes: 0
Received 0 Likes
on
0 Posts
Originally Posted by mrimage27
steve, i think you should stock 2or 3 so as a order come you just ship. honestly i don't like to wait, i like as i order it ship out.
Remember, this endeavor is not a profit center. It is merely to provide low volume items to those who want them.
08-30-2004, 10:56 AM
#110
Suzuka Master
Thread Starter
Join Date: Sep 2000
Location: Woodstock, GA
Age: 53
Posts: 9,431
Likes: 0
Received 0 Likes
on
0 Posts
The installation of the IC assembly is very easy. It could be done in about thirty minutes. The rest of it is what will take some time. You have to remove the front bumper to mount the heat exchangers and then run that plumbing. There is also the electrical supply for the pump.
Lastly and dependant on placement of the reservoir, is the time involved in the hose routing. If the reservoir is placed in the trunk it will take longer to mount and complete.
Total time shouldn't exceed three hours though.
Lastly and dependant on placement of the reservoir, is the time involved in the hose routing. If the reservoir is placed in the trunk it will take longer to mount and complete.
Total time shouldn't exceed three hours though.
08-30-2004, 11:42 AM
#111
Pro
Join Date: Jan 2004
Location: us 'n a
Age: 44
Posts: 693
Likes: 0
Received 0 Likes
on
0 Posts
Originally Posted by scalbert
Just FYI, the car feels fantastic with this new unit. I don't know if it is the combination of new plugs, driving it easy for two days and the new design, but regardless, it feels great.
It was warm this morning, in the mid 70'd but very humid, Humidity: 94%, Visibility: 3.0, miles, Pressure: 29.98 inches (taken from Weather.com ) and the car pulled very well. Much harder than I would have expected in these conditions.
It was warm this morning, in the mid 70'd but very humid, Humidity: 94%, Visibility: 3.0, miles, Pressure: 29.98 inches (taken from Weather.com
) and the car pulled very well. Much harder than I would have expected in these conditions. 
BTW Serge posted the pics of his block with custom cyl. sleeves, custom pistons, custom rods - HERE
08-31-2004, 06:50 AM
#113
Suzuka Master
Thread Starter
Join Date: Sep 2000
Location: Woodstock, GA
Age: 53
Posts: 9,431
Likes: 0
Received 0 Likes
on
0 Posts
Originally Posted by sgmotoring
Is that a new Aluminum mandrel bend pipe from the S/C to the intercooler? Looking good :gheywave:
08-31-2004, 08:13 AM
#115
Suzuka Master
Thread Starter
Join Date: Sep 2000
Location: Woodstock, GA
Age: 53
Posts: 9,431
Likes: 0
Received 0 Likes
on
0 Posts
Originally Posted by mrimage27
steve when you have the IC and all the pluming supply in stock let me know so i can get that only ok.
 08-31-2004, 12:18 PM
#116
13.68 @ 102.56
Join Date: Jul 2003
Location: Sorrento, FL
Age: 57
Posts: 567
Likes: 0
Received 0 Likes
on
0 Posts
Originally Posted by scalbert
That will never happen. I will not keep $2000+ sitting on the shelf with no way to move it for sure. Remember, this is not for real profit, but nor will it be for a loss. Sorry...
This is true to most of the performance market. And as for you Steve, you are doing quite a bit on our behalf and for one person......KUDOS!!!!!
08-31-2004, 12:21 PM
#117
Posts: 1,100,980

Join Date: Jun 2002
Location: Lake Arrowhead
Posts: 2,144
Likes: 0
Received 0 Likes
on
0 Posts
Wow it looks great Steve ! Thanks for all of your hard work and dedication, bringing this project to life!
Only three hours for the install? I have yet to install the hbp. This should be alot of fun.
! Thanks for all of your hard work and dedication, bringing this project to life!Only three hours for the install? I have yet to install the hbp. This should be alot of fun.
08-31-2004, 02:22 PM
#118
Suzuka Master

Join Date: Apr 2002
Location: Pittsburgh, PA
Age: 48
Posts: 9,940
Likes: 0
Received 0 Likes
on
0 Posts
Originally Posted by Chemmech
I have yet to install the hbp. This should be alot of fun.
i recommend you have a round FILE on hand... i installed 2 of them and both needed alittle filing of the burs, on the inside, to get the pulley on correct.
08-31-2004, 04:34 PM
#120
COME AT ME BRO!
scalbert funny i have a issue of trubo with an art. on building a watter cooler for the water to air intercooler. it looks alot like your except they used 2 transcoolers..here is some of what it says..
There are many advantages to an air-water intercooling system, and some potential disadvantages. One great thing about an air-water intercooler is that-unlike an air-air unit- the charge-cooler unit can be positioned in a location optimized to accelerate boost gain and minimize turbo lag( i know u have an s/c) via reduced intake plumbing volume. you also get the freedom to locate the water cooler in a seperate location. we acquired a second trans cooler identical to the original singal unit,welded the two cooler units together and add some aluminum starps for structural reinforcement. they mounted the water cooler unit in front of the a/c condenser. they then plumbed the 2 units together in parallel, running 5/8-inch hose to and from the air-cooler to the front of the car, with 2-into-1 fittings to send coolant simultaneously to and from the 3/8- inch trans cooler connections.
forced-induction expert corky bell calculated that the water reservoir should be at least five liters. the trunk mounted air-cooler was already at 16-inches high by 20 inches wide by 4 inches thick, and the front water cooler was similarly fixed by the available real estate in front of the a/c compressor behind the front bumper. we built a tank 6.5x 6.5x 11 inches deep to fit in the right side pocket of the trunk. we mounted a centrifugal-style water pump rigidly to the bottom of the reservoir tank to pump the water through the system. Engine heat soak can ruin the efficiency of an intercooler system. to improve the efficiency of the intercooler system, we decided to insulate the intercooler and all of the plumbing all the way from the air cleaner inlet to the throttlebody with aluminum-backed foam pipe wrap, with additional insulation where the heater type coolant hoses went under the engine or any where near a heat sorce on the way forward and back from the water cooling units..
sorry for the long post thought some might want to read this, and scalbert it might have helped you to i hope.