
Intake Manifold Part 2, Polishing

Thread Starter
Suzuka Master
Joined: Sep 2000
Posts: 9,431
Likes: 0
From: Woodstock, GA
Intake Manifold Part 2, Polishing
It is not complete, I only have the injector bases done but they sure do look good. I didn't get to work on it last night and didn't get started until late this evening so only the injector bases are completely finishing.
I'm leaving the office early tomorrow in order to get everything finished and tested out. So there will be more pics of the manifold tomorrow along with another post documenting the process of putting everything back together.
But I am quite pleased, with two and a half hours of work they came out great. Now that I have done it I could probably get both done in an hour and a half, about fifteen minutes per runner.
Pics are below:
Injector Base Inlet:

Injector Base Outlet:

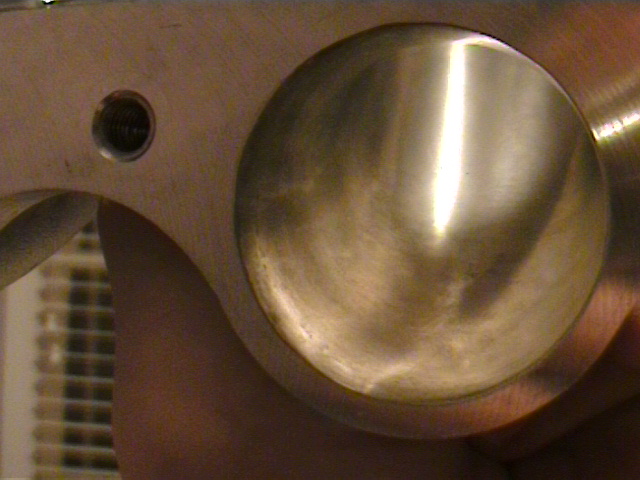
And now for the close up with before and after pics:
Before:

After
I'm leaving the office early tomorrow in order to get everything finished and tested out. So there will be more pics of the manifold tomorrow along with another post documenting the process of putting everything back together.
But I am quite pleased, with two and a half hours of work they came out great. Now that I have done it I could probably get both done in an hour and a half, about fifteen minutes per runner.
Pics are below:
Injector Base Inlet:
Injector Base Outlet:
And now for the close up with before and after pics:
Before:
After

Thread Starter
Suzuka Master
Joined: Sep 2000
Posts: 9,431
Likes: 0
From: Woodstock, GA
Re: Very nice!!
Originally posted by allmotor_2000
Are you going to match the gaskets??
Are you going to match the gaskets??
I had planned on it but when I checked it out gasket match up, the gasket is slightly over sized, maybe a half millimeter. So I checked the port match up expecting the injector base outlet to be slightly smaller than the heads inlet port and they were exactly the same. Well close enough that there was nothing to do.
I then checked the manifold to injector base ports and they were the same way. So in shape and match up the factory did an excellent job.
So that left me with just grinding down the high spots and polishing. But as you can see, the polishing certainly smoothed out those passages. I can't wait to put it back together and test it out!!


Trending Topics


Thread Starter
Suzuka Master
Joined: Sep 2000
Posts: 9,431
Likes: 0
From: Woodstock, GA
Thanks guys, the actual tool is an air grinder so I am running my compressor most of the time. It will maintain 80 PSI with the grinder constantly running which gives me about 18,000 RPM. Unfortunately, I doubt a Dremel would do it. It would burn out quickly and I doubt there are sufficient cartridge rolls made for this type of work.
On the grinder I am using your standard aluminum oxide tapered cartridge rolls starting with 120 grit and working up to 320. But that really only gets the primary roughness out; there is a trick my father-in-law showed me which rivals the best flap wheels. These tapered cartridge rolls are made up of a cone of cotton backing with aluminum oxide impregnated in it (similar to sand paper). But since it is in a cone, you can cut the end free at the base and pull out about a couple of inches. So now think of it as the cone coming apart with a flapping piece. So as it turns there is a piece that is basically swiping due to centrifugal force. The beauty of it is as the flap end wears more and more cotton is exposed. There ends up being an optimal point where there is perfect balance of cotton and aluminum oxide with the 320 grit that it polishes up in no time. I could have a single port done in fifteen minutes.
I made a quick sketch below to describe what the flap would look like but I'll take a picture tonight of one.

Here is where I get the cartridge rolls in boxes of fifty which I will probably go through one hundred and fifty total; fifty120 grit, fifty 240 grit and fifty 320 grit. One nice thing about using these cartridge rolls is that you can replace them in just seconds:
http://www.mscdirect.com/PDF.process?pdf=873
I'm flattered for people asking if I would do this for them, of course with pay. But honestly I would charge more than a shop probably would as I don't do this daily. Heck, I would probably charge in the range of $300 which would include the rolls but not tear down and re-installation. I would suspect that some shops would do this for about that price including the removal and installation. I might consider helping someone out though.
On the grinder I am using your standard aluminum oxide tapered cartridge rolls starting with 120 grit and working up to 320. But that really only gets the primary roughness out; there is a trick my father-in-law showed me which rivals the best flap wheels. These tapered cartridge rolls are made up of a cone of cotton backing with aluminum oxide impregnated in it (similar to sand paper). But since it is in a cone, you can cut the end free at the base and pull out about a couple of inches. So now think of it as the cone coming apart with a flapping piece. So as it turns there is a piece that is basically swiping due to centrifugal force. The beauty of it is as the flap end wears more and more cotton is exposed. There ends up being an optimal point where there is perfect balance of cotton and aluminum oxide with the 320 grit that it polishes up in no time. I could have a single port done in fifteen minutes.
I made a quick sketch below to describe what the flap would look like but I'll take a picture tonight of one.
Here is where I get the cartridge rolls in boxes of fifty which I will probably go through one hundred and fifty total; fifty120 grit, fifty 240 grit and fifty 320 grit. One nice thing about using these cartridge rolls is that you can replace them in just seconds:
http://www.mscdirect.com/PDF.process?pdf=873
I'm flattered for people asking if I would do this for them, of course with pay. But honestly I would charge more than a shop probably would as I don't do this daily. Heck, I would probably charge in the range of $300 which would include the rolls but not tear down and re-installation. I would suspect that some shops would do this for about that price including the removal and installation. I might consider helping someone out though.
Thread Starter
Suzuka Master
Joined: Sep 2000
Posts: 9,431
Likes: 0
From: Woodstock, GA
Originally posted by 4pumpedCL
are you actually boring out the port, or just smoothing out the imperfections and polishing it?
are you actually boring out the port, or just smoothing out the imperfections and polishing it?
I basically don't look at it but stick my finger in there and feel for the roughness. That way you can tell how smooth it is and try to think of how the air will flow through it.
Thread Starter
Suzuka Master
Joined: Sep 2000
Posts: 9,431
Likes: 0
From: Woodstock, GA
Originally posted by JRock
Well judging by the before and after pics he made the oval a complete circle!
Hahahaha just playin'
Well judging by the before and after pics he made the oval a complete circle!
Hahahaha just playin'
I'll snap a pics from the same angle to correct this...

Thread Starter
Suzuka Master
Joined: Sep 2000
Posts: 9,431
Likes: 0
From: Woodstock, GA
Originally posted by jucee187
Nice job but Humor me what is the purpose of doing this? how many HPs are you expecting to gain?..
Nice job but Humor me what is the purpose of doing this? how many HPs are you expecting to gain?..
But I am very optimistic after looking at the stock runners, they were very rough with plenty of room for improvement. So hopefully they will be the one's to gain 5% - 7%, maybe more...

Hrmm, 7% on a 250 WHP car, 267.5 would sure be nice...
Just wishful thinking though...

Thread Starter
Suzuka Master
Joined: Sep 2000
Posts: 9,431
Likes: 0
From: Woodstock, GA
I got the manifold done tonight but didn't get eveything back together. So tomorrow will include the re-install with pictures. Below are the pictures of the finished intake manifold; I am very excited about putting it back together and taking it for a drive...
Throttle Body Oulet:
Before:

After:

Front Chamber Inlet:
Before:

After:

Runner Inlet:
Before:

After:

And lastly, the whole assembly:

Throttle Body Oulet:
Before:
After:
Front Chamber Inlet:
Before:
After:
Runner Inlet:
Before:
After:
And lastly, the whole assembly:


Thread Starter
Suzuka Master
Joined: Sep 2000
Posts: 9,431
Likes: 0
From: Woodstock, GA
Originally posted by mattg
btw, scalbert, do you have a before dyno? you do, huh
btw, scalbert, do you have a before dyno? you do, huh
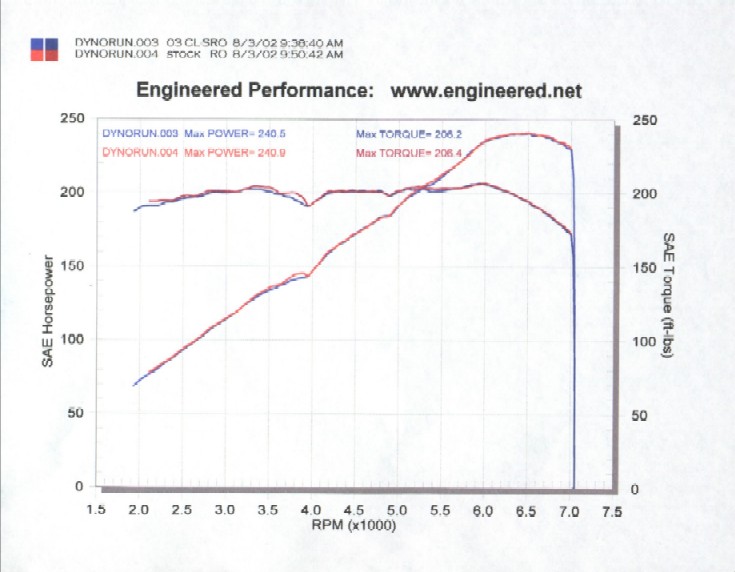
Old dyno:


Thread Starter
Suzuka Master
Joined: Sep 2000
Posts: 9,431
Likes: 0
From: Woodstock, GA
Originally posted by jucee187
WOW 240HP!!.. you have a 6spd right?
what is your mod list?
WOW 240HP!!.. you have a 6spd right?
what is your mod list?
At the time of that dyno I had 800 miles on the car in early August in Georgia. I had Comptech Headers, the AEM intake but for the AV6 (long story but it is smaller and not optimal) along with AEM pullies.
I would expect that with a proper intake (which is being done right now) more miles and cooler air it would hit 250 WHP. But I do plan on going back in mid-October for additional pulls.

Advanced
Joined: Aug 2002
Posts: 78
Likes: 0
From: DC Metro Area
Is it just me or did you cadmium coat the manifold after you P&P it? Or is the camera registering different colors? It looks bronze to me! Nice job. You saved a lot of money by doing it yourself. Don't they usually run about $200-300 per part at a shop?
Banned
Joined: Apr 2001
Posts: 7,281
Likes: 7
From: Ringgold, Georgia, U.S
!
Scalbert's the KING of "TWEAK"
Originally posted by jucee187
250WHP .. ??!? some people here would be considered lucky to get that number even with the 6spd.. how come your so special?. haha.
250WHP .. ??!? some people here would be considered lucky to get that number even with the 6spd.. how come your so special?. haha.
Thread Starter
Suzuka Master
Joined: Sep 2000
Posts: 9,431
Likes: 0
From: Woodstock, GA
Originally posted by showgunz
Is it just me or did you cadmium coat the manifold after you P&P it? Or is the camera registering different colors? It looks bronze to me! Nice job. You saved a lot of money by doing it yourself. Don't they usually run about $200-300 per part at a shop?
Is it just me or did you cadmium coat the manifold after you P&P it? Or is the camera registering different colors? It looks bronze to me! Nice job. You saved a lot of money by doing it yourself. Don't they usually run about $200-300 per part at a shop?
Yea, I did save money on this but that really wasn't the reason. I was more curious about being able to do it myself. Which in the end I was quite satisfied. As for shop pricing; I guess it would depend on the shop. Labor would be in the five to six hour range so $300 would not be far off.
Thread Starter
Suzuka Master
Joined: Sep 2000
Posts: 9,431
Likes: 0
From: Woodstock, GA
Originally posted by jucee187
250WHP .. ??!? some people here would be considered lucky to get that number even with the 6spd.. how come your so special?. haha.
250WHP .. ??!? some people here would be considered lucky to get that number even with the 6spd.. how come your so special?. haha.

Thread
Thread Starter
Forum
Replies
Last Post
cycdaniel
1G TSX Performance Parts & Modifications
8
Dec 17, 2019 10:58 AM
JarrettLauderdale
2G CL Dynograph Gallery
5
Sep 21, 2015 07:51 PM