DIY: Manual Transmission/Clutch Replacement and Removal
 09-19-2011, 07:58 PM
#1
Cruisin'
Thread Starter
DIY: Manual Transmission/Clutch Replacement and Removal
Ok this is my first DIY and its a big one....
this was done on my 05 i assume its mostly the same for the 1st gens
DISCLAIMER: I TAKE NO RESPONSIBILITY FOR ANY DAMAGE DONE TO YOUR CAR. THIS IS NOT SOMETHING YOU SHOULD TRY WITH OUT A DECENT AMOUNT OF EXPERIENCE.
Well with that out of the way here are the RECOMMENDED tools. Can you do it with out all of these sure but itll be way easier with them all.
-Assortment of flat head screwdrivers
-Sledge hammer
-Wood (ill explain later on)
-Metric wrenches 8-19mm (long and short handle wrenches help greatly)
-Metric sockets 8-19mm
-Impact sockets 14mm, 17mm, and 36mm
-3/8 and 1/2 torque ratchet
-3/8 and 1/2 ratchets
-long handle 1/2 ratchet
-pry bar (ill explain later)
-18inch breaker bar
-four jackstands
-2 jacks (this is absolutely necessary)
-1/2 Air gun
-Gear and pulley remover
-1/2 and 3/8 externstions
-Swivel head impact sockets 12mm 14mm 17mm
-work light
-Engine Support brace: 1000 Lb. Capacity Engine Support Bar
-two used spark plugs (ill explain later)
-lots and lots of plastic bags and a sharpie LABEL EVERYTHING
-get a paint pen to mark stuff
Ok well here we go. Take a deep breathe read through this entire guide before starting your work. Its really not that bad its just alot of work.
First go here and get the honda factory manual (yes its free for members here) for some reaspon photobuket flips the photos around so go to the last page last pic and go backwards. Login to a private Photobucket.com album use the password: if this link does not work PM me with your email addy and i will send it to you.
There will be a link to my photobucket account with all of the below pictures and more in HD
Ok now to the work...
First step get the car jacked up on four stands. Make the rear of the car slightly lower than the front so you get a few extra inches of room.
Than prop the hood open all the way (dont use the usual prop hole look on the left of the hood towards the bottom and you will see another hole)
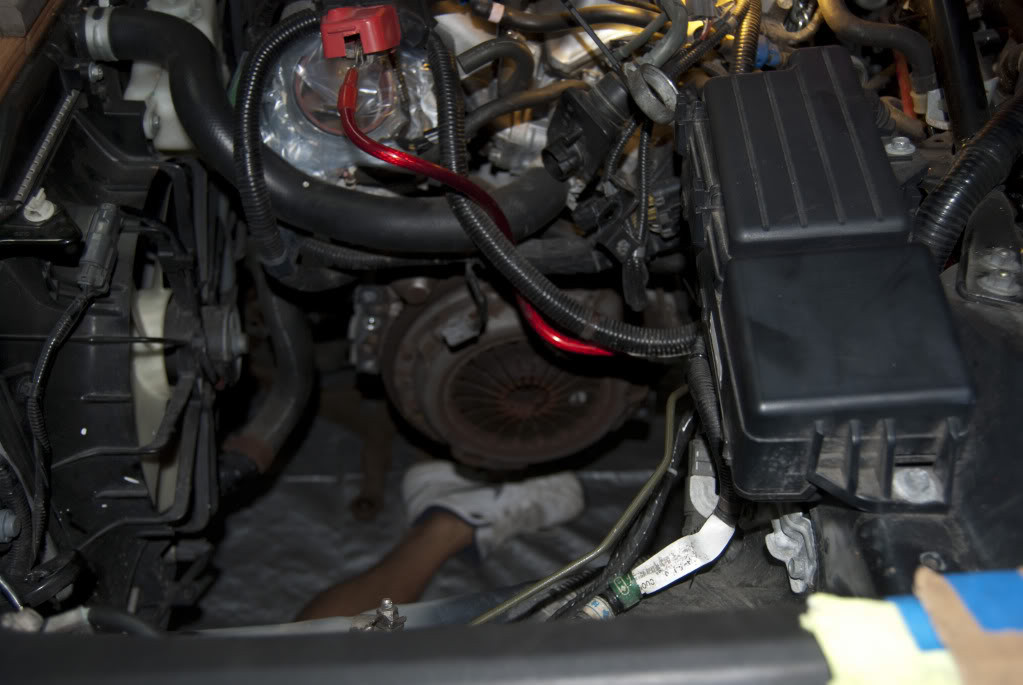
Remove the Intake (entire box and everything for you stockies) Remove the battery, battery tray and cover the intake with some plastic.
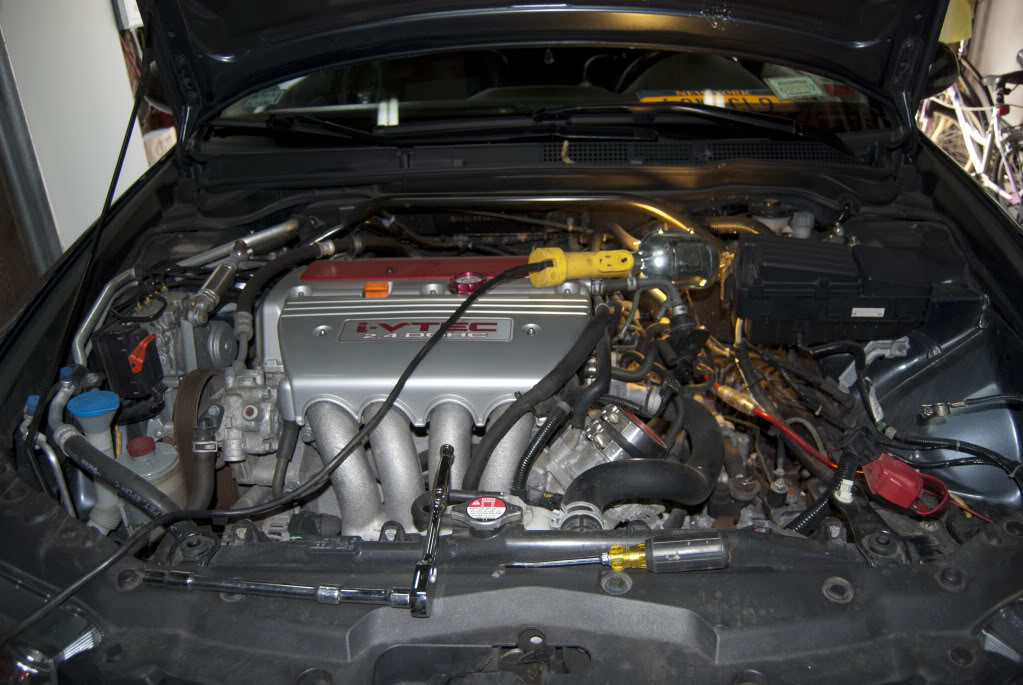
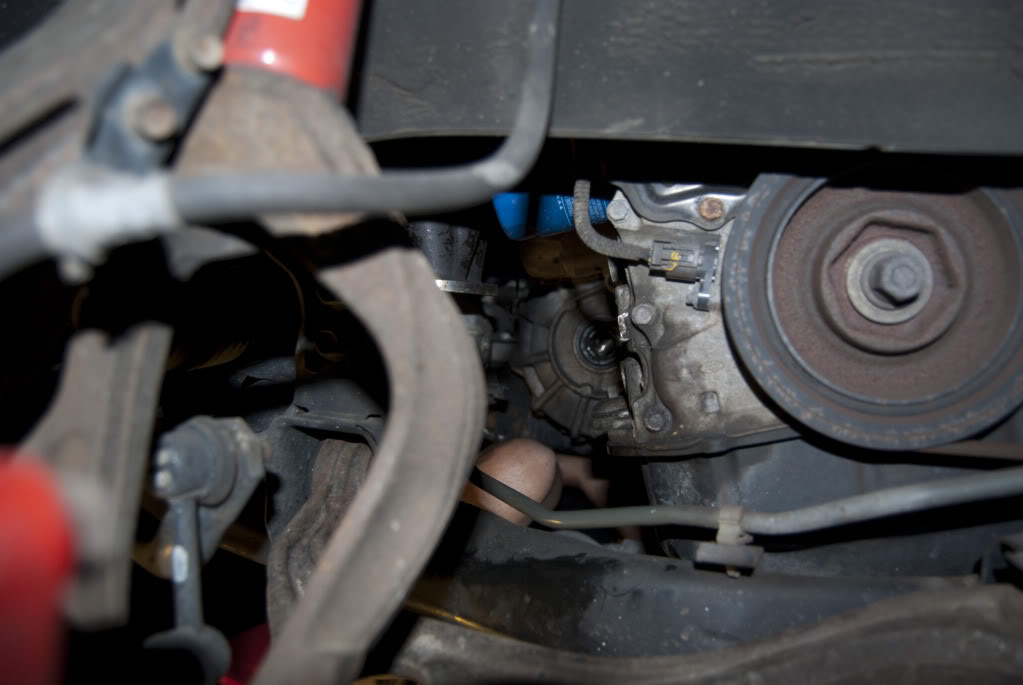
Remove the slave cylinder dont disconnect the line at this point unless you want to just completely flush your master out. This is located just below your intake mani.
Now remove the 2 linkages on the tranny. You should be able to just remove the cotter pins. Than take the 3 bolts out off the bracket. remove the bracket that holds the wiring harness to the actual gearbox housing NOT the bell housing. Becareful these bolts are reversed thread for some reason.
Take the two front wheels off and put them under the car but make it so there out of your way, but could still save your life if the car fell.
Go inside the car and lock your steering wheel doesnt matter what direction.
Now we need to break two joints. The tierod and the lower a-arm ball joint. DO NOT USE a fork to remove these use that gear puller. you will most like need an adjustable one.
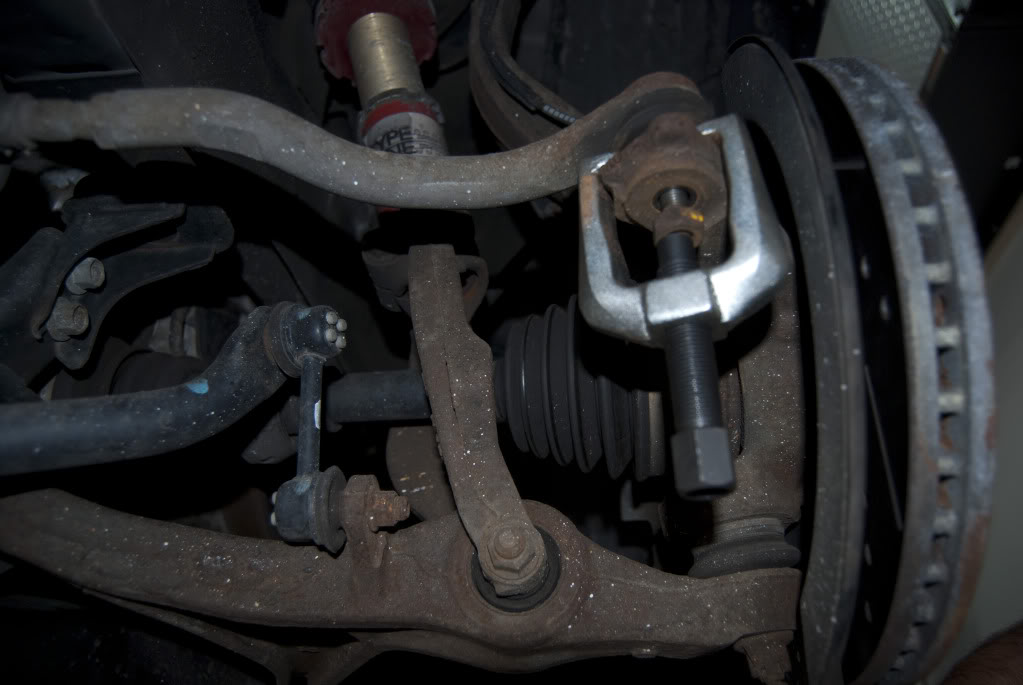
Do the same for both sides and both joints. if they dont pop out with the puller and tension alone give the a-arm a whack with the sledge
Drain the trans before doing these steps! or you will get a surprise
Now use that 36mm socket to remove the axle nut on the drivers side. Than take the pry bar and pry on the axle and the CV joint casing until it pops out.
Now the passenger side is a little bit trickier. On the Intermediate shaft there is a mount with three bolts remove these. The axle is easier to come out but still needs some force but there is not much to pry on just keep tuging on it but dont pull on the cv joints or you could damage them.
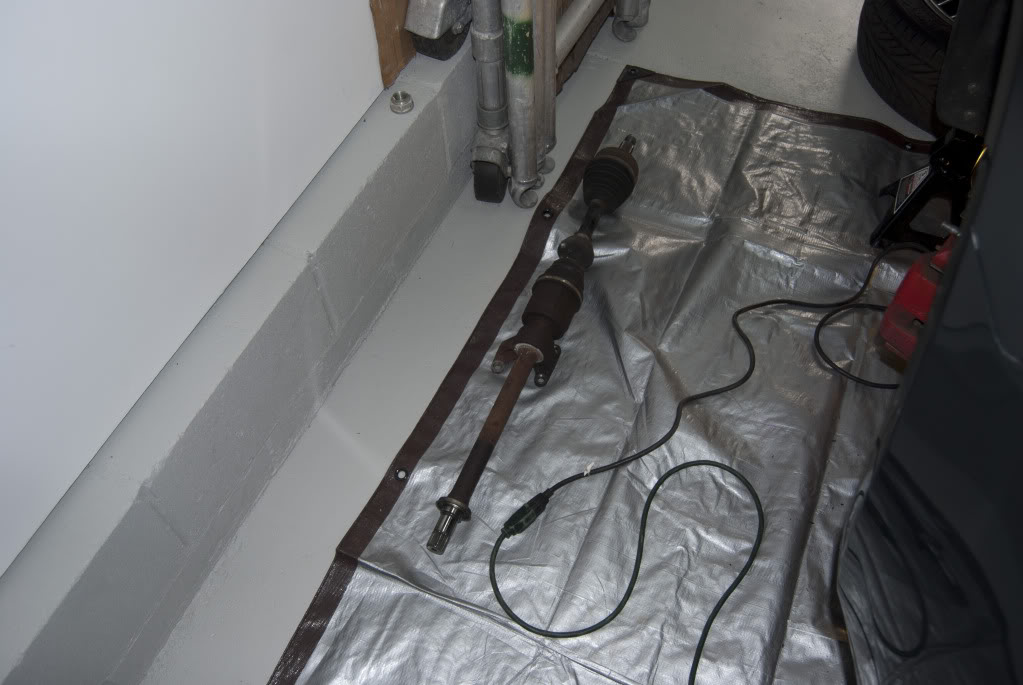
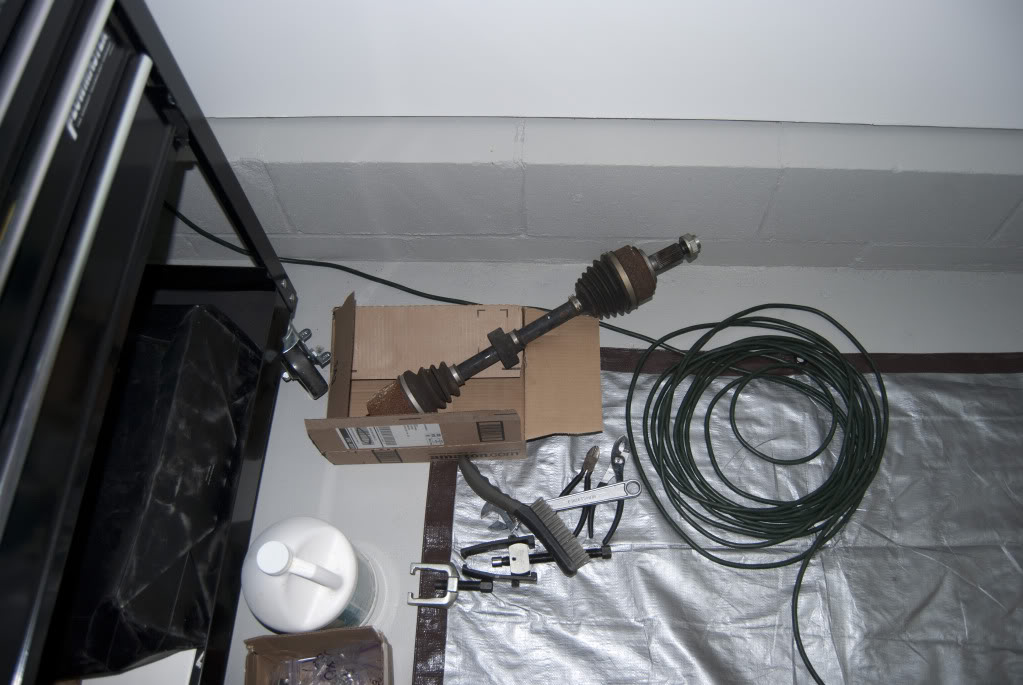
Heres a few shots with the axles out
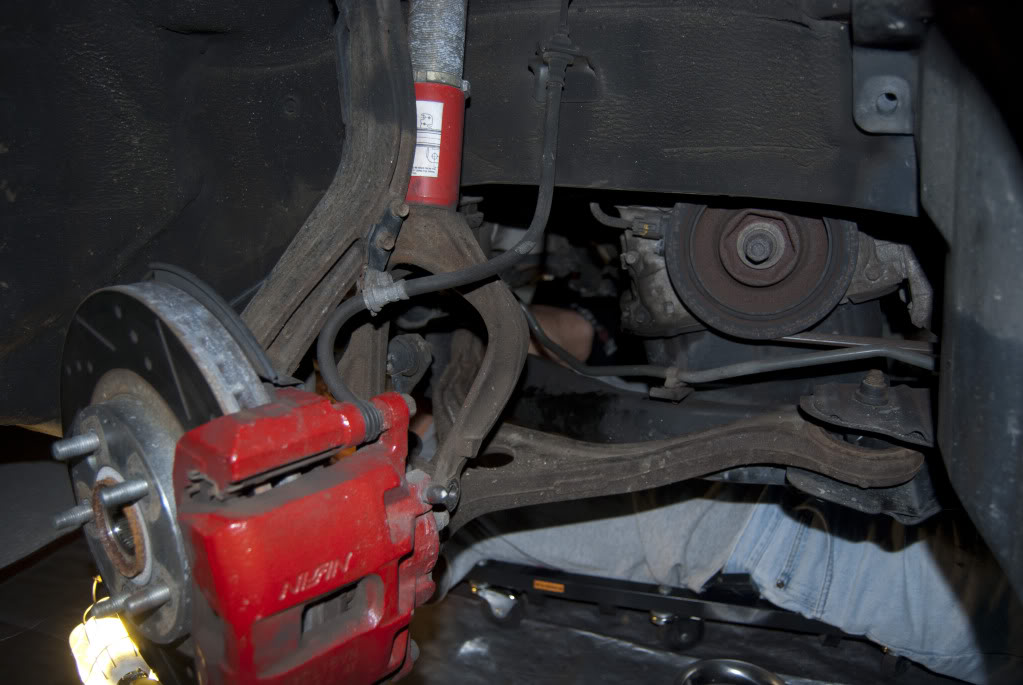
At this point you want to make sure to not put stress on the wheel sensors or brake lines, remove the brackets if needed to get some slack.
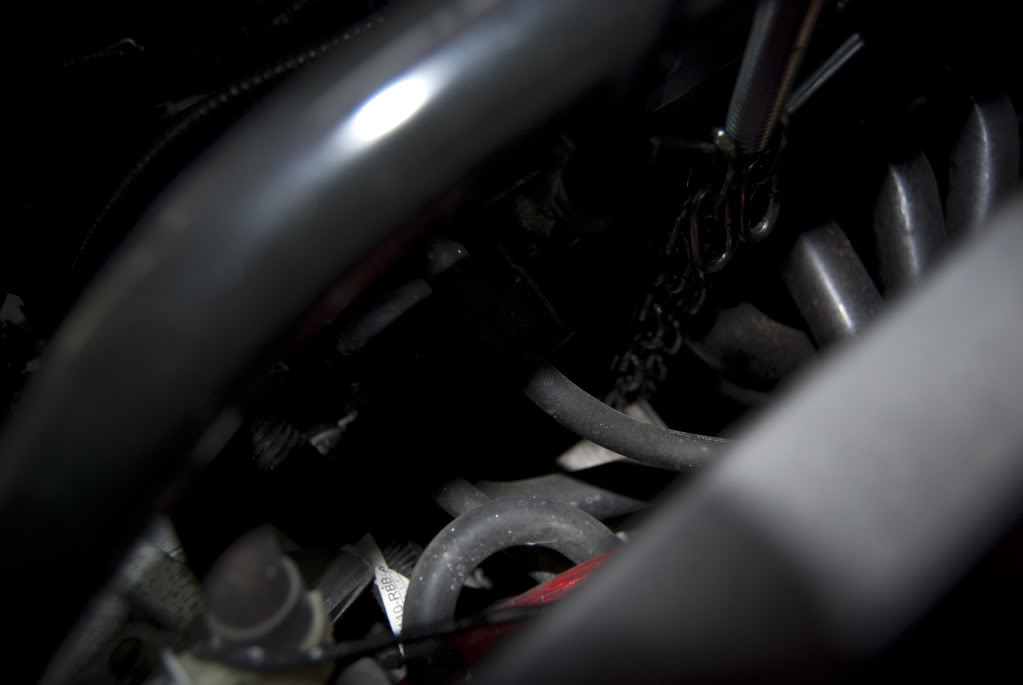
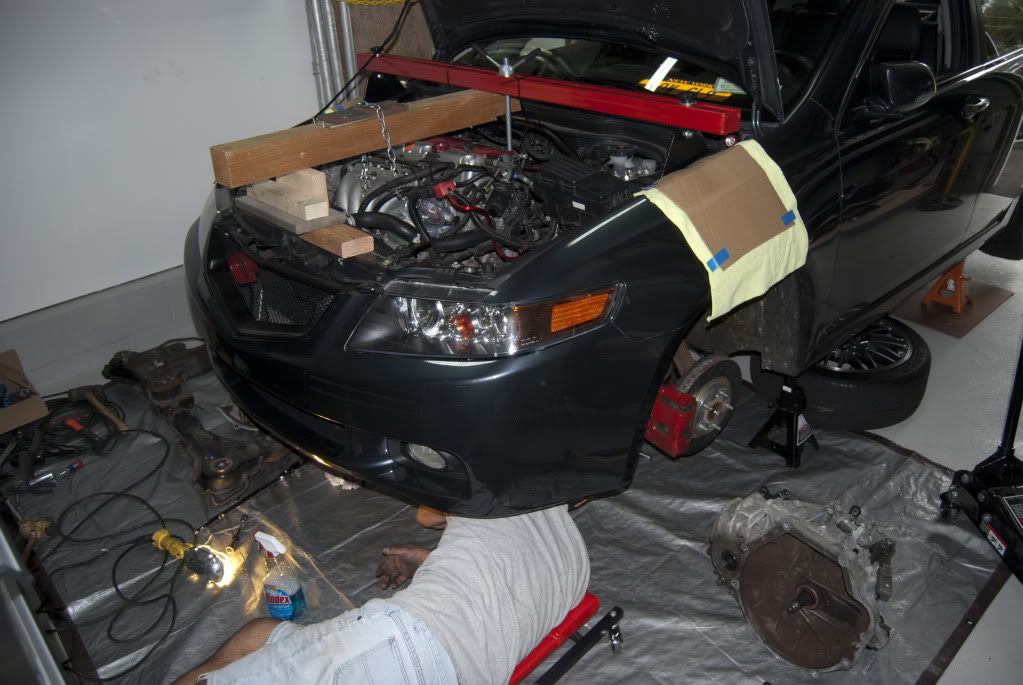
We need to now brace the motor. Start with the engine brace that was bought. You will be attaching it to the lower motor mount to the right of the exhaust manifold. Becareful at this point as you have to drop it inbetween the block and the mount and than back up again. Make sure it does not interfere with any of the bolts under the chain. The motor mount we are attaching this too is also connected to the trans so stay clear of that as well.
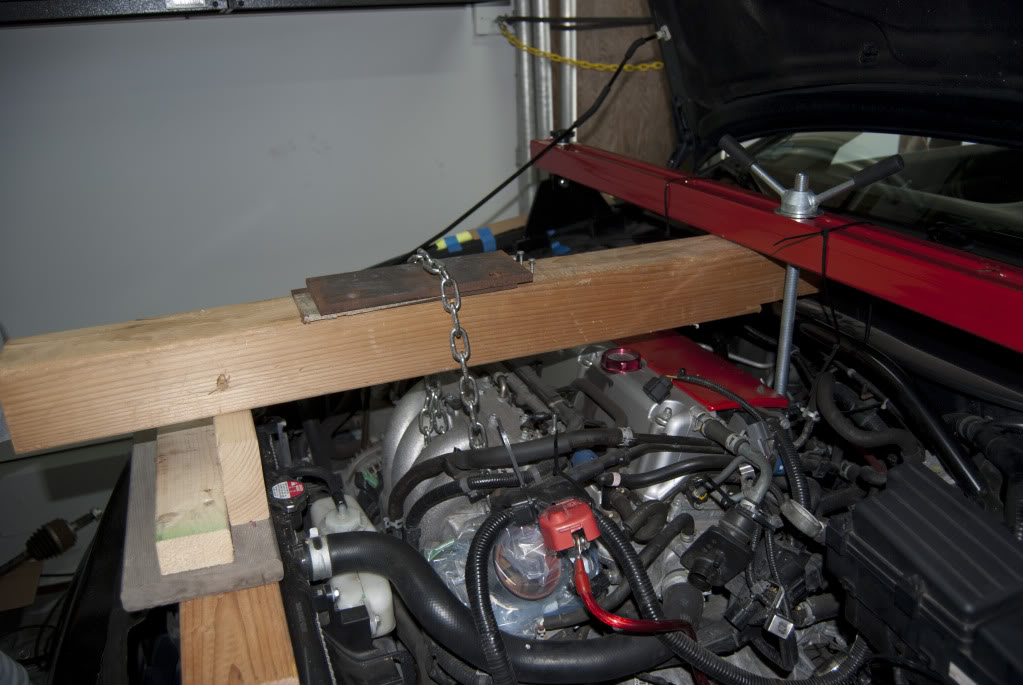
This pic is dark but it gives you an idea where to but the chain. I am standing near the drivers door taking this pic
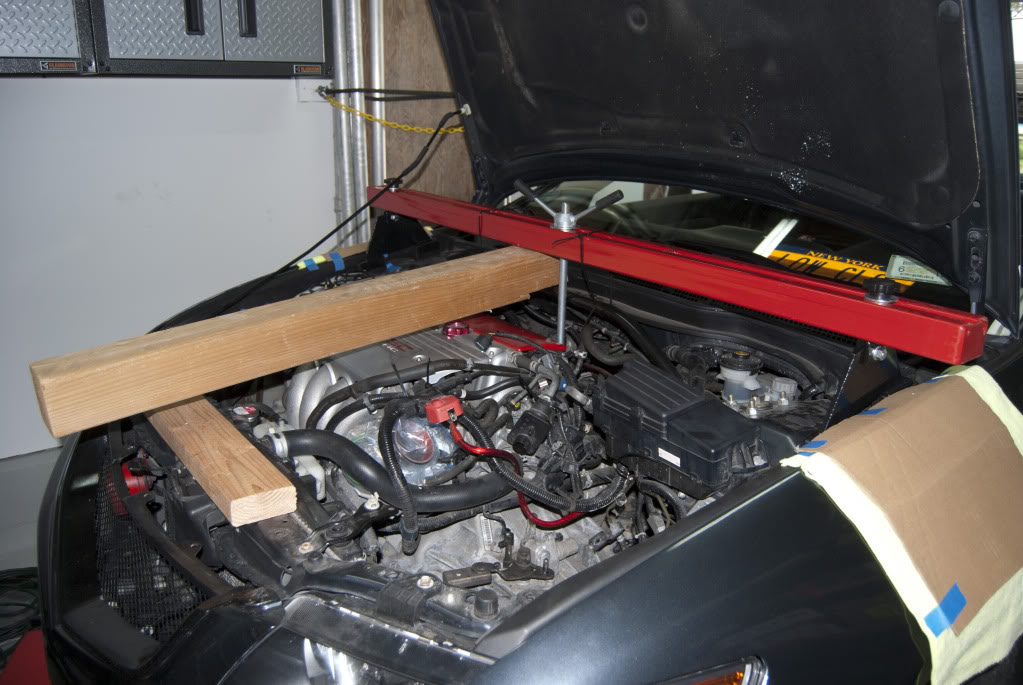
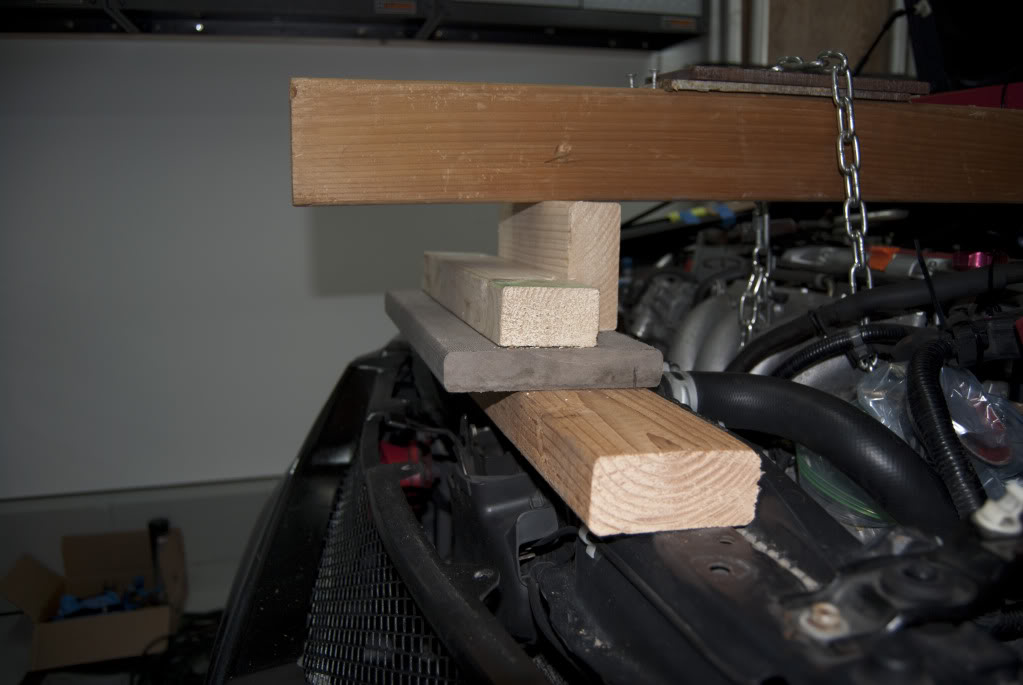
Now get a 4x4 and notch it so it can fit in between the engine brace and sit on your strut tower bar. block up the 4x4 from the rad up like this
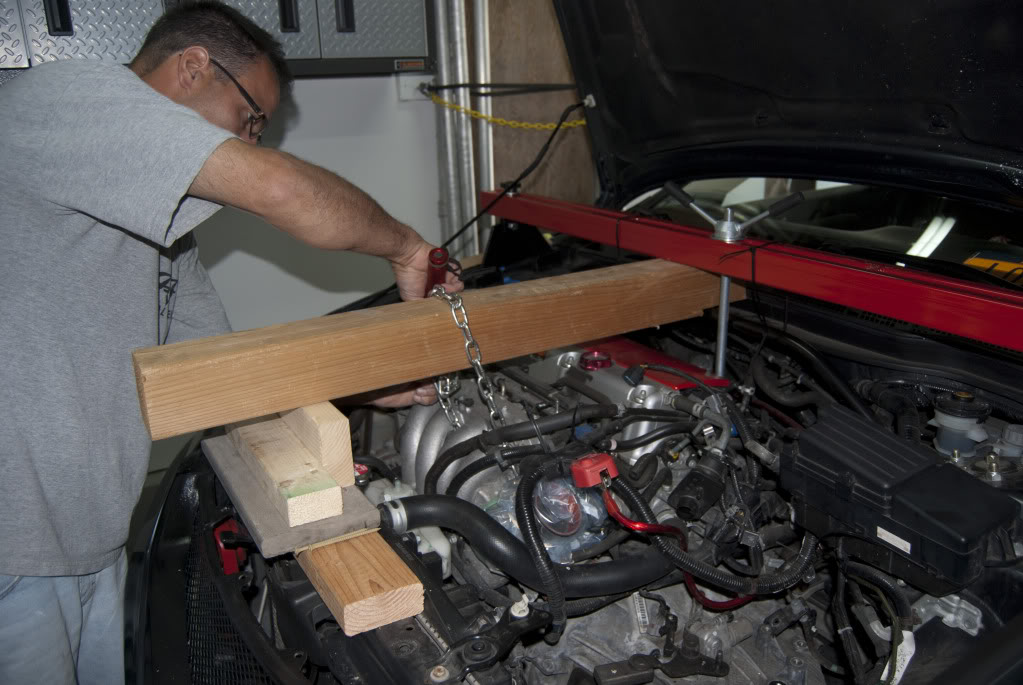
Try to wedge some wood or like in the next pic we used steel plate. this helps distribute the weight better.
Make sure to screw all of the wood together and put screws in front and back of the steel plate so it cant slide
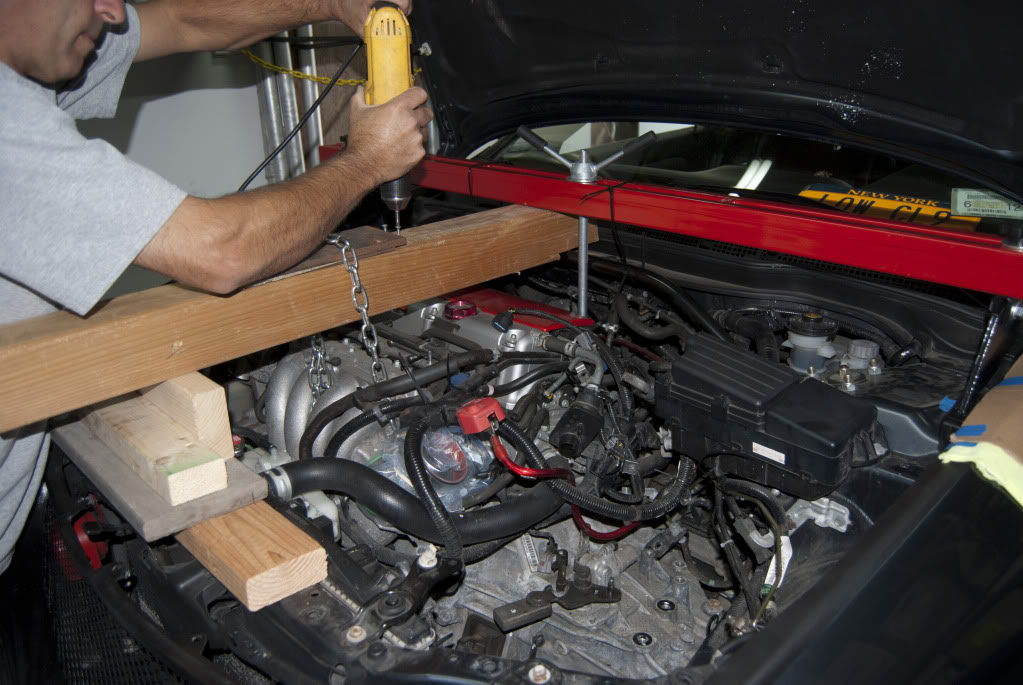
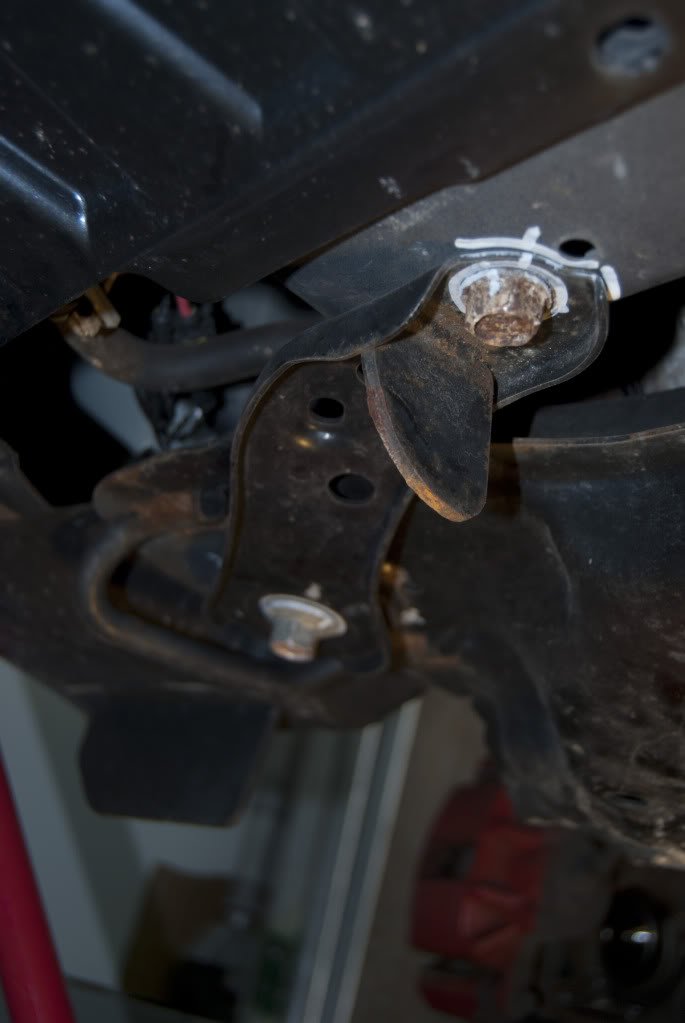
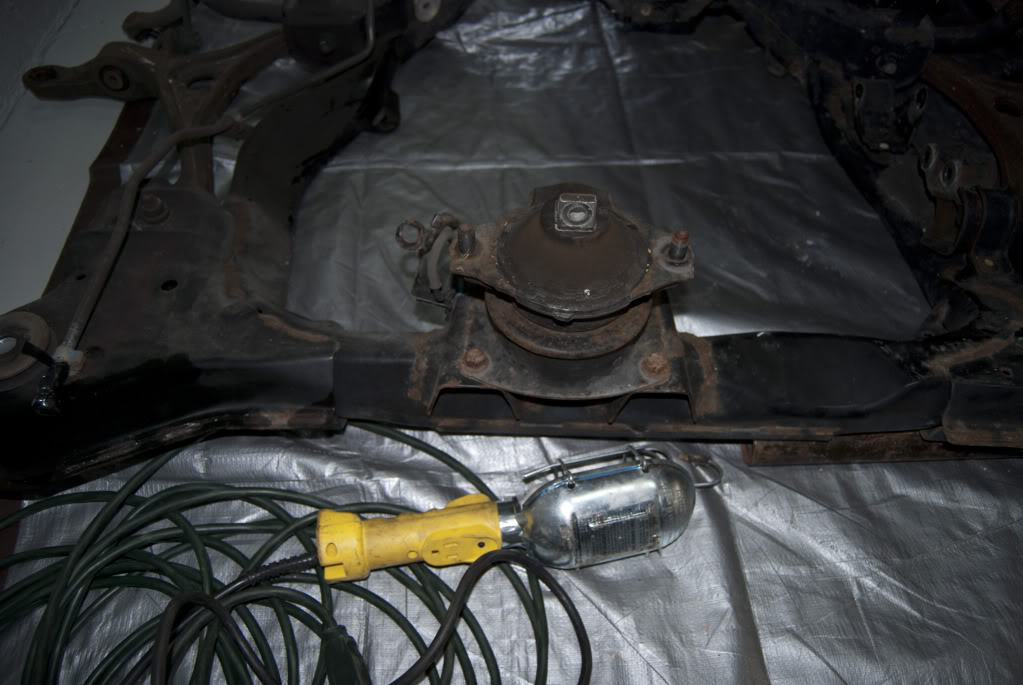
Now that we have the engine braced up we can start removing motor mounts. Start in the front by the rad. This is where those swivel sockets come in real handy. Take off the top bracket there are two bolts. This is what it looks like removed.
Continued on next post....
this was done on my 05 i assume its mostly the same for the 1st gens
DISCLAIMER: I TAKE NO RESPONSIBILITY FOR ANY DAMAGE DONE TO YOUR CAR. THIS IS NOT SOMETHING YOU SHOULD TRY WITH OUT A DECENT AMOUNT OF EXPERIENCE.
Well with that out of the way here are the RECOMMENDED tools. Can you do it with out all of these sure but itll be way easier with them all.
-Assortment of flat head screwdrivers
-Sledge hammer
-Wood (ill explain later on)
-Metric wrenches 8-19mm (long and short handle wrenches help greatly)
-Metric sockets 8-19mm
-Impact sockets 14mm, 17mm, and 36mm
-3/8 and 1/2 torque ratchet
-3/8 and 1/2 ratchets
-long handle 1/2 ratchet
-pry bar (ill explain later)
-18inch breaker bar
-four jackstands
-2 jacks (this is absolutely necessary)
-1/2 Air gun
-Gear and pulley remover
-1/2 and 3/8 externstions
-Swivel head impact sockets 12mm 14mm 17mm
-work light
-Engine Support brace: 1000 Lb. Capacity Engine Support Bar
-two used spark plugs (ill explain later)
-lots and lots of plastic bags and a sharpie LABEL EVERYTHING
-get a paint pen to mark stuff
Ok well here we go. Take a deep breathe read through this entire guide before starting your work. Its really not that bad its just alot of work.
First go here and get the honda factory manual (yes its free for members here) for some reaspon photobuket flips the photos around so go to the last page last pic and go backwards. Login to a private Photobucket.com album use the password: if this link does not work PM me with your email addy and i will send it to you.
There will be a link to my photobucket account with all of the below pictures and more in HD
Ok now to the work...
First step get the car jacked up on four stands. Make the rear of the car slightly lower than the front so you get a few extra inches of room.
Than prop the hood open all the way (dont use the usual prop hole look on the left of the hood towards the bottom and you will see another hole)
Remove the Intake (entire box and everything for you stockies) Remove the battery, battery tray and cover the intake with some plastic.
Remove the slave cylinder dont disconnect the line at this point unless you want to just completely flush your master out. This is located just below your intake mani.
Now remove the 2 linkages on the tranny. You should be able to just remove the cotter pins. Than take the 3 bolts out off the bracket. remove the bracket that holds the wiring harness to the actual gearbox housing NOT the bell housing. Becareful these bolts are reversed thread for some reason.
Take the two front wheels off and put them under the car but make it so there out of your way, but could still save your life if the car fell.
Go inside the car and lock your steering wheel doesnt matter what direction.
Now we need to break two joints. The tierod and the lower a-arm ball joint. DO NOT USE a fork to remove these use that gear puller. you will most like need an adjustable one.
Do the same for both sides and both joints. if they dont pop out with the puller and tension alone give the a-arm a whack with the sledge
Drain the trans before doing these steps! or you will get a surprise
Now use that 36mm socket to remove the axle nut on the drivers side. Than take the pry bar and pry on the axle and the CV joint casing until it pops out.
Now the passenger side is a little bit trickier. On the Intermediate shaft there is a mount with three bolts remove these. The axle is easier to come out but still needs some force but there is not much to pry on just keep tuging on it but dont pull on the cv joints or you could damage them.
Heres a few shots with the axles out
At this point you want to make sure to not put stress on the wheel sensors or brake lines, remove the brackets if needed to get some slack.
We need to now brace the motor. Start with the engine brace that was bought. You will be attaching it to the lower motor mount to the right of the exhaust manifold. Becareful at this point as you have to drop it inbetween the block and the mount and than back up again. Make sure it does not interfere with any of the bolts under the chain. The motor mount we are attaching this too is also connected to the trans so stay clear of that as well.
This pic is dark but it gives you an idea where to but the chain. I am standing near the drivers door taking this pic
Now get a 4x4 and notch it so it can fit in between the engine brace and sit on your strut tower bar. block up the 4x4 from the rad up like this
Try to wedge some wood or like in the next pic we used steel plate. this helps distribute the weight better.
Make sure to screw all of the wood together and put screws in front and back of the steel plate so it cant slide
Now that we have the engine braced up we can start removing motor mounts. Start in the front by the rad. This is where those swivel sockets come in real handy. Take off the top bracket there are two bolts. This is what it looks like removed.
Continued on next post....
 09-19-2011, 07:58 PM
#2
Cruisin'
Thread Starter
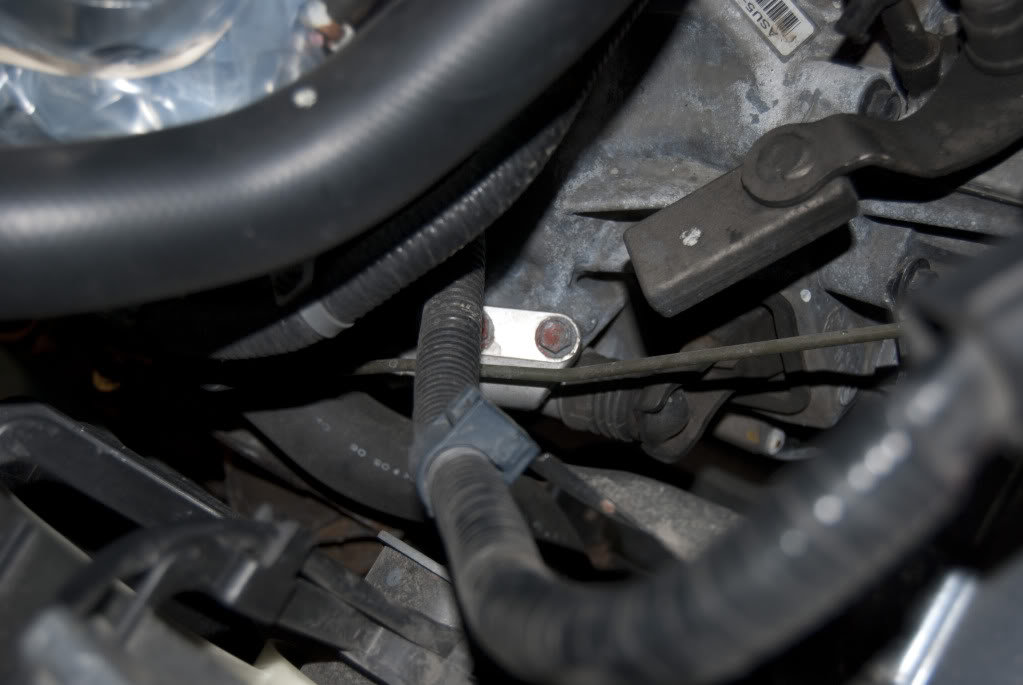
Now on that mount. dead center of it there is a bolt that goes horizontally into the mount on the motor. its very tight and hard to get too take your time and remove that bolt (look in the honda service manual for a better description)
There is also another mount just like this on the back side of the motor. do the same thing but you do not have to remove that horizontal bolt this time.
At this point you gonna wanna get under the car and get that splash guard out. Follow the high pressure pwr steering line out of the top of the pump and down the back side of the motor there is a connector on the line remove it.
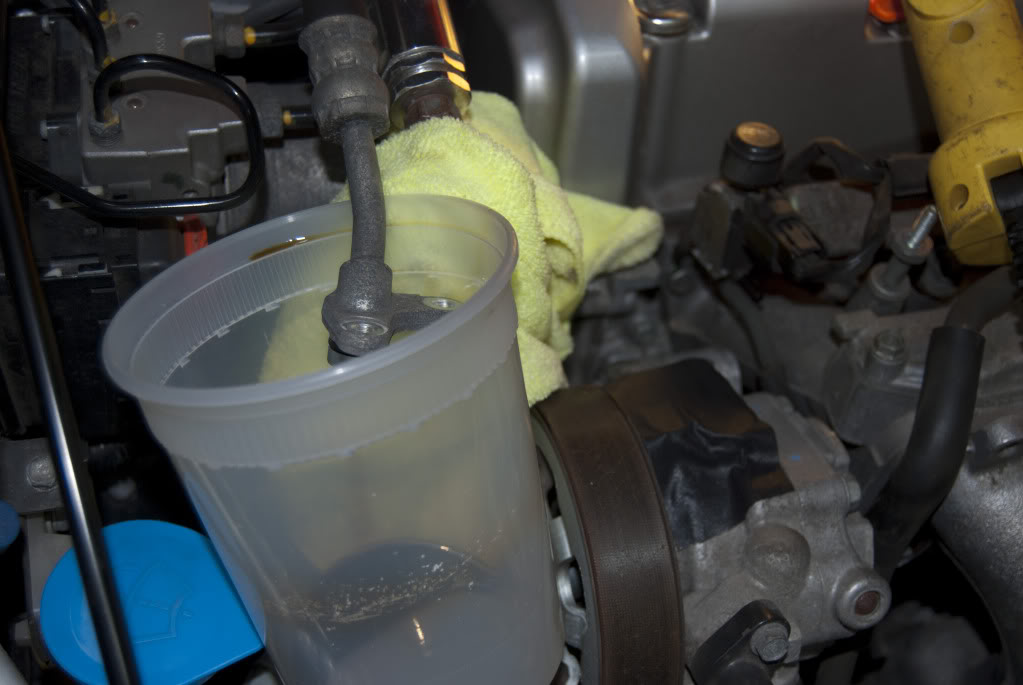
Now get a turkey baster or some kind of sucking device to remove as much pwr steering fluid as you can out of the fluid reservoir as you can. now remove the lower tube as seen in the pic below. spark plugs fit in these hoses perfectly and plug them up so the dont make a bigger mess than needed.
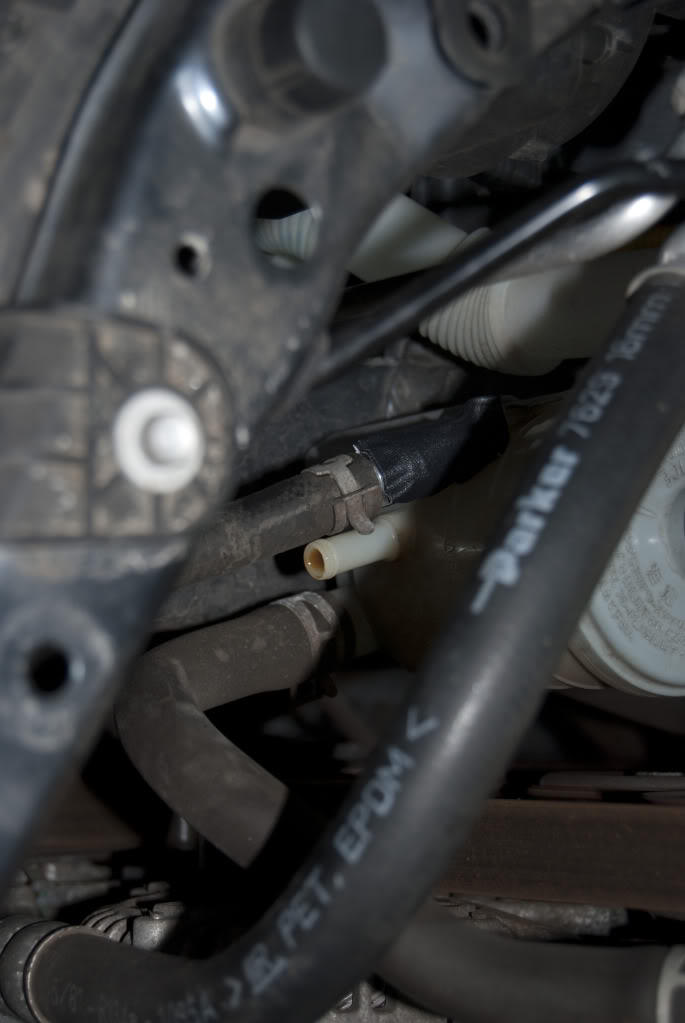
Now remove the high pressure line from the top of the pwr steering pump. there will be a small amount of fluid that comes out nothing terrible though. Suck some of the fluid out of the pump and put tape over the whole to keep it clean. Plug up the high pressure line aswell and do it good because this will be removed with the power steering rack.
Now head into the the car and pop off the cover for the steering ujoints you will see this
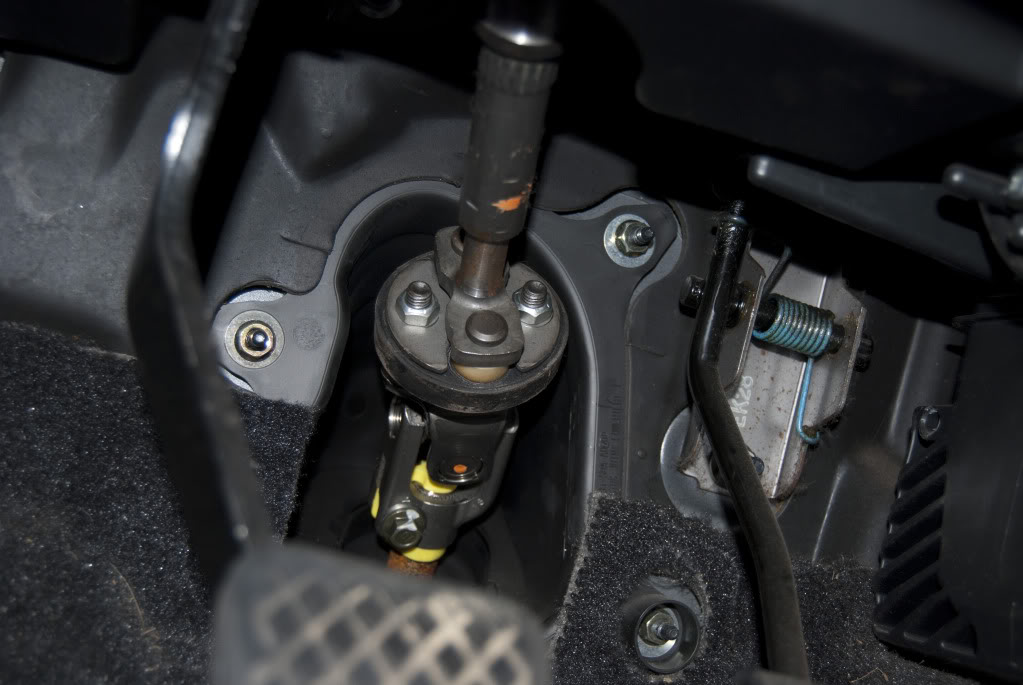
Now make sure your wheel is locked, if it moves more than the locked position youll have issues. Take that paint pen and make a mark on the spline and onto the ujoint for the wheel. LET IT DRY.
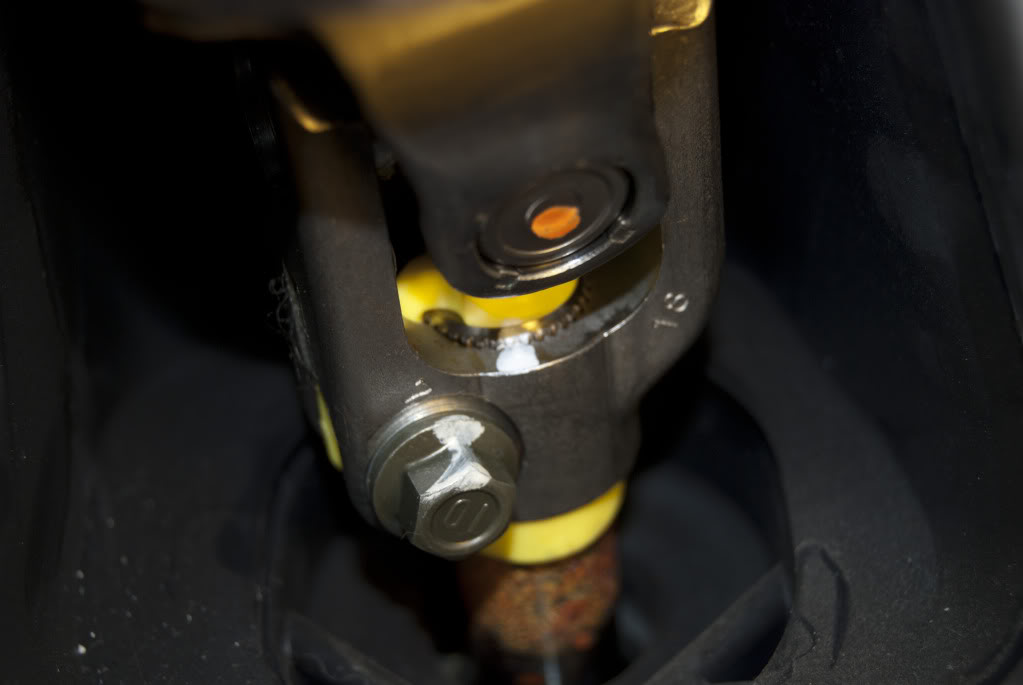
Now literally just take the bolt off and pull up on the ujoint and it will pop off. Take some rope and tie the joint up off the carpet it can fall out of the joint higher up.
Remove your header downpipe and tie up the exhaust. you can see how i tied it up here (it does skip to me lowering the frame but just ignore that for now)
Now to start removing the subframe bolts....
Now dont put jacks under it just yet (Ik its a bit scary but trust me here)
Break all the bolts first with the impact gun. Just a few turns nothing crazy.
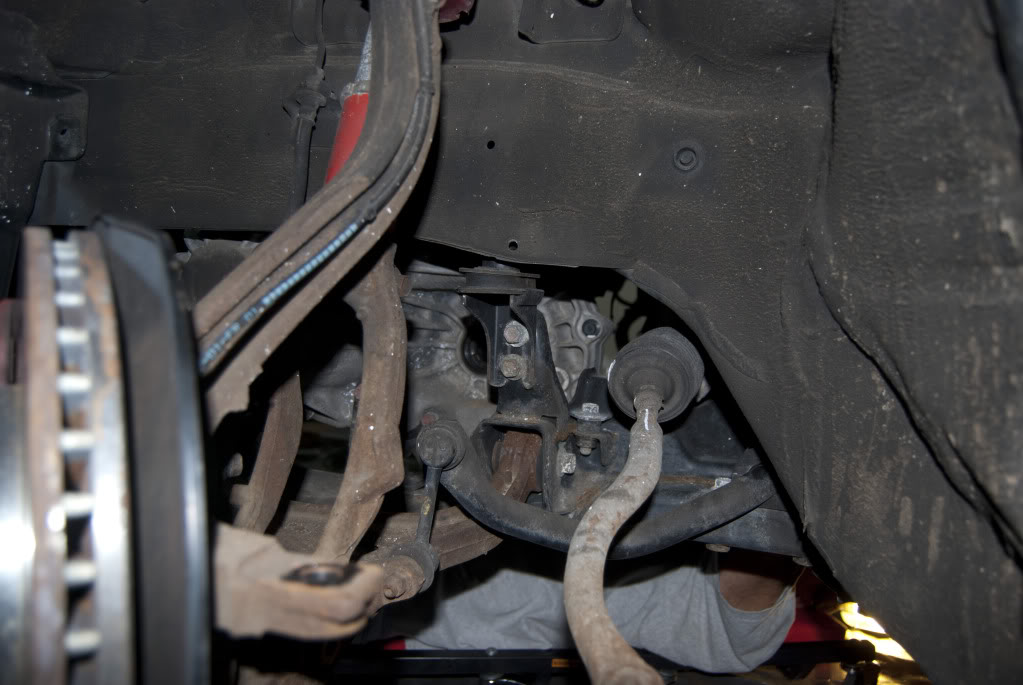
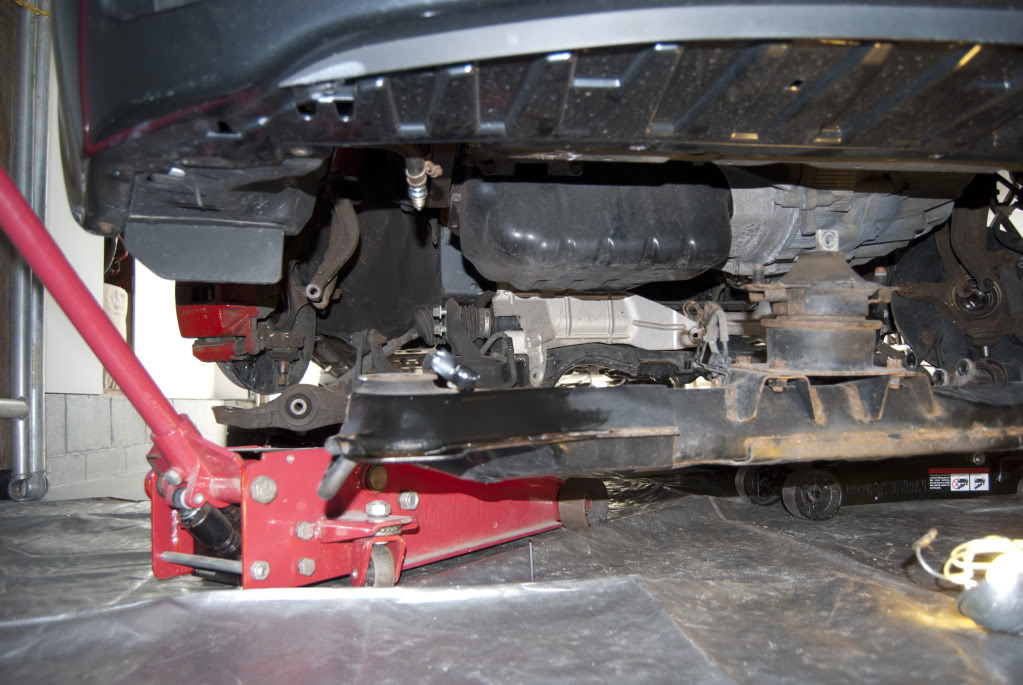
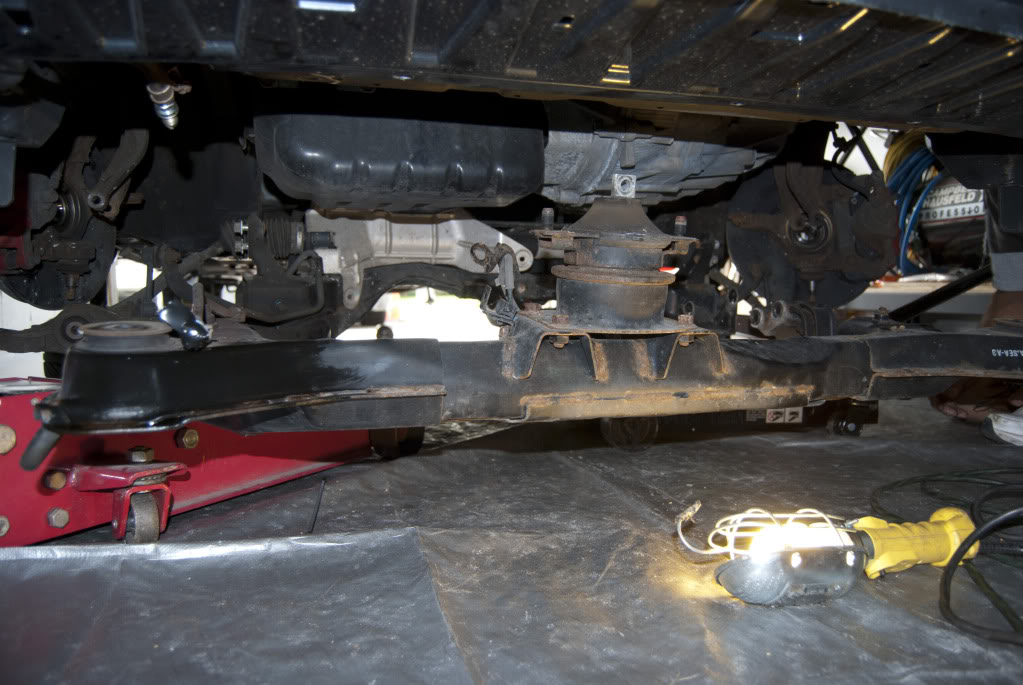
Now put the jacks under the subframe. heres a pic where you should put them.
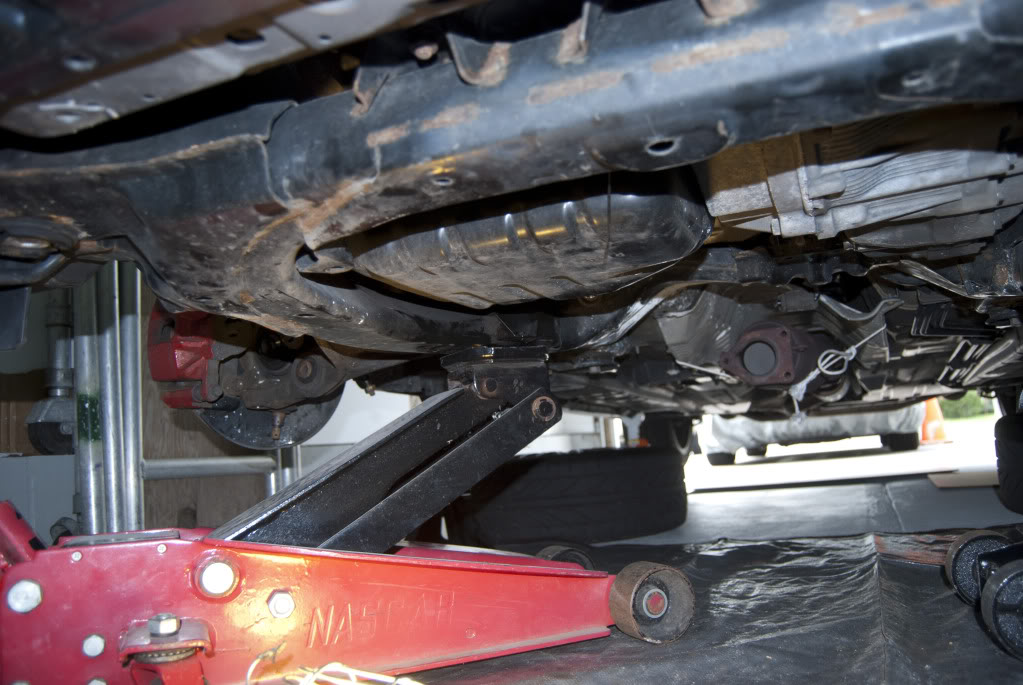
The idea is to get the frame to balance on the jacks (most of the weight is in the back due to the steering rack.
Make sure to mark up where these mounts go and how the line up with the car so it goes back exactly.
Im sorry for how the next set of pictures its hard to get a DSLR under the car. There are 12 bolts UNDER the car. There are two bolts in the wheel well.
There are four bolts that hold the read motor mount to the subframe you need to remove those four bolts.
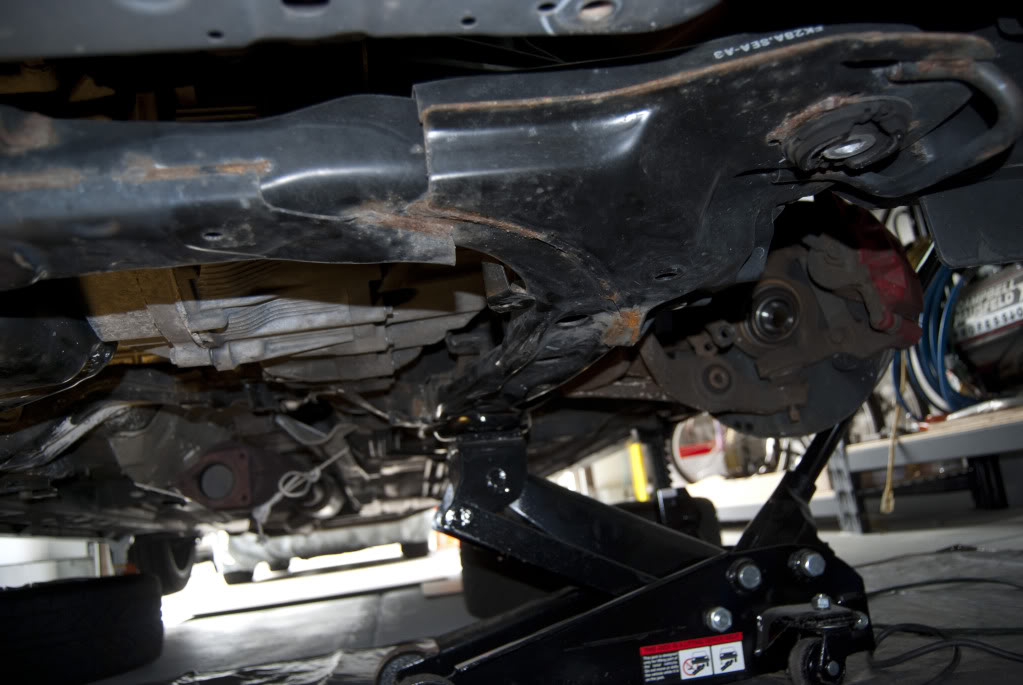
loosen the two bolts in the wheel well, dont take them out completely because when you put the frame back in it will help you line it back up. You can see those two bolts just to the right of my caliper and strut fork.
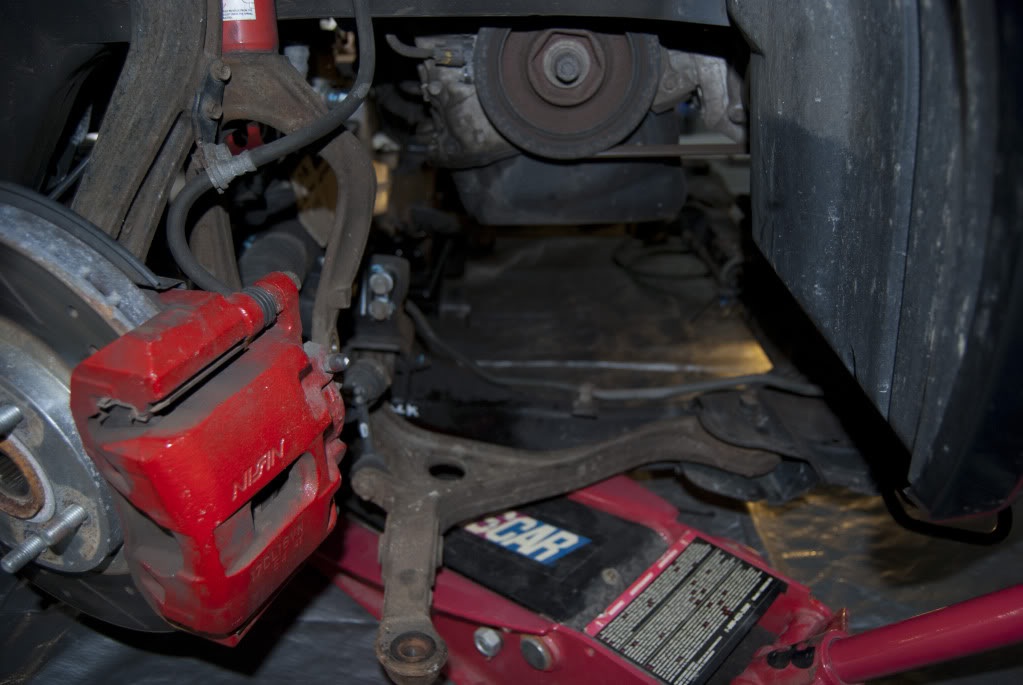
This is what the front brackets look like remove these
The back ones look like this.
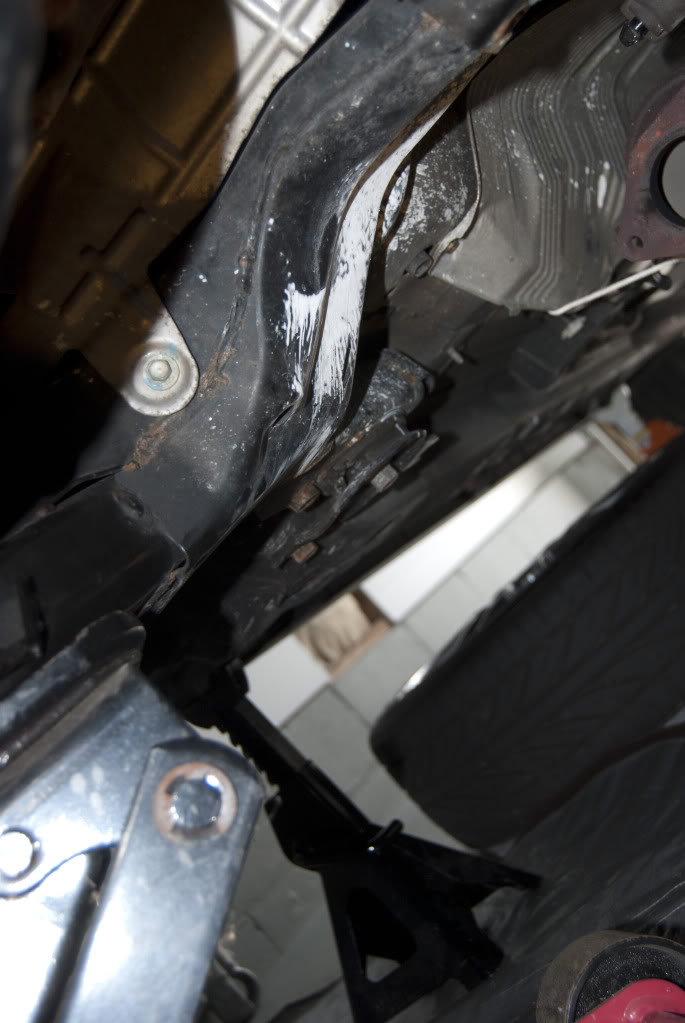
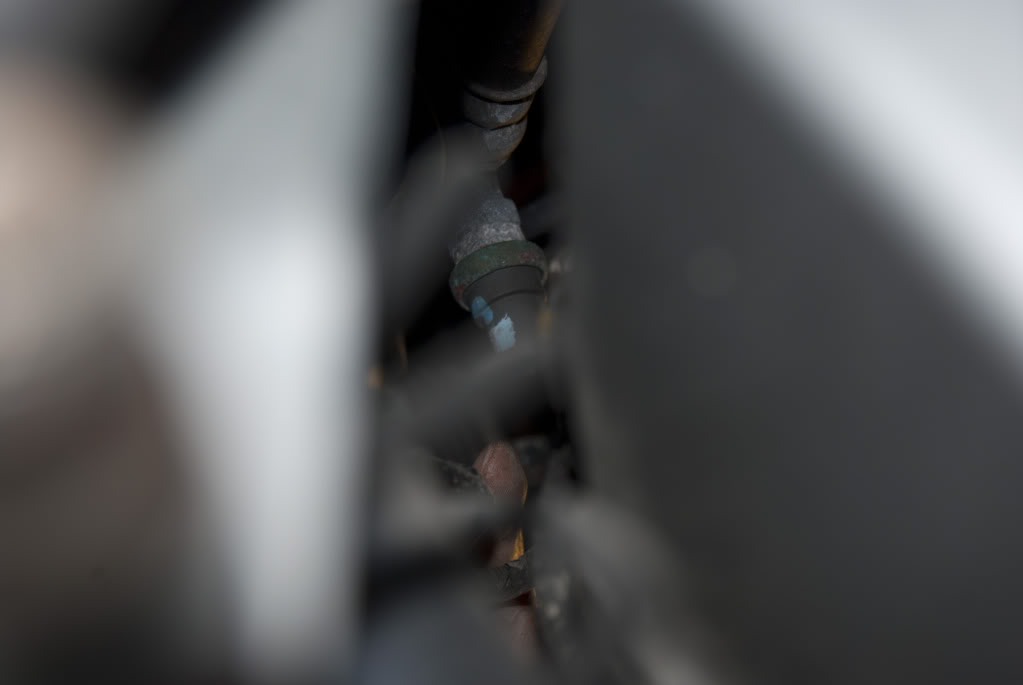
Now SLOWLY start to lower the subframe. Make sure you have removed the bracket holding the power steering pump to the valve cover and drop that line down. As you lower the frame you will see a power steering line that is not shown in the honda manual on the passenger side. remove the clip on the subframe side and plug it with the other spark plug. now tape up the line on the sub frame so it doesnt leak everywhere. you can see that line below. you can also see the clean spot where the fluid came out.
heres another shot of that line
Now lower the sub frame out. Becareful of the spine for the steering, and your wheel assembly, and the power steering line if you havnt already sorted that out. Also there is a unmentioned bolt. On the heat shield there is a bolt that attaches the heat shield to the frame of the car just take that one bolt out. you can see that heat shield in the picture below to the left of the motor mount.
Cover your steering spline with a bag to keep sand off it.
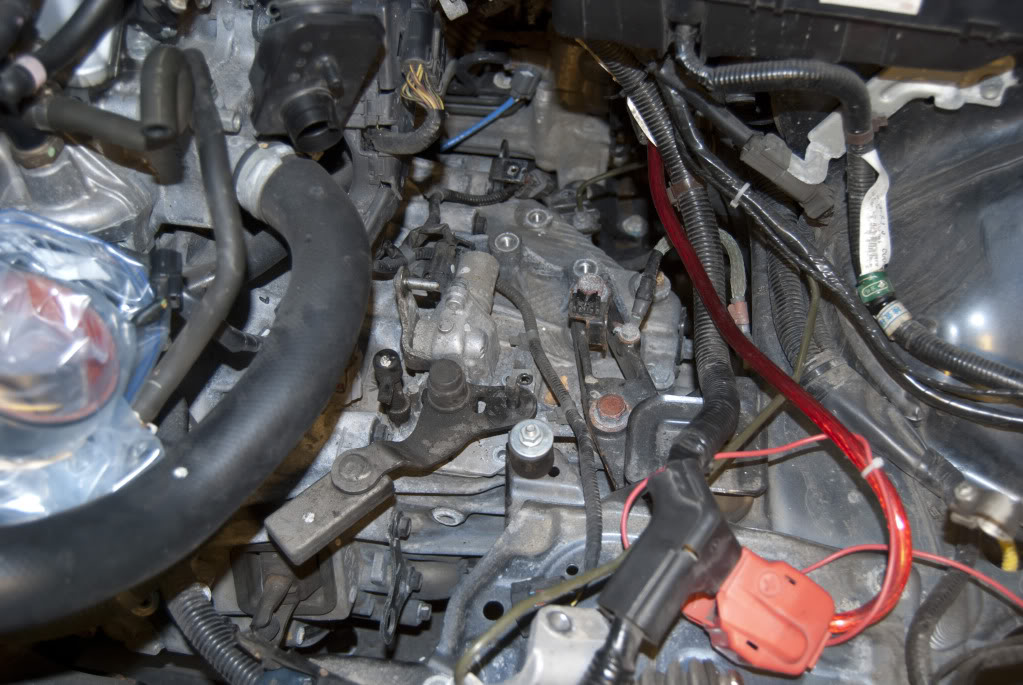
You will have to remove the bracket that supports the intake mani. there are two bolts for this. than remove the front motor mount (you need to do this to get at a trans bolt)
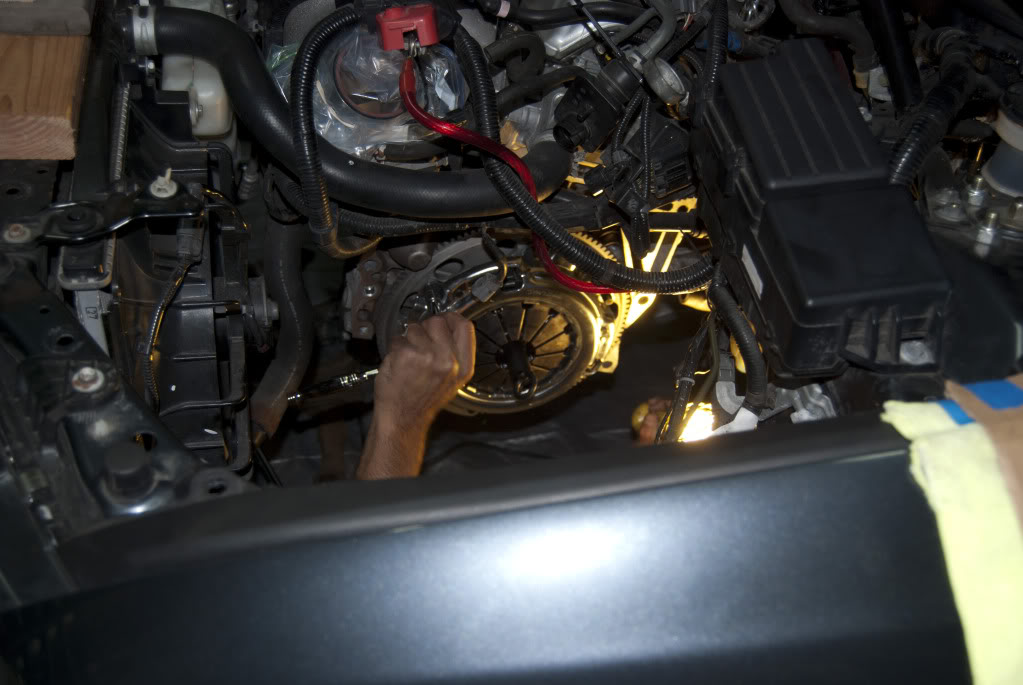
Ok now its time to remove the two bolts on the rear motor mount that go into the trans ONLY, Now on the lower bolt you will not be able to remove the bolt totally so just pull it out as much as you can and leave it. On the starter there is one bolt that goes into the trans remove this. Get a jack and some wood under the trans. Now go around and remove all the bolts around the trans including all of the bolts on the flywheel access plate under the trans. It shouldnt come off as its on pins. So give it a good shake and pull and it should just pop off. (make sure all those connectors are off)
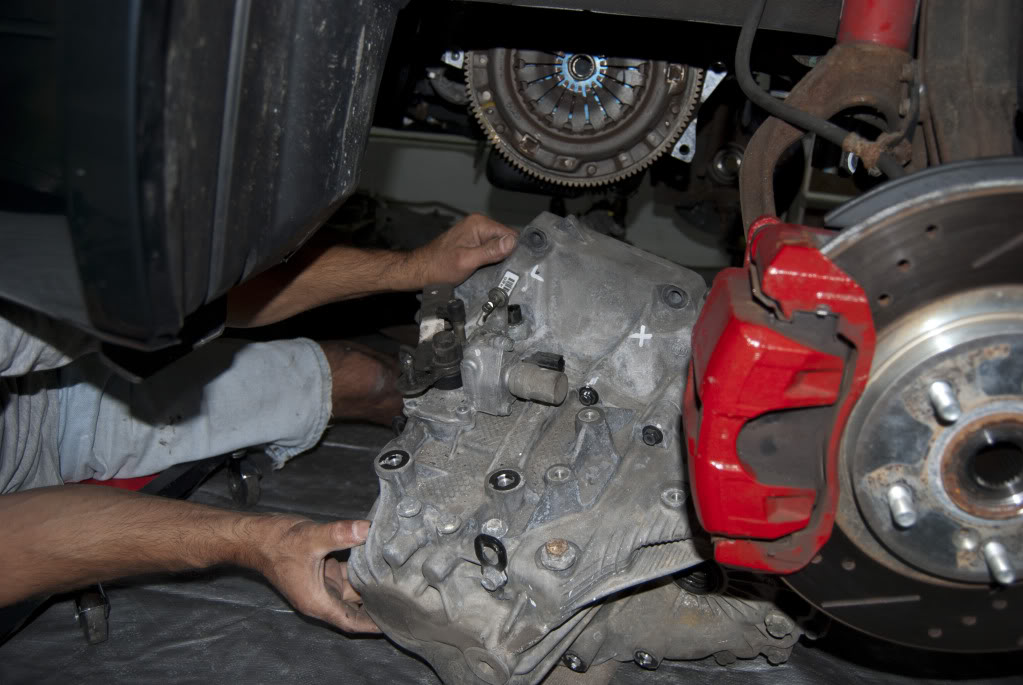
So now your bay should look like this
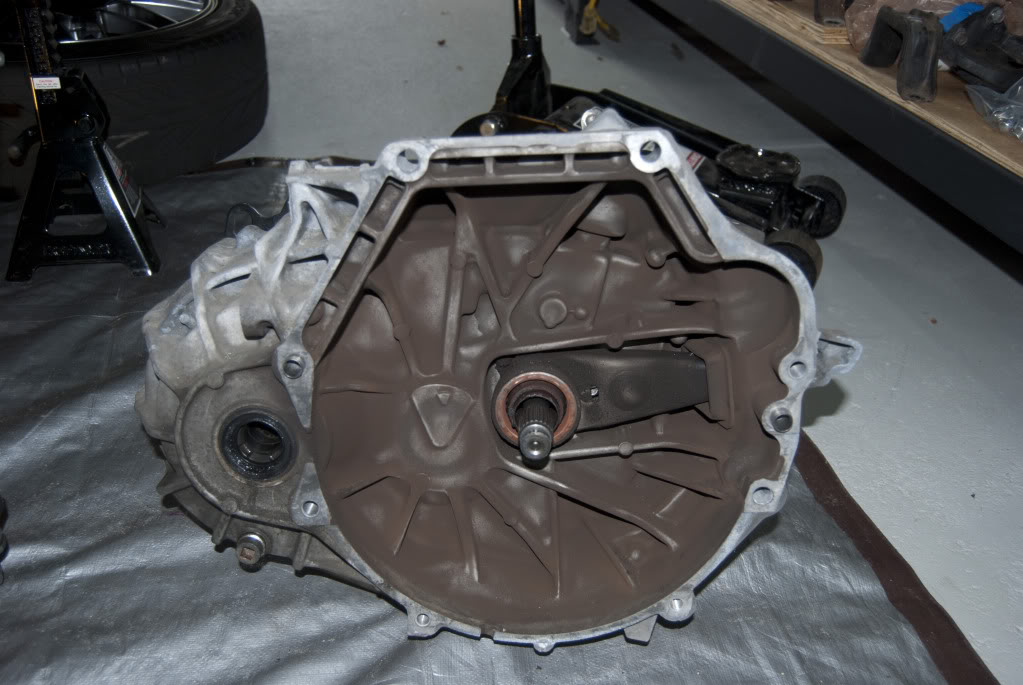
Now if your clutch was shot like mine your gonna need to clean out the housing. heres a dirty one. I didnt take a pic of it clean but just use brake cleaner and clean it good.
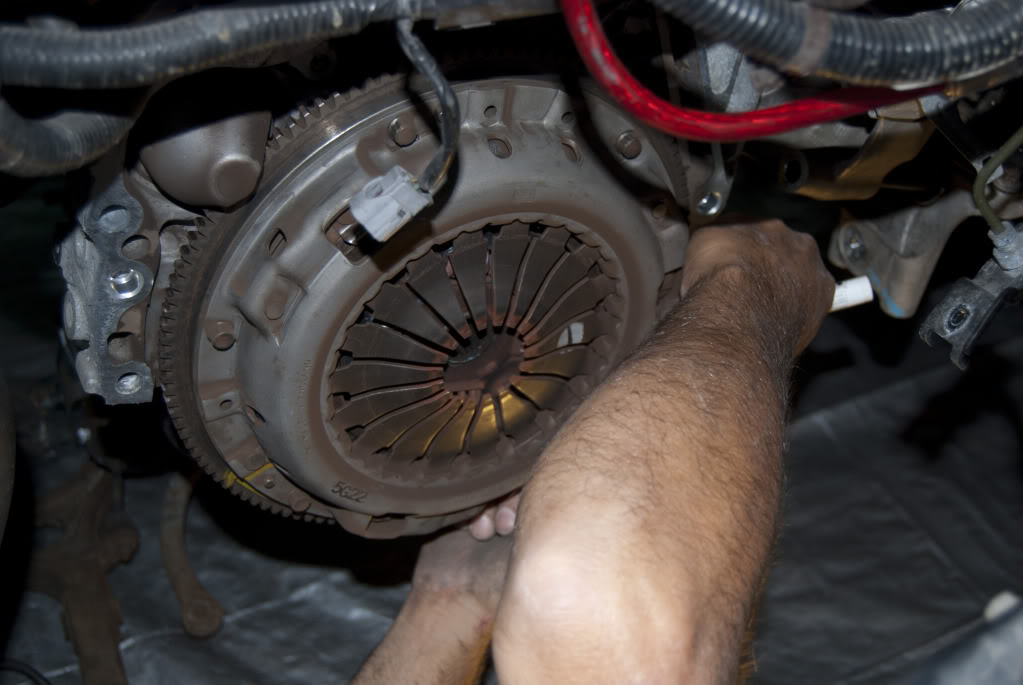
Now your gonna need a 12mm or 14mm 12 point socket i forget the size sorry:/
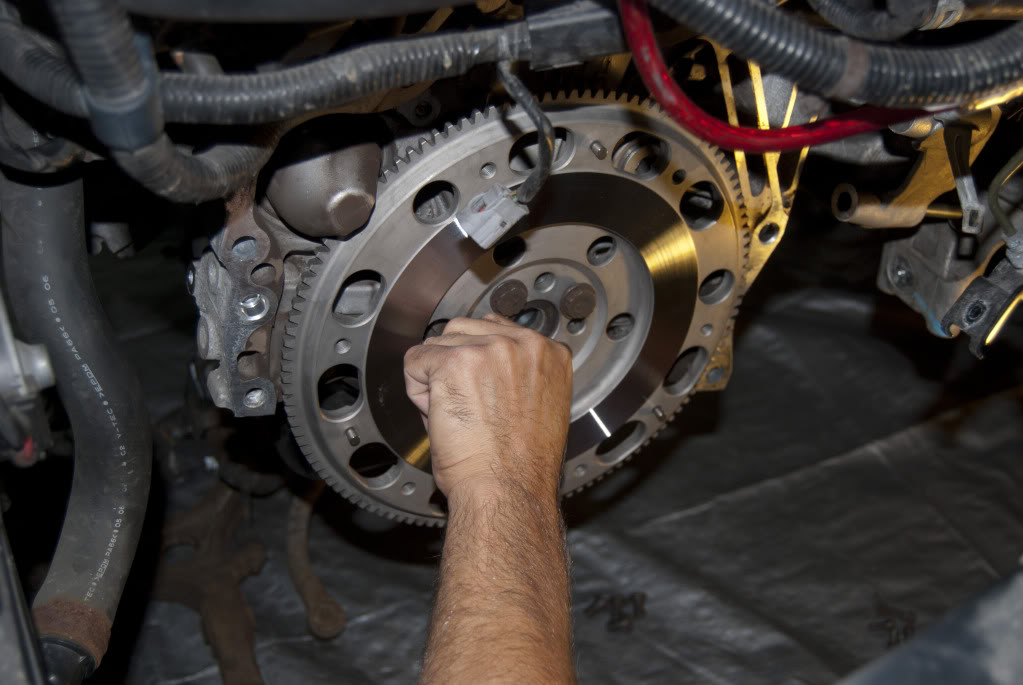
This is why you need that random 19mm wrench or socket. its easiest with a breaker bar. Put this on the crank and hold it so someone can break loose the pressure plate bolts. go around and slowly loosen each one. make sure you dont strip them youll need them again! Same goes for the flywheel but thes bolts are torqued to about 100ft lbs so your gonna need some effort NO AIR TOOLS at all on this step.
Continued on next post....
There is also another mount just like this on the back side of the motor. do the same thing but you do not have to remove that horizontal bolt this time.
At this point you gonna wanna get under the car and get that splash guard out. Follow the high pressure pwr steering line out of the top of the pump and down the back side of the motor there is a connector on the line remove it.
Now get a turkey baster or some kind of sucking device to remove as much pwr steering fluid as you can out of the fluid reservoir as you can. now remove the lower tube as seen in the pic below. spark plugs fit in these hoses perfectly and plug them up so the dont make a bigger mess than needed.
Now remove the high pressure line from the top of the pwr steering pump. there will be a small amount of fluid that comes out nothing terrible though. Suck some of the fluid out of the pump and put tape over the whole to keep it clean. Plug up the high pressure line aswell and do it good because this will be removed with the power steering rack.
Now head into the the car and pop off the cover for the steering ujoints you will see this
Now make sure your wheel is locked, if it moves more than the locked position youll have issues. Take that paint pen and make a mark on the spline and onto the ujoint for the wheel. LET IT DRY.
Now literally just take the bolt off and pull up on the ujoint and it will pop off. Take some rope and tie the joint up off the carpet it can fall out of the joint higher up.
Remove your header downpipe and tie up the exhaust. you can see how i tied it up here (it does skip to me lowering the frame but just ignore that for now)
Now to start removing the subframe bolts....
Now dont put jacks under it just yet (Ik its a bit scary but trust me here)
Break all the bolts first with the impact gun. Just a few turns nothing crazy.
Now put the jacks under the subframe. heres a pic where you should put them.
The idea is to get the frame to balance on the jacks (most of the weight is in the back due to the steering rack.
Make sure to mark up where these mounts go and how the line up with the car so it goes back exactly.
Im sorry for how the next set of pictures its hard to get a DSLR under the car. There are 12 bolts UNDER the car. There are two bolts in the wheel well.
There are four bolts that hold the read motor mount to the subframe you need to remove those four bolts.
loosen the two bolts in the wheel well, dont take them out completely because when you put the frame back in it will help you line it back up. You can see those two bolts just to the right of my caliper and strut fork.
This is what the front brackets look like remove these
The back ones look like this.
Now SLOWLY start to lower the subframe. Make sure you have removed the bracket holding the power steering pump to the valve cover and drop that line down. As you lower the frame you will see a power steering line that is not shown in the honda manual on the passenger side. remove the clip on the subframe side and plug it with the other spark plug. now tape up the line on the sub frame so it doesnt leak everywhere. you can see that line below. you can also see the clean spot where the fluid came out.
heres another shot of that line
Now lower the sub frame out. Becareful of the spine for the steering, and your wheel assembly, and the power steering line if you havnt already sorted that out. Also there is a unmentioned bolt. On the heat shield there is a bolt that attaches the heat shield to the frame of the car just take that one bolt out. you can see that heat shield in the picture below to the left of the motor mount.
Cover your steering spline with a bag to keep sand off it.
You will have to remove the bracket that supports the intake mani. there are two bolts for this. than remove the front motor mount (you need to do this to get at a trans bolt)
Ok now its time to remove the two bolts on the rear motor mount that go into the trans ONLY, Now on the lower bolt you will not be able to remove the bolt totally so just pull it out as much as you can and leave it. On the starter there is one bolt that goes into the trans remove this. Get a jack and some wood under the trans. Now go around and remove all the bolts around the trans including all of the bolts on the flywheel access plate under the trans. It shouldnt come off as its on pins. So give it a good shake and pull and it should just pop off. (make sure all those connectors are off)
So now your bay should look like this
Now if your clutch was shot like mine your gonna need to clean out the housing. heres a dirty one. I didnt take a pic of it clean but just use brake cleaner and clean it good.
Now your gonna need a 12mm or 14mm 12 point socket i forget the size sorry:/
This is why you need that random 19mm wrench or socket. its easiest with a breaker bar. Put this on the crank and hold it so someone can break loose the pressure plate bolts. go around and slowly loosen each one. make sure you dont strip them youll need them again! Same goes for the flywheel but thes bolts are torqued to about 100ft lbs so your gonna need some effort NO AIR TOOLS at all on this step.
Continued on next post....
09-19-2011, 07:59 PM
#3
Cruisin'
Thread Starter
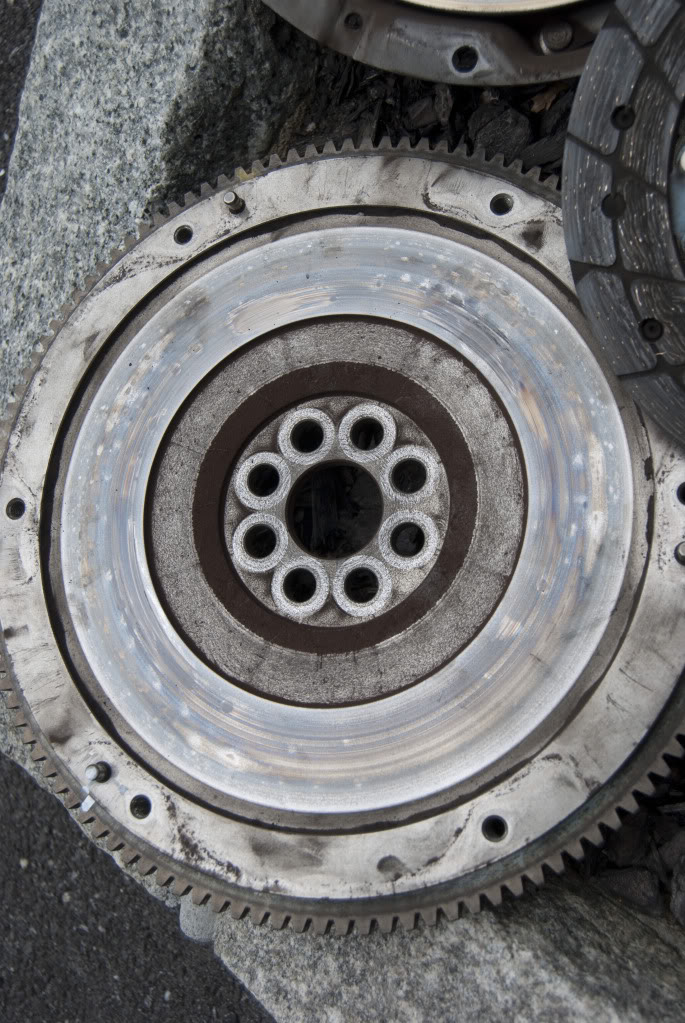
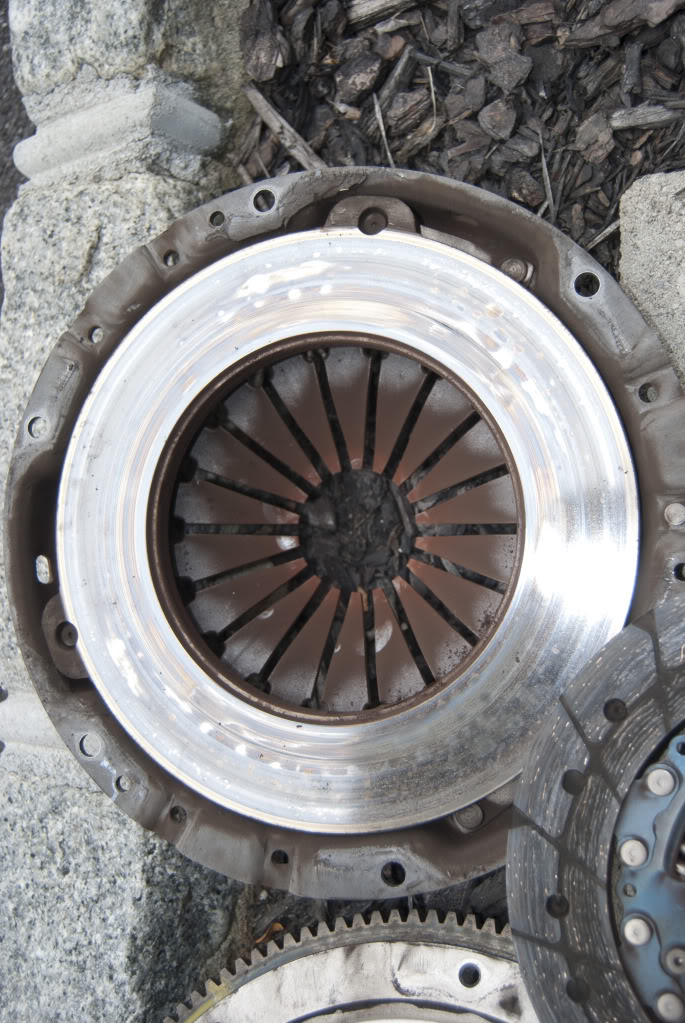
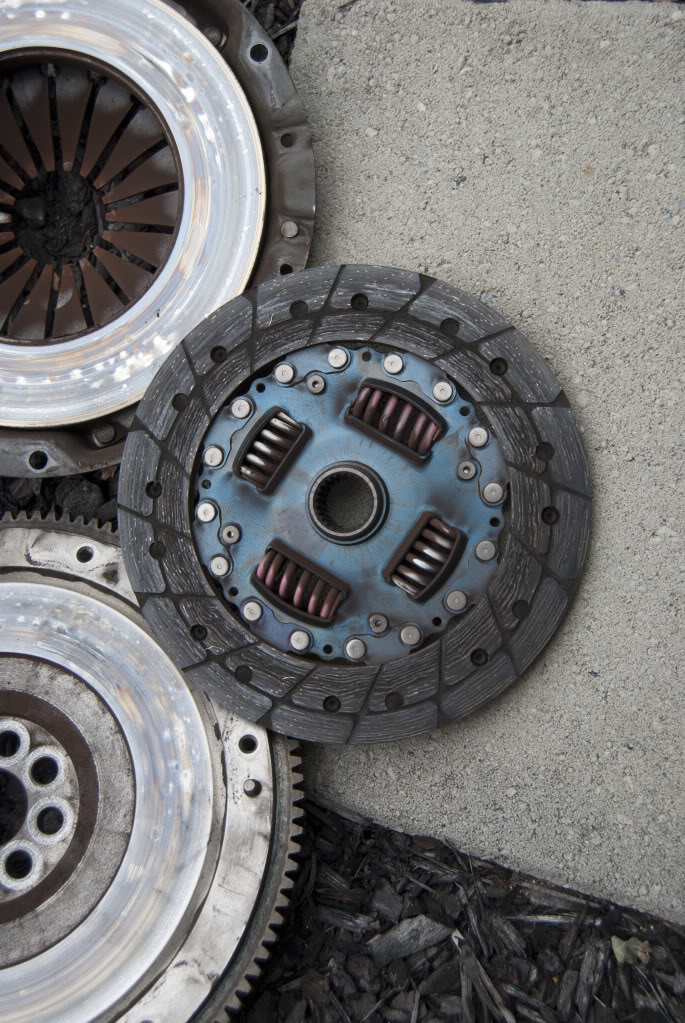
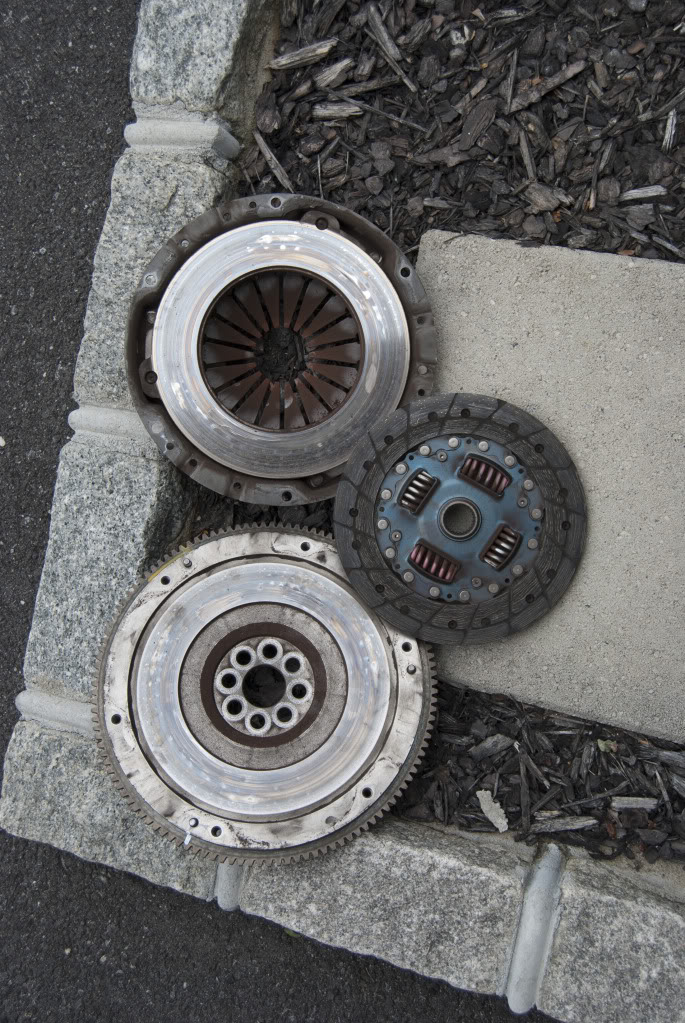
Heres a few shots of my completely fried clutch(this was not my doing it was bad when i got the car)
So at this point your garage should look like a warzone
If your replacing your fly wheel make sure to use brake cleaner on it to remove all of the dirt and grease and try not to touch the contact area, if you do just wipe off your grease. Put the guide pins in use a sledge for this dont be shy to hit it but dont miss either! When tighting the fly wheel make sure to use a star pattern and torque each bolt twice.
Now its time to line up the clutch, take your plastic guiding pin and push it through the clutch plate and than into the crank pilot bushing. than put the pressure plate on and line it up with the pins, it can only go on in one direction so dont panic if it doesnt fit right away!
go around and SLOWLY tighten each bolt so the plate seats evenly and not cocked in one direction.
Heres it all bolted up, these smaller bolts are torqued to 20ft lb but we did about 35 because 20 isnt that tight.
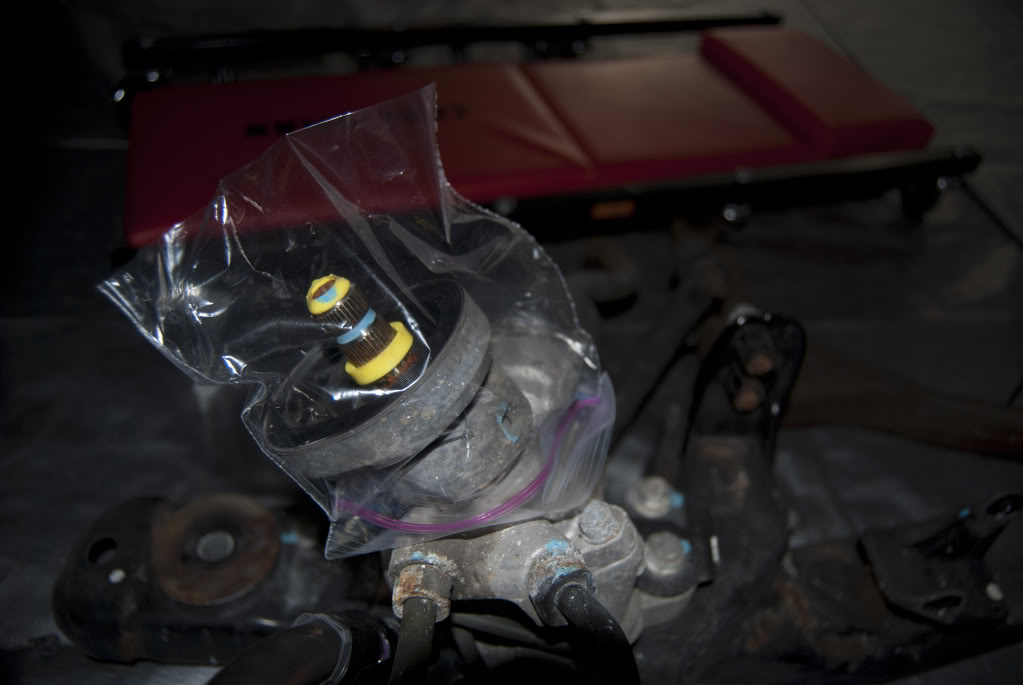
Replace your throw out bearing, and axle seals while your at it. i got it for 56 bucks because my buddy works at honda but you should be able to get it for about 70 or so.
Make sure you grease up the shaft where the bearing slides and use the supplied grease one the spline of the trans
CAREFULLY align the trany back up, keep the wrench on the crank bolt so you can move the splines to get the trans to line up right
Congrats your more than half way there
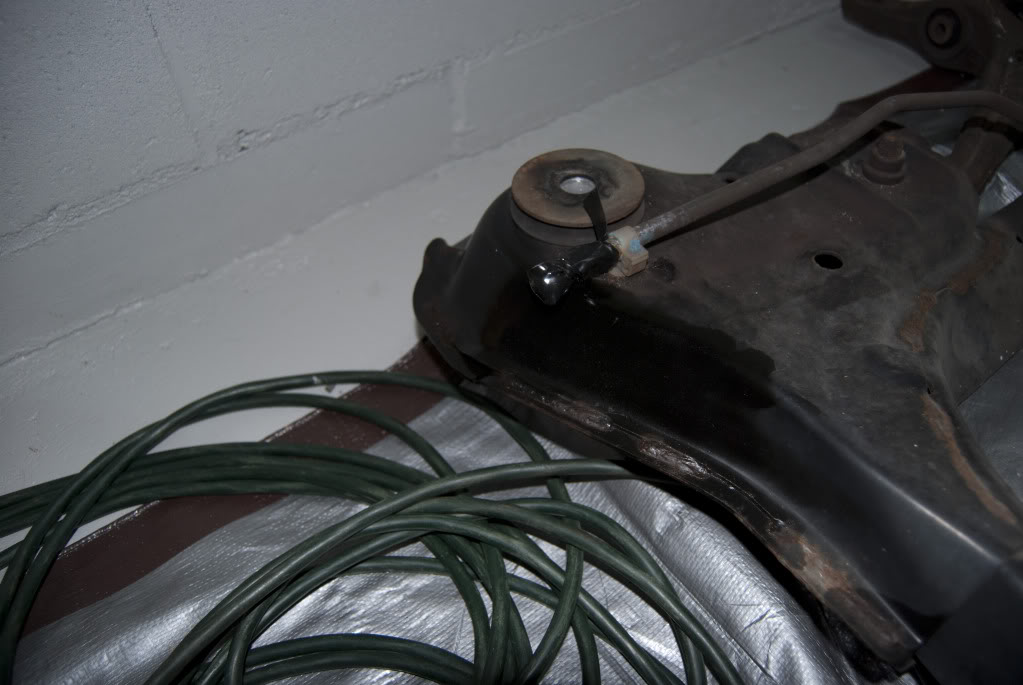
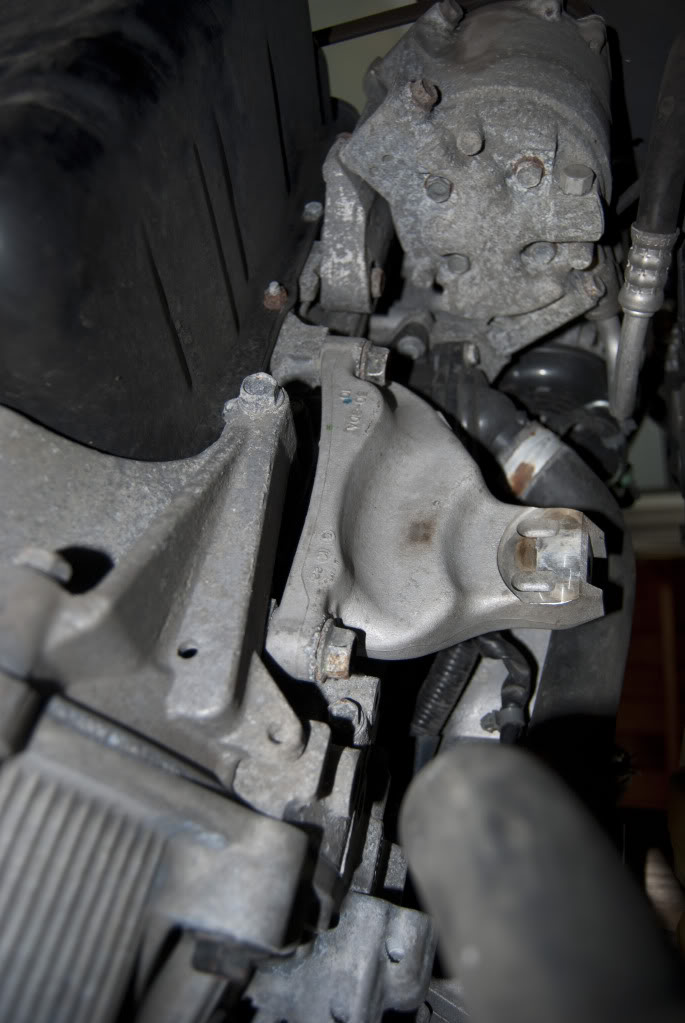
Heres what the intermediate shaft side or pasnangerside looks like. you can also see that bracket where the two bolts are that we just loosened and didnt remove.

Heres that center bolt hole that goes horizontally into the block.
This is a close up of our blocking system patented of course :P
Now just do everything in reverse and your done Just take your time and youll be good. When raising the frame back up dont forget to get the pwr steering line back up into the engine bay, and reconnect that line on the front passenger side. Also becareful not to damage your steering spline. Use those bolts that we didnt remove to line up the subframe and get it into place. Im not sure what the torque spec is on the subframe bolts but its over 120 just slam them in with an air gun make sure you thread it in with some grease first
Also when removing the intermediate shaft you may need to remove the strut fork but its just one bolt and it sides out. same goes for putting it back in.
I bought the exedy Stage 1 kit with a 8.5 lbs flywheel. The improvement is HUGE. shifts are quicker and heel toe braking is much much easier. I cant tell you how much faster the car is as it has a 750 mile break in period but the car is much more responsive.
Hope this helps you guys out. Good luck and be careful. TAKE YOUR TIME PM me with any questions
If there are any errors here let me know so i can fix them
So at this point your garage should look like a warzone
If your replacing your fly wheel make sure to use brake cleaner on it to remove all of the dirt and grease and try not to touch the contact area, if you do just wipe off your grease. Put the guide pins in use a sledge for this dont be shy to hit it but dont miss either! When tighting the fly wheel make sure to use a star pattern and torque each bolt twice.
Now its time to line up the clutch, take your plastic guiding pin and push it through the clutch plate and than into the crank pilot bushing. than put the pressure plate on and line it up with the pins, it can only go on in one direction so dont panic if it doesnt fit right away!
go around and SLOWLY tighten each bolt so the plate seats evenly and not cocked in one direction.
Heres it all bolted up, these smaller bolts are torqued to 20ft lb but we did about 35 because 20 isnt that tight.
Replace your throw out bearing, and axle seals while your at it. i got it for 56 bucks because my buddy works at honda but you should be able to get it for about 70 or so.
Make sure you grease up the shaft where the bearing slides and use the supplied grease one the spline of the trans
CAREFULLY align the trany back up, keep the wrench on the crank bolt so you can move the splines to get the trans to line up right
Congrats your more than half way there
Heres what the intermediate shaft side or pasnangerside looks like. you can also see that bracket where the two bolts are that we just loosened and didnt remove.
Heres that center bolt hole that goes horizontally into the block.
This is a close up of our blocking system patented of course :P
Now just do everything in reverse and your done
Just take your time and youll be good. When raising the frame back up dont forget to get the pwr steering line back up into the engine bay, and reconnect that line on the front passenger side. Also becareful not to damage your steering spline. Use those bolts that we didnt remove to line up the subframe and get it into place. Im not sure what the torque spec is on the subframe bolts but its over 120 just slam them in with an air gun make sure you thread it in with some grease first Also when removing the intermediate shaft you may need to remove the strut fork but its just one bolt and it sides out. same goes for putting it back in.
I bought the exedy Stage 1 kit with a 8.5 lbs flywheel. The improvement is HUGE. shifts are quicker and heel toe braking is much much easier. I cant tell you how much faster the car is as it has a 750 mile break in period but the car is much more responsive.
Hope this helps you guys out. Good luck and be careful. TAKE YOUR TIME
PM me with any questions If there are any errors here let me know so i can fix them
The following 4 users liked this post by tottenham12712:
09-19-2011, 09:24 PM
#5
Cruisin'
Thread Starter

Trending Topics
09-23-2011, 06:48 AM
#9
Great job with the write up and all the pictures. Perhaps it's my age (or just lazy), and though I'm a retired grease monkey and I assume could do this job, there is absolutlely NO part of me that would want to take this on. But.... I hope this may help out some other members here. I wonder if Honda expected the cluth and/or transmission to be lifetime part(s). It's really not like them to make servicing something such a hassle (take the friggin front end off the car? Come on.......). Oh, and boy am I glad I have an AT!
 10-09-2011, 02:51 PM
#13
Excellent write up, for me though I'm so spoiled by lifts and can't stand to do anymore DIY in the garage using stands.
Was curious though, how heavy is the clutch now? Lately I've been doing a lot of driving in traffic and the stock clutch is light enough that it doesn't bother me too much.
Was curious though, how heavy is the clutch now? Lately I've been doing a lot of driving in traffic and the stock clutch is light enough that it doesn't bother me too much.
05-06-2012, 08:00 PM
#14

MT Clutch DIY - Thanks !
Dear Tottenham � Thanks for the great DIY instructions! I would not have done my own clutch without the encouragement of seeing what the job entailed � and knowing at least one person HAD done it with only jackstands and jacks plus an engine support bar.
I�ll echo the usual disclaimer statements � Do these procedures only at your own risk! The procedures described are not meant to be a guarantee of success. You are responsible for your own safety and the results of your work.
Things different from your post: My 2004 TSX has over 270,000 miles. I used new OEM clutch and flywheel. I pulled out/pulled in new subframe mounting bushings, since they were not that expensive, and I don�t intend to take this whole thing apart again. I found almost everything just as you described. I needed new nuts for the flex pipe to cat connection � these are same as used on lots of Hondas, therefore available for cheap. I replaced about 1.5 bottles (12oz) of Honda power steering fluid. I used 2.2 quarts of AC Delco 88900399 semi-synthetic friction modified MT fluid.
Here are things that you might add (for a sticky, or just to improve your already great post)
1) Measurement of the height of any transmission jack plus the height of the trans itself to determine just how high the jackstands need to be to drop the trans and move it around (or out from under). My situation worked out okay, but it was tight.
2) I used what I suspect is the same engine support bar that you used (Harbor Freight) � I think Northern Tools sells the same item painted a different color.
3) �T� made by using a 4x4 was a GREAT idea � to lock the 4x4 and the wood blocks together atop the radiator support, I wedged all in place and used two 12� long �airplane� drill bits drilled to within about a half inch of the bottom 2x4 so that the support couldn�t move side to side or slip out. That left room to put in a wedge between boards and tighten the brace upward if needed (I didn�t). I used 2 pieces of wide (1.5 in on each side) angle steel on top of the 4x4 under the chain instead of metal plates (cheaper, available to me).
4) I read the shop manual and was surprised that Acura suggested removing the subframe brackets in the wheel well. Can�t emphasize enough how IMPORTANT it was to have those bolts and brackets left in place to re-align the subframe as I replaced it (I worked solo). Thanks!
5) My car has 270k miles, and I replaced 4 seals � both differential axle seals, the trans input shaft seal, and the rear main crank seal. Rear main seal would have probably been fine � nothing had leaked into the clutch bell housing from engine or trans (yet).
6) The clearance for my transmission against left inner wheel well / chassis was very tight. It was hard to get the transmission into place vertically but without the input shaft contacting the clutch pressure plate fingers horizontally. Don�t know what advice to give except being VERY careful and patient.
7) For a transmission jack I used a SEARS motorcycle lift (1500 lb capacity) with a square of 3/4 inch plywood and four 5/8 inch bolts to locate the plywood to the lift jack. The bolts fit through the plywood, and they locate the wood to the lift laterally using adapter holes in the cycle jack. I used wooden spacers to square the transmission to the plywood base BEFORE removing any tranny bolts, and secured the transmission, the plywood, and the jack as one unit w the straps form the cycle jack. Don�t treat this carelessly - the transmission could tip or slide off and result in serious physical injury.
8) My advice on Clutch Pedal � If you LIKED where your clutch pedal engaged before the job, DON�T adjust it at all until you test the car. I adjusted mine to the Acura shop manual settings � way different than the car as-received, and engaged way too high for my liking. I wasted time adjusting and then adjusting it back.
9) Filled the transmission with AC Delco Friction-Modified MT Fluid � I�m very impressed so far. My shifting was good before (I had refilled twice already with latest Honda fluid) � but this is improved. Car shifts incredibly well.
So in closing � Thanks!
Now my car is ready for two daughters to learn to drive manual transmission.
05-13-2012, 12:38 PM
#15
Dear Tottenham � Thanks for the great DIY instructions! I would not have done my own clutch without the encouragement of seeing what the job entailed � and knowing at least one person HAD done it with only jackstands and jacks plus an engine support bar.
I�ll echo the usual disclaimer statements � Do these procedures only at your own risk! The procedures described are not meant to be a guarantee of success. You are responsible for your own safety and the results of your work.
Things different from your post: My 2004 TSX has over 270,000 miles. I used new OEM clutch and flywheel. I pulled out/pulled in new subframe mounting bushings, since they were not that expensive, and I don�t intend to take this whole thing apart again. I found almost everything just as you described. I needed new nuts for the flex pipe to cat connection � these are same as used on lots of Hondas, therefore available for cheap. I replaced about 1.5 bottles (12oz) of Honda power steering fluid. I used 2.2 quarts of AC Delco 88900399 semi-synthetic friction modified MT fluid.
Here are things that you might add (for a sticky, or just to improve your already great post)
1) Measurement of the height of any transmission jack plus the height of the trans itself to determine just how high the jackstands need to be to drop the trans and move it around (or out from under). My situation worked out okay, but it was tight.
2) I used what I suspect is the same engine support bar that you used (Harbor Freight) � I think Northern Tools sells the same item painted a different color.
3) �T� made by using a 4x4 was a GREAT idea � to lock the 4x4 and the wood blocks together atop the radiator support, I wedged all in place and used two 12� long �airplane� drill bits drilled to within about a half inch of the bottom 2x4 so that the support couldn�t move side to side or slip out. That left room to put in a wedge between boards and tighten the brace upward if needed (I didn�t). I used 2 pieces of wide (1.5 in on each side) angle steel on top of the 4x4 under the chain instead of metal plates (cheaper, available to me).
4) I read the shop manual and was surprised that Acura suggested removing the subframe brackets in the wheel well. Can�t emphasize enough how IMPORTANT it was to have those bolts and brackets left in place to re-align the subframe as I replaced it (I worked solo). Thanks!
5) My car has 270k miles, and I replaced 4 seals � both differential axle seals, the trans input shaft seal, and the rear main crank seal. Rear main seal would have probably been fine � nothing had leaked into the clutch bell housing from engine or trans (yet).
6) The clearance for my transmission against left inner wheel well / chassis was very tight. It was hard to get the transmission into place vertically but without the input shaft contacting the clutch pressure plate fingers horizontally. Don�t know what advice to give except being VERY careful and patient.
7) For a transmission jack I used a SEARS motorcycle lift (1500 lb capacity) with a square of 3/4 inch plywood and four 5/8 inch bolts to locate the plywood to the lift jack. The bolts fit through the plywood, and they locate the wood to the lift laterally using adapter holes in the cycle jack. I used wooden spacers to square the transmission to the plywood base BEFORE removing any tranny bolts, and secured the transmission, the plywood, and the jack as one unit w the straps form the cycle jack. Don�t treat this carelessly - the transmission could tip or slide off and result in serious physical injury.
8) My advice on Clutch Pedal � If you LIKED where your clutch pedal engaged before the job, DON�T adjust it at all until you test the car. I adjusted mine to the Acura shop manual settings � way different than the car as-received, and engaged way too high for my liking. I wasted time adjusting and then adjusting it back.
9) Filled the transmission with AC Delco Friction-Modified MT Fluid � I�m very impressed so far. My shifting was good before (I had refilled twice already with latest Honda fluid) � but this is improved. Car shifts incredibly well.
So in closing � Thanks!
Now my car is ready for two daughters to learn to drive manual transmission.
05-14-2012, 10:20 AM
#16

I'm sorry if I'm bumping too old a thread but I wanted to offer a TY to the OP for this. I referenced this for doing the clutch on my wife's '07. As an aside, I did some things slightly different and wanted to offer this input for anyone going through this.
I did a 'tilting of the cradle'. Essentially you do the most of what he OP suggested except the following;
You don't disconnect the passenger side axle nut.
You don't disconnect any of the power steering lines.
You don't remove/disconnect the front or rear motor mounts.
You don't disconnect the exhaust manifold.
You DO remove the radiator (just for ease of access to the starter motor bolt)
You essentially use the passenger side engine mount as a pivot. Its gives you enough room to tilt the cradle down to split the trans from the engine. It stays in the bay the whole time, but you have ample room to get everything in and out. Use a floor jack on the driver side of the cradle to lower it one you have all the bolts out. I think this way can save a lot of headache. Over all, with consuming more beer than what is deemed 'socially acceptable', it took about 9 hrs and I'm certain if I had to go do it again I could knock it out in ~6-7.
Again, many thanks OP, cheers.
Joe
The following users liked this post:
StealthTSX (05-14-2012)
05-16-2012, 06:51 AM
#17
3rd Gear

Join Date: Jun 2007
Age: 61
Posts: 3
Likes: 0
Received 0 Likes
on
0 Posts
Honda Manual and Photobucket
How do I get to the Honda Manual and Photobucket you referenced in the description of the clutch and transmission removal DIY. I am about to undertake the same task.
Thanks,
John
john@hohmanhouse.com
Thanks,
John
john@hohmanhouse.com
05-22-2012, 11:16 AM
#18
where is my garage?!
iTrader: (2)
Join Date: Oct 2006
Location: nassau county, ny
Age: 46
Posts: 1,857
Likes: 0
Received 1 Like
on
1 Post
i just helped my brother-in-law do this over the weekend on his civic. even with 2 people, this was a pita to do, especially since none of us has ever removed a tranny from a car so everything just took longer. i think the worst part was just getting the tranny case back on and making sure everything lined up. this is a good diy.
10-04-2013, 02:37 PM
#19
Cruisin'
Thread Starter
Sorry I forgot to add it here
For those of you that I helped out im glad it was of use, Im not on this site very often so I apologize for the year + delay :P
03-11-2015, 01:53 PM
#22
Cruisin'
I'm sorry if I'm bumping too old a thread but I wanted to offer a TY to the OP for this. I referenced this for doing the clutch on my wife's '07. As an aside, I did some things slightly different and wanted to offer this input for anyone going through this.
I did a 'tilting of the cradle'. Essentially you do the most of what he OP suggested except the following;
You don't disconnect the passenger side axle nut.
You don't disconnect any of the power steering lines.
You don't remove/disconnect the front or rear motor mounts.
You don't disconnect the exhaust manifold.
You DO remove the radiator (just for ease of access to the starter motor bolt)
You essentially use the passenger side engine mount as a pivot. Its gives you enough room to tilt the cradle down to split the trans from the engine. It stays in the bay the whole time, but you have ample room to get everything in and out. Use a floor jack on the driver side of the cradle to lower it one you have all the bolts out. I think this way can save a lot of headache. Over all, with consuming more beer than what is deemed 'socially acceptable', it took about 9 hrs and I'm certain if I had to go do it again I could knock it out in ~6-7.
Again, many thanks OP, cheers.
Joe
I did a 'tilting of the cradle'. Essentially you do the most of what he OP suggested except the following;
You don't disconnect the passenger side axle nut.
You don't disconnect any of the power steering lines.
You don't remove/disconnect the front or rear motor mounts.
You don't disconnect the exhaust manifold.
You DO remove the radiator (just for ease of access to the starter motor bolt)
You essentially use the passenger side engine mount as a pivot. Its gives you enough room to tilt the cradle down to split the trans from the engine. It stays in the bay the whole time, but you have ample room to get everything in and out. Use a floor jack on the driver side of the cradle to lower it one you have all the bolts out. I think this way can save a lot of headache. Over all, with consuming more beer than what is deemed 'socially acceptable', it took about 9 hrs and I'm certain if I had to go do it again I could knock it out in ~6-7.
Again, many thanks OP, cheers.
Joe
If you are only tilting the engine down on the transmission side are you just dropping the sub-frame down but not away?
 11-02-2016, 02:48 PM
#24
Advanced
Bump. I would like to know about the 'tilt the cradle' shortcut.
I have a '04 TSX with the ORIGINAL clutch still hanging in there at 208K miles... It's not wonderful at this point.
Also I hear the throwout bearing going 'screech' on colder days more often.
I have a '04 TSX with the ORIGINAL clutch still hanging in there at 208K miles... It's not wonderful at this point.
Also I hear the throwout bearing going 'screech' on colder days more often.
11-20-2016, 07:55 AM
#25
AWESOME Write up i'm about to drop my sub frame all by myself. so far im going slow and not rushing anything. steady working on this everyday after work for a few hours.

Thread
Thread Starter
Forum
Replies
Last Post
cycdaniel
1G TSX Performance Parts & Modifications
8
12-17-2019 10:58 AM
Joseph Stansbury
3G TL Performance Parts & Modifications
34
12-04-2015 01:57 PM
asahrts
Member Cars for Sale
0
09-04-2015 05:55 PM