
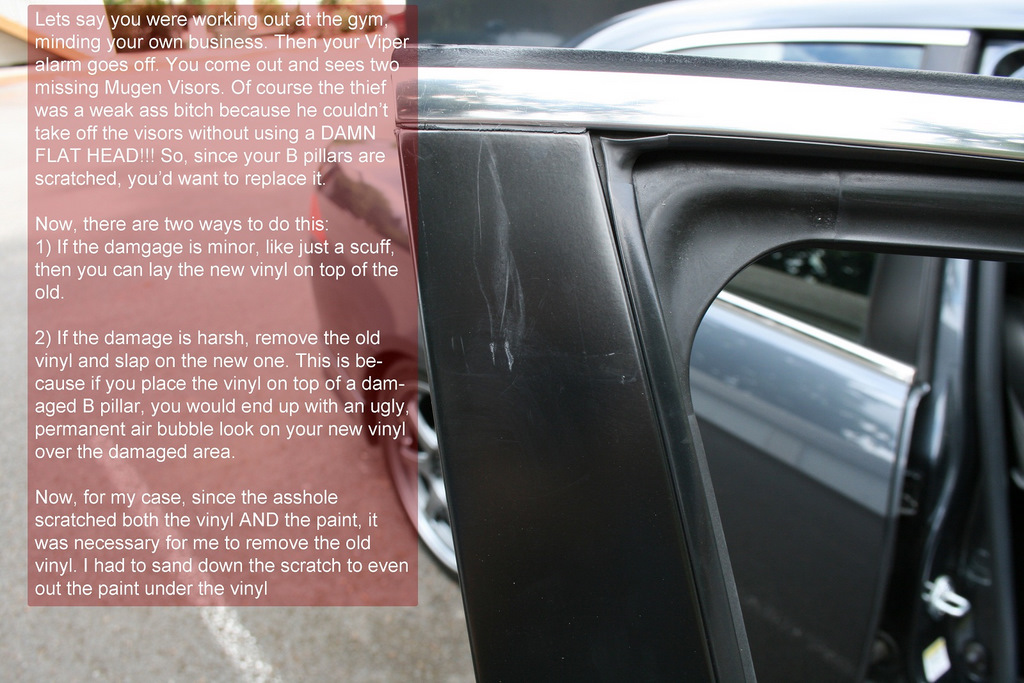
DIY: Replacing B Pillar Vinyl
 07-19-2011, 04:48 AM
#1
Moderator
Thread Starter
DIY: Replacing B Pillar Vinyl
Part numbers for these parts:
67326-SEA-003ZA - TAPE, R. FR. DOOR SASH CENTER (OUTER) *NH70* ( FLAT BLACK )
67366-SEA-003ZA - TAPE, L. FR. DOOR SASH CENTER (OUTER) *NH70* ( FLAT BLACK )
67826-SEA-003ZA TAPE, R. RR. DOOR SASH CENTER (OUTER) *NH70* ( FLAT BLACK )
67866-SEA-003ZA TAPE, L. RR. DOOR SASH CENTER (OUTER) *NH70* ( FLAT BLACK )

The following 2 users liked this post by mdkxtreme:
Guanacoracing (07-19-2011),
JuiceSteez (11-26-2016)

The following users liked this post:
Guanacoracing (07-19-2011)
 Criminals
Trending Topics
07-23-2011, 01:19 AM
#8

You are my hero for posting this DIY. Thanks so much for doing this. A lot of people have been wondering what the process is. No wonder there's no replacement diy in the service manual. You'd have to remove the door trim to put on new vinyl like oem.
 08-08-2011, 03:35 PM
#10
Moderator
Thread Starter
 08-19-2011, 08:30 PM
#12
9th Gear

Join Date: Feb 2009
Age: 40
Posts: 9
Likes: 0
Received 0 Likes
on
0 Posts
Nice DIY. So when you laid it down, if there was a bubble would you have to peel it back off and re-apply? I know with screen protectors you can kind of squeegee them out, but on black vinyl it seems like a credit card would scratch the new vinyl.
08-19-2011, 11:24 PM
#13
Moderator
Thread Starter
You definitely wouldn't want to try and squeegee this out because it will indeed scratch the vinyl.
11-28-2011, 04:32 PM
#14
Advanced

I just did this DIY over the weekend.
You can use a hair dryer to warm the vinyl as you pull it off and it will make the job a lot easier. With the heat, you can pull the vinyl and leave almost no residue behind.
You can use a hair dryer to warm the vinyl as you pull it off and it will make the job a lot easier. With the heat, you can pull the vinyl and leave almost no residue behind.
The following users liked this post:
mdkxtreme (11-28-2011)
11-28-2011, 07:49 PM
#15
Moderator
Thread Starter
I used a hair dryer to debadge my car but didn't even think about it when doing this. Thanks for the great reminder though

 03-19-2016, 05:09 PM
#17
1st Gear

Join Date: Mar 2016
Age: 31
Posts: 1
Likes: 0
Received 0 Likes
on
0 Posts
Going to try this this week sometime on a Subaru. Vinyl I have no is new, but the dealer tried to polish it and ending up putting a bunch of swirl marks. Instead of having them take apart a relatively new car, I'm going to try this DIY. I think I am going to just apply the new vinyl over the current one instead of cutting and taking the old one off. Since the current one doesn't have any major defects, the new one should go on smooth over it. Don't see why it wouldn't stick? I see they often sell carbon fiber pillar tape that are specifically designed to go over the OEM one as like mod so I'm hoping this works as well!
06-26-2020, 11:08 AM
#18
Cruisin'


Thread
Thread Starter
Forum
Replies
Last Post
TLDude876
Car Talk
134
12-28-2016 03:18 PM
oyayjoe
Member Cars for Sale
1
09-12-2015 04:40 PM