
DIY: 06-08 EuroR kit installation
 08-19-2007, 09:47 PM
#1
Not Driving, Just Posting
Thread Starter
Join Date: Aug 2006
Location: Middleburg, FL
Age: 42
Posts: 792
Likes: 0
Received 0 Likes
on
0 Posts
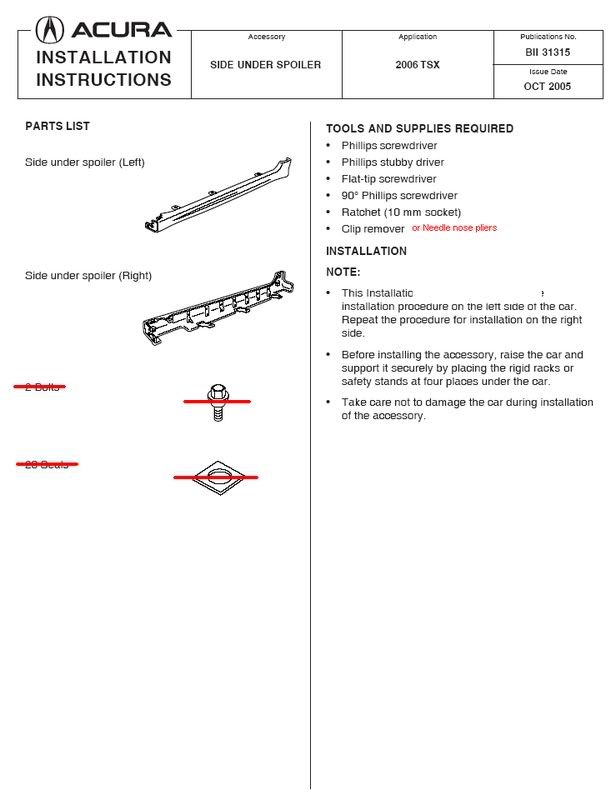
After many request one is now available.........
Besides the kit this is what you will need
TOOLS:
Phillips screwdriver
Phillips stubby screwdriver
90 degree Phillips(if you have it will help with the side skirts)
Flat-Tip screwdriver
Ratchet(10mm - Honda bolts & 8mm socket - Pepboys bolts)
Isopropyl alcohol
Shop towel
Torx wrench/Allen wrench set
Needlenose Pliers
Large Blanket
A Friend or 2
HARDWARE:
FROM HONDA:
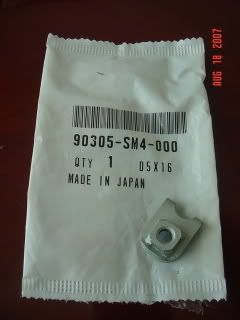
(10) Spring Clips - {Part # 90305-SM4-00} $1.50 each
They come individually packaged - $15.00 each
FROM PEPBOYS:
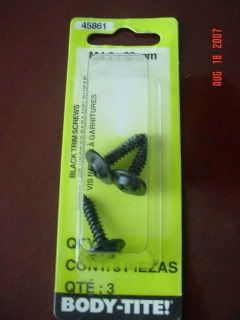
(8) Black Trim Screws - {Part # 45861}$1.99 each
They come 3 to a box, so you will need 3 boxes - $5.97 each
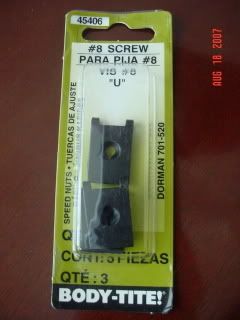
(8) Speed Nuts - {Part # 45406}$1.99 each
They come 3 to a box, so you will need 3 boxes - $5.97 each
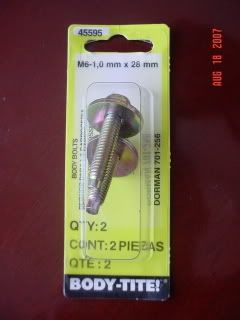
(10) Body Bolts - {Part # 45595}$1.99 each
They come 2 to a box, so you will need 5 boxes - $9.95 each
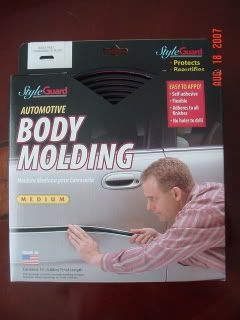
(1) Box of Body Moulding - $17.99
(OPTIONAL & RECOMMENDED)
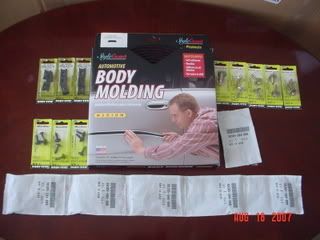
Here's a picture of all the hardware needed - $54.88 total before tax
NOW ONTO THE INSTALLATION:
THE FRONT BUMPER:
STEP 1-3:
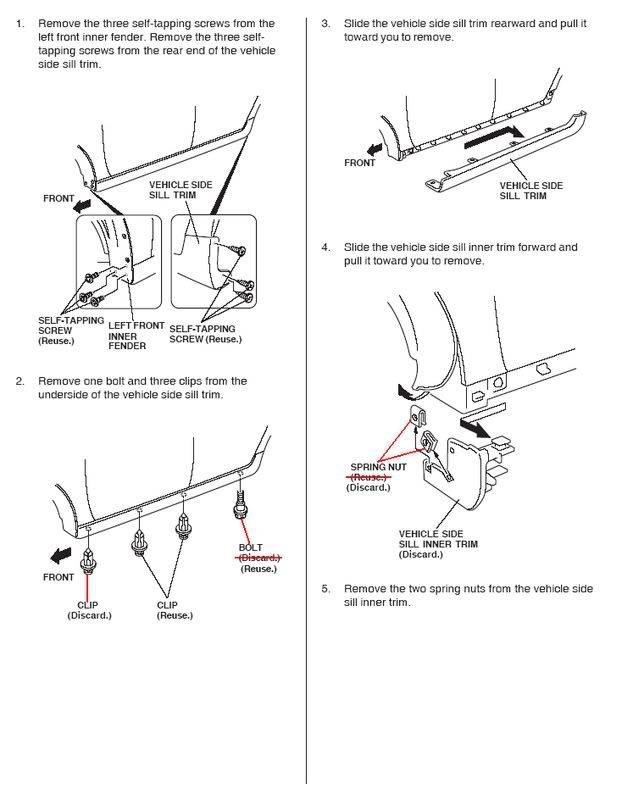
Follow the A-SPEC instructions for STEPS 1-3 pictured below

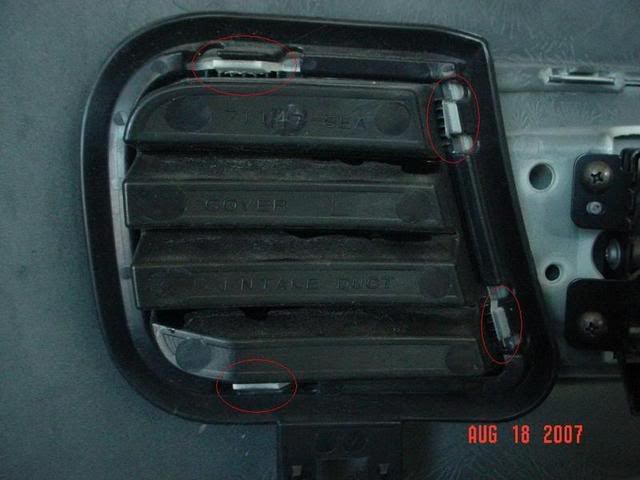
STEP 4 - Removing Duct Covers:(All pics are from the drivers side)
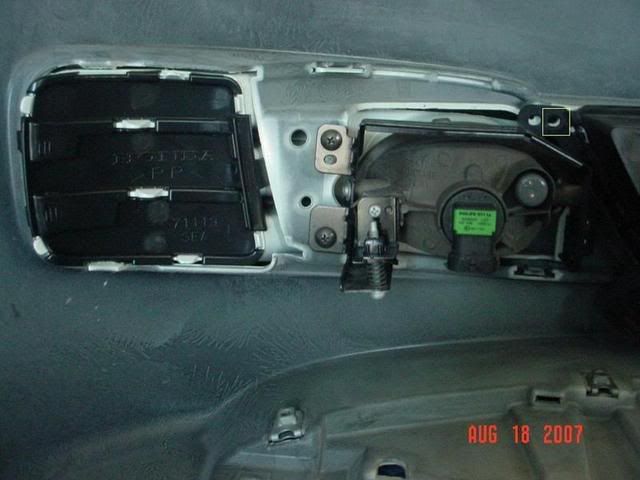
Once the bumper is off the car remove the intake cover by disconnecting the 4 clips CIRCLED in red
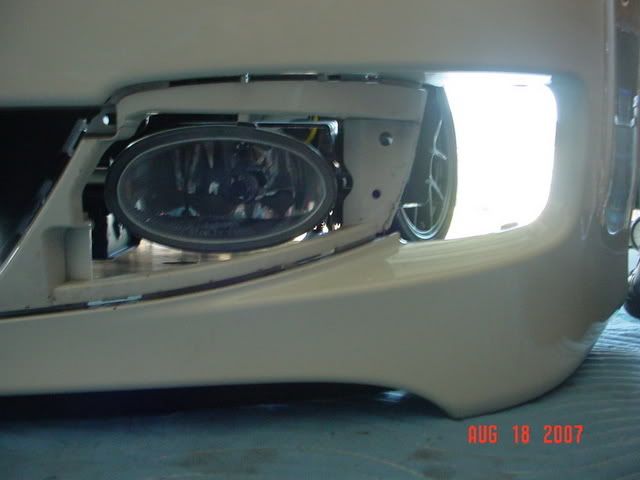
Up next is the fog light cover by disconnecting the 6 clips, 5 of which are CIRCLED in red and 1 is out of the picture pointed out by the red ARROW. You will also need to remove the screw in the yellow SQUARE and make sure to keep it

This is what the front of the bumper looks like with both covers off
DO THE SAME THING ON THE OTHER END OF THE BUMPER
STEP 5 - Installing the Speed/Spring Nuts:
First off you need to install the speed/spring nuts onto the ends of the bumpers, for this follow STEP 14 from the Acura A-SPEC instructions below

Make sure to also tap out the holes on the kit itself to make installing it a lot easier.
STEP 6 - Cleaning the Bumper:
Once the speed/spring nuts have been installed clean the surfaces of the bumpers with the Isopropyl alcohol where the double sided tape will connect to the bumper.
STEP 7 - Installing the lip:
After the bumper is clean attach the lip making sure the 2 plastic tabs on the inner part of each fog light housing where the lower grille section is and once the bumper is on the back of the fog light housing will look like this.
The yellow SQUARE in the picture above is where you removed the screw from in STEP 4 and is next to the whole that you need to re-install it into in the picture below it's marked with the blue SQUARE
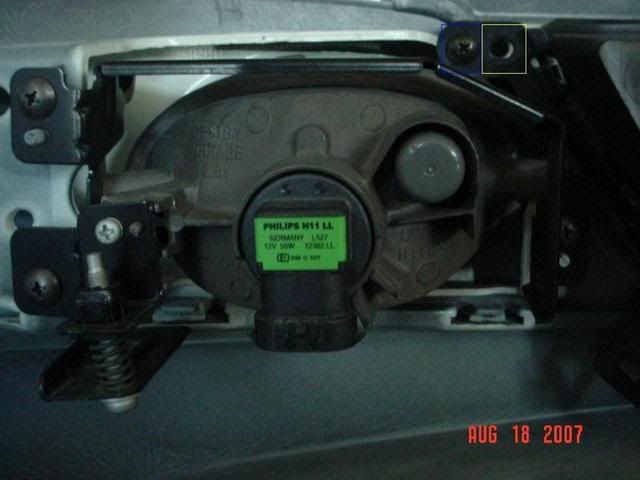
Here's a close-up of where the screw is placed in the blue SQUARE and where it was factory installed in the yellow SQUARE
DO THE SAME THING ON THE OTHER HOUSING COVER
Once both housing covers are connected it's time to install the black trim screws. In the picture below it's the PASSENGER SIDE this time where I have the tapped hole from STEP 5 on top and a trim screw going through the lip, bumper and into the speed nut on the bottom
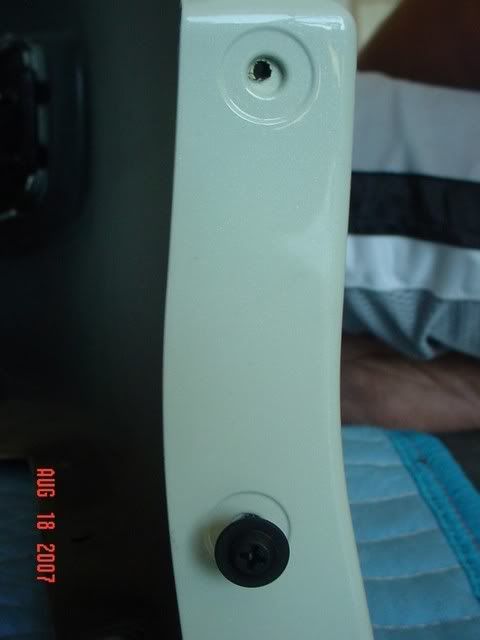
This is what the trim screws look like installed
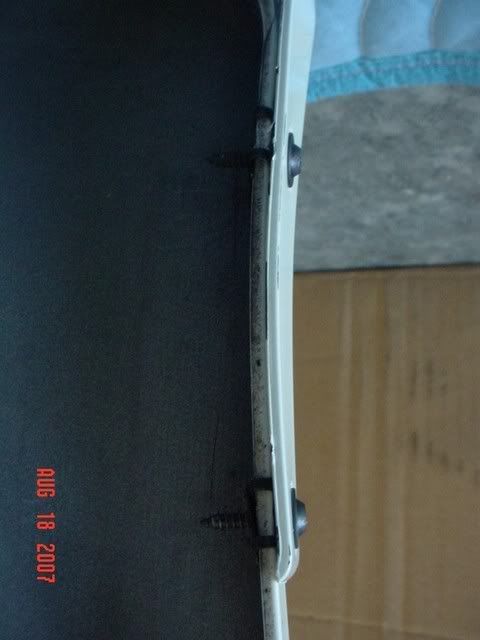
DO THE SAME THING ON THE OTHER END OF THE BUMPER
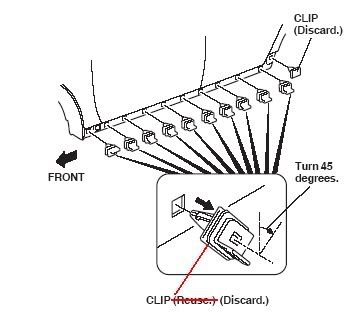
STEP 9 - Installing the Spring Clips:
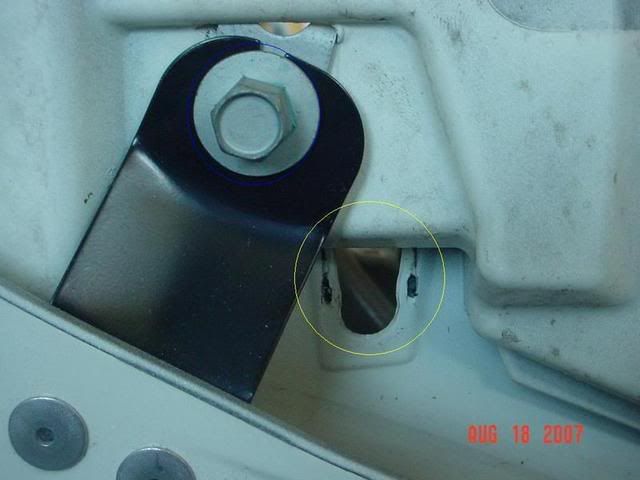
There are 4 total that need to be installed, 2 of which just need to be moved and installed with 2 factory bolts and 2 new spring clips from Honda installed with the body bolts from Pepboys.
The factory spring clip has the yellow CIRCLE and the new location on the lip that the bolt goes through and the location on the bumper that is behind the black bracket are in the blue CIRCLE

Swap over the parts and use the 10mm socket and you'll have the spring clip and bolt swapped to look like what is in the blue CIRCLE while the factory location is in the yellow CIRCLE
The new spring clips get installed at the end of the bumpers where the other 2 black brackets are. This picture shows the bracket in the blue CIRCLE
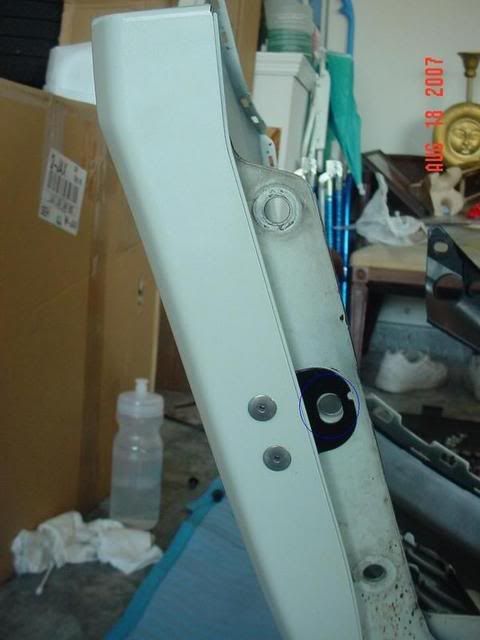
First install the NEW Honda spring clip on the bumper that the blue ARROW is pointing out here
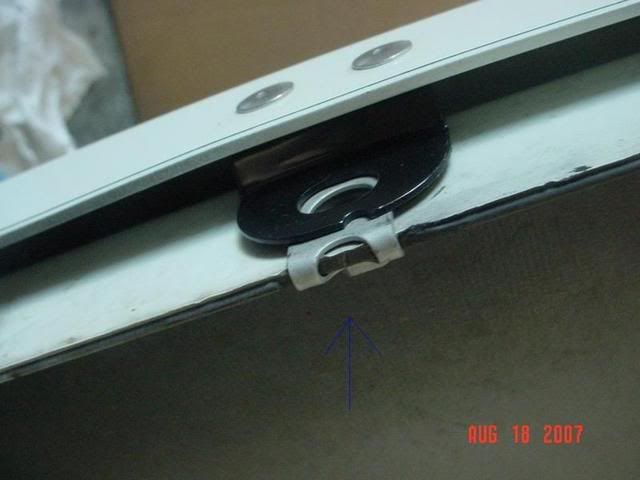
Once you install the bolt through the black bracket and the spring clip using the Pepboys body bolt and the 8mm socket it will look like what's in the blue CIRCLE

DO THE SAME THING ON THE OTHER END OF THE BUMPER
STEP 9 - Reinstall the Bumper:
To reinstall the bumper on the car follow the A-SPEC instructions for STEPS 1-3 pictured below but in reverse of course and instead of installing the black trim piece you will connect the brackets from the lips with the factory bolts removed with the trim piece in STEP 3
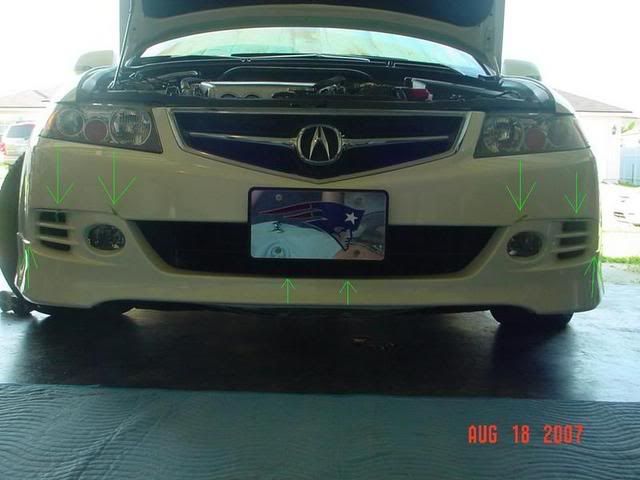
Once the bumper is back on you will need to pull off all 8 of the double sided tape tabs and press firmly on those areas to help them adhere to the bumper. The tabs are in the general directions of there the 8 green ARROWS are pointing at below
STEP 10 - Adding the body molding:(OPTIONAL & RECOMMENDED)
Run the black body molding on the bottom of the bumper along the outer edge of the lip as seen in the blue RECTANGLE below
Once your done running the molding it should look like this, but can you see it?
THE SIDE SKIRTS:
Follow the A-SPEC instructions with the modifications I have made
MY MODIFICATIONS ARE NOTED IN RED

THE REAR BUMPER:
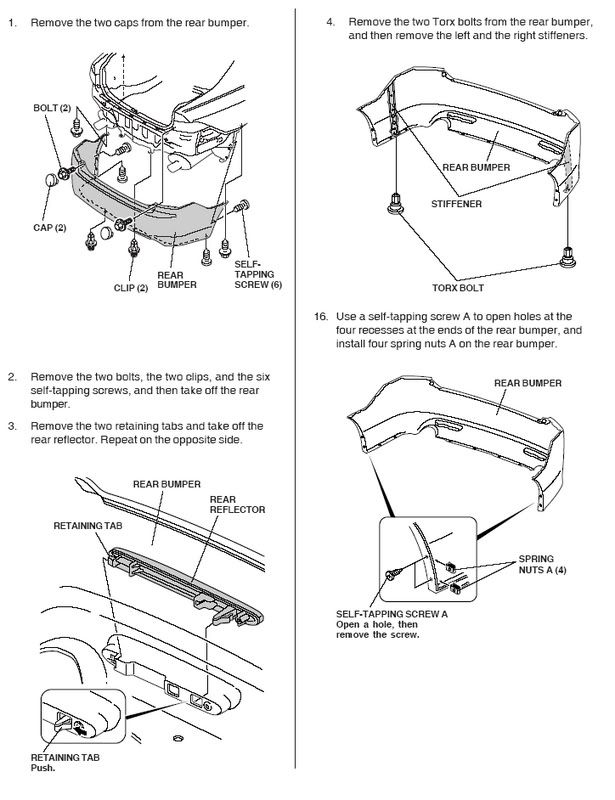
STEP 1-5:
Follow the A-SPEC instructions for STEPS 1-4 and then do STEP 16 which are all pictured below and MAKE SURE TO KEEP ALL THE HARDWARE
STEP 6 - Remove lip screws:
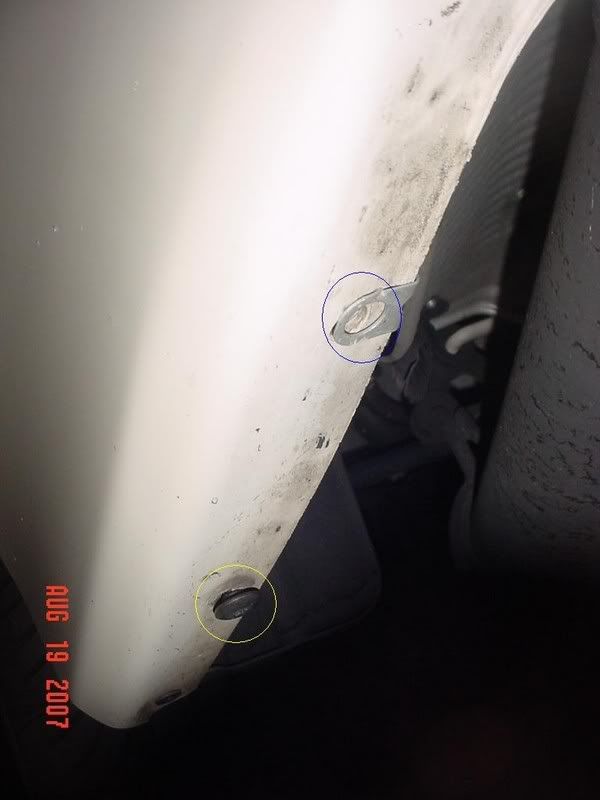
This is a decision you need to make, but when I say these screws and where they would anchor into the bumper I decided to remove them, the screws are CIRCLED in magenta
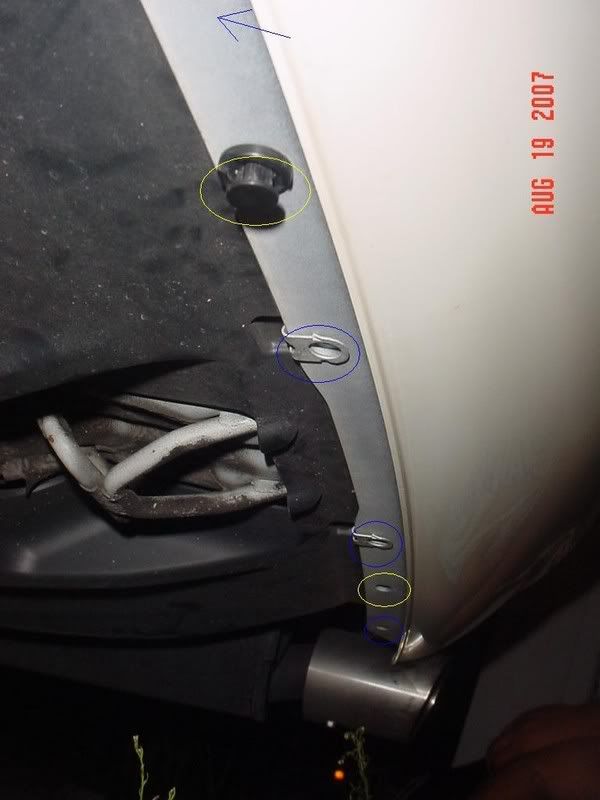
STEP 7 - Installing Spring Clips:
You will need to install the spring clips onto the bumper, there are 8 total
Below is a picture from the side with the torx screw you would have already removed CIRCLED that needs to be replaced by a spring clip and another spring clip next to it CIRCLED in blue
DO THE SAME THING ON THE OTHER END OF THE BUMPER
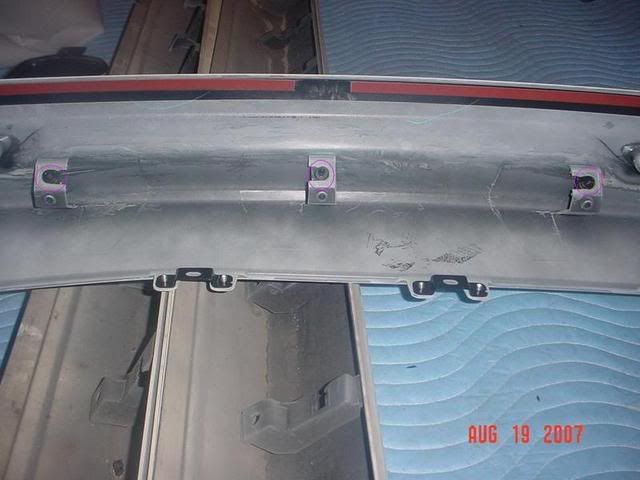
Now install the 4 spring clips on the back part of the bumper, they are CIRCLED in blue and the one out of the picture is show by the blue ARROW, The clip CIRCLED in yellow and the other yellow circle show you the clips you will re-install with the bumper
STEP 7 - Installing the Lip and Bumper:
Follow the Acura A-SPEC directions below to clean the bumper prior, then install the lip to the bumper followed by the installing the both back onto the car using the body bolts from Pepboys for the body bolts pictured below.
Also, make sure the tabs for the double sided tape are on the outside so you can pull them of once the bumper is secured onto the car.
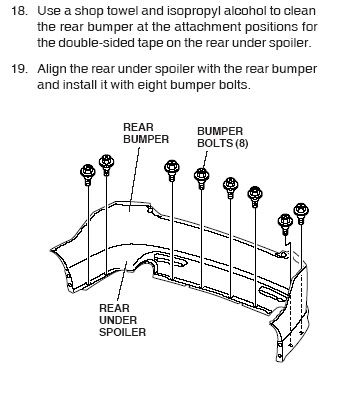
Then install the black trim screws through the lip, bumper, and the speed/spring nuts you installed using the Acura A-SPEC instructions STEP 16.
Once those are connected re-attach the bumper and once it's secure remove the tabs for the double sided tape and press firmly to let them seal.
I know I don't have a lot of pictures of the in between stuff, but it was a learning process for me and that's why I recommend installing the rear lip while it's off the car unlike myself who did it with it still on the car.
Sean
Besides the kit this is what you will need
TOOLS:
Phillips screwdriver
Phillips stubby screwdriver
90 degree Phillips(if you have it will help with the side skirts)
Flat-Tip screwdriver
Ratchet(10mm - Honda bolts & 8mm socket - Pepboys bolts)
Isopropyl alcohol
Shop towel
Torx wrench/Allen wrench set
Needlenose Pliers
Large Blanket
A Friend or 2
HARDWARE:
FROM HONDA:
(10) Spring Clips - {Part # 90305-SM4-00} $1.50 each
They come individually packaged - $15.00 each
FROM PEPBOYS:
(8) Black Trim Screws - {Part # 45861}$1.99 each
They come 3 to a box, so you will need 3 boxes - $5.97 each
(8) Speed Nuts - {Part # 45406}$1.99 each
They come 3 to a box, so you will need 3 boxes - $5.97 each
(10) Body Bolts - {Part # 45595}$1.99 each
They come 2 to a box, so you will need 5 boxes - $9.95 each
(1) Box of Body Moulding - $17.99
(OPTIONAL & RECOMMENDED)
Here's a picture of all the hardware needed - $54.88 total before tax
NOW ONTO THE INSTALLATION:
THE FRONT BUMPER:
STEP 1-3:
Follow the A-SPEC instructions for STEPS 1-3 pictured below
STEP 4 - Removing Duct Covers:(All pics are from the drivers side)
Once the bumper is off the car remove the intake cover by disconnecting the 4 clips CIRCLED in red
Up next is the fog light cover by disconnecting the 6 clips, 5 of which are CIRCLED in red and 1 is out of the picture pointed out by the red ARROW. You will also need to remove the screw in the yellow SQUARE and make sure to keep it
This is what the front of the bumper looks like with both covers off
DO THE SAME THING ON THE OTHER END OF THE BUMPER
STEP 5 - Installing the Speed/Spring Nuts:
First off you need to install the speed/spring nuts onto the ends of the bumpers, for this follow STEP 14 from the Acura A-SPEC instructions below
Make sure to also tap out the holes on the kit itself to make installing it a lot easier.
STEP 6 - Cleaning the Bumper:
Once the speed/spring nuts have been installed clean the surfaces of the bumpers with the Isopropyl alcohol where the double sided tape will connect to the bumper.
STEP 7 - Installing the lip:
After the bumper is clean attach the lip making sure the 2 plastic tabs on the inner part of each fog light housing where the lower grille section is and once the bumper is on the back of the fog light housing will look like this.
The yellow SQUARE in the picture above is where you removed the screw from in STEP 4 and is next to the whole that you need to re-install it into in the picture below it's marked with the blue SQUARE
Here's a close-up of where the screw is placed in the blue SQUARE and where it was factory installed in the yellow SQUARE
DO THE SAME THING ON THE OTHER HOUSING COVER
Once both housing covers are connected it's time to install the black trim screws. In the picture below it's the PASSENGER SIDE this time where I have the tapped hole from STEP 5 on top and a trim screw going through the lip, bumper and into the speed nut on the bottom
This is what the trim screws look like installed
DO THE SAME THING ON THE OTHER END OF THE BUMPER
STEP 9 - Installing the Spring Clips:
There are 4 total that need to be installed, 2 of which just need to be moved and installed with 2 factory bolts and 2 new spring clips from Honda installed with the body bolts from Pepboys.
The factory spring clip has the yellow CIRCLE and the new location on the lip that the bolt goes through and the location on the bumper that is behind the black bracket are in the blue CIRCLE
Swap over the parts and use the 10mm socket and you'll have the spring clip and bolt swapped to look like what is in the blue CIRCLE while the factory location is in the yellow CIRCLE
The new spring clips get installed at the end of the bumpers where the other 2 black brackets are. This picture shows the bracket in the blue CIRCLE
First install the NEW Honda spring clip on the bumper that the blue ARROW is pointing out here
Once you install the bolt through the black bracket and the spring clip using the Pepboys body bolt and the 8mm socket it will look like what's in the blue CIRCLE
DO THE SAME THING ON THE OTHER END OF THE BUMPER
STEP 9 - Reinstall the Bumper:
To reinstall the bumper on the car follow the A-SPEC instructions for STEPS 1-3 pictured below but in reverse of course and instead of installing the black trim piece you will connect the brackets from the lips with the factory bolts removed with the trim piece in STEP 3
Once the bumper is back on you will need to pull off all 8 of the double sided tape tabs and press firmly on those areas to help them adhere to the bumper. The tabs are in the general directions of there the 8 green ARROWS are pointing at below
STEP 10 - Adding the body molding:(OPTIONAL & RECOMMENDED)
Run the black body molding on the bottom of the bumper along the outer edge of the lip as seen in the blue RECTANGLE below
Once your done running the molding it should look like this, but can you see it?
THE SIDE SKIRTS:
Follow the A-SPEC instructions with the modifications I have made
MY MODIFICATIONS ARE NOTED IN RED
THE REAR BUMPER:
STEP 1-5:
Follow the A-SPEC instructions for STEPS 1-4 and then do STEP 16 which are all pictured below and MAKE SURE TO KEEP ALL THE HARDWARE
STEP 6 - Remove lip screws:
This is a decision you need to make, but when I say these screws and where they would anchor into the bumper I decided to remove them, the screws are CIRCLED in magenta
STEP 7 - Installing Spring Clips:
You will need to install the spring clips onto the bumper, there are 8 total
Below is a picture from the side with the torx screw you would have already removed CIRCLED that needs to be replaced by a spring clip and another spring clip next to it CIRCLED in blue
DO THE SAME THING ON THE OTHER END OF THE BUMPER
Now install the 4 spring clips on the back part of the bumper, they are CIRCLED in blue and the one out of the picture is show by the blue ARROW, The clip CIRCLED in yellow and the other yellow circle show you the clips you will re-install with the bumper
STEP 7 - Installing the Lip and Bumper:
Follow the Acura A-SPEC directions below to clean the bumper prior, then install the lip to the bumper followed by the installing the both back onto the car using the body bolts from Pepboys for the body bolts pictured below.
Also, make sure the tabs for the double sided tape are on the outside so you can pull them of once the bumper is secured onto the car.
Then install the black trim screws through the lip, bumper, and the speed/spring nuts you installed using the Acura A-SPEC instructions STEP 16.
Once those are connected re-attach the bumper and once it's secure remove the tabs for the double sided tape and press firmly to let them seal.
I know I don't have a lot of pictures of the in between stuff, but it was a learning process for me and that's why I recommend installing the rear lip while it's off the car unlike myself who did it with it still on the car.
Sean
 08-19-2007, 10:00 PM
#2
Not Driving, Just Posting
Thread Starter
Join Date: Aug 2006
Location: Middleburg, FL
Age: 42
Posts: 792
Likes: 0
Received 0 Likes
on
0 Posts
sorry about posting it in the Performance section, I saw you can't add new posts to the DIY section and I had seen some other DIY int he Performance section before, so I thought why not
08-19-2007, 10:13 PM
#4
Not Driving, Just Posting
Thread Starter
Join Date: Aug 2006
Location: Middleburg, FL
Age: 42
Posts: 792
Likes: 0
Received 0 Likes
on
0 Posts
Originally Posted by lcrazyaznl
Nice man talk about pricey, on those darn clips.
im guessing xjohndoex will find this helpful.
im guessing xjohndoex will find this helpful.
I actually got them for close to a buck each because I have a buddy that works in the Honda Parts Dept in town
08-19-2007, 10:56 PM
#7
Not Driving, Just Posting
Thread Starter
Join Date: Aug 2006
Location: Middleburg, FL
Age: 42
Posts: 792
Likes: 0
Received 0 Likes
on
0 Posts
Originally Posted by godfather2
though it doesn't really help me, congrats on a very comprehensive/detailed/informative diy
then i went to my new Macbook and I was 2/3 of the way done and Firefox had an error and shut down
so i went back to my windows PC and after every step was done I save what i had written to a text file on my desktop
talk about a royal pain in the @$$

so this was definitely a blood, sweat and tears effort after cutting my finger trim the molding, sweating in the FL heat doing the install and the computer issues killing me

Trending Topics
08-19-2007, 11:31 PM
#8
Time to Climb
^ you're the type of person that keeps me coming back to this site hour after hour. tremendous effort! and talk about modding in the fl heat, i was doing it thursday
08-20-2007, 02:21 AM
#10
Not Driving, Just Posting
Thread Starter
Join Date: Aug 2006
Location: Middleburg, FL
Age: 42
Posts: 792
Likes: 0
Received 0 Likes
on
0 Posts
Originally Posted by godfather2
^ you're the type of person that keeps me coming back to this site hour after hour. tremendous effort! and talk about modding in the fl heat, i was doing it thursday
and don't forget I find misguided drivers in Orlando on the way to a Go Kart Track
 08-20-2007, 03:21 AM
#12
Not Driving, Just Posting
Thread Starter
Join Date: Aug 2006
Location: Middleburg, FL
Age: 42
Posts: 792
Likes: 0
Received 0 Likes
on
0 Posts
Originally Posted by Tsx6363
nice diy, i'm still intimidated by all the steps though.. call me a noob and flame me purpleee 
08-21-2007, 02:38 AM
#14
Not Driving, Just Posting
Thread Starter
Join Date: Aug 2006
Location: Middleburg, FL
Age: 42
Posts: 792
Likes: 0
Received 0 Likes
on
0 Posts
Originally Posted by LoveMyTSX
Awesome write-up Sean!! You now need to post up some pics.............Looks like I missed out on the fun.
hopefully I can have them up on the boards by the time most sane people are awake
 08-21-2007, 10:40 AM
#17
Advanced

Join Date: Jun 2007
Age: 44
Posts: 56
Likes: 0
Received 0 Likes
on
0 Posts
Thanks for the DIY! It is really gonna come in handy in a few months when I do my car.
Quick question since you have it installed now on your car, what else, besides the fog light vent areas being painted, does the front lip of the Euro R change? It looks to me like it may even make the car look a little lower with more front lip? Is the bottom of the lip wider than stock? Does it add any flare?
thanks!
08-21-2007, 10:57 AM
#18
Not Driving, Just Posting
Thread Starter
Join Date: Aug 2006
Location: Middleburg, FL
Age: 42
Posts: 792
Likes: 0
Received 0 Likes
on
0 Posts
Originally Posted by Reach
Just wanted to say, great info. Thank you for the DIY!
08-21-2007, 11:04 AM
#19
Not Driving, Just Posting
Thread Starter
Join Date: Aug 2006
Location: Middleburg, FL
Age: 42
Posts: 792
Likes: 0
Received 0 Likes
on
0 Posts
Originally Posted by jayq16
Thanks for the DIY! It is really gonna come in handy in a few months when I do my car.
Quick question since you have it installed now on your car, what else, besides the fog light vent areas being painted, does the front lip of the Euro R change? It looks to me like it may even make the car look a little lower with more front lip? Is the bottom of the lip wider than stock? Does it add any flare?
thanks!
Quick question since you have it installed now on your car, what else, besides the fog light vent areas being painted, does the front lip of the Euro R change? It looks to me like it may even make the car look a little lower with more front lip? Is the bottom of the lip wider than stock? Does it add any flare?
thanks!
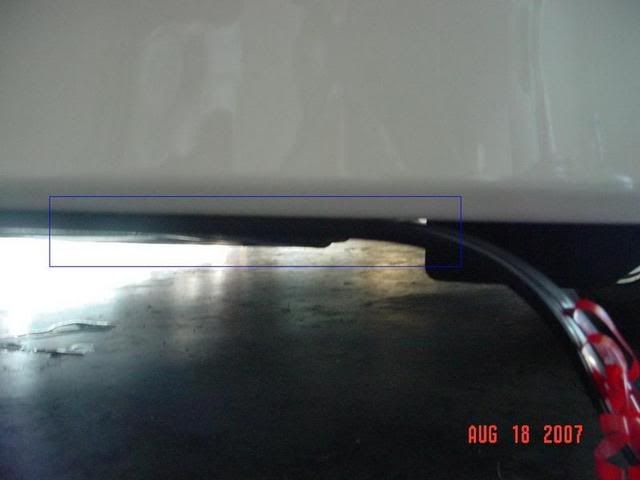
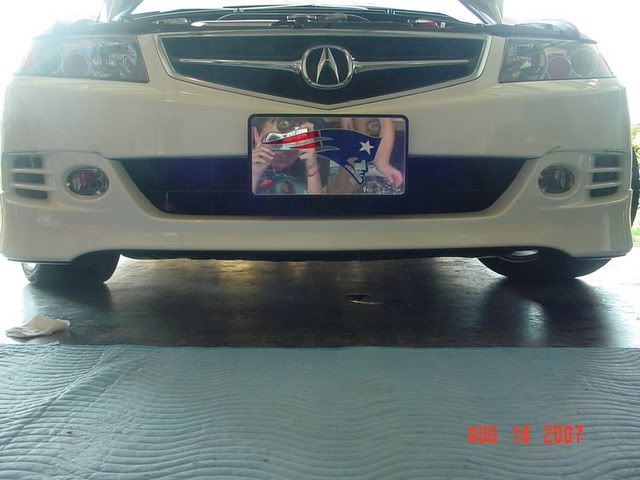
here is my car stock

vs the car with the euroR lip kit on
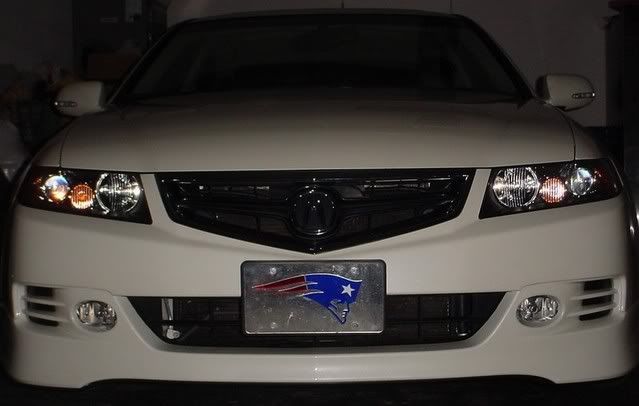
just compare the thickness of the piece below the lower grille to see how much of a difference it really is
08-21-2007, 02:11 PM
#23
Not Driving, Just Posting
Thread Starter
Join Date: Aug 2006
Location: Middleburg, FL
Age: 42
Posts: 792
Likes: 0
Received 0 Likes
on
0 Posts
Originally Posted by xjohnkdoex
lol. nevermind. i found your reference to the 8mm socket.
08-21-2007, 02:12 PM
#24
Not Driving, Just Posting
Thread Starter
Join Date: Aug 2006
Location: Middleburg, FL
Age: 42
Posts: 792
Likes: 0
Received 0 Likes
on
0 Posts
Originally Posted by jayq16
Wow! that is a nice difference. Looks great! Do you have any pictures of the rear and sides? Do these add to the car's height and flare as well?
but I posted some new pics in the photo gallery forum

 08-24-2007, 09:18 AM
#29
Not Driving, Just Posting
Thread Starter
Join Date: Aug 2006
Location: Middleburg, FL
Age: 42
Posts: 792
Likes: 0
Received 0 Likes
on
0 Posts
Originally Posted by rza49311
Is there a "back" to the ducts on the euro kit or are they open?
in this picture you can see the cover from behind and the white tabs are the painted vents of the lips that connect the intake duct cover to the lip. disconnect all of them and it should come right off like the factory one did
08-24-2007, 01:10 PM
#30
Racer
Join Date: Apr 2007
Location: Driver's seat
Posts: 384
Likes: 0
Received 0 Likes
on
0 Posts
I look at heeltoeauto.com for the Euro R and the pictures are kinda misleading... the photos are of the A-spec kit.
Oh well... I'll still be placing my Euro R front lip and progress RSB order soon. I don't have the money for hte whole kit and I think it'll look just fine without the rest of the kit
Oh well... I'll still be placing my Euro R front lip and progress RSB order soon. I don't have the money for hte whole kit and I think it'll look just fine without the rest of the kit
04-27-2008, 02:47 AM
#32
User with Skills
Join Date: Mar 2008
Location: SoCal
Age: 38
Posts: 162
Likes: 0
Received 0 Likes
on
0 Posts
I know that the 04 TSX oem fog lights didn't fit with the Euro R kit, but with the 06-08 model TSX, is that still the case? I'm having trouble finding information about this as nobody seems to mention wut years some of these mods apply to. Thanks in advance!
04-27-2008, 06:56 PM
#33
Three Wheelin'
Join Date: Feb 2007
Location: Rockville, MD
Age: 40
Posts: 1,554
Likes: 0
Received 0 Likes
on
0 Posts
I thought I would add to this DIY since I just used it for my install. I couldn't find all of the body bolts (part # 45595) from any of the auto part stores here. I could only find two boxes at the local Pep Boys, but you need 5 boxes for the install. Instead of using those bolts, I picked up similar bolts that also fit. They are made by the same company, except the part # is 45594. You can also pick up these bolts from Honda, but they run about $3 PER BOLT. These boxes of two are about $2 each so you are saving quite a bit.
04-27-2008, 06:57 PM
#34
Three Wheelin'
Join Date: Feb 2007
Location: Rockville, MD
Age: 40
Posts: 1,554
Likes: 0
Received 0 Likes
on
0 Posts
Originally Posted by ZildJonKim
I know that the 04 TSX oem fog lights didn't fit with the Euro R kit, but with the 06-08 model TSX, is that still the case? I'm having trouble finding information about this as nobody seems to mention wut years some of these mods apply to. Thanks in advance!

Thread
Thread Starter
Forum
Replies
Last Post
cycdaniel
1G TSX Performance Parts & Modifications
8
12-17-2019 10:58 AM
InFaMouSLink
Car Parts for Sale
7
10-27-2015 06:51 PM
nuldabz
3G TL Tires, Wheels & Suspension
3
09-03-2015 05:49 PM