Cabin air filter replacement (DIY, part #s, and *PICS*)
 02-13-2008, 08:38 PM
#41
Originally Posted by pacman821
hey thanks, my 07 manual doesn't show how to replace the filter. i'll poke around with the glove box just FMI and i'll talk to the dealer about replacing it too. 
 02-13-2008, 09:10 PM
#42
Team Owner
For some reason Acura left the replacement procedure out of the 06 & 07 manuals. The procedure is in the 04 manual, the 06/07 manual just tells you to take it to the dealer. I think they're trying to give the dealer a little more profit. 
02-16-2008, 05:44 PM
#43

Dealership wanted $140+tax to replace the cabin filter.
Was able to get the Honda Equivalent that model# that was posted from a Honda dealership for about $27 and change. Definitely well worth it to do it on your own.
Was able to get the Honda Equivalent that model# that was posted from a Honda dealership for about $27 and change. Definitely well worth it to do it on your own.
02-16-2008, 11:55 PM
#44
Instructor

Join Date: Jan 2008
Age: 41
Posts: 155
Likes: 0
Received 0 Likes
on
0 Posts
So let's see, for maintenence minder "2" code, I can knock off changing air filter and cabin air filter myself. All that leaves is "inspect drive belt", i can just make a mention to do that during my next oil change.
Don't they inspect all the belts and stuff anyway when you take it in for an oil change?
Don't they inspect all the belts and stuff anyway when you take it in for an oil change?
03-28-2008, 10:33 PM
#46
Make a hole, coming thru!
Thread Starter
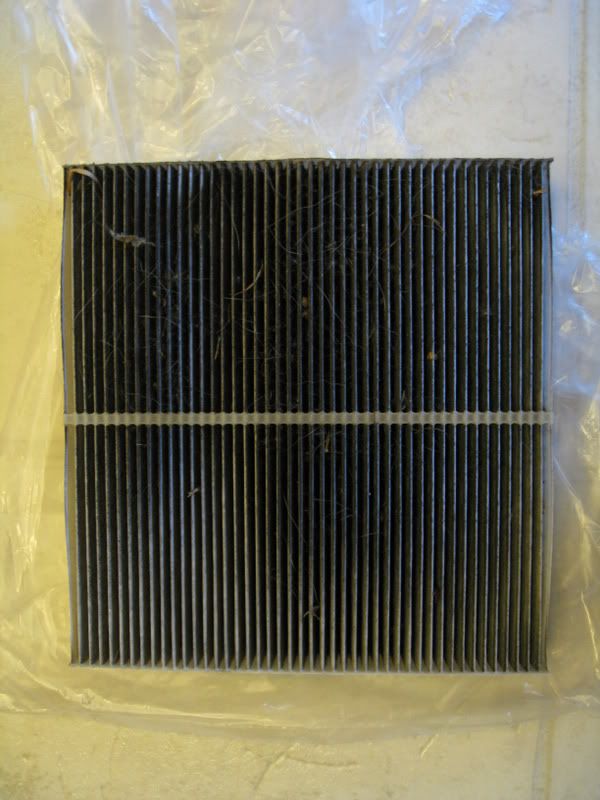
Roguemoog recently changed out his filter ... this beauty had either been in for 14 months and 24,000 miles ... or, if it wasn't changed with the dealer prop, it has been in there since before 15,000 miles when he bought it. Pray that your filter doesn't look this bad....

(reused by permission)
(reused by permission)
03-31-2008, 08:13 PM
#48
Cruisin'

Join Date: Apr 2004
Location: Santa Monica, CA
Age: 43
Posts: 20
Likes: 0
Received 0 Likes
on
0 Posts
^ditto to that! I knew it was in there and knew from my previous vehicle how dirty they get...but for some reason it slipped my mind for the longest time until I saw a thread get bumped here...and that pic above is what resulted!
Like I said in the other thread...you can't even see BETWEEN the pleats...which were PACKED with dirt. Frankly I'm surprised the thing didn't collapse, I guess the middle support and its holding cage is pretty good.
It's an easy DIY and one I really recommend doing frequently.
Like I said in the other thread...you can't even see BETWEEN the pleats...which were PACKED with dirt. Frankly I'm surprised the thing didn't collapse, I guess the middle support and its holding cage is pretty good.
It's an easy DIY and one I really recommend doing frequently.
04-01-2008, 10:30 AM
#49
Make a hole, coming thru!
Thread Starter
I'll bet air is flowing a lot more freely now (as in, "woah, the air really blows out the vents now"). Your heater/blower (which is what the filter slides into) may be quieter, too. Just conjecture on my part.
04-01-2008, 10:32 AM
#50
Instructor
Join Date: Dec 2006
Location: Massachusetts
Age: 42
Posts: 205
Likes: 0
Received 0 Likes
on
0 Posts
I did this over the weekend too at 22,000 miles and looked similar to picture above. While I was having my car serviced the service guy came out and offered someone else's TSX this service for $155. Got the Honda Accord one at Honda dealer for $22. I'm all for clean air! Plus it gives at least 5 whp!!!
04-05-2008, 12:22 PM
#51
Racer
Join Date: Apr 2005
Location: Salinas, CA
Age: 42
Posts: 485
Likes: 0
Received 0 Likes
on
0 Posts
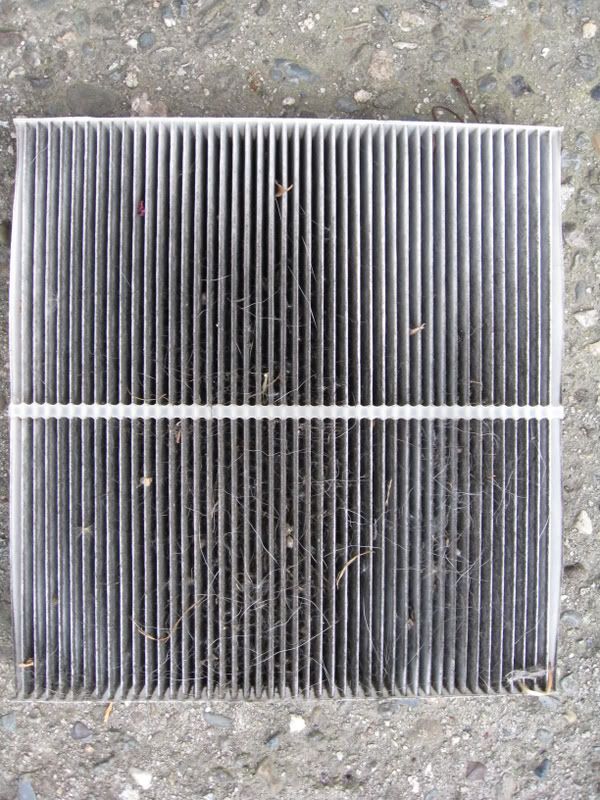
After being told it would cost around 100 dollars to do this at the dealer I said no thanks and did it myself. Was kinda iffy at first taking the glove box out but it ended up being a 5 min job. I replaced mine with the honda accord/TL filter which was 20 bucks at the honda dealer. Heres 2 pics of how dirty it was after 20k miles and 3 years. As you can see the first picture really shows how black the filter was while the 2nd picture shows all the crap stuck down in the bottom of the ridges.
04-23-2008, 07:31 PM
#52
Racer
Join Date: Aug 2006
Location: CA
Posts: 486
Likes: 0
Received 0 Likes
on
0 Posts
I just want to say THANK YOU SO MUCH to the OP for the DIY. I just replaced my filter, literally a minute or two ago, using this guide. You just saved me a bunch of money! Thanks!
 04-29-2008, 04:24 PM
#55
Burning Brakes
Originally Posted by buste2
the air filter in the engine bay? just undo 4 screws...and pop off...and replace filter ><
04-29-2008, 05:42 PM
#56
Racer

is it the 4 black screws attached to the corners? the top left one is pretty low and kinda blocked by another unit, how did you unscrew that? those screws are damn tight i told u.. i could only unscrew the two on the right
04-29-2008, 06:03 PM
#57
Make a hole, coming thru!
Thread Starter
It's covered in the 2004 manual, which is linked from an FAQ sticky about the manuals. You need a long screwdriver (or good grip). If you really can't do it, ask a shop to "start it" for ya.
 Back on topic, please.
Back on topic, please.
 04-30-2008, 06:17 PM
#60
Make a hole, coming thru!
Thread Starter
I've found a new filter at my local United Auto Parts ... an ATP HA-5 for Accord and TSX. My jaw dropped when I looked at it. ATP makes an upgraded charcoal impregnated filter (like micronAir's expensive "combi" filter) for the TSX. List price was $36, but my checkout cost was $22, a bit less than Honda dealers charge for the US-made micronAir regular particulate filter. What a steal.
04-30-2008, 11:36 PM
#61
10th Gear

Join Date: Apr 2006
Age: 74
Posts: 12
Likes: 0
Received 0 Likes
on
0 Posts
The lever that lets the glove box down slowly was not fastened correctly on mine after I changed the filter. I started getting rattles from the glovebox. Once I put it in place, no rattles.
05-01-2008, 01:22 PM
#62
Senior Moderator
Just did mine at lunch. Picked up a Wix filter for $18 at a local auto parts store. Took 5 minutes. It wasn't nearly as bad as the pics above but it definitely needed replacing.
05-02-2008, 10:41 AM
#63
Make a hole, coming thru!
Thread Starter
Inspected my (Honda micronAir-US) cabin air filter after about 5300 miles (installed 1/27/08, before the major pollen season). It's grey but still serviceable. Knocked out some loose material and reinstalled. I think the real test is the darkness of the gray discoloration at the blower-side ridges of the filter (where contaminants settle). If it's only discolored but not "dark," the filter's still working. YMMV.
05-02-2008, 11:49 AM
#64
Make a hole, coming thru!
Thread Starter
BTW, we are indeed fortunate in the location of our pollen filter. I changed out the filter on a 2000 Jetta VR6 last night, and my hand is covered in red scrapes. It's under the passenger side "cowl," covered by a piece that I can only say has to be un-wedged from the cowl. NOT something I want to do regularly without KY.
 05-10-2008, 12:18 PM
#66
1st Gear

Join Date: May 2008
Posts: 1
Likes: 0
Received 0 Likes
on
0 Posts
Kudos to you DavidSpalding - you're a good man
Thank you so much for the DIY guide. This thing was easy as hell to DIY. The dealer wanted 170 bucks for it as A2 service. Give me a break!! Do they know that its Internet Age ... I'm going to start offering this service for 15 bucks locally.
I got the ATP HA-5 filter from RockAuto.com for $15 (combine multiple items to spread the shipping cost $7). I have 26K on my 2006 TSX and the filter was as dirty as the ones shown in the pictures in this thread. Anybody know if any performance enhancements due to cabin-air filter? I'm thinking no but who knows. I'm thinking it is solely for the purpose of clean air circulation inside the car.
I got the ATP HA-5 filter from RockAuto.com for $15 (combine multiple items to spread the shipping cost $7). I have 26K on my 2006 TSX and the filter was as dirty as the ones shown in the pictures in this thread. Anybody know if any performance enhancements due to cabin-air filter? I'm thinking no but who knows. I'm thinking it is solely for the purpose of clean air circulation inside the car.
05-10-2008, 12:47 PM
#67
Make a hole, coming thru!
Thread Starter
 $15?!? Wow, they claim to have a micronAir filter for roughly $14 + s/h.
Your heater/blower unit might perform better....
 Or course, a good filter would keep the muck out of the blower anyway, but you might notice better air flow, or less noise, or you can smell the lilacs in spring again, or your laundry might come out whiter, or more guys/girls will look your way, your team will go to the World Series, or....
  You get the idea.
 Thanks for the kudos, every one of you, reading these responses makes my day. I'm glad to have given some "payback" for all the superb info I've gleaned from the mods and other members.
 05-11-2008, 08:07 AM
#69
Cruisin'

Join Date: Apr 2007
Location: MA
Age: 46
Posts: 23
Likes: 0
Received 0 Likes
on
0 Posts
Just replaced my girlfriend's cabin filter yesterday in her 2006 Civic EX. That car uses the same cabin filter as the TSX and it's a little easier to replace than the TSX.
I should be replacing mine sometime this week. Thanks for the info on this mod. It lead me to thinking I should check out my girlfriend's car to see if it had a cabin filter!
I should be replacing mine sometime this week. Thanks for the info on this mod. It lead me to thinking I should check out my girlfriend's car to see if it had a cabin filter!
05-12-2008, 11:24 AM
#70
Pro
Join Date: Nov 2005
Location: CT
Age: 52
Posts: 614
Likes: 0
Received 0 Likes
on
0 Posts
Just got a flyer in the mail from my Acura dealer. In it is a coupon to change the pollen filter. Just the pollen filter. They want $100! And that's the supposed discounted "coupon" price!!
05-13-2008, 09:57 AM
#71
Intermediate

Join Date: May 2008
Age: 43
Posts: 26
Likes: 0
Received 0 Likes
on
0 Posts
Did you guys try this one FRAM FCF10134 Fresh Breeze Cabin Air Filter http://www.amazon.com/FRAM-FCF10134-...tive&carId=002
It looks like a good filter and costs only $18
It looks like a good filter and costs only $18
05-13-2008, 11:26 AM
#72
Old Man Yelling at Clouds
Originally Posted by DLTSX6MT
Just got a flyer in the mail from my Acura dealer. In it is a coupon to change the pollen filter. Just the pollen filter. They want $100! And that's the supposed discounted "coupon" price!!
 Jiffy Lube wanted $40, and still that's a rip off.
 I do intend to make my own next time just for grins out of a furnace filter so I can be assured of the true pedigree of the material. Should not be that hard from what I can see. I'll post a DIY here - probably next month.
05-13-2008, 11:35 AM
#73
Pro
Join Date: Nov 2005
Location: CT
Age: 52
Posts: 614
Likes: 0
Received 0 Likes
on
0 Posts
Originally Posted by 1Louder
Wow. Jiffy Lube wanted $40, and still that's a rip off.
I do intend to make my own next time just for grins out of a furnace filter so I can be assured of the true pedigree of the material. Should not be that hard from what I can see. I'll post a DIY here - probably next month.
Jiffy Lube wanted $40, and still that's a rip off. I do intend to make my own next time just for grins out of a furnace filter so I can be assured of the true pedigree of the material. Should not be that hard from what I can see. I'll post a DIY here - probably next month.
05-13-2008, 08:37 PM
#74

Awesome thread! Just came home from the local Honda/Acura dealers. Bought a Honda cabin filter for $24 + tax, and an Acura air filter for $31 + tax (kinda pricey, but I just got the car a few months back and said screw it  ).
).
My car has ~23k miles, I just swapped out and replaced both filters. The cabin one looks like a lot of the ones people posted. ...Fairly filthy and full of debris. My engine air filter looked alright from the top (side facing the intake), but the bottom was practically smudge-black in like 60% of the areas.
Replaced that too, and now both me and my TSX can breathe some cleaner air.
).My car has ~23k miles, I just swapped out and replaced both filters. The cabin one looks like a lot of the ones people posted. ...Fairly filthy and full of debris. My engine air filter looked alright from the top (side facing the intake), but the bottom was practically smudge-black in like 60% of the areas.
Replaced that too, and now both me and my TSX can breathe some cleaner air.
07-13-2008, 04:11 PM
#75
Cruisin'
Join Date: Feb 2007
Age: 53
Posts: 15
Likes: 0
Received 0 Likes
on
0 Posts
Thanks to the OP. The instructions are spot on and like everyone else I was able to complete in 5 mins. I also finally got around to routing my DICE (the previous gen) through the glovebox while I was doing this.
09-08-2008, 11:53 AM
#76
Make a hole, coming thru!
Thread Starter
Thanks to help from fjpthree, I've posted updated instructions for the 2GEN TSX here:
https://acurazine.com/forums/showthread.php?p=9971752
https://acurazine.com/forums/showthread.php?p=9971752
09-08-2008, 02:38 PM
#77
Excellent posting!!!!! I hope you don't mind david, I've immortalized you on Heeltoeauto.com!
http://www.heeltoeauto.com/Cabin-Air-Filter-c-3453.html
http://www.heeltoeauto.com/Cabin-Air-Filter-c-3453.html
09-08-2008, 03:36 PM
#78
Needs more Lemon Pledge
So....Umm..... Anyone know how to replace the retractor arm with the C-clip on the end that slowly lowers the glove box? I broke it.
It's a $10 part, but I want to avoid an hour of labor charge from the dealership...
It's a $10 part, but I want to avoid an hour of labor charge from the dealership...
09-08-2008, 04:30 PM
#79
Make a hole, coming thru!
Thread Starter
Excellent posting!!!!! I hope you don't mind david, I've immortalized you on Heeltoeauto.com!
http://www.heeltoeauto.com/Cabin-Air-Filter-c-3453.html
http://www.heeltoeauto.com/Cabin-Air-Filter-c-3453.html
I dunno, Stogie, but I'd guess you'll need to dismantle the dash a bit to get at the mount-point for it. Maybe the IPBs for the dash will help....
09-11-2008, 06:08 PM
#80
Racer
Join Date: Nov 2006
Location: Philadelphia
Age: 42
Posts: 336
Likes: 0
Received 0 Likes
on
0 Posts
Just did this today, my comments/tips:
1. The pneumatic arm with the C hook is on the right side outside of the glove box itself. i didn't even notice it at first and wasn't sure what the directions were talking about. on mine, it was already unhooked for some reason!
2. when getting the stoppers out to fully swing the glove box down, i put my hand up and behind the glove box (using my knee to keep it raised up a bit) where the pictures show those rubber wheel type things, pushing this down and in while using my other hand to push in on them (pressure applied towards the inside of the glove box, i was able to get them to snap out.
3. when sliding the tray out, watch out for cables/wires in the way on the left hand side, go slow.
4. when putting the new air filter in after checking the air flow direction is correct, when it's almost all the way in the filter tray, flip it over on the side and ensure the top and bottom first row of fins are pressed against the tray plastic and fit in between the wall of the tray and the small lip of the tray. my filter kept buckling and the fins got crumpled and disoriented the first few times i tried because i didn't realize that small lip was there on each side and the fins were getting caught and jammed. note: i used a purolator filter