
Another non-Navi to Navi conversion story
 05-04-2007, 03:27 AM
#1
Racer
Thread Starter

Join Date: Sep 2005
Age: 42
Posts: 258
Likes: 0
Received 0 Likes
on
0 Posts
Another non-Navi to Navi conversion story
Total cost:
$1500 for navi display + navi unit
$200 for lastest navi disc
$300 for navi sub-clock
$50 for navi unit connectors
$55 for navi display connector (custom made)
$50 for wires & miscellanous stuff.
--------
$2155 total
I spent 1 saturday & 2 long nights after coming home from work to get everything connected. I spent tonight putting everything back. I will let the pictures speak for itself.
I also run a switch to the front for the backup camera later on. I want to use this switch to allow turning on the backup camera at anytime even while driving. I will work on this mod at a later time when I have some free time.

backseat off

installed gps

navi unit

wires to navi unit through right side backseat

removing side panel

glove box removed

removing dash panels


removing center dash (there are 5 bolts total to be removed. 1 behind hazard button, 2 behind dash panels, 2 under the cd player)


removing sub-clock to replace it with the navi one

wires coming from the back (navi unit)


3 wires from the display connector come back to front passenger kick panel (right door. These 3 wires are from connector B of the audio unit. You can connect to connector B behind the dash, but I found it's easier to do it here. I will post a wiring diagram later on)

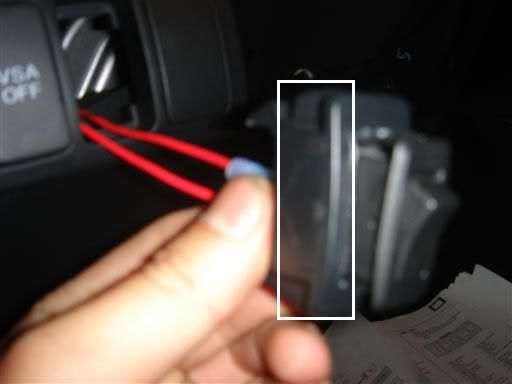
the red, black, red are the 3 wires you want

1 wire from navi unit stop here to connector to access VSS from PCM/ECM

I added two wires to connector A of the audio unit (behind dash). These two wires will connect to connector B from navi unit.


Ground wire for the navi unit and display unit

I connected the ground wire behind the dash. easiest ground location to access to.

I run the CAN wires to here (under the driver kick panel). You don't need to remove the steering wheel to access them like someone else did. They are available at this connector.

wires used: white, red, brown = shield

soldered and taped it up

I also run two wires for power from navi display connector to here (at fuse relay box - different connector). 1 of the wire is shared with the navi unit. This will power the navi unit.
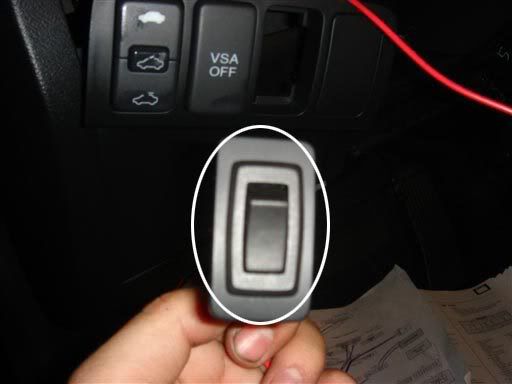
I also add a toggle switch to 1 of the 2 wire for power when car is started.


putting stuff back in (notice I have the MP3 player, so this mod works if you happen to have a MP3 player too)


After navi code. Whola! I also tested drived it today and everything is working as they are suppose to.

sneak peek on my backup camera


I used a coke bottle to make the cover for the license plate light.


$1500 for navi display + navi unit
$200 for lastest navi disc
$300 for navi sub-clock
$50 for navi unit connectors
$55 for navi display connector (custom made)
$50 for wires & miscellanous stuff.
--------
$2155 total
I spent 1 saturday & 2 long nights after coming home from work to get everything connected. I spent tonight putting everything back. I will let the pictures speak for itself.
I also run a switch to the front for the backup camera later on. I want to use this switch to allow turning on the backup camera at anytime even while driving. I will work on this mod at a later time when I have some free time.
backseat off
installed gps
navi unit
wires to navi unit through right side backseat
removing side panel
glove box removed
removing dash panels
removing center dash (there are 5 bolts total to be removed. 1 behind hazard button, 2 behind dash panels, 2 under the cd player)
removing sub-clock to replace it with the navi one
wires coming from the back (navi unit)
3 wires from the display connector come back to front passenger kick panel (right door. These 3 wires are from connector B of the audio unit. You can connect to connector B behind the dash, but I found it's easier to do it here. I will post a wiring diagram later on)
the red, black, red are the 3 wires you want
1 wire from navi unit stop here to connector to access VSS from PCM/ECM
I added two wires to connector A of the audio unit (behind dash). These two wires will connect to connector B from navi unit.
Ground wire for the navi unit and display unit
I connected the ground wire behind the dash. easiest ground location to access to.
I run the CAN wires to here (under the driver kick panel). You don't need to remove the steering wheel to access them like someone else did. They are available at this connector.
wires used: white, red, brown = shield
soldered and taped it up
I also run two wires for power from navi display connector to here (at fuse relay box - different connector). 1 of the wire is shared with the navi unit. This will power the navi unit.
I also add a toggle switch to 1 of the 2 wire for power when car is started.
putting stuff back in (notice I have the MP3 player, so this mod works if you happen to have a MP3 player too)
After navi code. Whola! I also tested drived it today and everything is working as they are suppose to.
sneak peek on my backup camera
I used a coke bottle to make the cover for the license plate light.

 great job...welcome to the navi club
05-04-2007, 08:26 AM
great job...welcome to the navi club
05-04-2007, 08:26 AM
#6
mrgold35
Did you opt for the latest 06/07 TSX Navi or is it the older 04/05 Navi? I've heard there is a upgraded module attached to the bluetooth found on TL/RL that allows XM traffic to work on the TSX 06/07 Navi.
Did you also connect a DVD player to your Navi unit?
Did you also connect a DVD player to your Navi unit?

 Just teasing.
Trending Topics
05-04-2007, 08:50 AM
#9
Three Wheelin'
Looks great!!
Not sure what these are called...

But did you use the stock ones that came with the car? or did you order them?
Could you please let me know?!
Thanks!!
Not sure what these are called...
But did you use the stock ones that came with the car? or did you order them?
Could you please let me know?!
Thanks!!
05-04-2007, 09:19 AM
#10
Racer
Thread Starter
Join Date: Sep 2005
Age: 42
Posts: 258
Likes: 0
Received 0 Likes
on
0 Posts
Originally Posted by taz98spin
Looks great!!
Not sure what these are called...
But did you use the stock ones that came with the car? or did you order them?
Could you please let me know?!
Thanks!!
Not sure what these are called...
But did you use the stock ones that came with the car? or did you order them?
Could you please let me know?!
Thanks!!
05-04-2007, 09:24 AM
#11
Three Wheelin'
Originally Posted by tuoncan
I just use the stock one and drilled a rectangular hole and push the switch through. The switch has those snap on clips where it will snap in perfectly
Thanks for letting me know!
For others, do you know what that thing is called??
Cuz I am going to put my Escort 8500's SmartCord MuteDisplay there but don't want to cut a whole through the stock one..
05-04-2007, 10:14 AM
#14
Racer
Thread Starter
Join Date: Sep 2005
Age: 42
Posts: 258
Likes: 0
Received 0 Likes
on
0 Posts
Originally Posted by vthree
what year is your car? i'm looking to do this too.. but i dont know how to keep my bluetooth.... did you install the voice command buttons?
I will try to update my wiring diagram this weekend and post it up for those who want to do this conversion.
05-04-2007, 10:19 AM
#15
Racer
Thread Starter
Join Date: Sep 2005
Age: 42
Posts: 258
Likes: 0
Received 0 Likes
on
0 Posts
Originally Posted by yungwunn911
whats the toggle switch for?
also, what were you talking about when u said, you have mp3??
congrats n teh work
also, what were you talking about when u said, you have mp3??
congrats n teh work
I might of add another switch, since I have like 3 unused wires running toward the back for the DVD player in the future.
05-04-2007, 10:23 AM
#16
Racer
Thread Starter
Join Date: Sep 2005
Age: 42
Posts: 258
Likes: 0
Received 0 Likes
on
0 Posts
Originally Posted by taz98spin
Thanks for letting me know!
For others, do you know what that thing is called??
Cuz I am going to put my Escort 8500's SmartCord MuteDisplay there but don't want to cut a whole through the stock one..
For others, do you know what that thing is called??
Cuz I am going to put my Escort 8500's SmartCord MuteDisplay there but don't want to cut a whole through the stock one..
05-04-2007, 01:01 PM
#19
Three Wheelin'
Originally Posted by vthree
where did you find your parts?
Just typed in Acura parts in google, and you'll find a bunch of dealers that sell
Acura parts.
I had to call the Acura dealer's parts department, to find exactly what I was looking for though


 05-05-2007, 01:45 PM
#24
Racer
Thread Starter
Join Date: Sep 2005
Age: 42
Posts: 258
Likes: 0
Received 0 Likes
on
0 Posts
Originally Posted by Roastpig
hey, where did u get ur camera
05-05-2007, 01:50 PM
#25
Racer
Thread Starter
Join Date: Sep 2005
Age: 42
Posts: 258
Likes: 0
Received 0 Likes
on
0 Posts
Originally Posted by sluggercz
Where do you live and can you sell the custom harnesses you built?
Since I did this already, I think it's pretty easy to create the complete custom harnesses if I have all of the connectors.
I love my navi
 at night when you turn on your light, it switches to night mode automatically. I need to play around with it to discover more features.
I also have a Ver 3.40C Navi disc (I didn't know that it's already in there when I bought the unit)
The radio unit (in perfect condition, no scratches)
and the subclock for the radio for sale if anyone interested.
 05-07-2007, 07:08 AM
#28
John Starks - The Dunk
nice job on the install....
Is that a custom job you have around the radio/nav trim....i never seen that color before. It looks like its brushed aluminum. I guess I haven't been on the site for a while if that is stock.
Is that a custom job you have around the radio/nav trim....i never seen that color before. It looks like its brushed aluminum. I guess I haven't been on the site for a while if that is stock.
05-07-2007, 08:12 PM
#30
Racer
Thread Starter
Join Date: Sep 2005
Age: 42
Posts: 258
Likes: 0
Received 0 Likes
on
0 Posts
Originally Posted by yuhoo22
nice job on the install....
Is that a custom job you have around the radio/nav trim....i never seen that color before. It looks like its brushed aluminum. I guess I haven't been on the site for a while if that is stock.
Is that a custom job you have around the radio/nav trim....i never seen that color before. It looks like its brushed aluminum. I guess I haven't been on the site for a while if that is stock.
05-07-2007, 08:16 PM
#31
Racer
Thread Starter
Join Date: Sep 2005
Age: 42
Posts: 258
Likes: 0
Received 0 Likes
on
0 Posts
Originally Posted by anthongy817
Maybe you can make it a side job to make complete custom harnesses for the non-navi to navi conversion. If you ever do, let me know!
05-07-2007, 08:27 PM
#32
Racer
Thread Starter
Join Date: Sep 2005
Age: 42
Posts: 258
Likes: 0
Received 0 Likes
on
0 Posts
Here are some additional pics before I started taking my car apart.


You would only need these 3 connectors for the navi unit and 1 for the head display unit (which can be custom made for $55). It would be nice to find all 4.
Also if you happen to get the 20 pin connector for the audio unit (the one I have to add two additional wires to it), get it to make your life easier. If not, then you will have to add the wires to it yourself.
05-07-2007, 08:29 PM
#33
Advanced
Join Date: Oct 2006
Location: Houston, TX
Age: 36
Posts: 85
Likes: 0
Received 0 Likes
on
0 Posts
Originally Posted by tuoncan
I thought it would be cool if I can do it and you guys can just buy the harness and install it to your system, but the hardest part is where can I find the neccessary connectors? haha so I don't think it's possible.
"I know we only need 4 total (3 for the dvd rom and 1 for the head unit). I paid 120 for all connectors (except XM, which we already have it in our non-navi system)."
Was it $120 for 4 connectors?
05-07-2007, 08:40 PM
#34
Racer
Thread Starter
Join Date: Sep 2005
Age: 42
Posts: 258
Likes: 0
Received 0 Likes
on
0 Posts
Originally Posted by anthongy817
Taken from your other thread:
"I know we only need 4 total (3 for the dvd rom and 1 for the head unit). I paid 120 for all connectors (except XM, which we already have it in our non-navi system)."
Was it $120 for 4 connectors?
"I know we only need 4 total (3 for the dvd rom and 1 for the head unit). I paid 120 for all connectors (except XM, which we already have it in our non-navi system)."
Was it $120 for 4 connectors?
 05-07-2007, 09:19 PM
#36
Advanced
Join Date: Oct 2006
Location: Houston, TX
Age: 36
Posts: 85
Likes: 0
Received 0 Likes
on
0 Posts
Originally Posted by tuoncan
Yea, someone was able to sale me all 4 connectors for $120, but the shipment got lost. He was able to find me a new set but without the display connector and refunded me $65 on it without me asking. A pretty nice guy. I then use those $65 to go get myself a custom made connector.
BTW. How much do you think you'll charge to create a complete harness if I were to provide the required connectors?
 05-09-2007, 08:22 PM
#39
Racer
Thread Starter
Join Date: Sep 2005
Age: 42
Posts: 258
Likes: 0
Received 0 Likes
on
0 Posts
Originally Posted by anthongy817
I see. I will contact Acura client services tomorrow and see if they are able to tell me where to purchase the connectors. I'll probably just tell them a story that my navigation was stolen including the connectors, and that the service center is having trouble sourcing the connectors to install the new navi.
BTW. How much do you think you'll charge to create a complete harness if I were to provide the required connectors?
BTW. How much do you think you'll charge to create a complete harness if I were to provide the required connectors?
05-09-2007, 08:30 PM
#40
Racer
Thread Starter
Join Date: Sep 2005
Age: 42
Posts: 258
Likes: 0
Received 0 Likes
on
0 Posts
Originally Posted by Roastpig
can you please specify the backup camera information? I am a noob on those camera and i really want to install one 
The power and ground cable can be found on connect C of your navi unit (the smallest one)
For the NAV tool, there are 6 wires on that unit. 3 wires will be ground (connect to the same wire of your camera ground wire). 1 for power (same with camera). 1 for a different power (this is also one of the wire on your connector C. This wire will have power even you don't start your car i believe. The other one only power on when you put ur car in reverse). 1 wire go to your handbrake (you only need this if you want to install a DVD player. I didn't connect this to anything, since I don't have one right now. I hope that helps a little