DIY Rear UCA (upper control arm)
 10-25-2010, 03:41 PM
#1
so i noticed a pretty bad thud on the passenger side rear when going over bumps... i was changing the rear pads yest and checked the upper control arm... there was play when i shook the arm left to right... movement and clicking in the ball and socket where the arm connects to the body of the car...
have put in an order with tim for a new one... will do a DIY with pics when it arrives...
have put in an order with tim for a new one... will do a DIY with pics when it arrives...
 10-25-2010, 05:27 PM
#2
Three Wheelin'
What a coincidence, I also replaced my passenger side rear upper control arm last weekend while changing the rotors and pads because it was making the same "thud" sound everytime I go over a bump. Found out that my rear passenger side bearing was bad and changed both hubs while I was at it.
10-26-2010, 11:01 AM
#4
Three Wheelin'
I didn't want to just replace one side with a brand new control arm so I decided to go with a used one. Ordered a set of rear upper and lower control arms from a wrecked car for a total of $40 shipped with ball joint and bushing in excellent condition. I replaced just the passenger rear upper arm for now, although I should have done both side.
Last edited by main70072; 10-26-2010 at 11:04 AM.
10-27-2010, 10:24 AM
#6
Three Wheelin'
Yeah, I kinda lucked out on the parts because I didn't expect them to be in such great condition. I figured for the price, it was worth a try. As for the hub assemblies with the bearings, those have to be new because I did not want to risk getting them used and crapping out on me anytime soon.
When is the arm coming?
When is the arm coming?
Last edited by main70072; 10-27-2010 at 10:28 AM.
Trending Topics
11-21-2010, 04:32 PM
#11
installed today... but figured out that the arm was actually fine anyway... the boot was torn and leaking grease, but the arm is fine so i will replace the boot and resell it used... anyone need a passenger side UCA?
the thud i traced down to a loose locking nut on the lower control arm...
will post pics of the DIY...
the thud i traced down to a loose locking nut on the lower control arm...
will post pics of the DIY...
11-21-2010, 05:45 PM
#12
DIY w/ pics
step one is of course to jack up the car and apply jack stands where appropriate and remove the wheel...
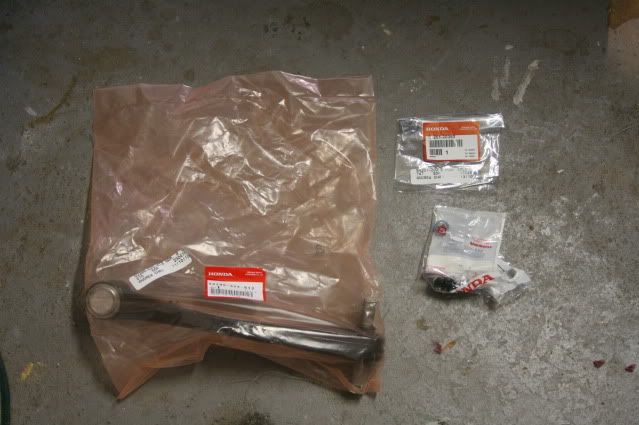
here are all the part #a.
replacement arm: 52390-SZ5-013
new castle nut: 90321-SE0-000
cotter pin: 94201-20350
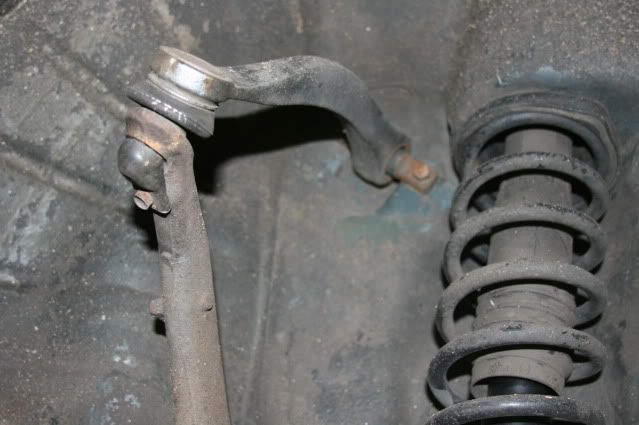
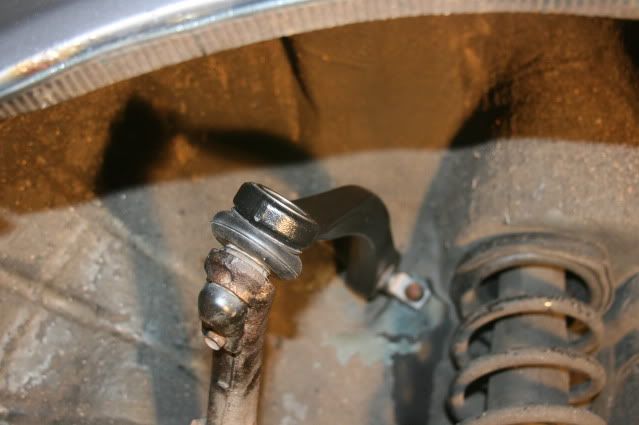
here is a view of the arm that you will be removing...
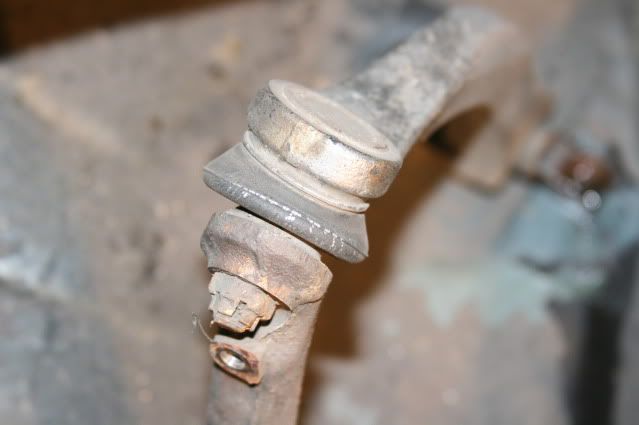
First remove the plastic protective cap that is covering the castle nut on the ball joint... (10mm) and then remove the old cotter pin... i was able to unhook the pin and tap it out... if it is really seized in there you can cut the pin...
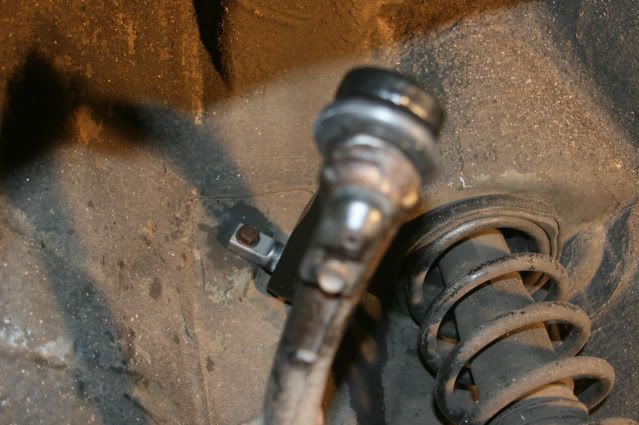
after you get the cotter pin off, unscrew the castle nut halfway (15mm or 17mm i forgot)... keep it halfway on and do not completely remove it... helps if you have an impact gun...
take a few good wacks with a hammer on the control arm and knuckle to loosen it a bit... (there are points on the arm and knuckle where you can strike the hammer... do not wail on the ball joint or any other spot than is not designated to take impact... if you don't know where to strike, skip this step...
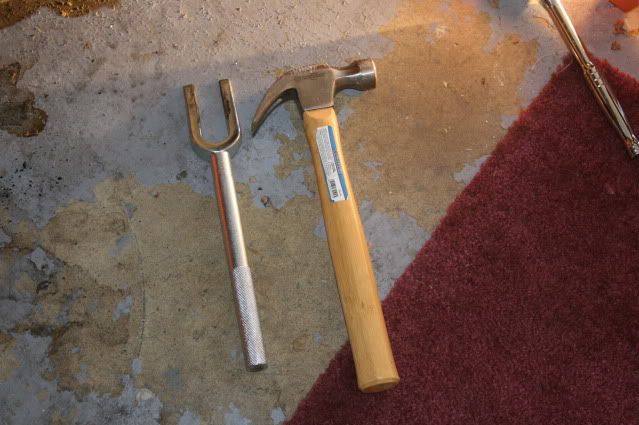
you will need a ball joint separator or ball joint fork...
before you stick the fork and separate the ball joint from the knuckle, place the jack underneath the knuckle to catch the assembly when it separates... after it separates, remove the castle nut and it will be free...

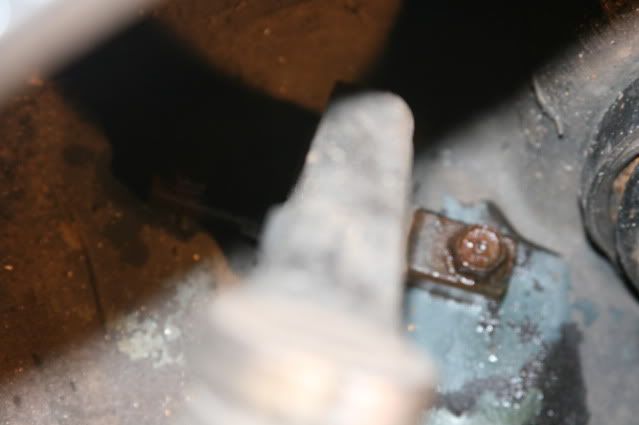
now remove the two bolts that hold the arm to the chassis... those should be 14mm IRRC... i sprayed them with some WD40 or PB Blaster at the start to let them set in and break loose easier... it helps if you have an impact gun...
put on the new arm in the reverse order...
Torque specs to reinstall:
2 Flange bolts for the arm to the chassis is 28 ft/lbs
Castle nut is 35 ft/lbs
took me 40 mins start to finish...
feel free to ask any questions...
here are all the part #a.
replacement arm: 52390-SZ5-013
new castle nut: 90321-SE0-000
cotter pin: 94201-20350
here is a view of the arm that you will be removing...
First remove the plastic protective cap that is covering the castle nut on the ball joint... (10mm) and then remove the old cotter pin... i was able to unhook the pin and tap it out... if it is really seized in there you can cut the pin...
after you get the cotter pin off, unscrew the castle nut halfway (15mm or 17mm i forgot)... keep it halfway on and do not completely remove it... helps if you have an impact gun...
take a few good wacks with a hammer on the control arm and knuckle to loosen it a bit... (there are points on the arm and knuckle where you can strike the hammer... do not wail on the ball joint or any other spot than is not designated to take impact... if you don't know where to strike, skip this step...
you will need a ball joint separator or ball joint fork...
before you stick the fork and separate the ball joint from the knuckle, place the jack underneath the knuckle to catch the assembly when it separates... after it separates, remove the castle nut and it will be free...
now remove the two bolts that hold the arm to the chassis... those should be 14mm IRRC... i sprayed them with some WD40 or PB Blaster at the start to let them set in and break loose easier... it helps if you have an impact gun...
put on the new arm in the reverse order...
Torque specs to reinstall:
2 Flange bolts for the arm to the chassis is 28 ft/lbs
Castle nut is 35 ft/lbs
took me 40 mins start to finish...
feel free to ask any questions...
Last edited by KaMLuNg; 11-21-2010 at 05:49 PM.
 11-21-2010, 09:04 PM
#14
Three Wheelin'
Nice write up and pics. I would like to add that the torque specs for the 2.5TL is the same. Also, if spindle nut was taken off for any reason, that should be torque to 134ft/lbs.

Thread
Thread Starter
Forum
Replies
Last Post
cycdaniel
1G TSX Performance Parts & Modifications
8
12-17-2019 10:58 AM
marcelft
2G TL (1999-2003)
30
07-10-2018 06:17 PM
nuldabz
3G TL Tires, Wheels & Suspension
3
09-03-2015 05:49 PM