
DIY: 1st Gen Acura RL Instrument Cluster LED Bulbs


Advanced
Joined: Oct 2007
Posts: 60
Likes: 0

and chitownRLer, I sent you a pm, but to anyone wanting the xenon white LEDs im selling mine, only been on for a couple months so lots of life left on them.

Cruisin'
Joined: Mar 2008
Posts: 21
Likes: 0
From: Toronto, ON
I saw this LED earlier - http://www.superbrightleds.com/specs/74.html
The third one, xHP3 SMD, have LEDs on the side and the measurements are really close to those of the 3-LED ones in the original post (from ebay). These are actually slightly smaller. Even though incandescent #74 bulbs don't fit, I'm wondering if these would since the size is so close. They have the 2 LEDs on the side so it should light up the cluster much more evenly, if they fit of course. I saw this type of LED used on a 2nd gen Legend cluster, and it was lit up beautifully, no spotting.
Anyone have any insight on if this LED would fit our clusters?
Advanced
Joined: Oct 2007
Posts: 60
Likes: 0
omg im so pissed.
so i got the clear bulbs from a local shop that specializes in bulbs, come home to put them in and wouldn't ya know it....
because the damn power tilt\telescope is fubar I couldn't get the gauge bezel out, then I was thinking to remove the top part of the steering column cover but didn't want to pull too hard and break it?
any idea if I just have to pull the cover off?
(btw selling the LEDs now for $15 shipped!! ding ding)
Instructor
Joined: Dec 2006
Posts: 213
Likes: 0
omg im so pissed.
so i got the clear bulbs from a local shop that specializes in bulbs, come home to put them in and wouldn't ya know it....
because the damn power tilt\telescope is fubar I couldn't get the gauge bezel out, then I was thinking to remove the top part of the steering column cover but didn't want to pull too hard and break it?
any idea if I just have to pull the cover off?
(btw selling the LEDs now for $15 shipped!! ding ding)
so i got the clear bulbs from a local shop that specializes in bulbs, come home to put them in and wouldn't ya know it....
because the damn power tilt\telescope is fubar I couldn't get the gauge bezel out, then I was thinking to remove the top part of the steering column cover but didn't want to pull too hard and break it?
any idea if I just have to pull the cover off?
(btw selling the LEDs now for $15 shipped!! ding ding)
Advanced
Joined: Oct 2007
Posts: 60
Likes: 0
k got it in woot! took some struggling and swearing but its all good.
and was expecting to get a whiteish output, but guess there is an amber film somewhere in the cluster. well, im happy though. thanks GSRL and all who posted write ups
and was expecting to get a whiteish output, but guess there is an amber film somewhere in the cluster. well, im happy though. thanks GSRL and all who posted write ups

Instructor
Joined: Mar 2006
Posts: 198
Likes: 0
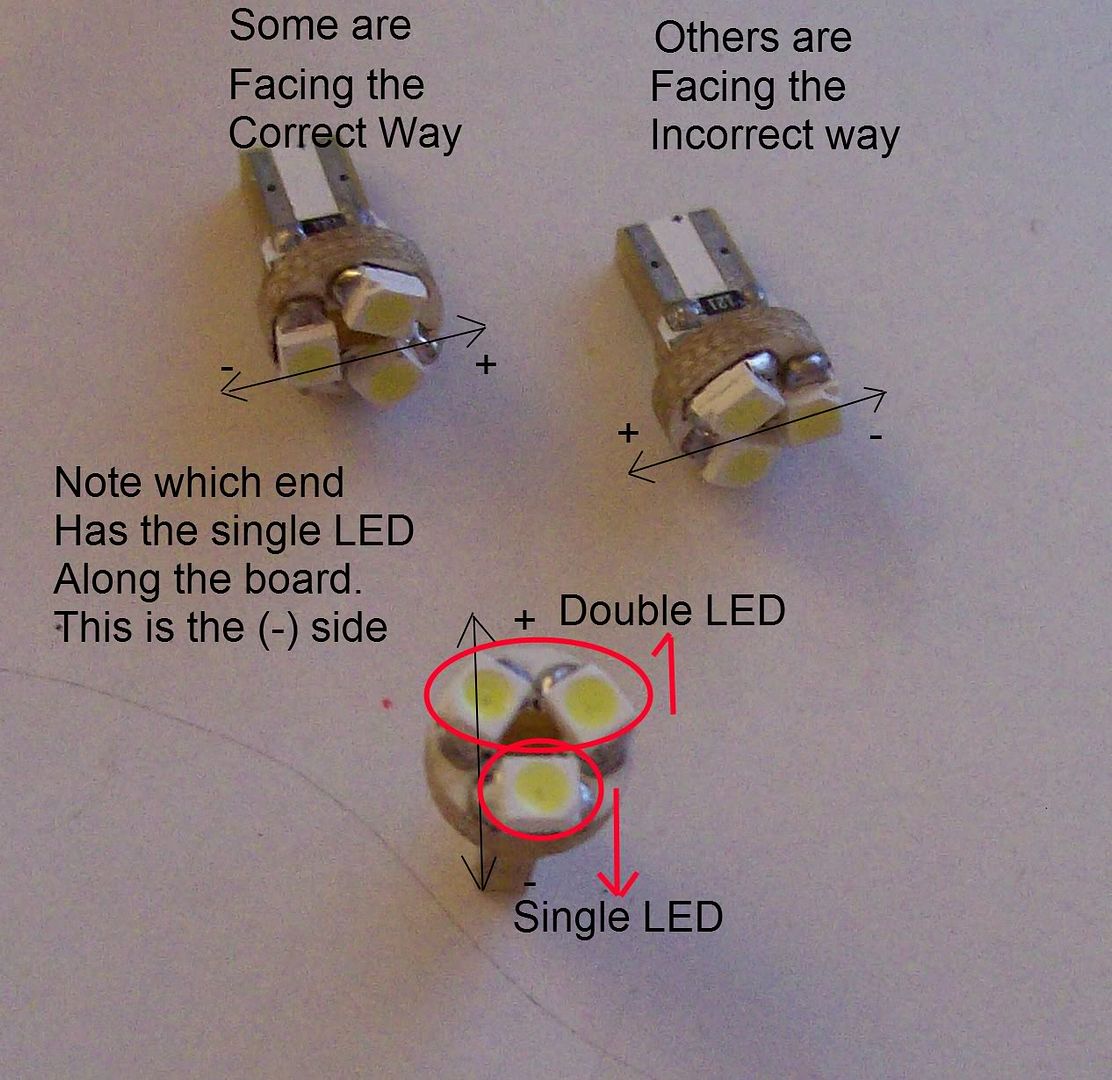
I had this done over the weekend. I paid mechanic $60 to do it since it was a very "tedious" work. I wanted to help everyone out by pointing out this particular thread. Jerm1386's post would have been very handy with regards to polarity. Use the pictures to determine the polarity as SOME OF THEM ARE NOT MARKET CORRECTLY! This will save you from screwing the backs of cluster to plug it in to dash to see which bulbs are not lighting up, etc...
My mechanic did it by trial and error but this thread would've been very handy! Will save you tons of time!
My mechanic did it by trial and error but this thread would've been very handy! Will save you tons of time!
ok, here's something to help everyone who's doing this: pictures and a 'which direction do I put the darn things in?' guide
First off, the LED's. If you buy them from the seller that 97_RLer recommended, as i did, there are some that are facing the right way with respect to the little (+) symbol on the bottom of each LED, and some that are not. You can figure out which is which (which side is the positive vs negative) by comparing your LED's to this picture. I strongly recommend using a marker to indicate which side is positive (red) and which is negative (usually black). The lines with the arrows indicate the direction the longer, insert board is polarized.
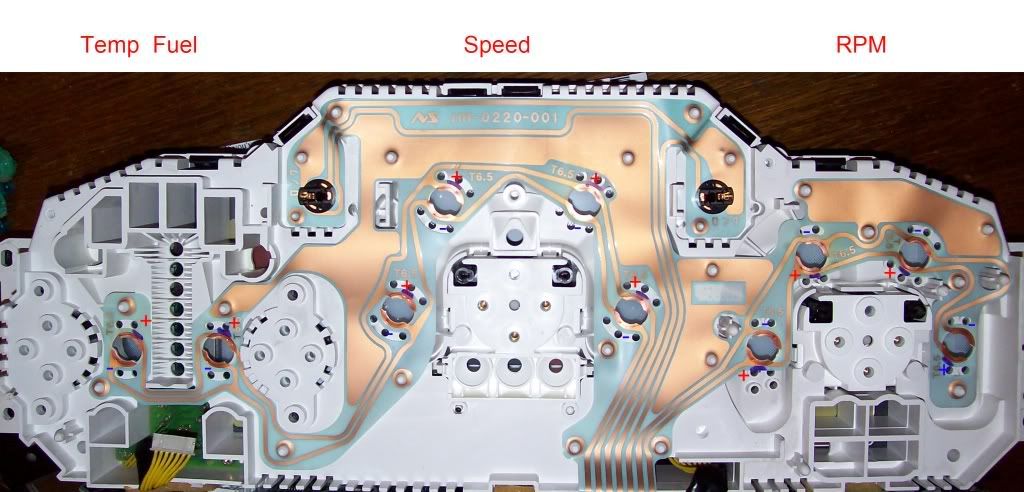
This second picture is of the place where the LED's go. For instructions on how to get to this phase, see the original instructions (here) and the PDF version of the service manual (here) . Insert the LED's so that the positive terminals from the first picture (now inserted into the holders) are in contact with the parts of the sheet that are labeled as positive in the second picture. I got 10 for 10 on the first try after some circuit tracing.
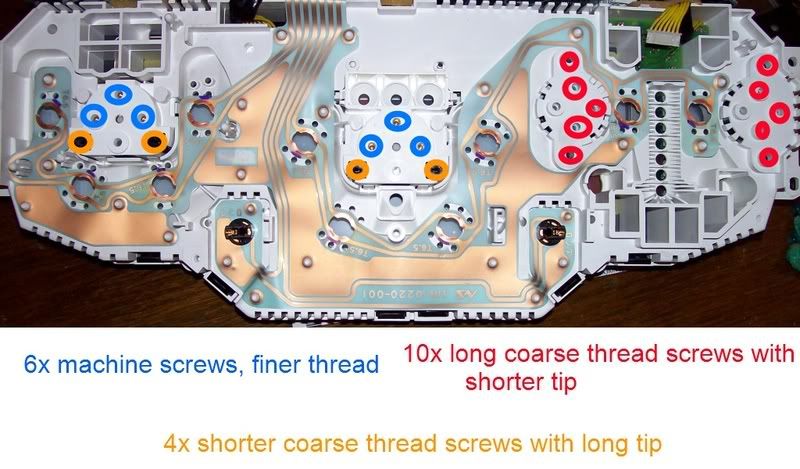
For your convenience, I have included a color-coded diagram of which screws go where. Take it easy on the coarse thread ones (orange and red), use a #2-#3 philips and make sure not to strip them. I used a new leatherman wave and it was pretty much perfect. note that in this picture, the rear of the console is shown oriented upside-down
First off, the LED's. If you buy them from the seller that 97_RLer recommended, as i did, there are some that are facing the right way with respect to the little (+) symbol on the bottom of each LED, and some that are not. You can figure out which is which (which side is the positive vs negative) by comparing your LED's to this picture. I strongly recommend using a marker to indicate which side is positive (red) and which is negative (usually black). The lines with the arrows indicate the direction the longer, insert board is polarized.
This second picture is of the place where the LED's go. For instructions on how to get to this phase, see the original instructions (here) and the PDF version of the service manual (here) . Insert the LED's so that the positive terminals from the first picture (now inserted into the holders) are in contact with the parts of the sheet that are labeled as positive in the second picture. I got 10 for 10 on the first try after some circuit tracing.
For your convenience, I have included a color-coded diagram of which screws go where. Take it easy on the coarse thread ones (orange and red), use a #2-#3 philips and make sure not to strip them. I used a new leatherman wave and it was pretty much perfect. note that in this picture, the rear of the console is shown oriented upside-down
Instructor
Joined: Mar 2006
Posts: 198
Likes: 0
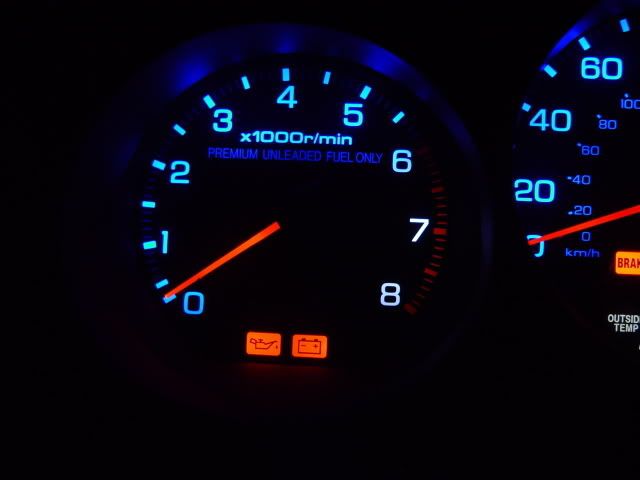
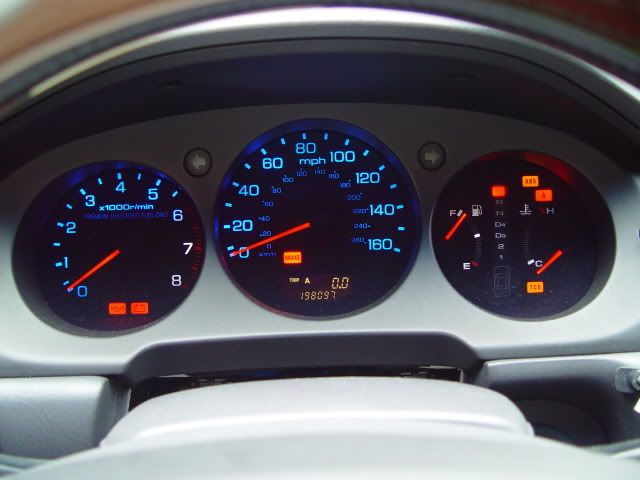
Also, I must mention the difference is night and day....for such a small thing, it makes a huge difference. It felt like I was inside a new vehicle when your dash is lighting up all white at night! But now the ac/radio console loooks like crap compared to the dash, LOL.....
But highly recommend everyone get this done if you can...makes a world of difference at night!
But highly recommend everyone get this done if you can...makes a world of difference at night!
Cruisin'
Joined: Mar 2008
Posts: 21
Likes: 0
From: Toronto, ON
yeah the console doesn't look that great beside the cluster anymore. There are LEDs that can be put in the console, it's pretty easy to get behind the climate control but it looks like the radio lights are gonna be hard to get to. Also the console will have more of a blue tint as the face that the light shines through is blue (giving it the green color when mixed with the yellow incandescent bulbs). It's worth a shot though if anyone can figure out how to get to the bulbs behind the radio.
Instructor
Joined: Mar 2006
Posts: 198
Likes: 0
Thanks master, but i think i replied...i ended up purchasing them from that warden guy on ebay and paid mechanic to put it on.


8th Gear
Joined: May 2009
Posts: 8
Likes: 0
if anyone is still interested just search ebay for 2pcs 24 T6.5 Instrument Panel 3 LED Bulbs(Blue/White),
I just bought 3 sets of blue and 1 set of white for $14.76 (shipping included)
I just bought 3 sets of blue and 1 set of white for $14.76 (shipping included)
Thread Starter
Ultimate DIYer
Joined: Mar 2007
Posts: 99
Likes: 17
From: Dallas, TX
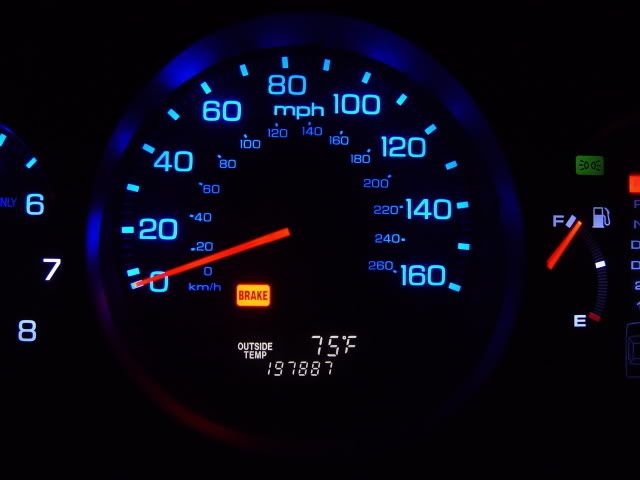
There is an answer in the thread but you missed I think. The blue LEDs cannot illuminate the red zones in the gauges unlike white LEDs. If I'm doing the instrument gauge bulb conversion again, I would go all white LEDs now.
Just my two cents!
97_RLer
Just my two cents!
97_RLer

1st Gear
Joined: Oct 2009
Posts: 1
Likes: 0
I purchased the same bulbs and they were too fat to fit in the socket or the hole in the panel. I was really disappointed and don't understand why my instrument cluster is different. I have a 2002 MDX with nav. Any ideas, I would really like to make this modification.

1st Gear
Joined: Dec 2009
Posts: 1
Likes: 0
97_RLer
Warden_jp2002 replied to me today (Dec 05, 2009) that the T6.5 3-LED bulbs are # 24 not # 37, and wrote thre cross reference number as 74. Are you sure the T6.5 led bulbs are number 37? Also your pictures of the 3-LED light bulbs are different from his pictures for the number 37. Thanks in advance for your response.
Warden_jp2002 replied to me today (Dec 05, 2009) that the T6.5 3-LED bulbs are # 24 not # 37, and wrote thre cross reference number as 74. Are you sure the T6.5 led bulbs are number 37? Also your pictures of the 3-LED light bulbs are different from his pictures for the number 37. Thanks in advance for your response.


Cruisin'
Joined: Aug 2010
Posts: 23
Likes: 1
Hey did you ever get that fixed? I just put mine in earlier and one of them blinks every so often. Gonna take it apart again tomorrow and see if it's just loose (I hope that's it).
Cruisin'
Joined: Aug 2010
Posts: 23
Likes: 1

7th Gear
Joined: Oct 2010
Posts: 7
Likes: 0
regular gauge bulbs
I was told by Acura that the instrument panel bulbs could not be bought aftermarket. Only available through Acura or Honda. Total price for the bulbs is $250! Since I have not removed the instrument panel to see the bulbs for myself, I wonder if it is true. Does anybody know if the bulbs are available other than Acura? I think replacing them with the same incandesent bulbs again would be fine.
Cruisin'
Joined: Aug 2010
Posts: 23
Likes: 1
I was told by Acura that the instrument panel bulbs could not be bought aftermarket. Only available through Acura or Honda. Total price for the bulbs is $250! Since I have not removed the instrument panel to see the bulbs for myself, I wonder if it is true. Does anybody know if the bulbs are available other than Acura? I think replacing them with the same incandesent bulbs again would be fine.
Here are the replacement bulbs for stock:
http://www.rockauto.com/catalog/x,ca...lectrical-Lamp
the LED ones, you can search for the seller's name (on first page of this thread) on ebay .

10th Gear
Joined: May 2010
Posts: 10
Likes: 0
Installing LED bulbs in gauges need help!!!!
Hey guys, I am in the process of installing the T6.5 led bulbs. I got the board removed already and I see the 10 bulbs that I am suppose to be replacing. What I don't get is how can those T6.5 bulbs go in to the hole and stay there tight. Mine seems to want to fall into the hole. I have already figured out the polarity on the LEDs. Can someone show me a pictures of the LEDs install without the back cover on please? Thanks in advance.

10th Gear
Joined: May 2010
Posts: 10
Likes: 0
If it's the T6.5 from Warden then it should fit. Just remember to check the polarity first because some are wrong. And be very carefully with those 20 screws....not too loose.....not too tight. I just finished mine and I love it. I went with white on the 2 gauge on the side and blue in the middle.
Fuck! I install the white LED and when I turned it on the Milage is not showing up and the temp is not working too! The LED is working fine. BTW it smell like something is burning too! Man i hope I didn't fry the cluster!!!! Any idea? thx.
update. The temp is working now but the mileage (where the LCD in the speedo show exactly the mileage of the car, trip A, B, and the outside temp) is not showing up! help plz, damn man the cluster is $500! Why me!!!
how is the mileages recorded? From the ECU or from the cluster itself? 96 RL. Damn I should have paid the mechanic to do it for me, stupid me! I'm planning to buy a used cluster and hopefully I can get the exact mileage back.
Damn I couldn't find any used cluster, I looked at the acuraoempart.c but I couldn't find it. Does any one know the model number for a 96 RL cluster?BTW is it legal to drive with a broken odometer? I've checked with CA DMV website and it didn't say anything about a broken odometer.
Banned
Joined: May 2010
Posts: 3,138
Likes: 113
From: Charlotte, NC
I like this look better than the all white as it updates the gauges to look more inline to the current Acura gauges. Great job. Really updates the gauges. Question... Why didnt you go ahead and update the heating/air/audio stack to LED whilr you were in there?
Banned
Joined: May 2010
Posts: 3,138
Likes: 113
From: Charlotte, NC
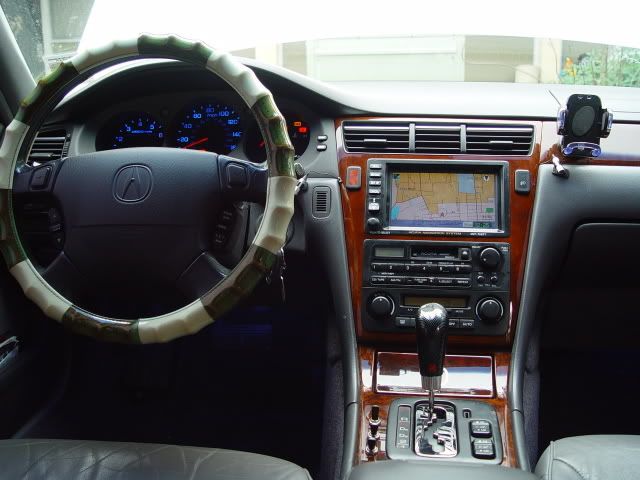
Why do you have that awful steeringwheel cover on there? U can spend money on leds but not a leather wheel cover?

3rd Gear
Joined: Mar 2009
Posts: 3
Likes: 1
3.5 RLv-tec: Did you find a new cluster? I just change my dashboard to LED's, and the speedometer is showing about 15 mph over my driving speed. I'm going to take it apart this week and try to re-adjust the screws. Good luck finding a cluster.
Willhiro
Willhiro