Diy icebox intake acura cl 3.0
 05-03-2014, 08:58 PM
#1
Advanced
Thread Starter
Diy icebox intake acura cl 3.0
Since I bought my 98 CL 3.0 in NOV ive been looking on the boards for mods. Saw the CTE ICEBOX DIY IN THE INTEGRA forums but couldnt find one for our cars.. so I made it myself and did a wright up for anyone else who wants to follow.
Below is the materials list: (LOWES & PARTS EXPRESS ONLINE)
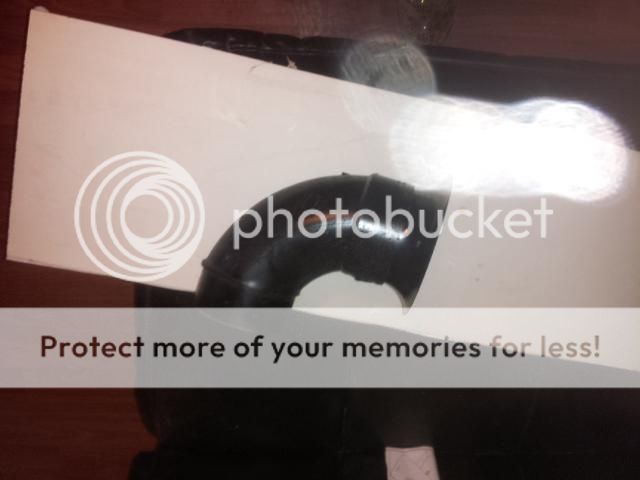
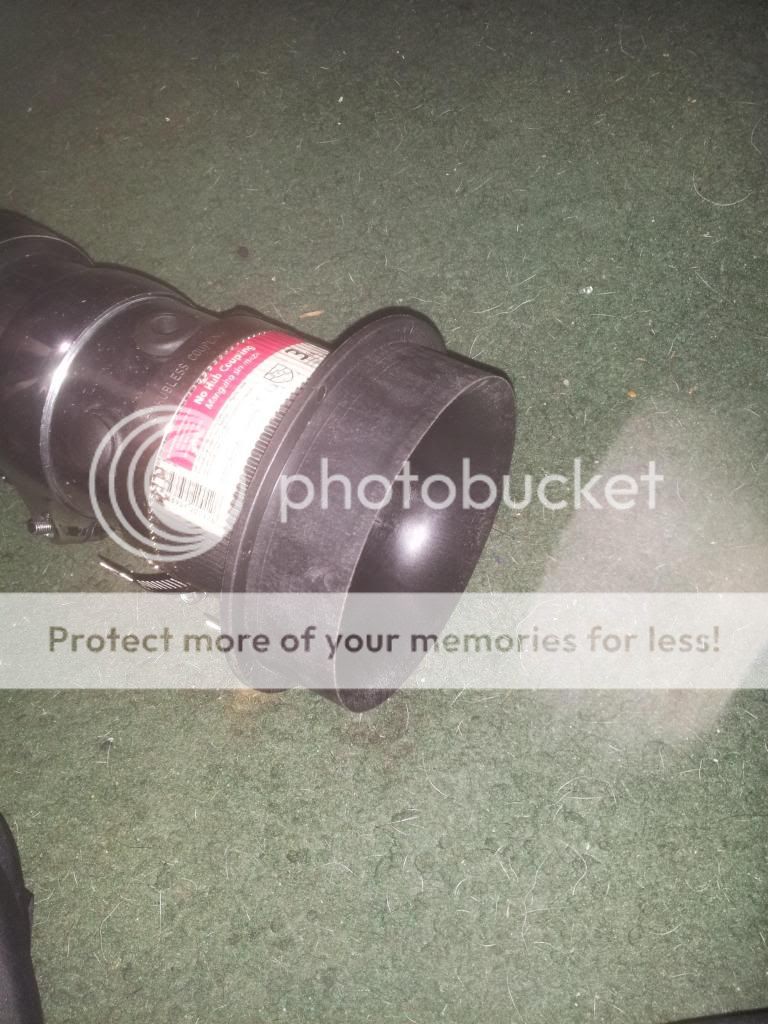
1 - 4" thin-walled 90� PVC street elbow ($4.29)
1 - 4" to 3" rubber transition coupler ($10.29ea)
1 - 6-1/2 bellmouth 4" diameter x 2" long speaker port Precision Port PSP-4IF 4" Inside Flare for Port Tube(this part serves as the air horn) ($4.40) http://www.parts-express.com/precisi...-tube--268-377
WHATS COOL ABOUT THIS PART IS I GOT A FREE DOUBLE SIDED(FLAT AND PHILLIPS) SCREW DRIVER WITH THE ORDER!!
PVC TO ABS cement ($4.47) HOME DEPOT
black paint (flat or satin) ($3.99 estimated price)
So the cost is around $28 for all the materials.
Intake tool list:
Screw drivers: flat and Philips
12mm and 14mm socket wrench and extension
12mm and 14mm wrench
Drill: electric or cordless
Drill bits: ?" and 3/8"
Intake assembly instructions:
Jack up the front of car and support the car with jack stands.
Remove the lid from airbox and remove the air filter from intake tube.
Remove the right front wheel.
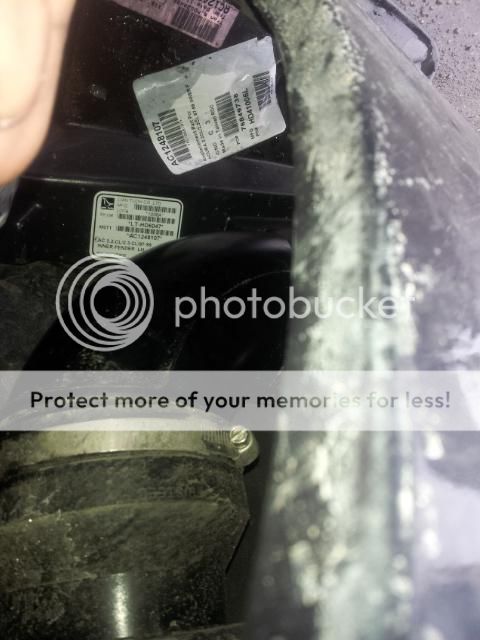
Remove the screws from the front half of the right side inner fender liner and pull down liner
Remove stock resonator. Should be 3 bolts 1 up top and 2 at the bottom (see guide)
Glue the speaker port to the larger end of the 4" elbow.. it will fit like it was made to be there.
Paint the tubing with flat black paint (optional).
Pull airbox up slightly and push the 4" to 3" coupler through the bottum of the fender and connect to air box.
If your by your self use your left hand to hold coupler in place while your using your chin to push the box down while tightening the screws. You want the coupler to be snug to the buttom of the box and tight. Or you can get your friend to help.
Attach the 90 degree PVC street elbow to the 4" buttom of the coupler.
You can.. I didnt as of yet.. Drill a 1/4" drain hole in the bottom of the 90? PVC Street elbow. This hole will allow water to drain in the event that water enters the intake tube.
Reinstall the inner fender liner.
Reinstall the front wheel.
Reinstall the air filter and the lid to the airbox.
Remove the jack stands and lower the car to the ground.
Now you can stop there and with the stock flat panel filter you should be fine.. but I wanted to be extra..
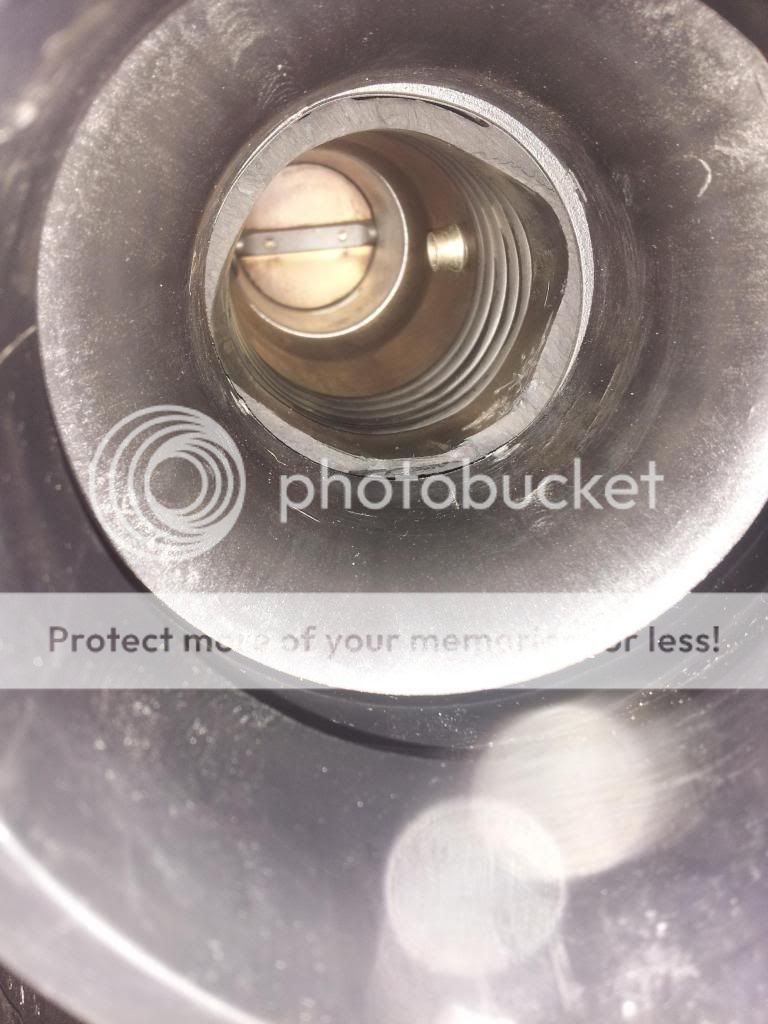
After looking at ct engineering tsx icebox i realize that the top of the tsx airbox lid where it goes into the intake arm also has a velocity stack..
So i figured let me try to continue.. and god knows how many weeks have gone by trying to get this thing right, first i tried measuring it and looking to see if any cone cone filter will work.. but all are too big for the stock box and or any vstack on the market..
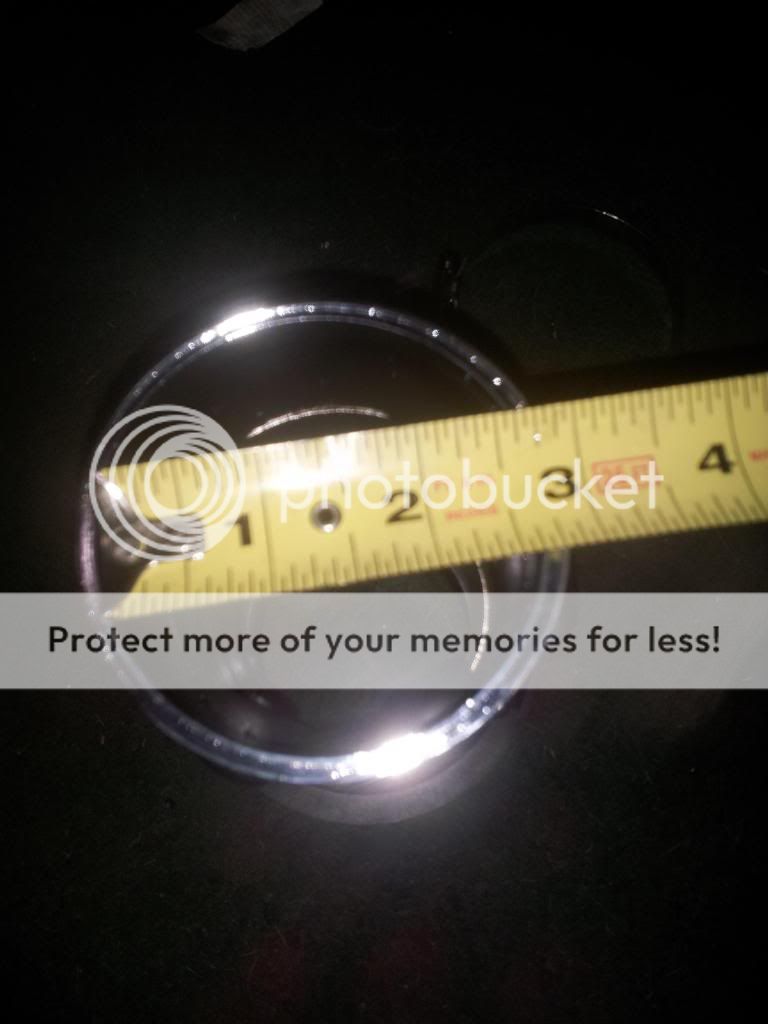
So i called up cte and asked them the dimensions of there vstack, Nate over there emailed me back , its actual size is 4.25 in diameter with a bell size of 4" and 3 inch flange outlet..
so i ordered it.
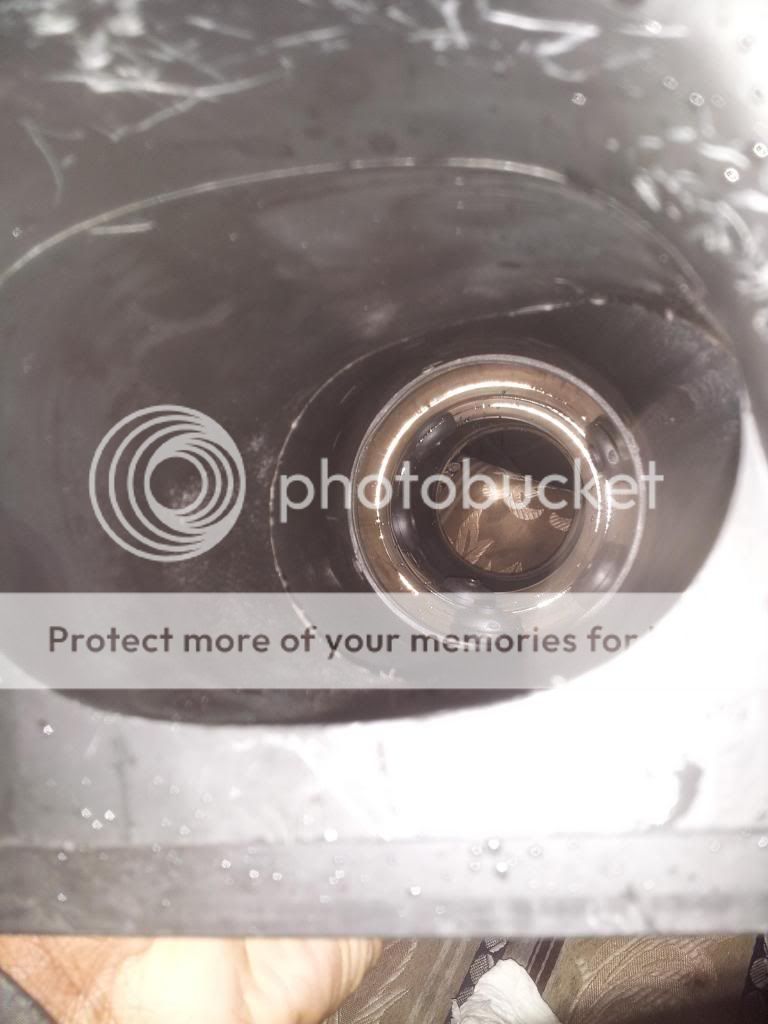
However after getting the vstack and trying to fit it in the box there was no luck, until today by accident when i was taking apart the whole thing so i can measure the area and construct my own box out of aluminum and fit a pod filter with the vstack in there, I saw that the vstack can fit in the 4" to 3" coupler that I got from lowes.
Then I saw that the 3" side can fit over the airbox outlet, so i said hmm if i get another 4" to 3" reducer I can fab something together..
Also looking at the stock arm on the 3.0 it measures about 3" outside diameter but the ID is acutally 2" very restrictive.. the specter pipes couplers and ct vstack has 2.75 ID so alot more air can pass through to the throttle body.
stock

specter:
this is how the final product looked before the specter parts.. I cut the stock arm in half to make it work.. not recommended if you dont have measuring tools
and inside see how restrictive it is. almost 1/4 inch immediate reduction after vstack
Supplies:
CT engineering Velocity stack $22 shipped
3" no hub connector $3 lowes
4" to 3" coupler $10 lowes
2: 3" Specter vacuum pipe. Autozone $10.99 ea = $21+tax
Specter collar pipe connector. its usually $10 but i had one already from a previous pipe
Specter 3" to 2" reducer.$7.99 autozone
vacuum hoses. $1.25 each for a foot
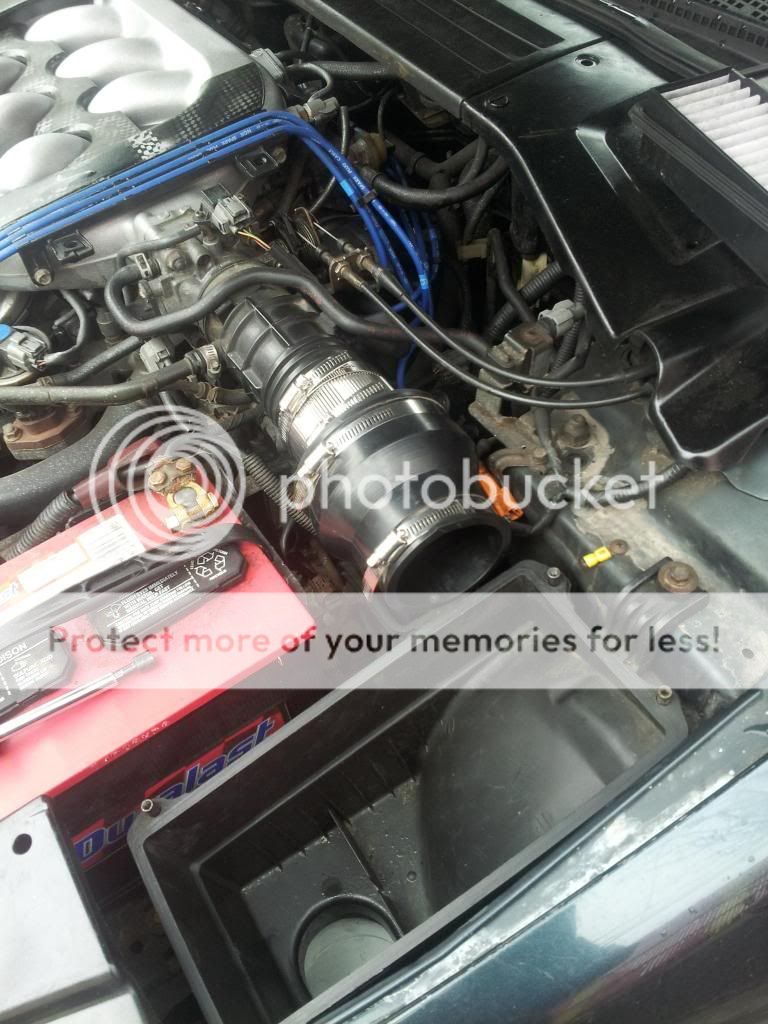
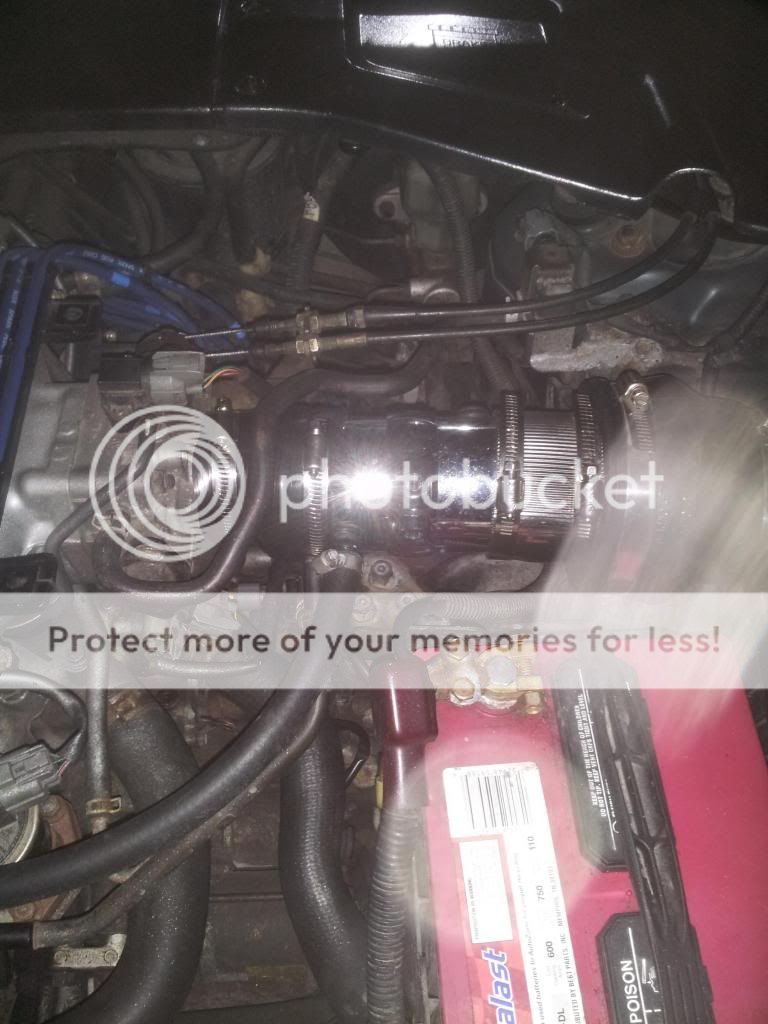
1. Disconnect and remove the stock arm.
2. Place the 3" to 2" reducer on the throttle body.
3. Connect the two vacuum pipes together with the collar. And have 3 of vacuum holes facing one direction and the other facing the opposite
4. Connect the vacuum pipes to the 3" side of the reducer.
5. connect the 3" no hub connecter to the other end of the reducer. make sure everything is as flush as possible becuase its a tight fit.
6. then place the velocity stack in the 4" side of the coupler and tighten..
7. Then place the flange of the vstack on the 3" no hub connector other end with the first end already connected to the new intake arm.
so much wider
8. then place airbox lid outlet on the 3" side of the coupler everything should be connected and tighten..
drop in a nice k&n flat panel filter, and viola.. here the whistle sounds of DIY ICE BOX.
will place a better pic tommorow
so much more space inside the arm
this is the width of the cte vstack thats inside my intake arm.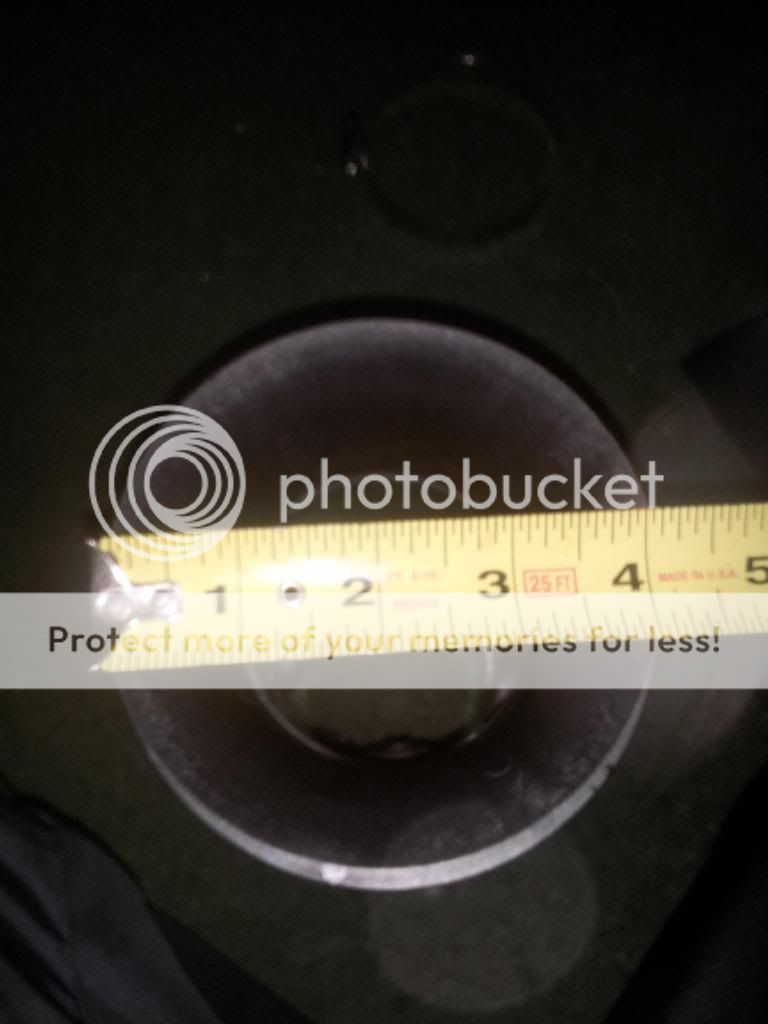
TOTAL FOR ME FOR THE PROJECT
1ST PART: $28
2ND PART: $77
TOTAL:$105 (Still way cheaper than the actual ice box.. and the second part is just my addition. you can stop with just the first part of the mod.)
Once i get my k&n flat panel filter the price goes up another $50 but still cheaper than most intakes.
My take on the whole set up you really start to feel it at 4k and up.. the pull of the vehicle.. and you definitely hear the difference from stock.. i dont know how it sounds compared to other CAI but It growls..
Using the torque app I was able to test the temp of the intake with just the 1st stage and the 2nd stage.. didn't have the app when it was stock so no earlier results but maybe someone can test..
Usually idle intake temp was sitting at 140 degrees f about 60 deg c.
1st stage: i was able to get it around 40 degrees c that's the lowers i saw it that 104 deg F.
2ND STAGE: I got it down to a whopping 91 deg F WHICH IS AROUND 32 DEG C.
So changing the piping from the stock arm and adding the second velocity stack dropped the temp 13 deg lower than it was before.
Below is the materials list: (LOWES & PARTS EXPRESS ONLINE)
1 - 4" thin-walled 90� PVC street elbow ($4.29)
1 - 4" to 3" rubber transition coupler ($10.29ea)
1 - 6-1/2 bellmouth 4" diameter x 2" long speaker port Precision Port PSP-4IF 4" Inside Flare for Port Tube(this part serves as the air horn) ($4.40) http://www.parts-express.com/precisi...-tube--268-377
WHATS COOL ABOUT THIS PART IS I GOT A FREE DOUBLE SIDED(FLAT AND PHILLIPS) SCREW DRIVER WITH THE ORDER!!
PVC TO ABS cement ($4.47) HOME DEPOT
black paint (flat or satin) ($3.99 estimated price)
So the cost is around $28 for all the materials.
Intake tool list:
Screw drivers: flat and Philips
12mm and 14mm socket wrench and extension
12mm and 14mm wrench
Drill: electric or cordless
Drill bits: ?" and 3/8"
Intake assembly instructions:
Jack up the front of car and support the car with jack stands.
Remove the lid from airbox and remove the air filter from intake tube.
Remove the right front wheel.
Remove the screws from the front half of the right side inner fender liner and pull down liner
Remove stock resonator. Should be 3 bolts 1 up top and 2 at the bottom (see guide)
Glue the speaker port to the larger end of the 4" elbow.. it will fit like it was made to be there.
Paint the tubing with flat black paint (optional).
Pull airbox up slightly and push the 4" to 3" coupler through the bottum of the fender and connect to air box.
If your by your self use your left hand to hold coupler in place while your using your chin to push the box down while tightening the screws. You want the coupler to be snug to the buttom of the box and tight. Or you can get your friend to help.
Attach the 90 degree PVC street elbow to the 4" buttom of the coupler.
You can.. I didnt as of yet.. Drill a 1/4" drain hole in the bottom of the 90? PVC Street elbow. This hole will allow water to drain in the event that water enters the intake tube.
Reinstall the inner fender liner.
Reinstall the front wheel.
Reinstall the air filter and the lid to the airbox.
Remove the jack stands and lower the car to the ground.
Now you can stop there and with the stock flat panel filter you should be fine.. but I wanted to be extra..
After looking at ct engineering tsx icebox i realize that the top of the tsx airbox lid where it goes into the intake arm also has a velocity stack..
So i figured let me try to continue.. and god knows how many weeks have gone by trying to get this thing right, first i tried measuring it and looking to see if any cone cone filter will work.. but all are too big for the stock box and or any vstack on the market..
So i called up cte and asked them the dimensions of there vstack, Nate over there emailed me back , its actual size is 4.25 in diameter with a bell size of 4" and 3 inch flange outlet..
so i ordered it.
However after getting the vstack and trying to fit it in the box there was no luck, until today by accident when i was taking apart the whole thing so i can measure the area and construct my own box out of aluminum and fit a pod filter with the vstack in there, I saw that the vstack can fit in the 4" to 3" coupler that I got from lowes.
Then I saw that the 3" side can fit over the airbox outlet, so i said hmm if i get another 4" to 3" reducer I can fab something together..
Also looking at the stock arm on the 3.0 it measures about 3" outside diameter but the ID is acutally 2" very restrictive.. the specter pipes couplers and ct vstack has 2.75 ID so alot more air can pass through to the throttle body.
stock
specter:
this is how the final product looked before the specter parts.. I cut the stock arm in half to make it work.. not recommended if you dont have measuring tools
and inside see how restrictive it is. almost 1/4 inch immediate reduction after vstack
Supplies:
CT engineering Velocity stack $22 shipped
3" no hub connector $3 lowes
4" to 3" coupler $10 lowes
2: 3" Specter vacuum pipe. Autozone $10.99 ea = $21+tax
Specter collar pipe connector. its usually $10 but i had one already from a previous pipe
Specter 3" to 2" reducer.$7.99 autozone
vacuum hoses. $1.25 each for a foot
1. Disconnect and remove the stock arm.
2. Place the 3" to 2" reducer on the throttle body.
3. Connect the two vacuum pipes together with the collar. And have 3 of vacuum holes facing one direction and the other facing the opposite
4. Connect the vacuum pipes to the 3" side of the reducer.
5. connect the 3" no hub connecter to the other end of the reducer. make sure everything is as flush as possible becuase its a tight fit.
6. then place the velocity stack in the 4" side of the coupler and tighten..
7. Then place the flange of the vstack on the 3" no hub connector other end with the first end already connected to the new intake arm.
so much wider
8. then place airbox lid outlet on the 3" side of the coupler everything should be connected and tighten..
drop in a nice k&n flat panel filter, and viola.. here the whistle sounds of DIY ICE BOX.
will place a better pic tommorow
so much more space inside the arm
this is the width of the cte vstack thats inside my intake arm.
TOTAL FOR ME FOR THE PROJECT
1ST PART: $28
2ND PART: $77
TOTAL:$105 (Still way cheaper than the actual ice box.. and the second part is just my addition. you can stop with just the first part of the mod.)
Once i get my k&n flat panel filter the price goes up another $50 but still cheaper than most intakes.
My take on the whole set up you really start to feel it at 4k and up.. the pull of the vehicle.. and you definitely hear the difference from stock.. i dont know how it sounds compared to other CAI but It growls..
Using the torque app I was able to test the temp of the intake with just the 1st stage and the 2nd stage.. didn't have the app when it was stock so no earlier results but maybe someone can test..
Usually idle intake temp was sitting at 140 degrees f about 60 deg c.
1st stage: i was able to get it around 40 degrees c that's the lowers i saw it that 104 deg F.
2ND STAGE: I got it down to a whopping 91 deg F WHICH IS AROUND 32 DEG C.
So changing the piping from the stock arm and adding the second velocity stack dropped the temp 13 deg lower than it was before.
 05-24-2014, 01:21 PM
#2

It's pretty cool what you did with this. I'm considering doing at least the first part and I've been looking up the parts list. Would you mind sending me a link to the 4" to 3" coupler you used from Lowes? I think I found it, but am not sure. Is this it: http://www.lowes.com/ProductDisplay?...llow&cId=PDIO1
Also, do you think this would work instead?
http://www.homedepot.com/p/ProFlex-4...5-43/202245804
Thanks.
Also, do you think this would work instead?
http://www.homedepot.com/p/ProFlex-4...5-43/202245804
Thanks.
05-26-2014, 08:16 PM
#3
Advanced
Thread Starter
The first link is the right one, The second link is a coupler but will wonly work if your using 3" tubing going to a 3"
Use the 4" on the integra forums alot of people who originally did the diy had better results going from up to 4"
also the mugen icebox is 4"..
but yeah they have a whole bunch of that 4"to 3" reducer in lowes .. go into pluming.!!
Use the 4" on the integra forums alot of people who originally did the diy had better results going from up to 4"
also the mugen icebox is 4"..
but yeah they have a whole bunch of that 4"to 3" reducer in lowes .. go into pluming.!!
The following users liked this post:
fabrizzio71 (05-27-2014)

Thread
Thread Starter
Forum
Replies
Last Post
nanos
Car Parts for Sale
26
11-12-2015 08:41 PM
Nitin
Car Parts for Sale
4
09-30-2015 08:22 PM
C2CuSn07 TL
Car Parts for Sale
1
09-11-2015 06:54 PM