Changing Instrument Gauge Color
 07-22-2005, 06:50 PM
#1
DamnThisHobby'sExpensive!
Thread Starter
Changing Instrument Gauge Color
Disclaimer: By using these guides, you are removing us from any liability that is related to any injury that might occur. I would suggest having a friend help you on these installs, if you are unsure about your abilities for any of these projects, get a professional to do it.
Credit goes to: �Vinnie� for the DIY Write Up & Pictures
Changing Instrument Gauge Color
Estimated Time: 15 � 45 mins
Tools: Philips screwdriver, flathead screwdriver
Instructions:
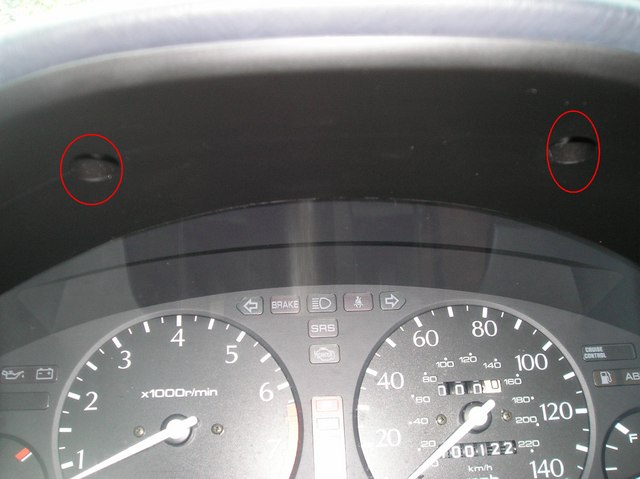
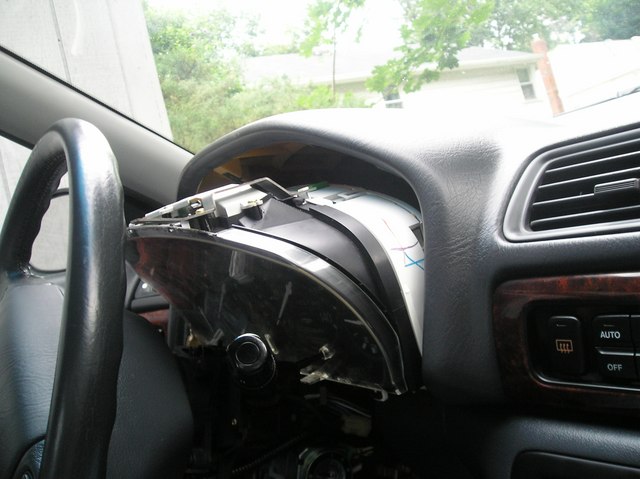
1. Take the plastic molding around the steering column off. 5 screws underneath hold it together.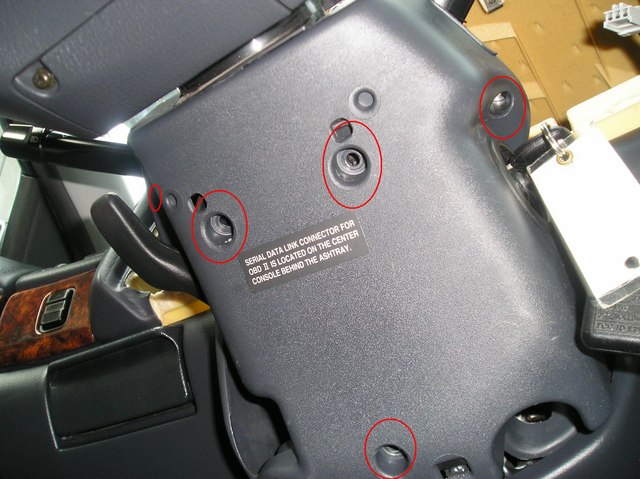
2. Stick the thinnest flathead screwdriver into the rectangular edge of the Cruise button. Pry into it and work it outward. Just be careful not to scratch up your car.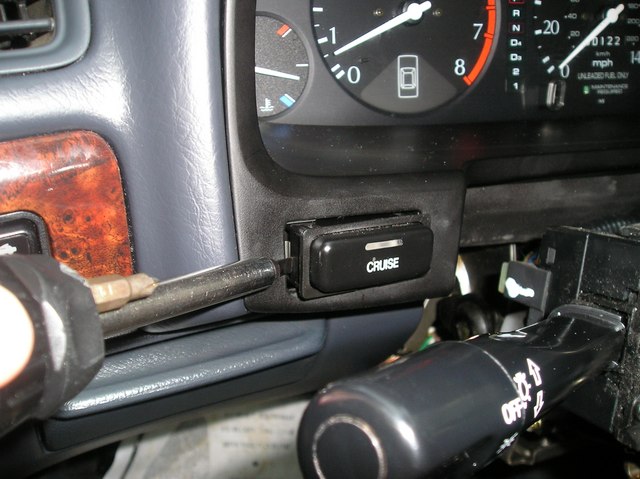
3. The Cruise button is a box that pulls out. There is a plug with wires connected to the back of it. Pull the plug out of the back of the box by pressing the release button found at the top. Repeat steps 2 and 3 for the Dimmer button found on the other side of the steering wheel.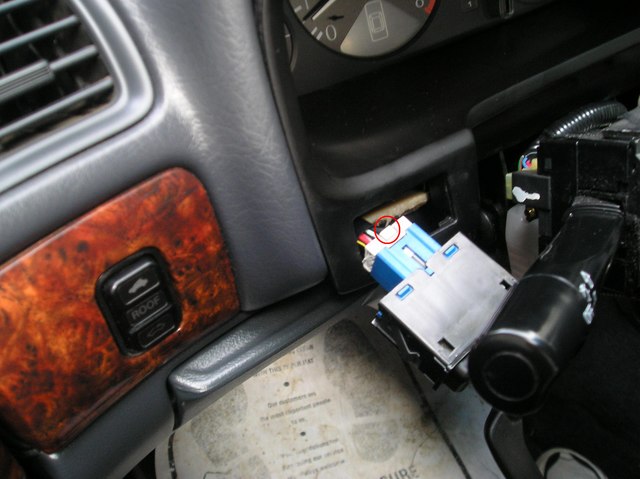
4. The Cruise button is a box that pulls out. There is a plug with wires connected to the back of it. Pull the plug out of the back of the box by pressing the release button found at the top. Repeat steps 2 and 3 for the Dimmer button found on the other side of the steering wheel.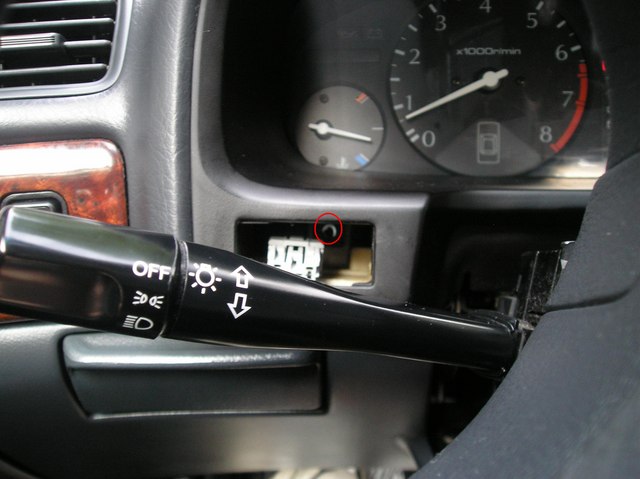
5. Pull the black plastic housing off and set aside.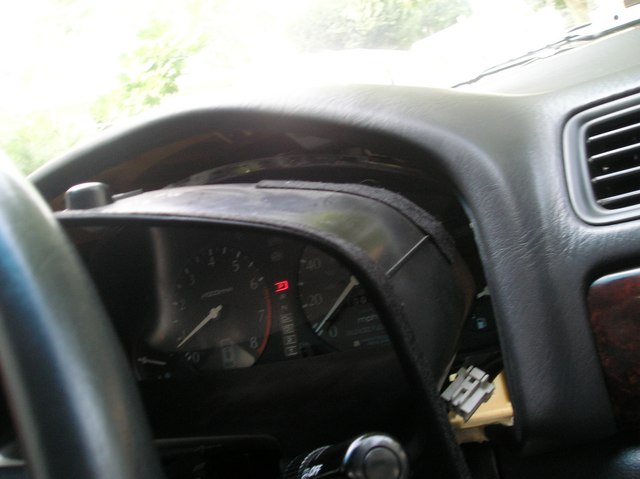
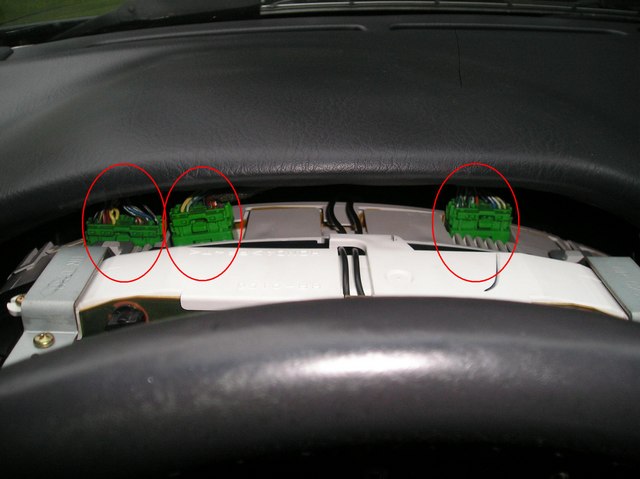
6. All of your gauges and the various components hooked up to them are referred to as your �gauge cluster.� To get the gauge cluster out, remove the four screws holding it in. Pull it out enough to see three plugs, similar to ones found in the Dimmer and Cruise buttons. You may have to work and wiggle to get the cluster out. Unplug the three plugs by pressing the release buttons.
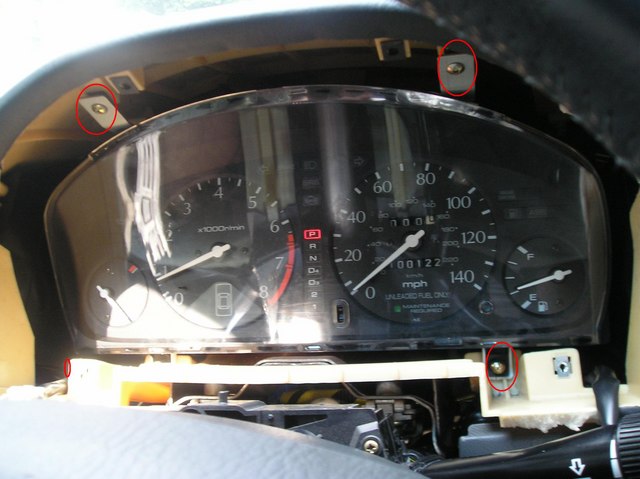
7. You can now take the cluster out completely.
8. On the back of the cluster there should be 5 plastic knobs, 4 big and 1 small. Twist and pull one out.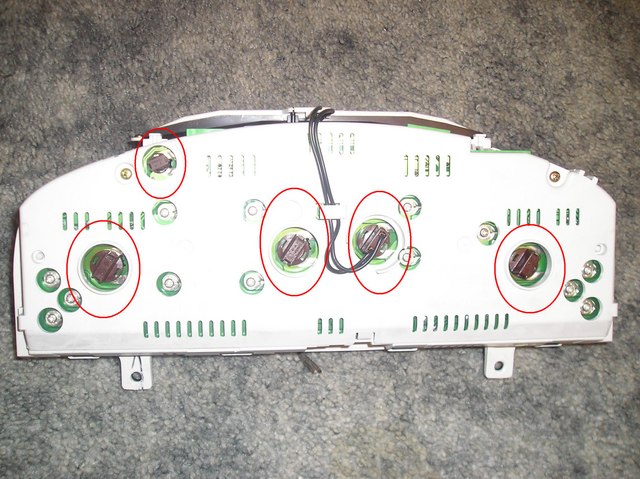
9. Take out the original bulb by pulling on it.

10. Replace it with the new bulb and put it back into its proper place. Twist it so that it is secure.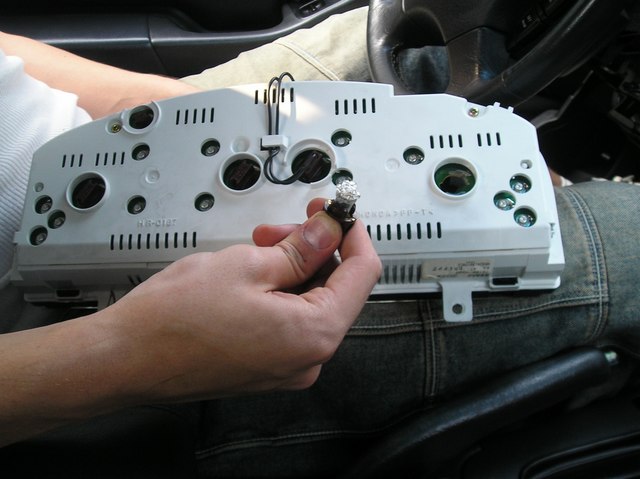
11. Do this to all four big bulbs. The large ones are 194/168 wedge base bulbs. The small one is 74, however, be careful of the kind of bulb because some may not fit. To be safe, just change the four big bulbs to the color of your choice. LED�s are probably your best bet.
12. Reverse these directions, carefully putting all the screws back into place.
Before:
After:

Credit goes to: �Vinnie� for the DIY Write Up & Pictures
Changing Instrument Gauge Color
Estimated Time: 15 � 45 mins
Tools: Philips screwdriver, flathead screwdriver
Instructions:
1. Take the plastic molding around the steering column off. 5 screws underneath hold it together.
2. Stick the thinnest flathead screwdriver into the rectangular edge of the Cruise button. Pry into it and work it outward. Just be careful not to scratch up your car.
3. The Cruise button is a box that pulls out. There is a plug with wires connected to the back of it. Pull the plug out of the back of the box by pressing the release button found at the top. Repeat steps 2 and 3 for the Dimmer button found on the other side of the steering wheel.
4. The Cruise button is a box that pulls out. There is a plug with wires connected to the back of it. Pull the plug out of the back of the box by pressing the release button found at the top. Repeat steps 2 and 3 for the Dimmer button found on the other side of the steering wheel.
5. Pull the black plastic housing off and set aside.
6. All of your gauges and the various components hooked up to them are referred to as your �gauge cluster.� To get the gauge cluster out, remove the four screws holding it in. Pull it out enough to see three plugs, similar to ones found in the Dimmer and Cruise buttons. You may have to work and wiggle to get the cluster out. Unplug the three plugs by pressing the release buttons.
7. You can now take the cluster out completely.
8. On the back of the cluster there should be 5 plastic knobs, 4 big and 1 small. Twist and pull one out.
9. Take out the original bulb by pulling on it.
10. Replace it with the new bulb and put it back into its proper place. Twist it so that it is secure.
11. Do this to all four big bulbs. The large ones are 194/168 wedge base bulbs. The small one is 74, however, be careful of the kind of bulb because some may not fit. To be safe, just change the four big bulbs to the color of your choice. LED�s are probably your best bet.
12. Reverse these directions, carefully putting all the screws back into place.
Before:
After:

The following 3 users liked this post by Acura3.0CL:
07-22-2005, 09:33 PM
#2
yadadaa
Join Date: Jun 2005
Location: bay area
Age: 35
Posts: 429
Likes: 0
Received 0 Likes
on
0 Posts
wooooaaahhhh. nice buddy. this is a bazillion times better then those indiglo gauges i hate. plus this still has the stock look in the day. props for this. where did you get the led's?
07-22-2005, 10:31 PM
#3
Korean FIYAH!
Give props to the brutha who came up with this mod.... 
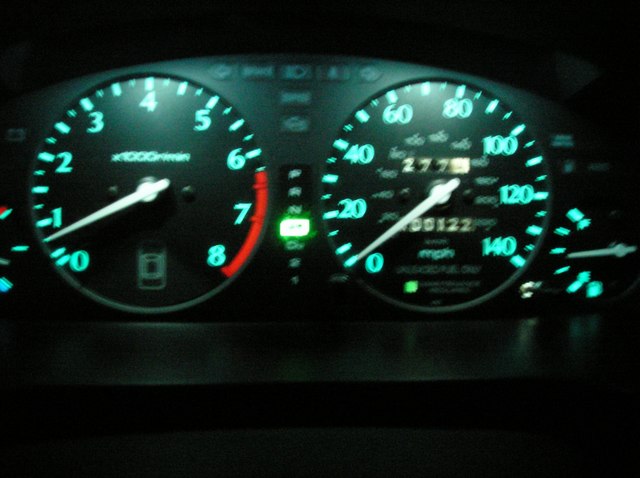
A better pic of the final results (from my car). Also for the #74 type bulb you can use an incandescent blue #74 bulb with no problems. If you want to use a #74 LED then you will have to mod the bulb - I strongly recommend using just an incandescent for the #74.
If you don't replace the #74 bulb then your "80 mpg" area will be a bit dimmer than the rest of the gauge. Some people can handle this, other people who are perfectionists will be bugged by this like crazy.
 07-23-2005, 01:17 AM
#5
Korean FIYAH!
Dimmer, Cruise, and Moonroof buttons are not swap outs, you have to remove and solder in a new LED with a resistor in series.
DIY Links:
http://www.ledautomotive.com/HowToGu...uttonHowTo.asp
http://v6performance.net/forums/show...=&threadid=548
Easy if you can handle a soldering iron.
DIY Links:
http://www.ledautomotive.com/HowToGu...uttonHowTo.asp
http://v6performance.net/forums/show...=&threadid=548
Easy if you can handle a soldering iron.
07-28-2005, 08:52 PM
#7
Changed all the bulbs in the gauges and hooked up the 3 plugs to see if the bulbs worked or if I did to turn them 180 degrees to make them work and now my oil light is flashing and the only other light that works is the seatbelt light. Is there a fuse for strictly the instrument gauge or what else could be the problem?
The following users liked this post:
Duarte12 (01-01-2017)
Trending Topics
07-28-2005, 11:18 PM
#8
Cruisin'

Originally Posted by OBs
Changed all the bulbs in the gauges and hooked up the 3 plugs to see if the bulbs worked or if I did to turn them 180 degrees to make them work and now my oil light is flashing and the only other light that works is the seatbelt light. Is there a fuse for strictly the instrument gauge or what else could be the problem?
The following users liked this post:
Duarte12 (01-01-2017)
08-07-2005, 07:23 PM
#11
Advanced

Join Date: Oct 2002
Location: Florida
Posts: 50
Likes: 0
Received 0 Likes
on
0 Posts
08-07-2005, 07:28 PM
#12
Korean FIYAH!
Originally Posted by Sc0rpi0
so, where do you guys buy the bulbs? ebay? auto parts store? online store? got links? i want to do this mod!!! awesome instructions vinnie!
Read the second post. I have a list of places to buy bulbs.
08-07-2005, 07:32 PM
#13
Korean FIYAH!
I just want to add that you can also change the turn signals to blue, as well as the rest of those lights in the center of the console (high beam, P R N D, etc). You have to remove the back of the gauge cluster (a few screws).
The bulb type is a T1.5 I think (twist in type). You can get premade screw in led bulbs from
http://www.superbrightleds.com/cgi-b....19322&next=50
It's the 4th one down.
The bulb type is a T1.5 I think (twist in type). You can get premade screw in led bulbs from
http://www.superbrightleds.com/cgi-b....19322&next=50
It's the 4th one down.
 08-14-2005, 12:56 AM
#15
Korean FIYAH!
Because the gauges have a greenish-blue filter built into the light transmitting parts, even if you put hyperwhite bulbs into the cluster the gauges will light up the stock greenish blue anyway. They will just be a much brighter version of the stock greenish blue color.
If you'd done a search, you would have found that out.
If you'd done a search, you would have found that out.
 10-15-2005, 07:34 PM
#21
Korean FIYAH!
Dude I found this in like 10 seconds of searching.
http://autolumination.com/festoon.htm
http://search.ebay.com/search/search...e=search&fgtp=
http://autolumination.com/festoon.htm
http://search.ebay.com/search/search...e=search&fgtp=
10-15-2005, 10:07 PM
#22
green3.0CL
Join Date: Aug 2005
Location: Miami/Tallahassee, Florida
Age: 40
Posts: 353
Likes: 0
Received 0 Likes
on
0 Posts
Originally Posted by Musulsa
I just want to add that you can also change the turn signals to blue, as well as the rest of those lights in the center of the console (high beam, P R N D, etc). You have to remove the back of the gauge cluster (a few screws).
The bulb type is a T1.5 I think (twist in type). You can get premade screw in led bulbs from
http://www.superbrightleds.com/cgi-b....19322&next=50
It's the 4th one down.
The bulb type is a T1.5 I think (twist in type). You can get premade screw in led bulbs from
http://www.superbrightleds.com/cgi-b....19322&next=50
It's the 4th one down.
10-16-2005, 02:24 AM
#23
Korean FIYAH!
Not to be rude, but this section is called "Do it yourself."
If you want to find out about it, then do it yourself; it is very easy.
The information here is VERY valuable and FREE info that took me and others trial and error, time and money to glean. It's a bit annoying to be constantly bombarded with requests for MORE info that costs ME time and effort, but you want quickly and for free. There is more than enough info for you to start your own quest to find out about your own car. Go do it. If you want pics of that stuff, how about YOU take them and post them here? Try contributing something before asking for freebies.
If you are afraid to take about your gauge cluster to check it out, then I would respectfully suggest that maybe this is not the right forum for you to be in. "Do-it-yourself" is not for everyone.
10-17-2005, 08:51 PM
#24
green3.0CL
Join Date: Aug 2005
Location: Miami/Tallahassee, Florida
Age: 40
Posts: 353
Likes: 0
Received 0 Likes
on
0 Posts
whoa okay well you posted it up so i figured you were knowlodgable about doing it, i guess i am wrong, it has nothing at all with me being afraid of taking out my cluster. but if i don't like the end result why do it. you are saying something is possible it is only natural to want to see the end result. calm down
10-22-2005, 03:13 PM
#25
Advanced

Join Date: Jul 2005
Age: 35
Posts: 67
Likes: 0
Received 0 Likes
on
0 Posts
ok i have a question, does the needle change color with the lights, does the needle stay white? im thinking about changing the bulbs red and would like the needle red too >> straight JDM y0 
10-28-2005, 11:20 PM
#26
666 Speed
iTrader: (2)
Join Date: Sep 2005
Location: Sinking Spring, PA
Age: 38
Posts: 2,088
Likes: 0
Received 1 Like
on
1 Post
Anyone think of replacing the small #74 bulbs that light up the needles and so on? I just did mine yesterday and love them!. I have pics on my phone, but the cables is at my other house. I will download them soon and post them. Along with that, i'll get the digi out and snap a few tomorrow night for better quality.
10-30-2005, 04:11 PM
#27
HEET Miser
Join Date: Jul 2004
Location: Jersey-no-more, MD
Age: 48
Posts: 375
Likes: 0
Received 0 Likes
on
0 Posts
Yeah, Art, not much mention of those two smaller bulbs on the top/front side of the console in this thread. I don't know, maybe the 97s don't have 'em. But I had the one on the right blow out, and I was wondering why I can't tell how much gas I have at night, even with xenon 194s in the 4 other plugs (they make a nice bright blue) -- I even tried painting my needles with Illuminite. Those are important little bulbs, and they do light up your needles. However, they're not 74s, they're smaller. All I had was a spare 74, so I wedged it in/made it fit. So far, so good -- BIG difference.
11-09-2005, 12:17 PM
#28
666 Speed
iTrader: (2)
Join Date: Sep 2005
Location: Sinking Spring, PA
Age: 38
Posts: 2,088
Likes: 0
Received 1 Like
on
1 Post
I had to do them because the greenish yellow color was annoying me. I ordered the 74 bulbs and put them in without a problem. They fit for me. Anyway, something else that i noticed was that now my red seatbelt light doesnt light up anymore. Not sure why, but I like it off without the belt on. I tried disconnecting it and reconnecting it but it didnt work. Yeah well...
12-06-2005, 11:06 AM
#30
Senior Moderator
Regional Coordinator
(Mid-Atlantic)
Regional Coordinator
(Mid-Atlantic)
iTrader: (6)
Originally Posted by sexytypes
Anyone Have Any Ideas To Do This To The Second Generation Cl-s
 12-11-2005, 12:26 PM
#33
Yes the four larger bulbs are 194/168 and the lone small one is 74. I ordered my bulbs from http://www.superbrightleds.com, I bought the 74 bulb with the socket included.
 03-27-2006, 04:28 PM
#35
Senior Moderator
Regional Coordinator
(Mid-Atlantic)
Regional Coordinator
(Mid-Atlantic)
iTrader: (6)
If you're looking to brighten your green lights, but not spend $$ on led's, you can just take out the cluster with these instructions, and remove the blue film from the bulbs, this makes your gauges glow a lot brighter green. I did this, because the 9 LED bulbs that I bought were too big for the holes in the gauge cluster, thankfully, cuz 9 would be too bright anyway, so I ordered some smaller 6 led bulbs in the mean time though, I took the blue caps off, and it looks a LOT brighter without spending any $$
Before:

After with just the blue caps removed from the bulbs:

I'll post another pic after I get my 6 LED bulbs installed
Before:
After with just the blue caps removed from the bulbs:
I'll post another pic after I get my 6 LED bulbs installed
The following users liked this post:
primrose98 (07-04-2022)
03-28-2006, 08:12 PM
#37
Senior Moderator
Regional Coordinator
(Mid-Atlantic)
Regional Coordinator
(Mid-Atlantic)
iTrader: (6)
Originally Posted by jumpmanbsktbll
anyone changed the leds to red?
09-30-2006, 04:23 AM
#38
Turtle Charged, Biotcch!!
Join Date: May 2006
Location: Irvine, SoCal
Age: 36
Posts: 1,168
Likes: 0
Received 0 Likes
on
0 Posts
anyone know the bulb type/number for the SRS, P R N D lights, etc? I'm thinking about changing every single bulb in the cluster....the climate control and clock also...I'm OK with a solder so no worry...except the resistors, what ohmage should i use?
To the OP: How did you make the color to disperse evenly? mine's a little bit dimmer at the top...
To the OP: How did you make the color to disperse evenly? mine's a little bit dimmer at the top...
09-30-2006, 09:00 AM
#39
Bagel Bomber
Originally Posted by Sleep_DEPRIVED_Sleeper
anyone know the bulb type/number for the SRS, P R N D lights, etc? I'm thinking about changing every single bulb in the cluster....the climate control and clock also...I'm OK with a solder so no worry...except the resistors, what ohmage should i use?
To the OP: How did you make the color to disperse evenly? mine's a little bit dimmer at the top...
To the OP: How did you make the color to disperse evenly? mine's a little bit dimmer at the top...
i think this about the third time i've hooked you up on the search function.
those bulbs are either 3 or 5 mm leds with a 470 ohm - .25 watt resistor.
I can answer more questions over on that thread to get you through it.
01-03-2007, 12:31 AM
#40
Burning Brakes
Join Date: Feb 2005
Location: Boston/CT
Age: 35
Posts: 1,094
Likes: 0
Received 0 Likes
on
0 Posts
Hey, I want to change my gauges to red, what steps do I have to go through with the actual gauges themselves to be able to see the red? And does anyone have pics of it? thx