97 3.0 CL, Wheel Bearing and Brake Rotor
 09-26-2008, 12:39 PM
#1

97 3.0 CL, Wheel Bearing and Brake Rotor
Would anyone like for me to do a DIY?
I am currently replacing my front discs rotors and in the process replacing the front wheel bearing too! If I get a good amount of response I'll take pictures of what I will be doing.
I am currently replacing my front discs rotors and in the process replacing the front wheel bearing too! If I get a good amount of response I'll take pictures of what I will be doing.

The following users liked this post:
bamaborn74 (03-12-2014)
09-26-2008, 03:21 PM
#2
Senior Moderator
Regional Coordinator
(Mid-Atlantic)
Regional Coordinator
(Mid-Atlantic)
iTrader: (6)
No one has done a wheel bearing diy on here, that would be a good one to have. The rotor would be nice with some pics as well. We're of the mind here, that if you're asking if you should do a diy, then you probably should do it. Someone can always reference your work use it for something
The following users liked this post:
bamaborn74 (03-12-2014)
09-26-2008, 11:33 PM
#3
Here We Go...
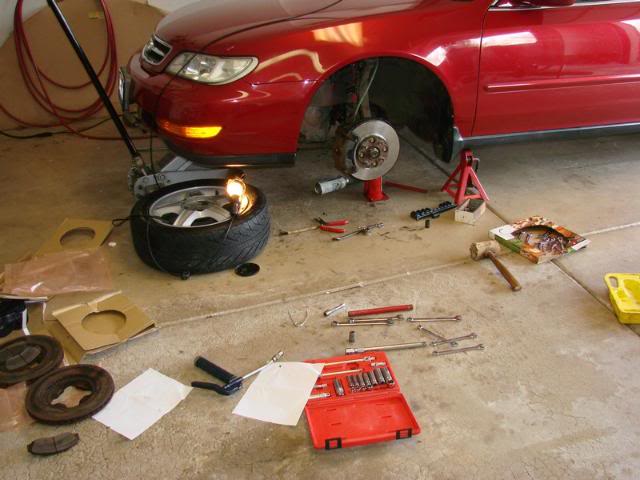
1. Remove wheel
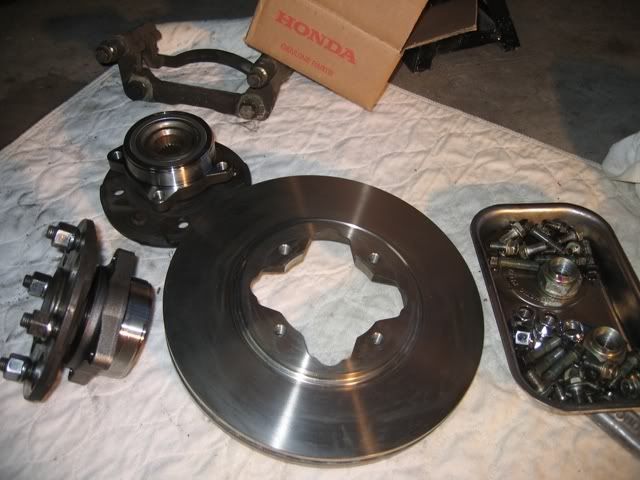
2. Here are the new parts for the front brake rotors and (front wheel bearings already pressed onto the hub assembly). If you take it to an Acura dealer to press it in, they will charge you an arm and leg for a 15 minute job.
I think they wanted $200 to press in and out for me when I went to pick up my parts.
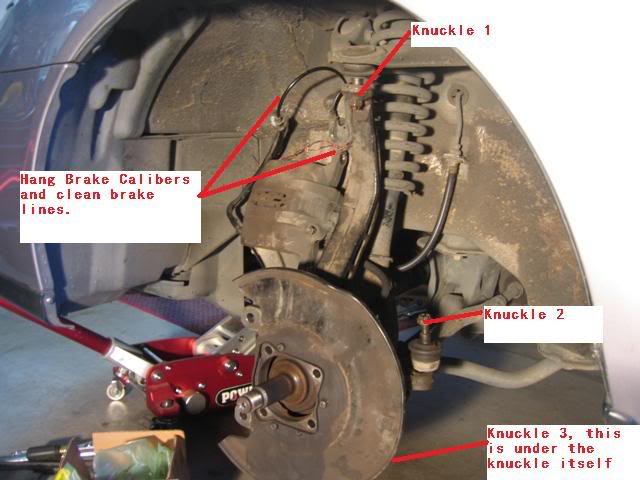
3. Remove the brake calibers and pads - there are 2 bolts that hold the calibers onto the brake frame and 2 more (bigger) bolts that hold the brake frame onto the knuckle (The knuckle is the long control arm thingy). Then Remove the 3 bolts that hold the knuckle onto the CL's frame. Listed as Knuckle 1, 2 and 3 in the picture.
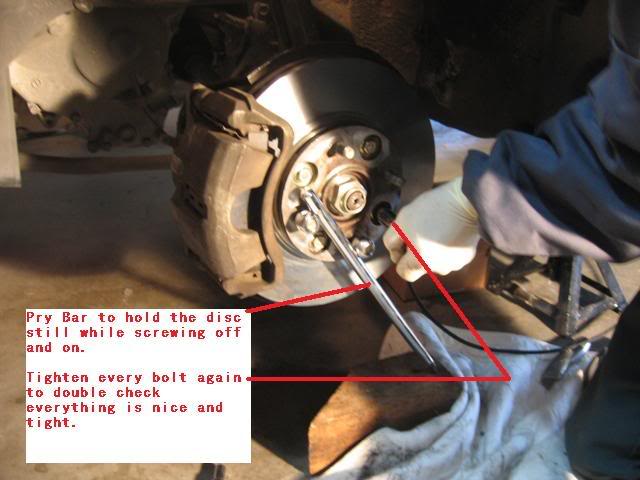
4.Then using a pry bar place it between two of the four wheel studs and the ground, this is to keep the hub from turning. Then using a 36mm socket with a long pipe for leverage, unbolt the axle nut.
-Hang the brake calibers with some wires onto the frame of the car or anything to hold it upright, you don't want to put a tear in the rubber brake line.
5. Now, part 3 is somewhat a PITA, because over time those 3 bolts get "stuck" on there, the trick is to take a hammer and pound on the outside hard metal to break/losen up the rust that is making the two metal pieces stick together after the bolt is taken out.
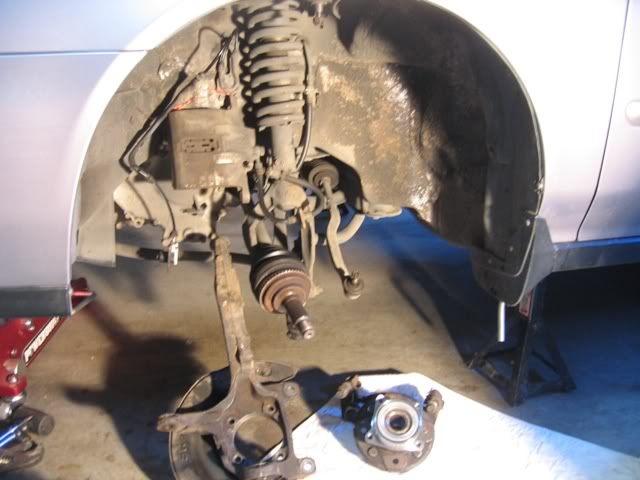
6. Here is what it looks like with parts 1-5 done.
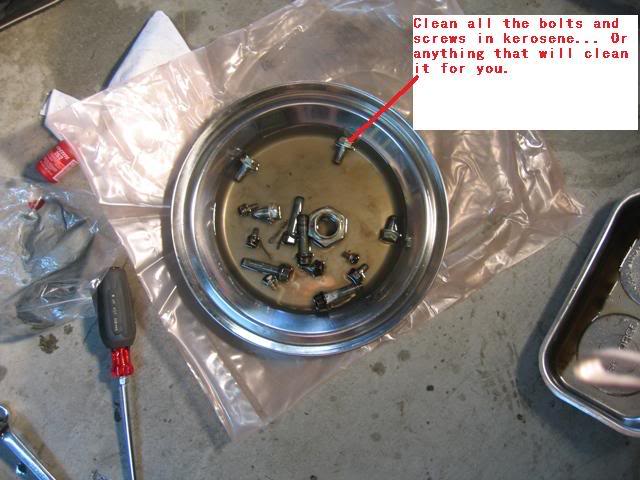
7.Optional if you really care about your car - Once all parts are out, take the time to
clean the brake hose, screws and what not so that it wont sieze up next time if you decide to do this process all over again!
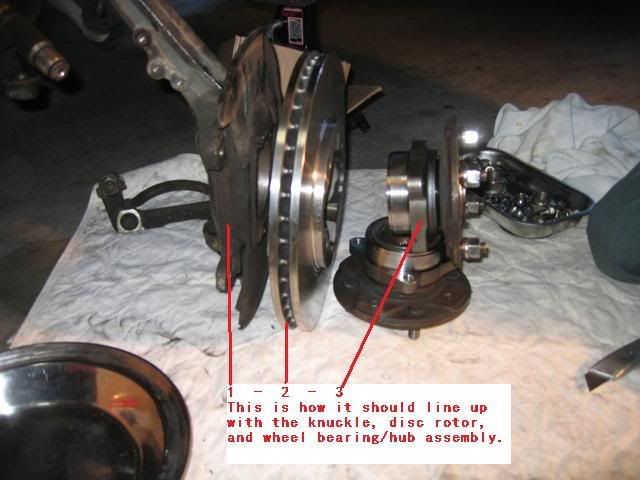
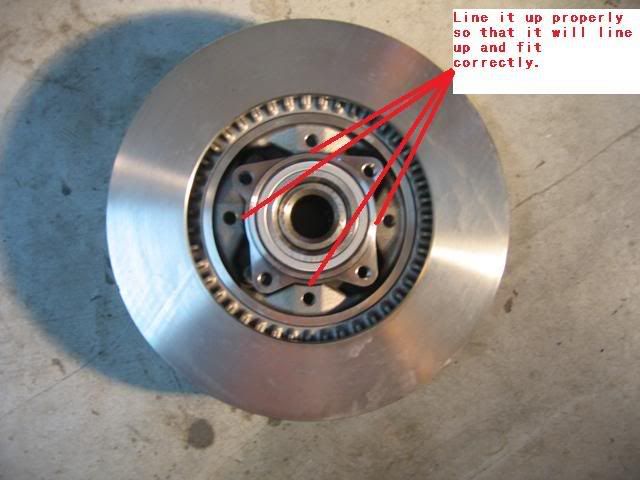
8. This is how the new parts should line up.
9. All the screws that I took out I cleaned, in kerosene or anything you prefer. Then I sprayed WD-40 on them to prevent rust in the future.
10. I didn't take pictures on this part, but in order take apart the wheel bearing you will need to have a press machine to press out your old wheel bearing and push in the new wheel bearing. In the first picture you see the wheel bearing and hub assembly already pressed together.
11. When it comes time to put it back together you should put the hub assemble that is already pressed into the wheel bearing down the the ground then put the brake rotor onto the unit, there is only one way of putting this on, so line it up carefully. Then screw the 4 bolts back onto the front side of the brake to hold it together with the hub assembly.
12. After part 10, put some anti-sieze lubricant onto the outter side of the new wheel bearing unit - to prevent future lock ups to the knuckle if you ever want to take it apart again. Tighten the 4 bolts on the back of the knuckle (put some lock tite on the bolts, since these are holding your wheels to your car!)
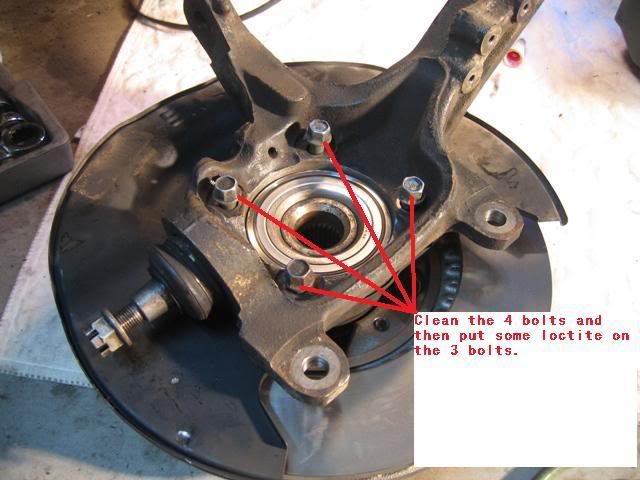
13. Put back the knuckle onto the car and tighten the 3 bolts.
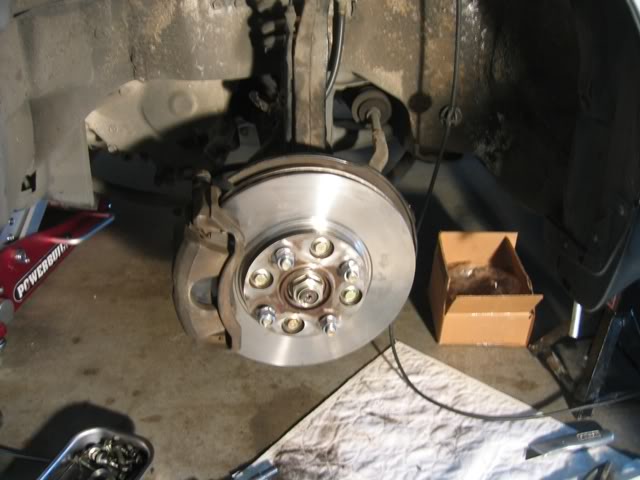
14. Then just do the reverse to assemble all the brake calibers and brake lines.
Have fun and I hope this is helpful to whoever decides to do it!
2. Here are the new parts for the front brake rotors and (front wheel bearings already pressed onto the hub assembly). If you take it to an Acura dealer to press it in, they will charge you an arm and leg for a 15 minute job.
I think they wanted $200 to press in and out for me when I went to pick up my parts.
3. Remove the brake calibers and pads - there are 2 bolts that hold the calibers onto the brake frame and 2 more (bigger) bolts that hold the brake frame onto the knuckle (The knuckle is the long control arm thingy). Then Remove the 3 bolts that hold the knuckle onto the CL's frame. Listed as Knuckle 1, 2 and 3 in the picture.
4.Then using a pry bar place it between two of the four wheel studs and the ground, this is to keep the hub from turning. Then using a 36mm socket with a long pipe for leverage, unbolt the axle nut.
-Hang the brake calibers with some wires onto the frame of the car or anything to hold it upright, you don't want to put a tear in the rubber brake line.
5. Now, part 3 is somewhat a PITA, because over time those 3 bolts get "stuck" on there, the trick is to take a hammer and pound on the outside hard metal to break/losen up the rust that is making the two metal pieces stick together after the bolt is taken out.
6. Here is what it looks like with parts 1-5 done.
7.Optional if you really care about your car - Once all parts are out, take the time to
clean the brake hose, screws and what not so that it wont sieze up next time if you decide to do this process all over again!
8. This is how the new parts should line up.
9. All the screws that I took out I cleaned, in kerosene or anything you prefer. Then I sprayed WD-40 on them to prevent rust in the future.
10. I didn't take pictures on this part, but in order take apart the wheel bearing you will need to have a press machine to press out your old wheel bearing and push in the new wheel bearing. In the first picture you see the wheel bearing and hub assembly already pressed together.
11. When it comes time to put it back together you should put the hub assemble that is already pressed into the wheel bearing down the the ground then put the brake rotor onto the unit, there is only one way of putting this on, so line it up carefully. Then screw the 4 bolts back onto the front side of the brake to hold it together with the hub assembly.
12. After part 10, put some anti-sieze lubricant onto the outter side of the new wheel bearing unit - to prevent future lock ups to the knuckle if you ever want to take it apart again. Tighten the 4 bolts on the back of the knuckle (put some lock tite on the bolts, since these are holding your wheels to your car!)
13. Put back the knuckle onto the car and tighten the 3 bolts.
14. Then just do the reverse to assemble all the brake calibers and brake lines.
Have fun and I hope this is helpful to whoever decides to do it!
The following users liked this post:
Myxomatosis (07-29-2013)
09-27-2008, 11:37 AM
#4
Senior Moderator
Regional Coordinator
(Mid-Atlantic)
Regional Coordinator
(Mid-Atlantic)
iTrader: (6)
Great diy man
09-27-2008, 11:09 PM
#5
Guitarded
Join Date: Jul 2007
Location: NE Ohio
Age: 33
Posts: 1,877
Likes: 0
Received 0 Likes
on
0 Posts
Awesome job dude. Wish this was made half a year ago though lol. My mechanic broke my wheel bearing when he replaced my rotors so I had to pay $300some for a new one. 
09-27-2008, 11:54 PM
#6
Thanks guys!
I appreciate it... Well, the instructions I made is missing some minor details but nothing you guys can't figure out when you're doing this job for yourself. All the major info is there.
By doing this job myself I saved a ton of money... It really helps to know someone who has a press machine (I do, and he did it for free ) Oh and now I know that the CL's disc brake is a two piece design, so that is cool versus a one piece.
Also, if you are going to change your brake rotors, most likely you will damage your wheel bearing because what you're suppose to be able to do is to lightly pound out the hub assemble/wheel bearing from the knuckle but 85% of the time the two pieces are "stuck" together (that is why I put anti-seize lub on the new wheel bearing unit) and you'll have to pound it out hard, which will damage your wheel bearing.
I appreciate it... Well, the instructions I made is missing some minor details but nothing you guys can't figure out when you're doing this job for yourself. All the major info is there.
By doing this job myself I saved a ton of money... It really helps to know someone who has a press machine (I do, and he did it for free
) Oh and now I know that the CL's disc brake is a two piece design, so that is cool versus a one piece.Also, if you are going to change your brake rotors, most likely you will damage your wheel bearing because what you're suppose to be able to do is to lightly pound out the hub assemble/wheel bearing from the knuckle but 85% of the time the two pieces are "stuck" together (that is why I put anti-seize lub on the new wheel bearing unit) and you'll have to pound it out hard, which will damage your wheel bearing.
10-04-2008, 07:16 AM
#7
Intermediate
Join Date: Dec 2007
Age: 48
Posts: 45
Likes: 0
Received 0 Likes
on
0 Posts
I truly appreciate the pics!!!!!
I am actually getting ready to order new hubs and new bearings for a 98, although I have a 97. I am converting.
Do you remember where and how much your bearings were?
I can get them from Acura for around 70 and the hubs are about 30, so 100 bucks a wheel, plus rotor isn't too bad, I guess.
Does anyone recommend a particular rotor (I wash my car allot so warping has been a problem for me)?
I do not see any reason for me to spend around 120 bucks for supposedly better bearings online in many places.
Does anyone recommend me do this or is the 97 rotor a better rotor than the 98?
The bearings are identical, just the hub and rotor are different.
Again, great pics. I feel more comfortable taking mine off to put new on.
Last edited by minorityCL; 10-04-2008 at 07:18 AM. Reason: adding
Trending Topics
10-04-2008, 11:55 AM
#8
Hi Minor,
Thanks for the comment, I got my bearings and rotors stock OEM for a 97 CL 3.0 from Acura of Lynnwood, WA (personally, I like to stick to stock), I looked online and found each part to be:
Bearing - List Price - $115 - Online Store Discount $66
Rotor - List Price - $115 - Online Store Discount $70
So the total was roughly $280 for the fronts.
I notice a big difference when I brake hard that my steering wheels doesn't "wiggle" any longer with the new stock rotors.
If you want to prevent the warping, just dont wash your car right after you drive it, since the rotors are still hot. Wait for it to cool down before letting water hit it.
Do you really need to replace the hub? All it's doing is just holding the lug nuts and wheels to your bearings.
10-05-2008, 12:58 PM
#9
Intermediate
Join Date: Dec 2007
Age: 48
Posts: 45
Likes: 0
Received 0 Likes
on
0 Posts
The reason I am changing teh hub is because I am wanting to convert my rotor design to the 98-99 style.
If I need to change my rotors and bearings I might as well spend teh extra 50 for the newer design, mainly because it is much easier to mess with the rotors.
The newer design the rotors come right off when taking caliper assembly off. Makes it easy if ever needed to turn again, which breaks do wear out eventually and need to be turned.
Does anyone have any advice on a good pad for our break system?
07-04-2009, 01:01 AM
#10
Sanest Florida Man
Ok are these instructions any different for a 98 3.0 CL? My front bearing is fucked and I'd like to fix it myself if possible.
 07-06-2009, 12:29 PM
#13
03-13-2010, 02:07 AM
#18
Iagent,
If it were me, I would go the OEM route... I've got 20k++ miles out of the new OEM rotors I replaced (For this thread) and still no vibrations and the thickness is still great!
I posted this thread back in Sept. 08.
If it were me, I would go the OEM route... I've got 20k++ miles out of the new OEM rotors I replaced (For this thread) and still no vibrations and the thickness is still great!
I posted this thread back in Sept. 08.
03-13-2010, 05:09 AM
#19
Instructor
Thanks, I think I will go that route then. I have 139,000 mi on the originals and I need to change them last year.
03-13-2010, 10:39 AM
#20
I am thinking you should consider changing the front wheel bearings too... More than likely they will get damaged in some ways when you take everything apart to get to the rotors. Plus consider the age of the components too, after all, a lot of weight is riding on those bearings.
04-03-2010, 07:16 PM
#21
Instructor
Has anyone tried this?
I just bought one, and I will give a full report after I try it out.

The GDT5 simply mounts to the hub using the lug nuts and with a turn of the lift bolt, the hub and rotor are removed . The GDT5 works without any hammering or removing any suspension parts, not even the axle.
Fastest , easiest way possible - 1/4 of the book time
No suspension parts to remove - saves time and money
No hammering of any kind - will not damage bearings
No need to press out of knuckle - save time and money
No other tool like it on the market - saves time and money
Also works on some Acura models
I just bought one, and I will give a full report after I try it out.
The GDT5 simply mounts to the hub using the lug nuts and with a turn of the lift bolt, the hub and rotor are removed . The GDT5 works without any hammering or removing any suspension parts, not even the axle.
Fastest , easiest way possible - 1/4 of the book time
No suspension parts to remove - saves time and money
No hammering of any kind - will not damage bearings
No need to press out of knuckle - save time and money
No other tool like it on the market - saves time and money
Also works on some Acura models
04-11-2010, 03:10 PM
#23
Instructor
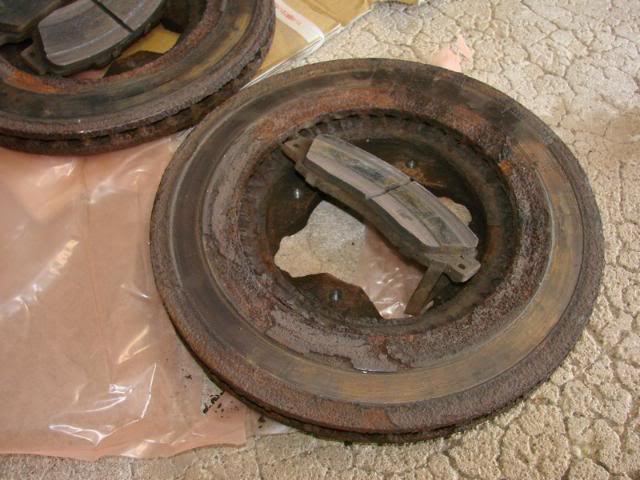
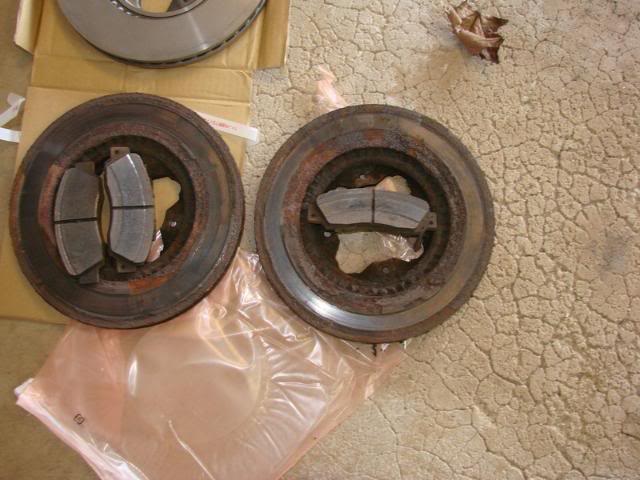
The puller is awesome! Just separates them as smooth as can be. Here are pics of the worn discs. Never seen such odd wear patterns. The severe wear was on the inside of both of them.
05-24-2010, 03:50 PM
#24
1998 CL 3.0
Join Date: Aug 2009
Location: Little Rock, USA
Age: 38
Posts: 172
Likes: 0
Received 0 Likes
on
0 Posts
So I've got the knuckle free of the three bolts and I've taken the spindle nut off. How do I get the knuckle/hub/bearing free of the drive shaft? It seems to be on there pretty tight do I just yank or hammer it off in some fashion? I'm assuming so since nobody mentions anything about it in books or in this DIY
05-24-2010, 03:56 PM
#25
Polaris, is step 10 what you're talking about?
If not, you should spray some WD40 around the drive shaft and hit it gently with a hammer to break the rust free, then you will need to slowly push the drive shaft towards the engine and then gently pull out the knuckle assemble... it will come off.
If not, you should spray some WD40 around the drive shaft and hit it gently with a hammer to break the rust free, then you will need to slowly push the drive shaft towards the engine and then gently pull out the knuckle assemble... it will come off.
08-06-2010, 07:52 PM
#30
2nd Gear

Join Date: Aug 2010
Age: 54
Posts: 2
Likes: 0
Received 0 Likes
on
0 Posts
Thanks,
My CL has 200k and it is time for new bearings, lower ball joints, rotors, and axles. This forum has shown me everything I needed to tackle the job. The Chilton's manual for this car is garbage.
Sporting, Do you have to press the bearing in and out of the steering knuckle, even if you remove those 4 bolts?
Iagent, How did you press the hub back into the bearing after you removed it with the GDT5?
 09-24-2010, 05:37 PM
#35
5th Gear

Join Date: Sep 2006
Age: 40
Posts: 5
Likes: 0
Received 0 Likes
on
0 Posts
I did the front rotor job in 2007 on my CL. Lasted me 70k miles. They tried to charge an arm and a leg for using a press. I told them to go pound sand, and used two pieces of 4 x 4 on which i placed the rotor on. I bought a socket that matched the diameter of the hub and drove it out with a hammer. Came out like butter. Make sure you use a rag cloth between the socket and the hub so it's not steel on steel when you're punching it out. Use the same procedure to drive the hub in once you replace the rotors.
10-31-2013, 08:38 PM
#37
Intermediate

Join Date: Sep 2011
Location: Fargo, yes Fargo
Age: 60
Posts: 25
Likes: 0
Received 2 Likes
on
2 Posts
Excellent write up- thank you! Does anyone know why the inside of the disk would wear like that? Mine is pretty close to the same. Any ideas? I hope it doesn't indicate a caliper issue.
Also- I plan to convert my 97 hubs/rotors to 98. It looks easy (going by the schematic) and should make future brake maintenance far easier. Anyone done this? Any reason not to do it? It seems like a no brainer, the 98 hubs are even $50 less per side from acuraoemparts.com. Thanks, Dan.
Also- I plan to convert my 97 hubs/rotors to 98. It looks easy (going by the schematic) and should make future brake maintenance far easier. Anyone done this? Any reason not to do it? It seems like a no brainer, the 98 hubs are even $50 less per side from acuraoemparts.com. Thanks, Dan.
The following users liked this post:
sporting (11-01-2013)
11-01-2013, 12:19 AM
#38
^ Because that is where the majority of the force is coming from, the only side the piston is forcing pressure upon is from the engine side outwards... meaning the inner side of the disc.
If you do this project, lube up all moving parts, meaning the (don't know what the correct term is) "joint" where you screw the screw to hold the calipers to the non moving part of the caliper assembly. There should only be 2 screws top and lower. Once lube it would allow for movements and variations in the disc rotation. It will also lessen vibrations as well.
If you do this project, lube up all moving parts, meaning the (don't know what the correct term is) "joint" where you screw the screw to hold the calipers to the non moving part of the caliper assembly. There should only be 2 screws top and lower. Once lube it would allow for movements and variations in the disc rotation. It will also lessen vibrations as well.

