DIY: Replace the Radiator and Flush A/F on 2G MDX
 01-16-2018, 12:10 AM
#1
Moderator
Thread Starter
DIY: Replace the Radiator and Flush A/F on 2G MDX
Hello folks!
Some background:
I just recently (Basically before xmas) had the bad fortune of having my OG radiator fail on me, the heater core aluminum cracked and made a nasty leak. So I had to replace the radiator, It is pretty ironic that the radiator failed this way having an ATF Warmer Bypass which was basically done so I didn�t have to replace the radiator as preventive maintenance hahaha my luck right?.
ATF Warmer:
Some of you guys might be interested in this guide if you are performing the change as preventive maintenance due to the faulty ATF Warmer design that fails and destroys the transmission? So this guide will help you out.
Anti-freeze Flush:
Some of you might be interested on just flushing the anti-freeze and not so much about replacing the radiator? if so the steps will be AFTER the replacement steps.
So scroll down wayyy down below until you find the "---------------------------------------- FLUSH ------------------------------------------------" mark.
Now how hard it is?
I will be blunt here.. Replacing the radiator is no small feat on the 2G MDX. I think Acura hired an Audi Engineer to design the undercarriage of the 2G MDX that allowed no normal human hands between the Subframe and Chassis to reach the lower portion of the radiator.. If you try to use ANY Youtube video for perhaps an Odyssey, Pilot or Ridgeline? DO NOT BOTHER! The space on those is massive compared to the 2G MDX. It was so hard that I missed the more important pictures of this DIY which is basically removing the Fans... I will try my best to describe this process as its very car specific to the MDX. The lower portion was also next to impossible to picture as the subframe and chassis are so close together my DSLR didn�t even fit and I could not focus even on a 14mm lens, Perhaps with a smartphone but I didn't think about it at the time (Due to the difficulty).. I give it a 9 out of 10 for DIY difficult rating.. Its a horrible experience but doable with patience.
Time needed:
+/- 4 hours (Flush Included)
Parts needed:
2x Gallons of Anti-freeze, Fully recommended Honda Type-2 A/F (The Blue Stuff).
You will need 2 gallons regardless if you are doing the flush or not as the radiator will take more than a gallon.
OPTIONAL: 2x radiator rubber feet (mine were pretty deformed).
Tools needed:
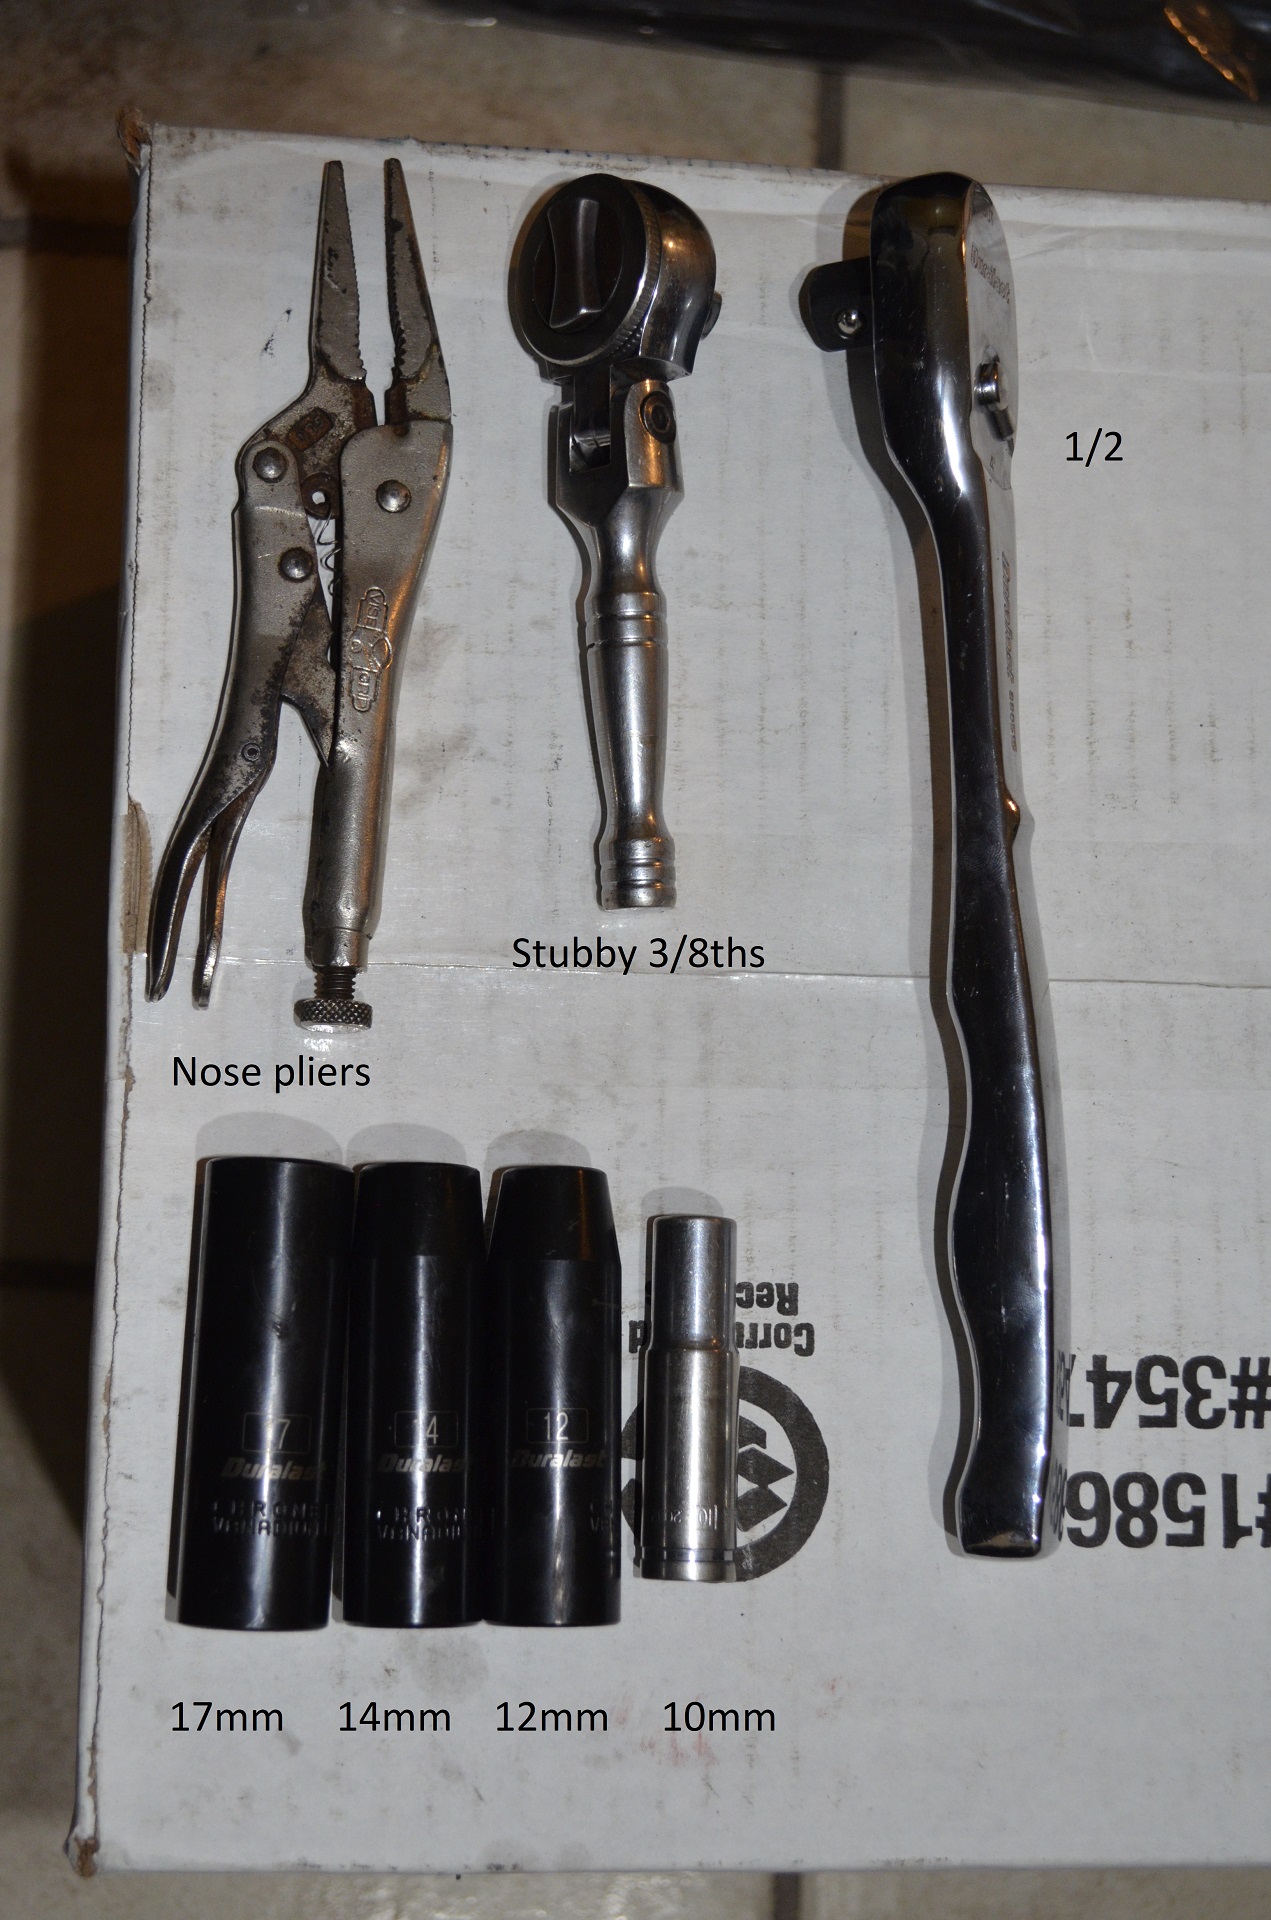
Not pictured: Flat Screwdriver for the plastic clips holding the plastic guards.1x Oil pan to catch the anti-freeze.
1x Pair of ramps (This will make your life so much easier! you can do the flush on ramps too).
The most important tool of them all:

This little fella will make your life 100x easier on the offset bolts (Condenser brackets, Fan Brackets and ATF Hardline Tube middle bolt).
I bought this tool out of Autozone for 200 pesos (Around 11 bucks) https://www.autozone.com.mx/llaves-p...-mm/762879_0_0
I could not find the part number for the US Site but you will need an identical tool if you want this to go smoothly..... Not having this tool will make your life miserable.
Now the STEPS!!!!!
0.- (Yeah I forgot this step hahaha) Jack the front axle up or better yet ramp the car up..
1.- Remove the upper plastic cover that hides the entire radiator, Do this by removing all of the plastic push pins. Use a flat screwdriver to pop them up and remove the part that pops off and the entire clip will come out.


2.- There are 2 more plastic push pins holding the grille, There are 3x 10mm bolts you must remove here (2 for the Grille and 1 for the ATF Cooler bracket).


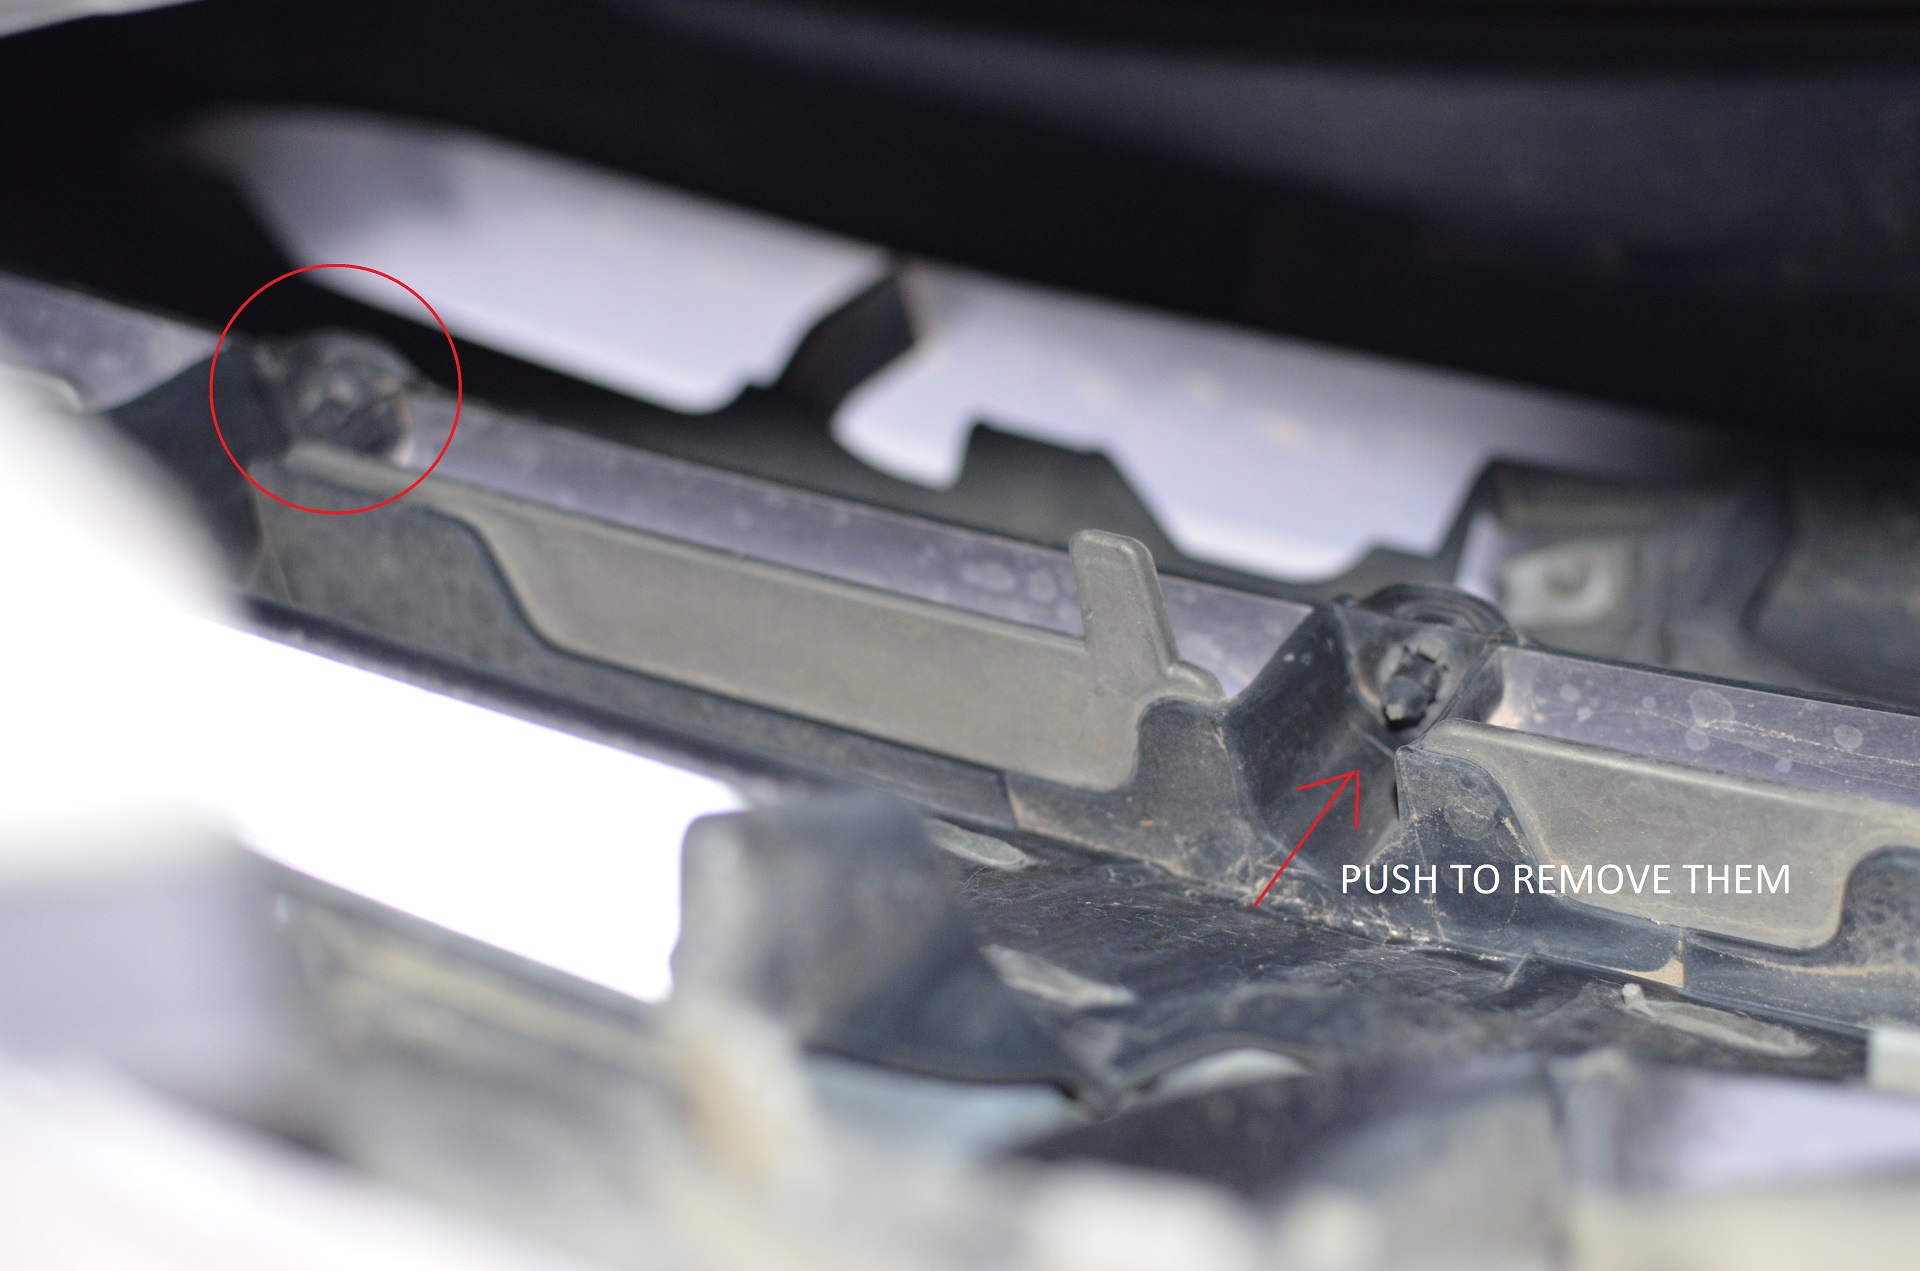
3.- There are 4 plastic push pins holding the grille to the bumper.. These are easier to remove even if they are facing down since the part that pushes out is easily accesible from the top I only needed my thumb to release the pins and then push the entire clip out.

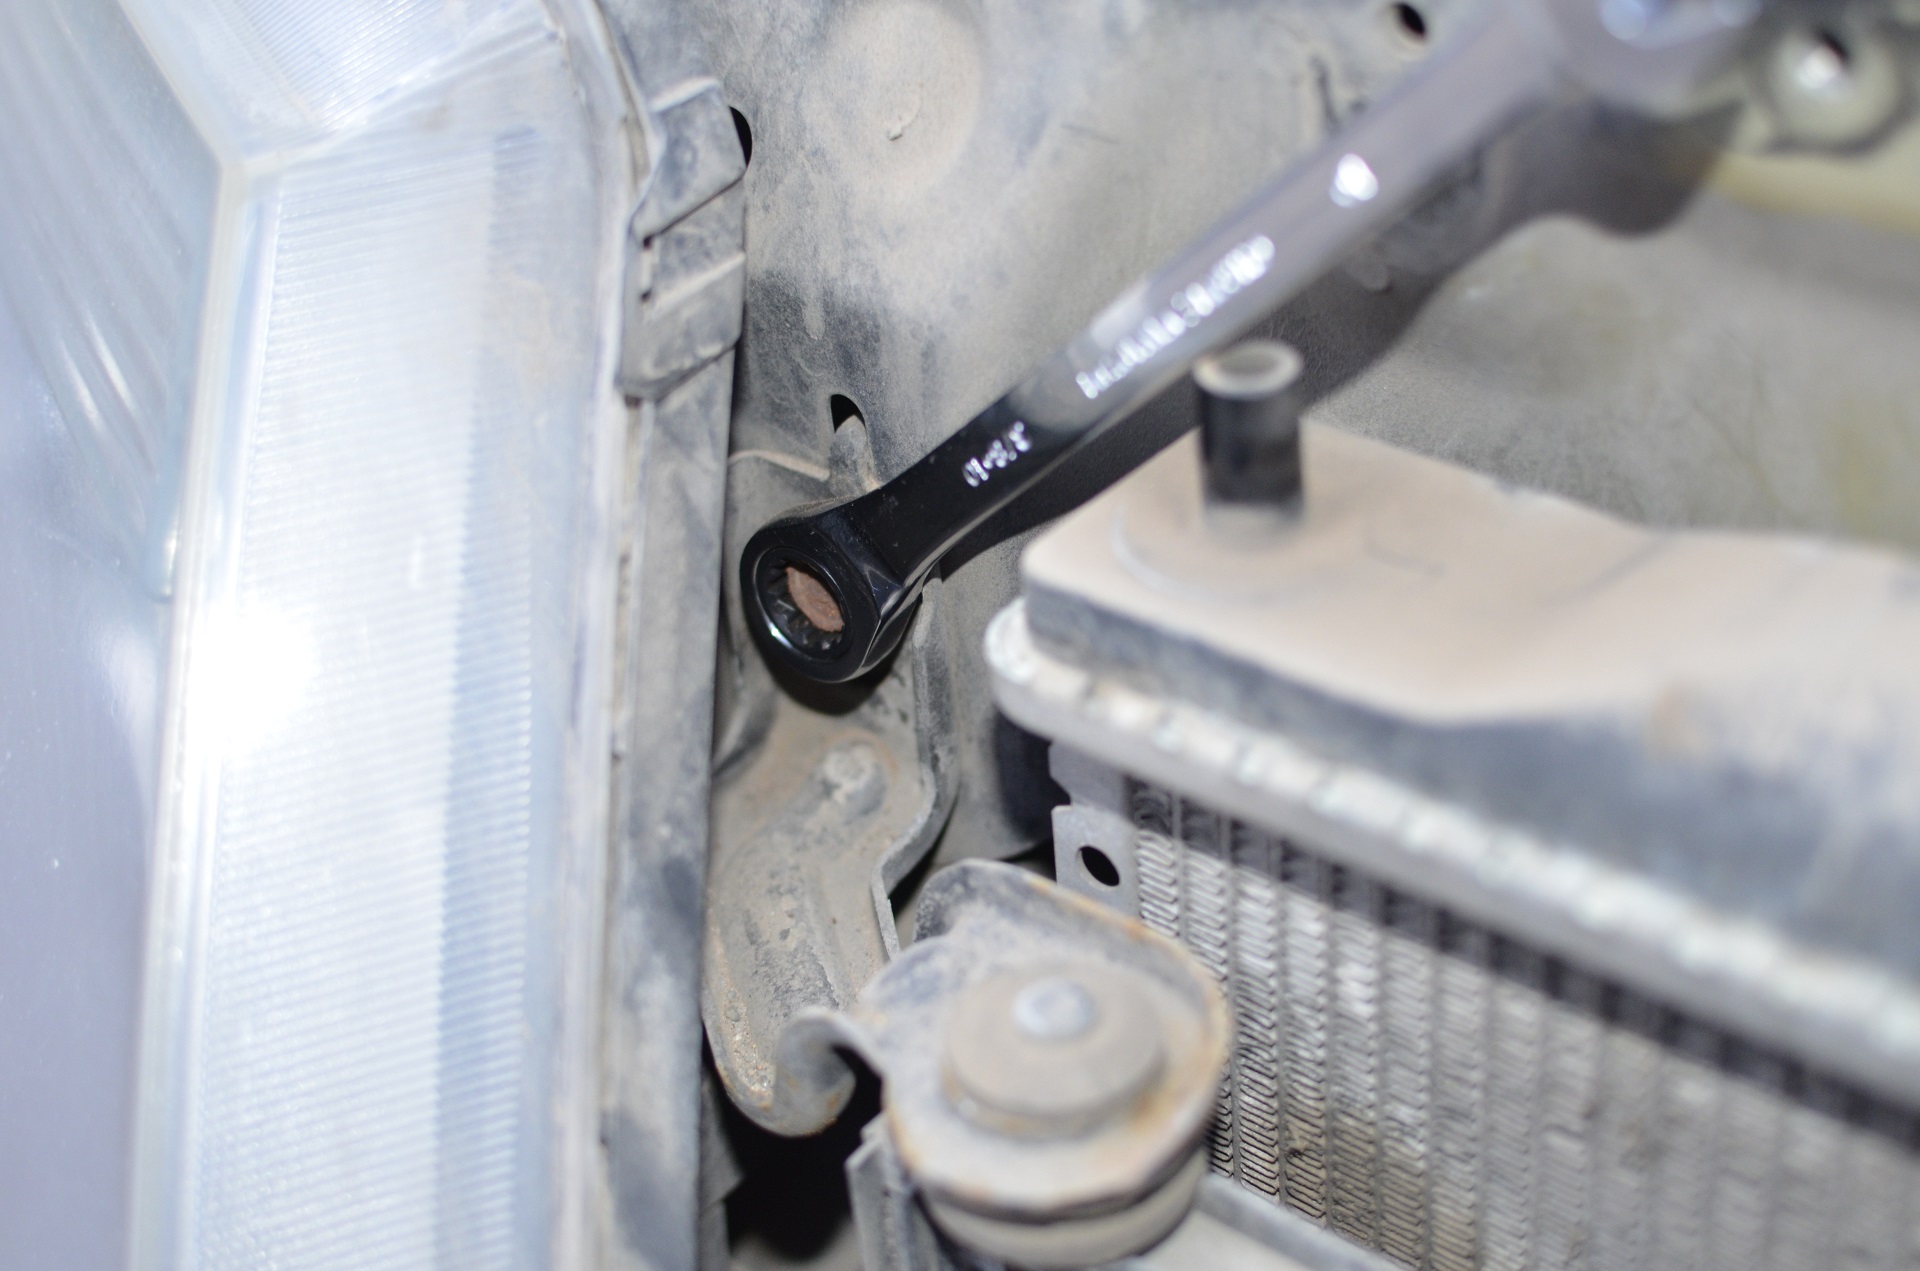
4.- Now its time to remove both brackets holding the radiator and condenser in place, Removing the radiator brackets is easy but the condenser bracket is offset behind the very tip of the headlight making it hard to reach.


This is when the ratcheting wrench pays for itself
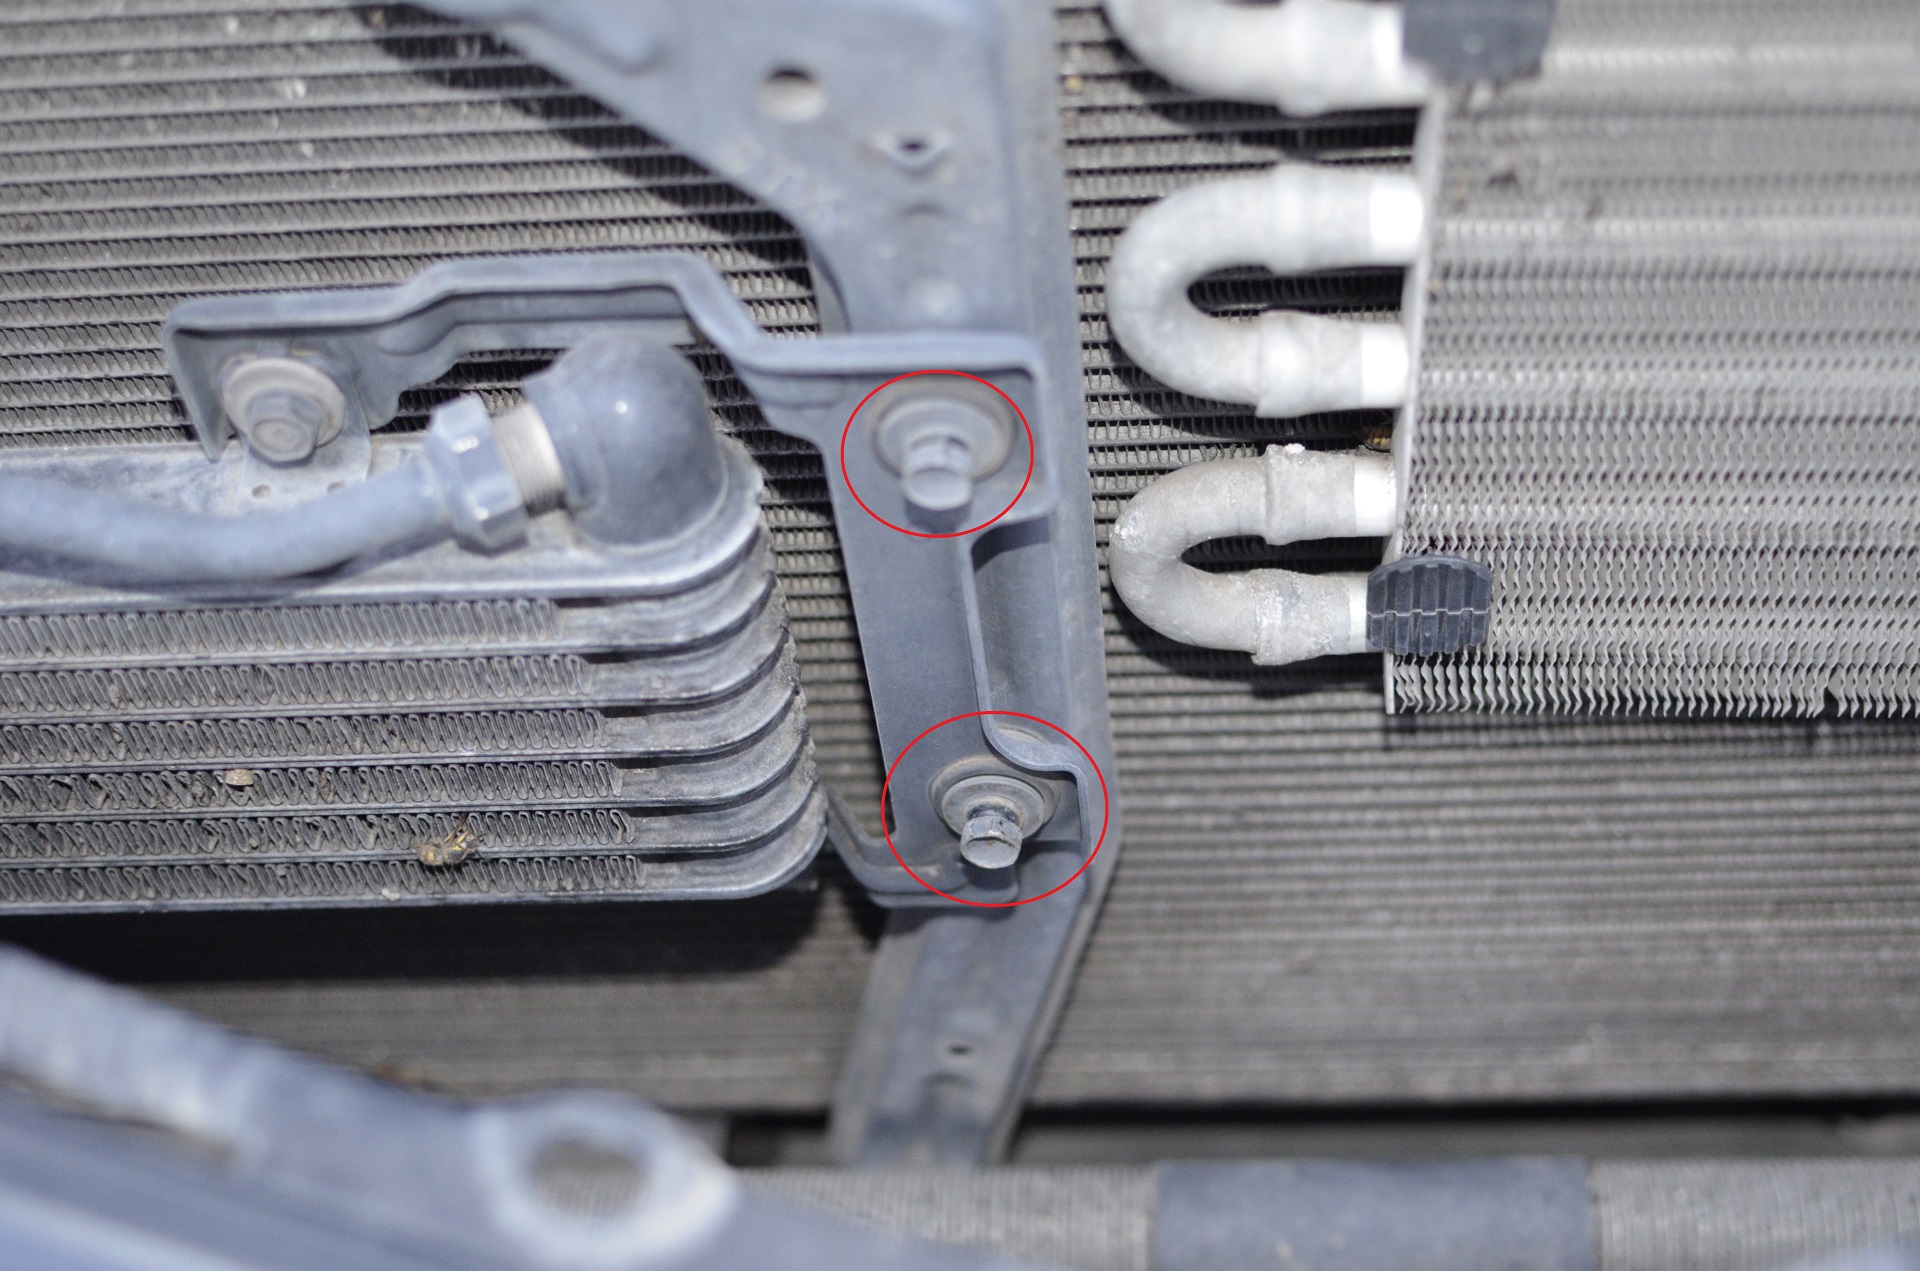
Remove the 2 bolts holding the ATF cooler to the ATF bracket brace.
5.- Now you can tilt the radiator to the front of the car allowing you to reach the harder bolts holding the fans.. This is again where the ratcheting wrench comes to the rescue!

6.- Its time to remove the hood latch its held on by 3x 10mm bolts, Now this part is designed to align the hood height and angle so you must remember its last position.. What I did is clean the sides completely so after removed the dirt behind it told me how it was placed.. You can use the adjusting lines too. The hood alarm sensor is connected from behind the chassis brace, You can remove the sensor latching point by pressing the tab on the back side of the connector (facing the chassis) and slide the plug out without breaking the plastic pin that holds it.


After cleaning the sides you should only see the dirty that was behind the hood latch so you can use that to adjust it back when you are replacing it.

7.- We can now switch our interest on the underneath.. This is where the FUN PART begins! First of all you have to remove the plastic lower cover its held on by plastic push pins.


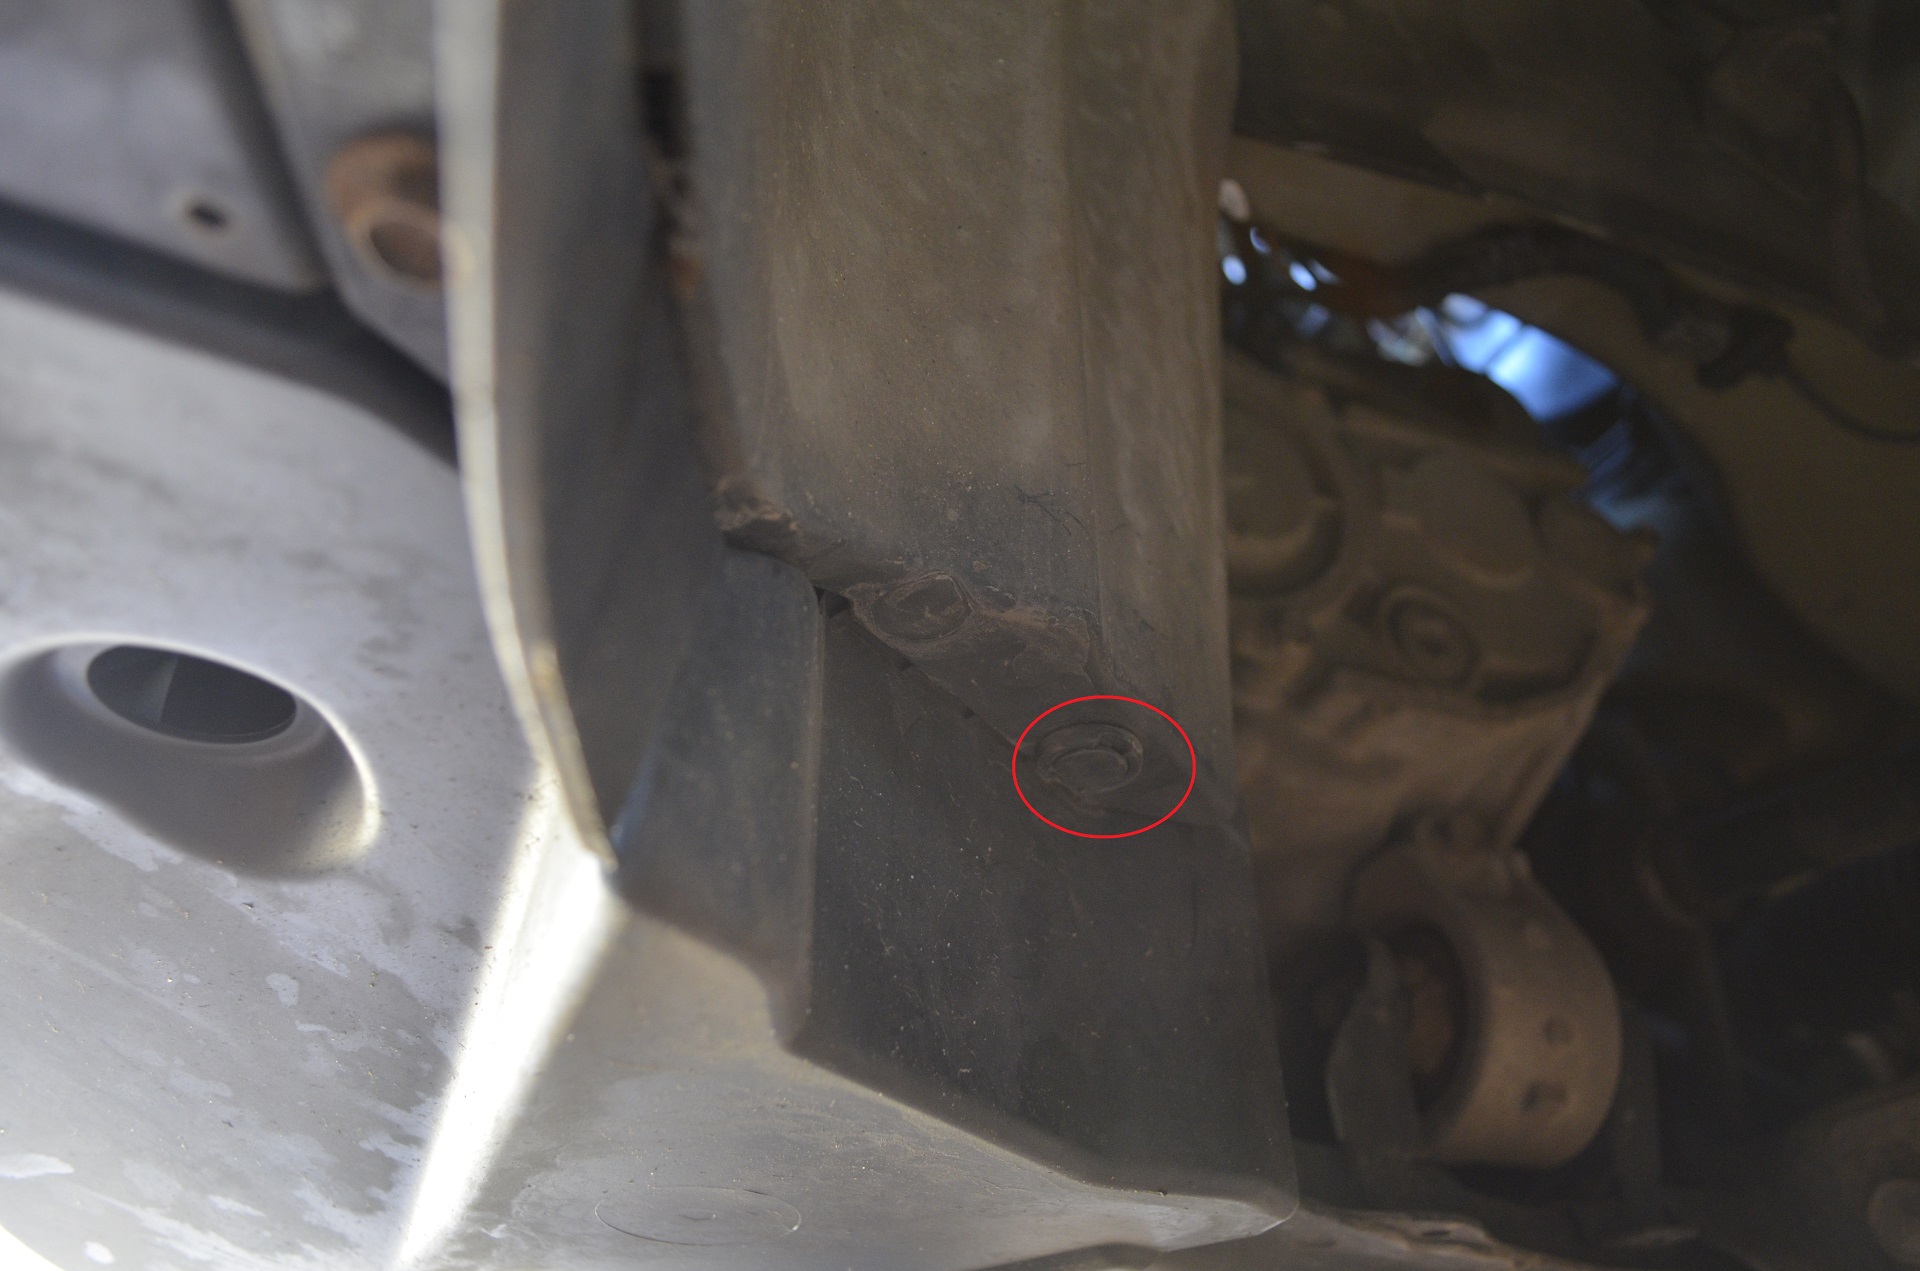
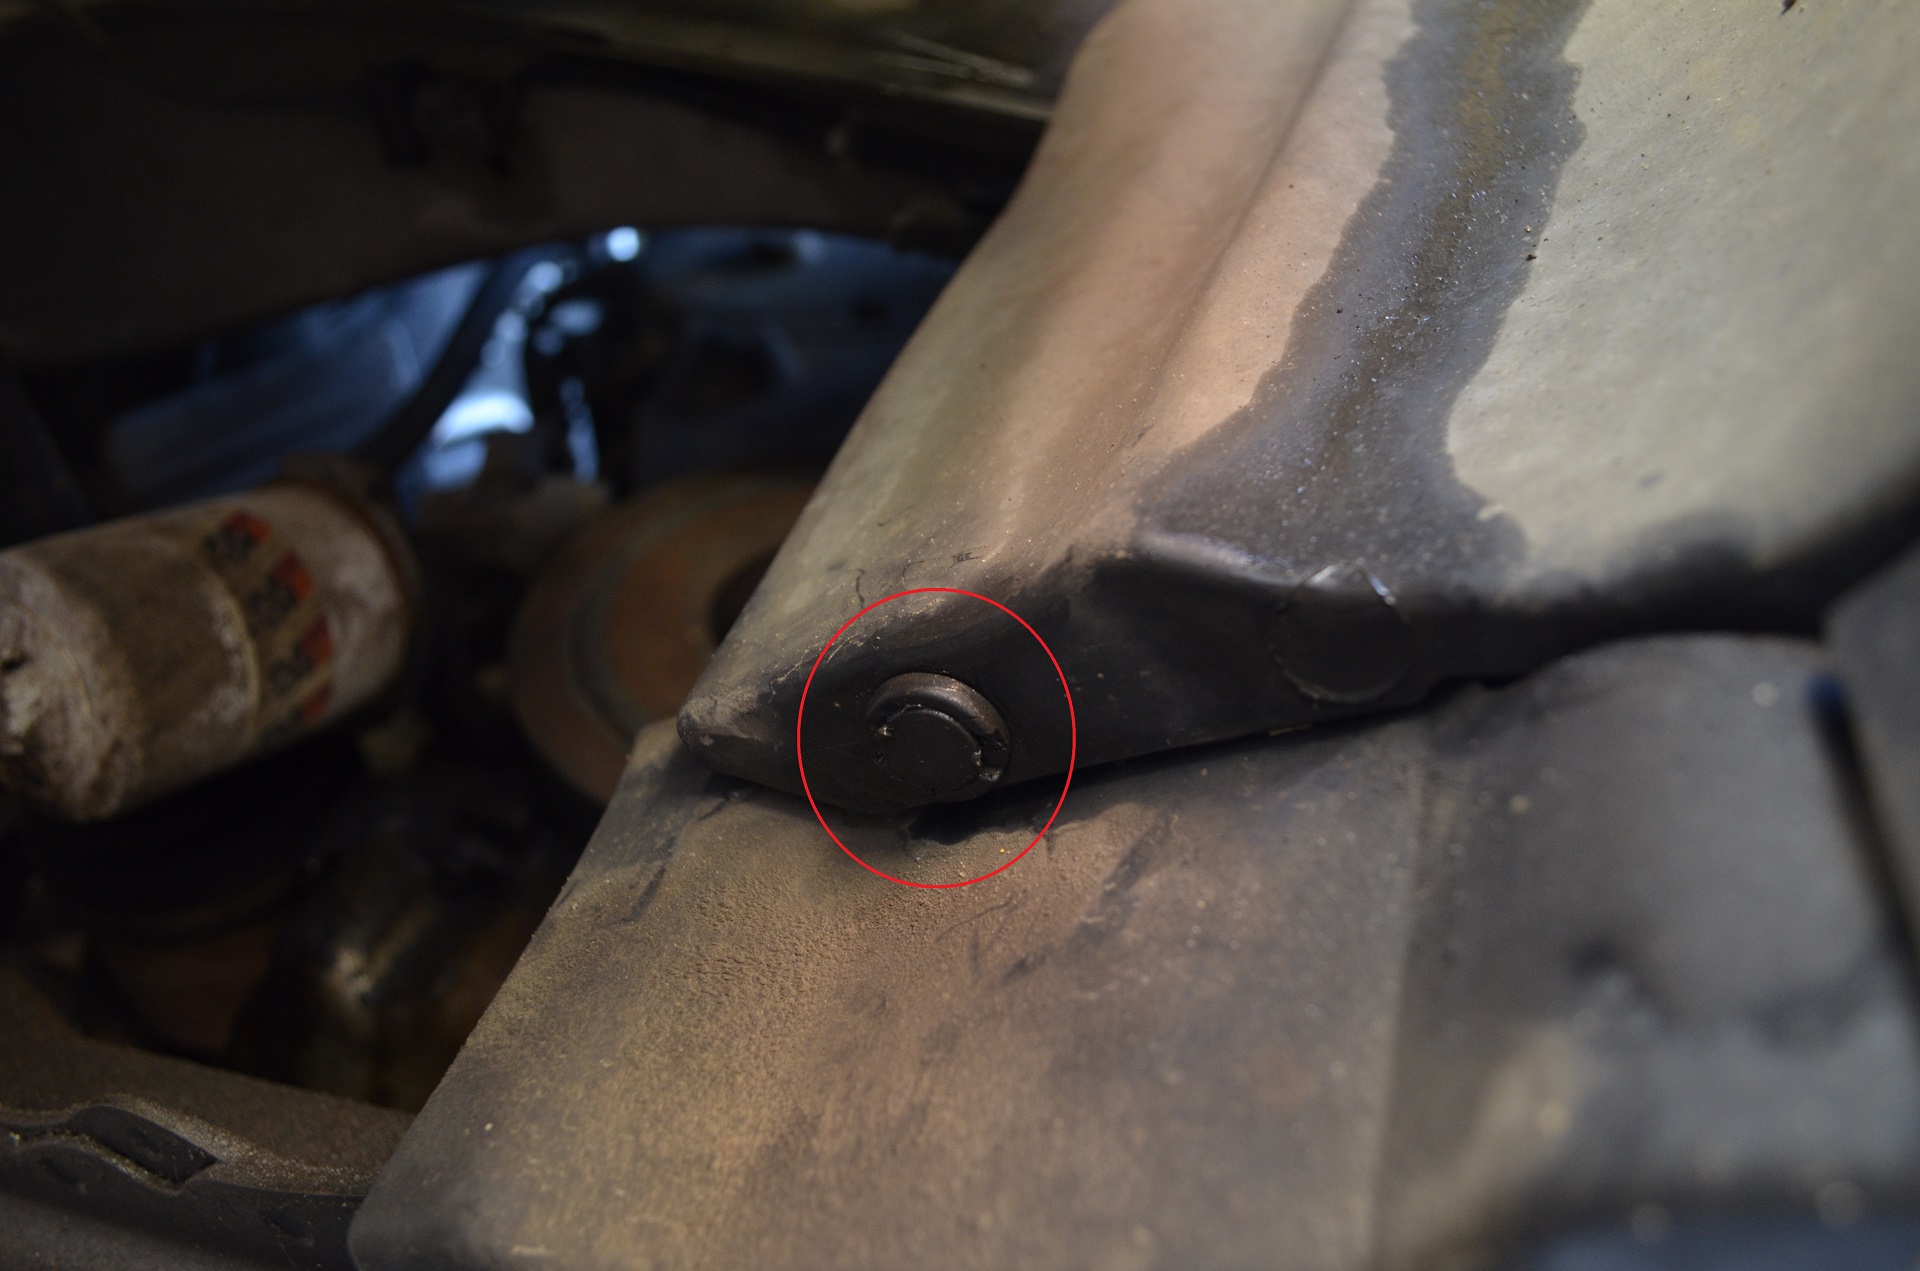
8.- Time to drain the radiator, Now you can remove the radiator cap so the anti-freeze drains faster. The drain valve is located just besides the ATF Warmer Outlet use this picture to locate it, You should be able to turn it by hand but if its too snug use the nose pliers.
9.- This next part is extremely difficult (Part of the reason why I don�t have any pictures) depending on what size of hands you have, Now that you are facing up you can see the horrible space you have between the subframe jacking point and the car front chassis bottom. First remove the ATF Warmer INLET and OUTLET hoses (I can feel your pain from here) if you are lucky the pressure clamps are not facing the opposite direction like it did on mine.. After that is time for the ATF Hardline tube to be removed from the radiator. I don�t have a real picture of it but I made a diagram on paint on how its installed.
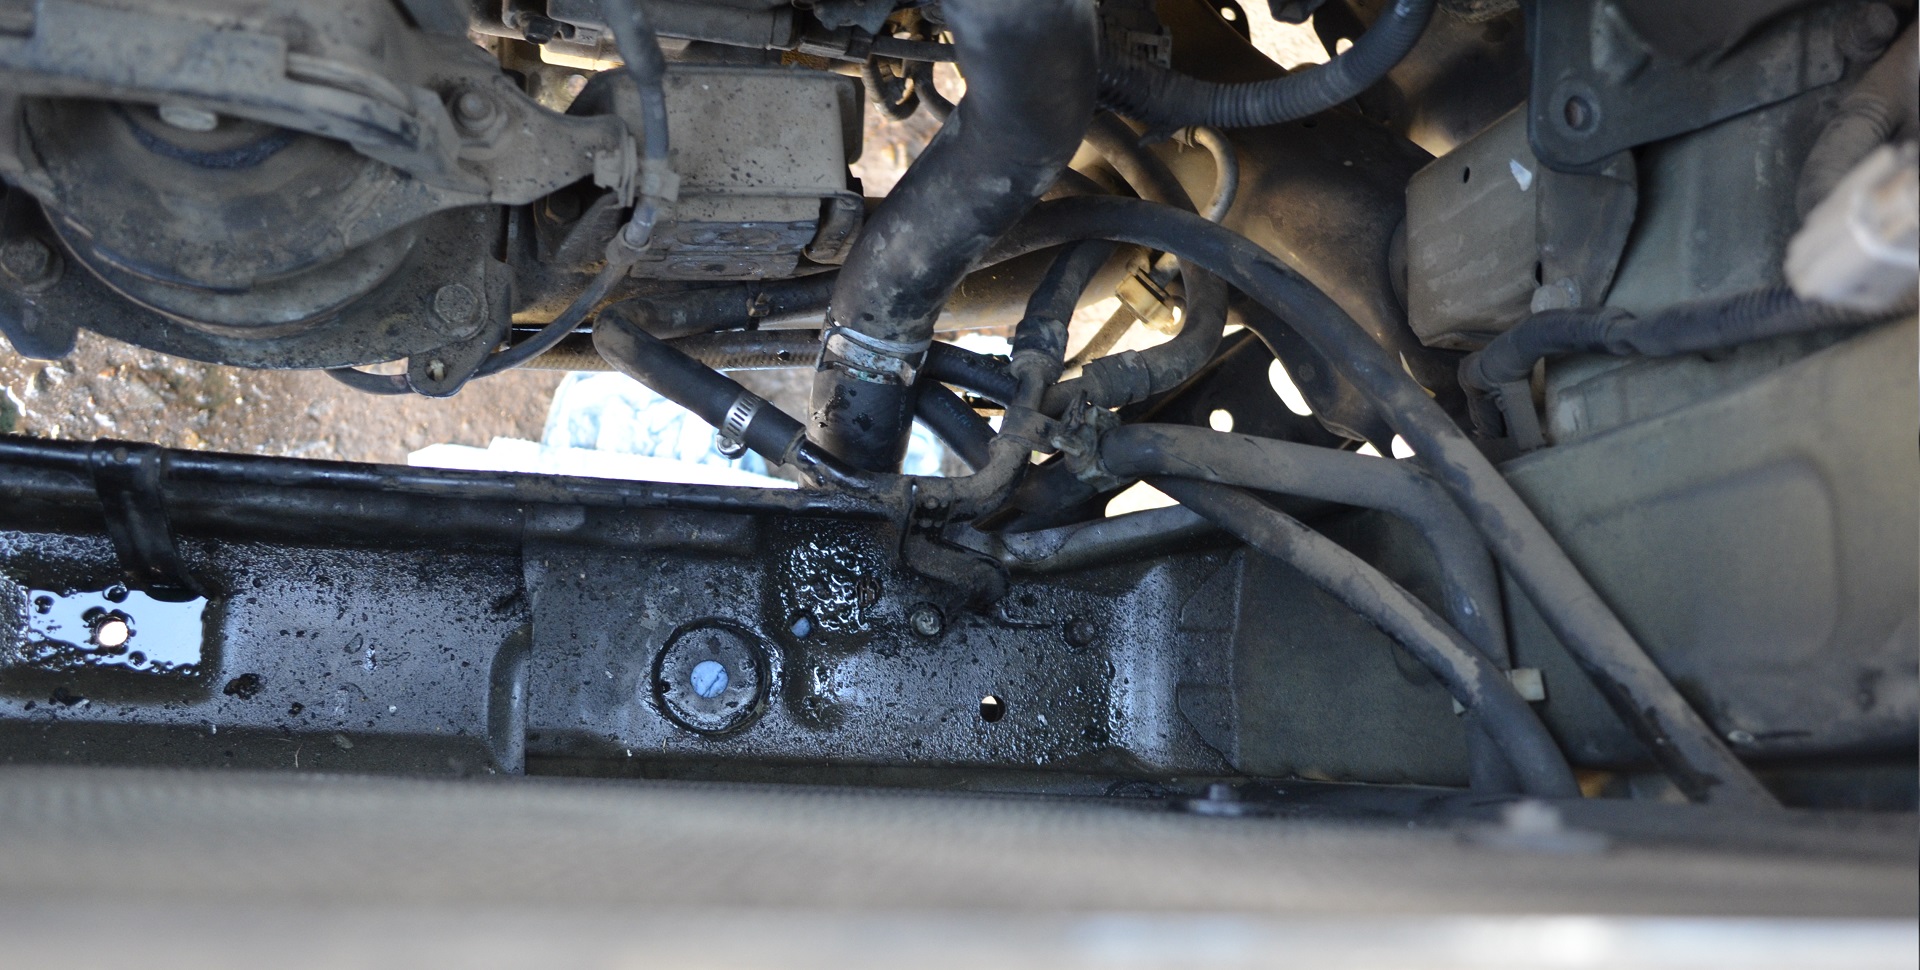
Use your ratcheting wrench to remove the middle bolt and use a long 10mm socket and stubby 3/8ths to remove the far left bolt. Once the bracket is loose remove the 2x 10mm lower bolts holding the passenger fan to the radiator.Now if you are lucky and not me the pressure clamp on the lower radiator hose is facing to the right of the car so you can remove it and remove the hose, Beside the hose there is the A/T Temp sensor that if you are also lucky the tab that removes the plug is facing up and not to the chassis like it did in mine.. If you are like me and have the lower radiator hose pressure clamp facing to the left of the car making it impossible for the nose pliers to fit and also the plug for the A/T Temp sensor is facing down to the chassis? Don�t worry we will come back at step #11.
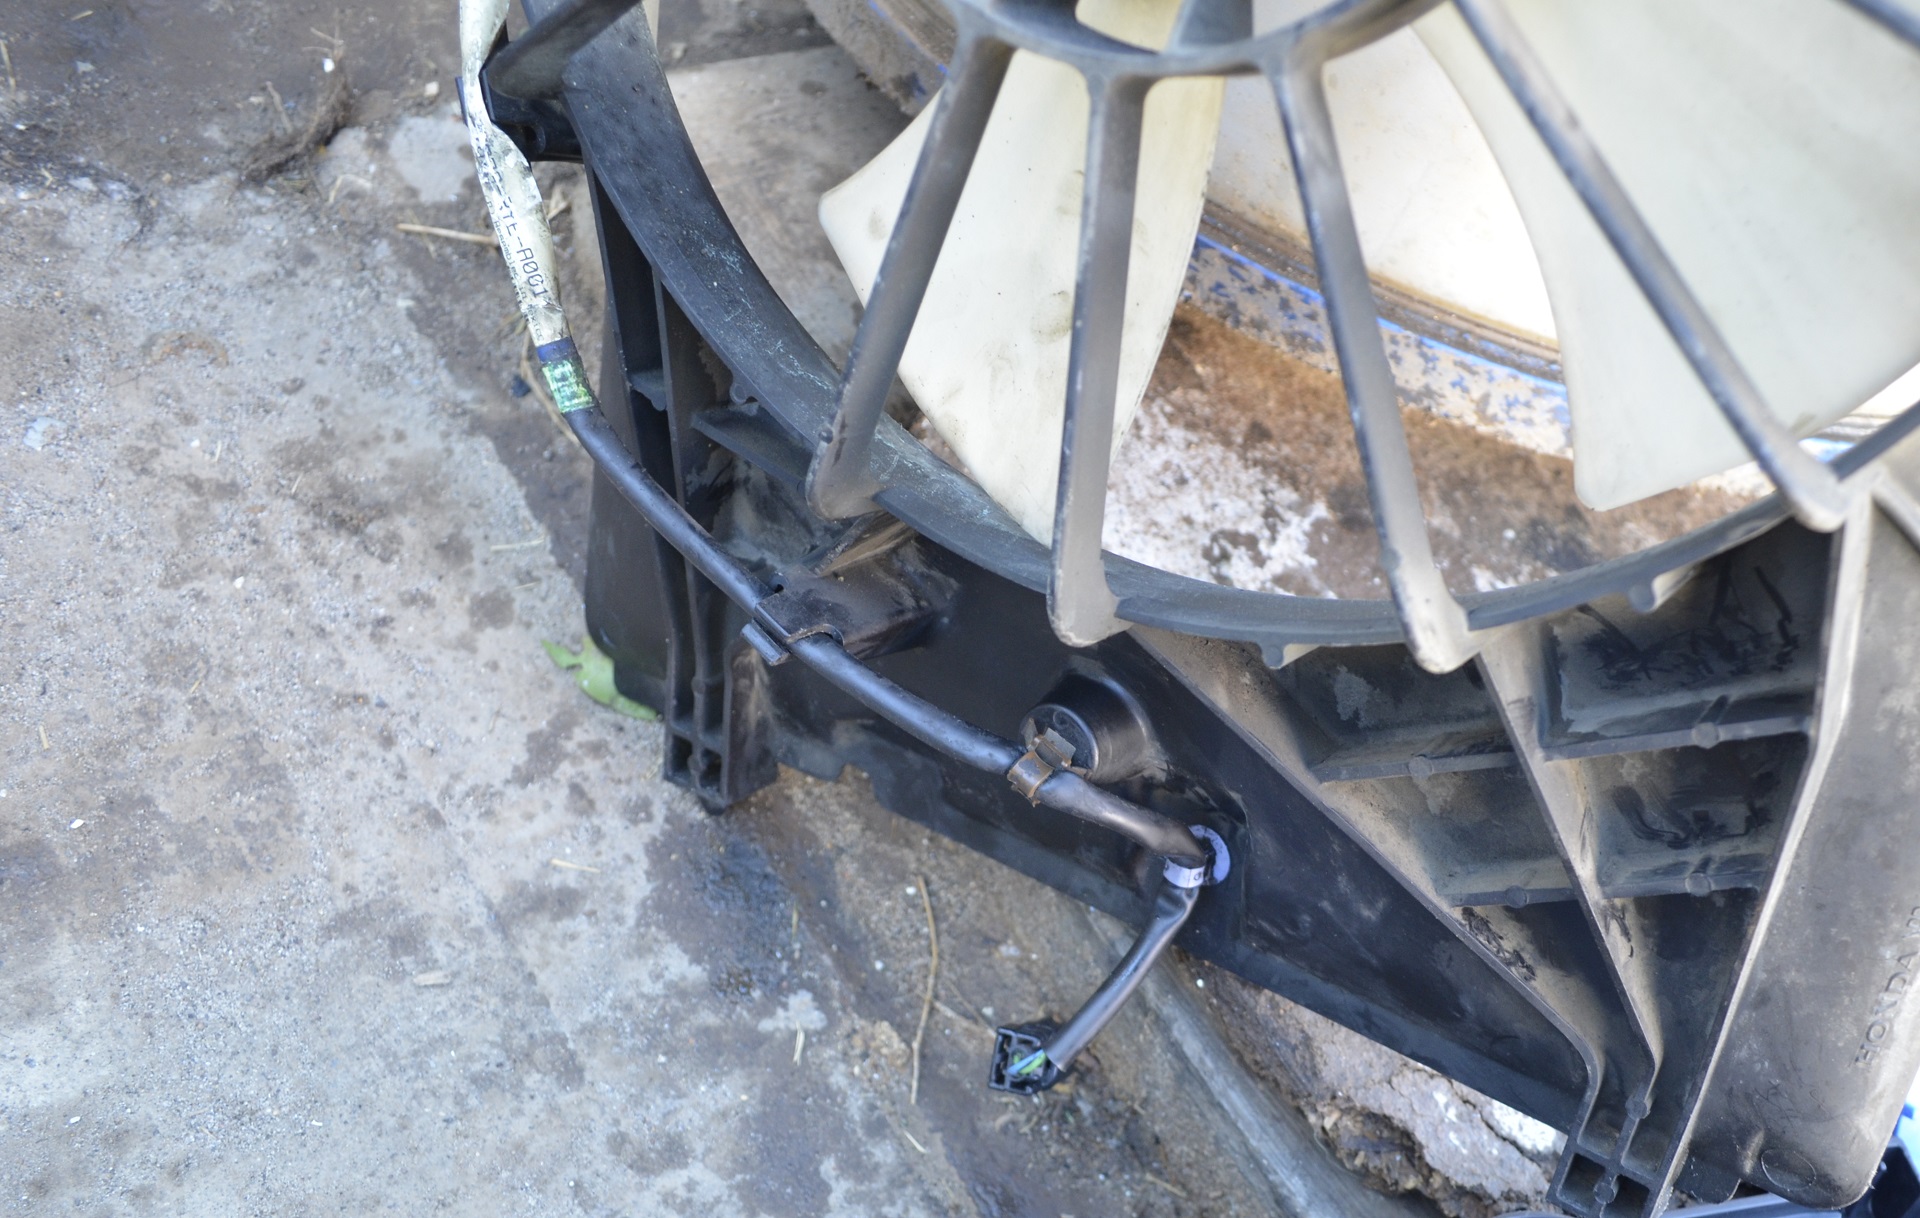
10.- Once everything is loose is time to remove the several clips that are attached to the fans specially the passenger side fan. I simply did not have the room to be careful with these you might wanna save these I don�t know how I just broke them. The clips are:
Passenger Fan:
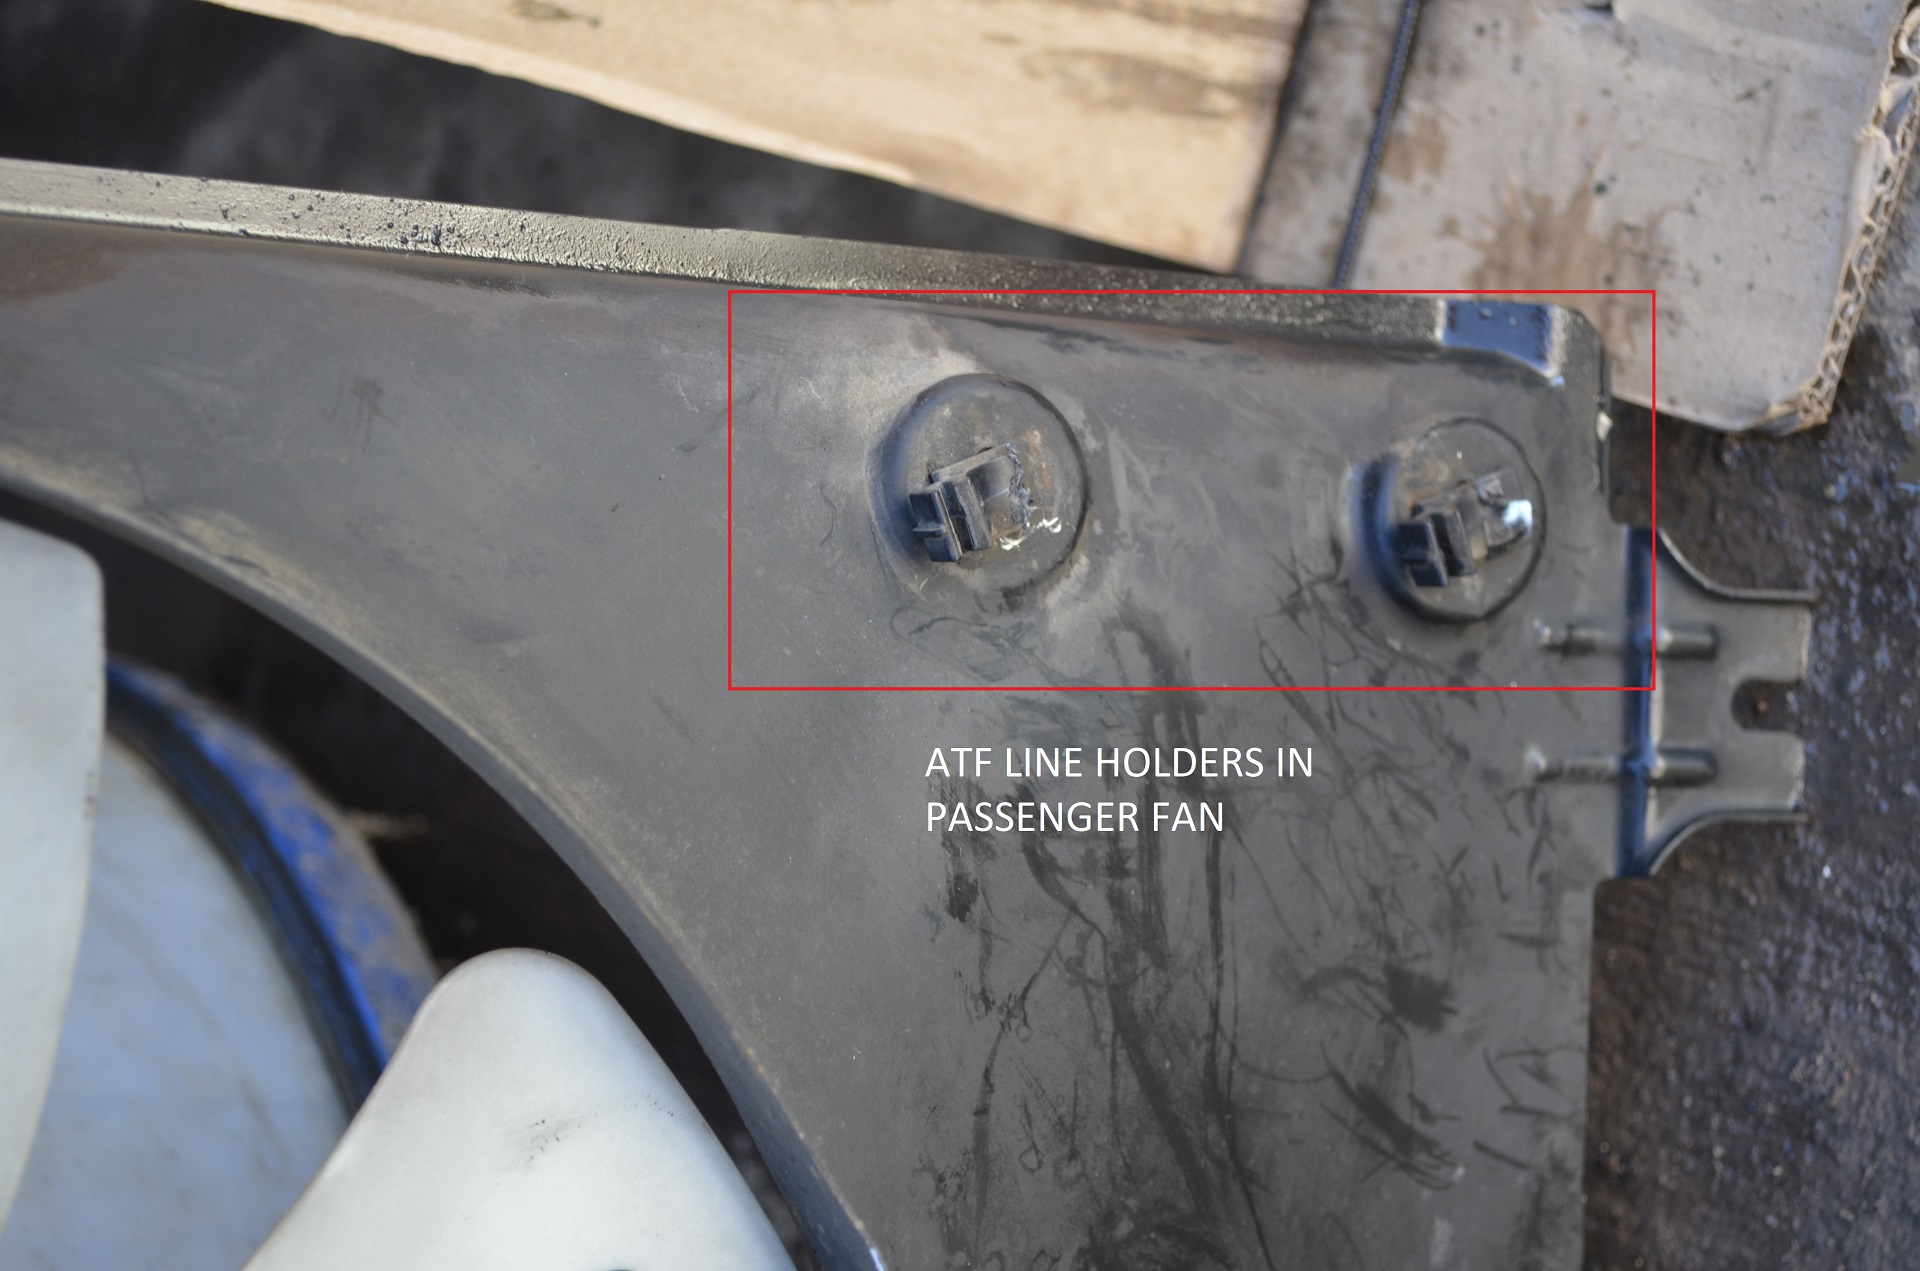

Driver Fan has the ATF Temperature Sensor cable that can be left in place, But the cable loom that connects the sensor and the fan has a clip on the upper part of the radiator which has to come out.
 Now that both fans are free you can remove the Upper Radiator hose by undoing the Pressure Clamp with the Nose Pliers.. Remove the hose and set it aside.
11.- If you are like me and have the most horrible luck of all time and have the lower rad hose clamp facing left and the temp sensor plug facing down? we can now up to this step able to push the radiator UP in order to make room. But first we need to hold the ATF warmer bracket so it doesn�t get in the way. This is what I did:
 Now have a helper pull the radiator up, It wont be able to remove it just yet because the fans will get in the way due to the passenger fan hitting the ATF warmer tubes but there is enough room to remove the A/T Temp sensor plug out. Now you can remove the fans!
12.- Another step that I simply could not picture and its in fact the hardest of them all, I will try my absolute best to describe this but its a little bit complicated.
A) Tilt the radiator as far as it will go to the front (It will stop when the condenser ends hit the headlights)
B) Grab the driver fan and pull it up so it falls out of the radiator base holes, you can now push the fan closer to the engine allowing the passenger fan to be sandwiched between the driver fan and radiator.
C) Grab the passenger fan now that is sandwiched between the driver fan and radiator and pull it through the space that was freed when you removed the hood latch, If needed pull the radiator up a little bit the fan should come out.
D) Now that the passenger fan is out you cannot remove the driver fan unless you remove the radiator.. In order to do this you will put the driver fan near the front engine mount this will allow you to finally remove the lower radiator Hose if you haven�t already.
E) This part is specially hard if you don�t have a helper. You will need to pull the radiator straight up while also moving the driver fan out of the way of the ATF warmer tubes, This is extremely cumbersome take your time and have lots of patience!You should now have the radiator out!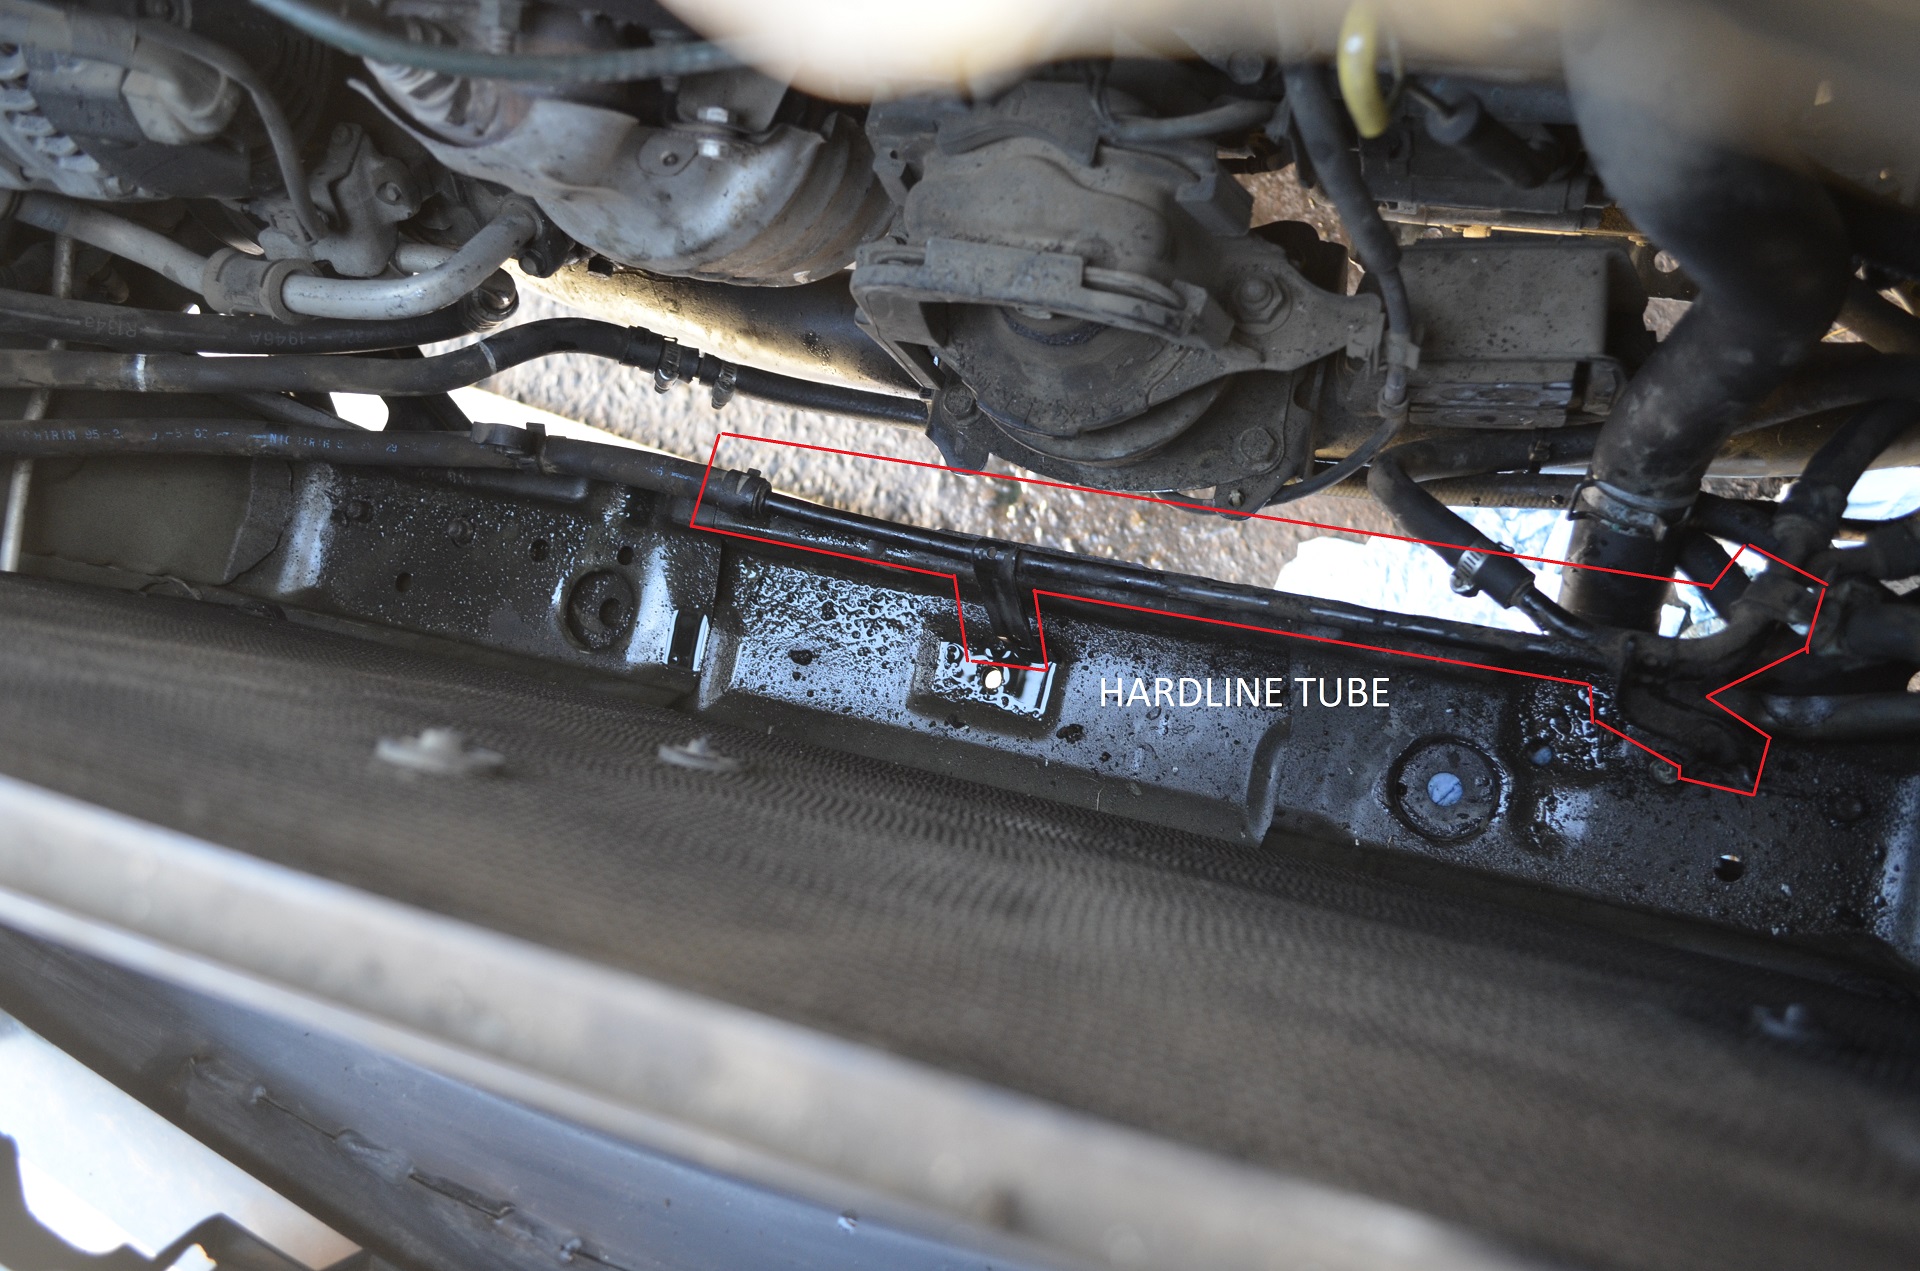
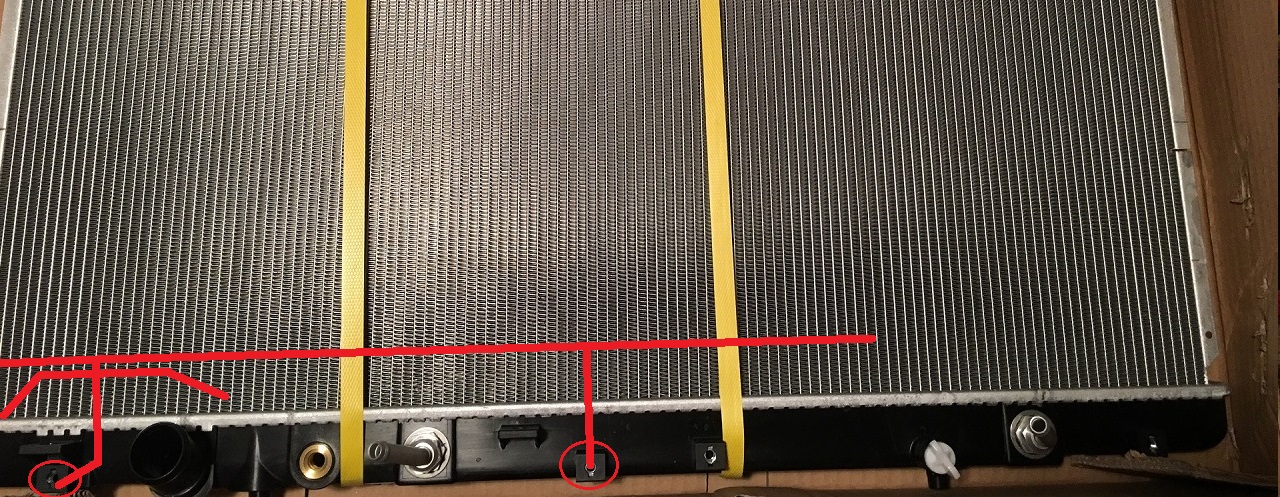
13.- Now grab your new radiator and we need to swap 3 parts: 1x A/F Temp sensor (Needs a 17mm socket) and 2x radiator rubber bases..

14.- Installation is basically reverse procedure until you hit the part where you install the upper radiator plastic cover, You must first BURP the radiator air bubbles.. I will tell you how on the steps for flushing that come next:
----------------------------------------------------------------------------------- FLUSHING ANTI-FREEZE + BURPING COOLANT---------------------------------------------------------------------------------------
1.- Now that you have your new radiator installer OR you are just simply flushing the operating capacity of the anti-freeze out of the system (FLUSH). You will need to remove the engine block drain bolt. First make sure you have the car on jack stands or on ramps! there is no need to remove the passenger wheel on the 2G MDX to reach the block drain bolt, Then put the key on position II (DO NOT START THE CAR) and set the A/C to FULL MAX HEAT wait until you feel the air coming from the foot area and close the key entirely.. This will allow some part of the A/C coolant lines to be drained with the block drain bolt.
2.- The drain bolt is located on the rear of the engine (firewall side) exactly behind the VTEC SOLENOID and Oil pressure sensor. I didn�t take an actual photo but this pic works as the entire J-Series engines drain bolt for the block is exactly the same (Note that you don�t need to unplug the sensor as this pic claims, at least not for the 2G MDX) catch as much of the antifreeze you can with an oil pan, You can also use a clear line tube in order to avoid spillage but I am too lazy for that so I did what I always do and let it flow.
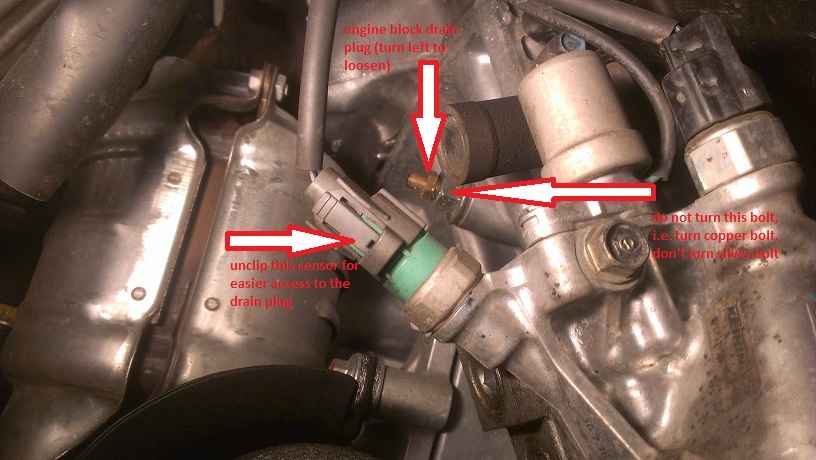
3.- Wait until there is no more A/F draining from the block drain bolt and close it.. This is a banjo bolt so there is no need to go gorilla mode on the torque for it, snug is fine. Take this time to replace any coolant on the Reservoir if you are going for maximum new A/T as possible! Its only held by 1 plastic push pin, once removed just pull the reservoir UP to un-dock it.
You can now start the BURP Process!
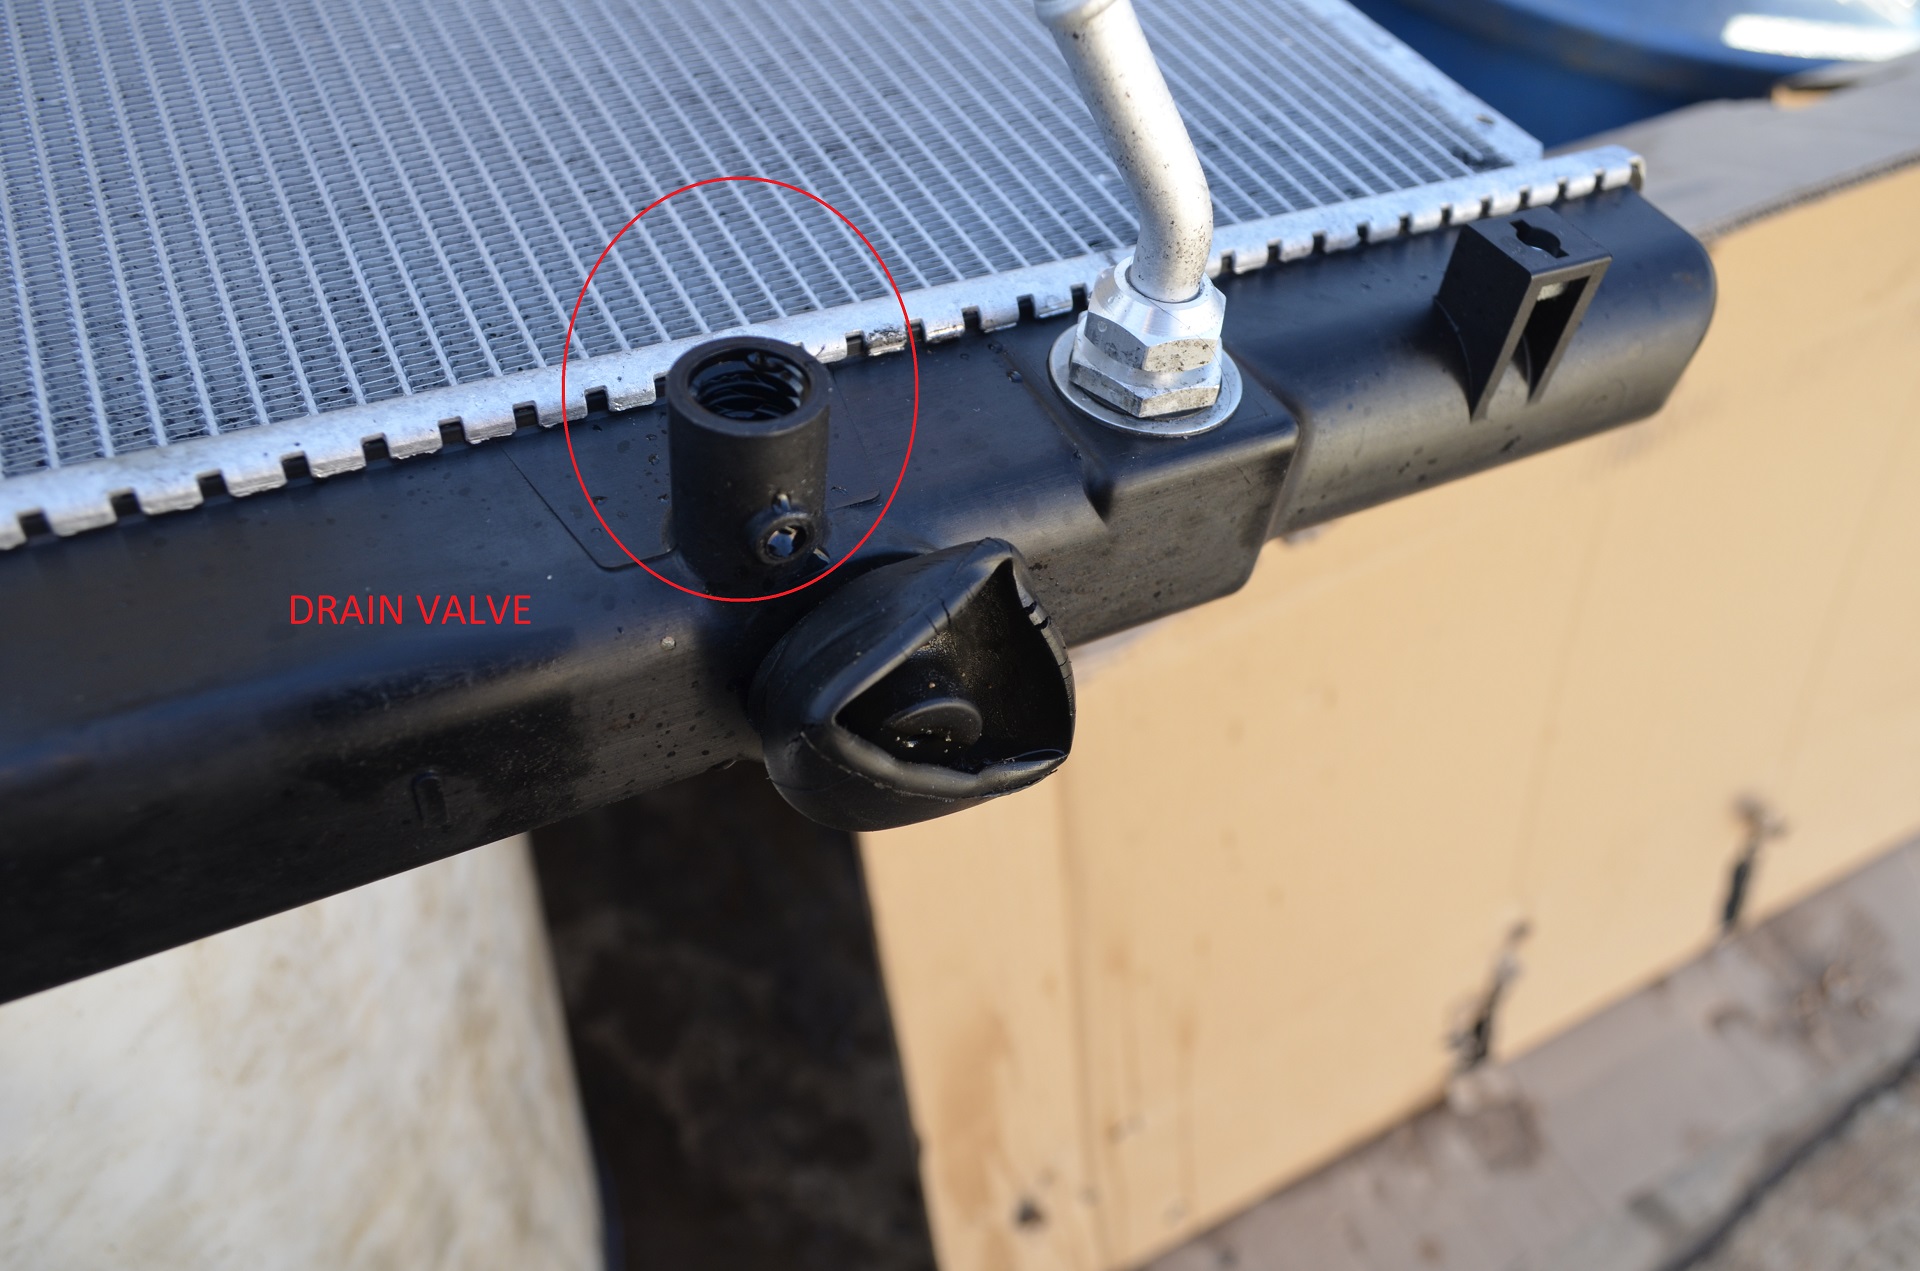
4.- Its time to fill the radiator! obviously make sure the radiator drain valve is fully closed. Fill the radiator until it fills up completely.
Now start the engine and continue to fill it as the level decreases (because of air bubbles in the system). Continue to do this until the fans kick in and make sure the A/C is in MAX HEAT! so any air bubbles in the system come out.


5.- Once the fans kick in you can now close the radiator and its DONE!
Soo if you made up all this way? CONGRATULATIONS! You just successfully replaced your radiator and/Or flushed the coolant system!
Sit back and enjoy your work..

Hope this DIY is of help for anyone!!! Feel free to ask any questions you need.
Some background:
I just recently (Basically before xmas) had the bad fortune of having my OG radiator fail on me, the heater core aluminum cracked and made a nasty leak. So I had to replace the radiator, It is pretty ironic that the radiator failed this way having an ATF Warmer Bypass which was basically done so I didn�t have to replace the radiator as preventive maintenance hahaha my luck right?.
ATF Warmer:
Some of you guys might be interested in this guide if you are performing the change as preventive maintenance due to the faulty ATF Warmer design that fails and destroys the transmission? So this guide will help you out.
Anti-freeze Flush:
Some of you might be interested on just flushing the anti-freeze and not so much about replacing the radiator? if so the steps will be AFTER the replacement steps.
So scroll down wayyy down below until you find the "---------------------------------------- FLUSH ------------------------------------------------" mark.
Now how hard it is?
I will be blunt here.. Replacing the radiator is no small feat on the 2G MDX. I think Acura hired an Audi Engineer to design the undercarriage of the 2G MDX that allowed no normal human hands between the Subframe and Chassis to reach the lower portion of the radiator.. If you try to use ANY Youtube video for perhaps an Odyssey, Pilot or Ridgeline? DO NOT BOTHER! The space on those is massive compared to the 2G MDX. It was so hard that I missed the more important pictures of this DIY which is basically removing the Fans... I will try my best to describe this process as its very car specific to the MDX. The lower portion was also next to impossible to picture as the subframe and chassis are so close together my DSLR didn�t even fit and I could not focus even on a 14mm lens, Perhaps with a smartphone but I didn't think about it at the time (Due to the difficulty).. I give it a 9 out of 10 for DIY difficult rating.. Its a horrible experience but doable with patience.
Time needed:
+/- 4 hours (Flush Included)
Parts needed:
2x Gallons of Anti-freeze, Fully recommended Honda Type-2 A/F (The Blue Stuff).
You will need 2 gallons regardless if you are doing the flush or not as the radiator will take more than a gallon.
OPTIONAL: 2x radiator rubber feet (mine were pretty deformed).
Tools needed:
Not pictured: Flat Screwdriver for the plastic clips holding the plastic guards.1x Oil pan to catch the anti-freeze.
1x Pair of ramps (This will make your life so much easier! you can do the flush on ramps too).
The most important tool of them all:
This little fella will make your life 100x easier on the offset bolts (Condenser brackets, Fan Brackets and ATF Hardline Tube middle bolt).
I bought this tool out of Autozone for 200 pesos (Around 11 bucks) https://www.autozone.com.mx/llaves-p...-mm/762879_0_0
I could not find the part number for the US Site but you will need an identical tool if you want this to go smoothly..... Not having this tool will make your life miserable.
Now the STEPS!!!!!
0.- (Yeah I forgot this step hahaha) Jack the front axle up or better yet ramp the car up..
1.- Remove the upper plastic cover that hides the entire radiator, Do this by removing all of the plastic push pins. Use a flat screwdriver to pop them up and remove the part that pops off and the entire clip will come out.
2.- There are 2 more plastic push pins holding the grille, There are 3x 10mm bolts you must remove here (2 for the Grille and 1 for the ATF Cooler bracket).
3.- There are 4 plastic push pins holding the grille to the bumper.. These are easier to remove even if they are facing down since the part that pushes out is easily accesible from the top I only needed my thumb to release the pins and then push the entire clip out.
4.- Now its time to remove both brackets holding the radiator and condenser in place, Removing the radiator brackets is easy but the condenser bracket is offset behind the very tip of the headlight making it hard to reach.
This is when the ratcheting wrench pays for itself
Remove the 2 bolts holding the ATF cooler to the ATF bracket brace.
5.- Now you can tilt the radiator to the front of the car allowing you to reach the harder bolts holding the fans.. This is again where the ratcheting wrench comes to the rescue!
6.- Its time to remove the hood latch its held on by 3x 10mm bolts, Now this part is designed to align the hood height and angle so you must remember its last position.. What I did is clean the sides completely so after removed the dirt behind it told me how it was placed.. You can use the adjusting lines too. The hood alarm sensor is connected from behind the chassis brace, You can remove the sensor latching point by pressing the tab on the back side of the connector (facing the chassis) and slide the plug out without breaking the plastic pin that holds it.
After cleaning the sides you should only see the dirty that was behind the hood latch so you can use that to adjust it back when you are replacing it.
7.- We can now switch our interest on the underneath.. This is where the FUN PART begins! First of all you have to remove the plastic lower cover its held on by plastic push pins.
8.- Time to drain the radiator, Now you can remove the radiator cap so the anti-freeze drains faster. The drain valve is located just besides the ATF Warmer Outlet use this picture to locate it, You should be able to turn it by hand but if its too snug use the nose pliers.
9.- This next part is extremely difficult (Part of the reason why I don�t have any pictures) depending on what size of hands you have, Now that you are facing up you can see the horrible space you have between the subframe jacking point and the car front chassis bottom. First remove the ATF Warmer INLET and OUTLET hoses (I can feel your pain from here) if you are lucky the pressure clamps are not facing the opposite direction like it did on mine.. After that is time for the ATF Hardline tube to be removed from the radiator. I don�t have a real picture of it but I made a diagram on paint on how its installed.
Use your ratcheting wrench to remove the middle bolt and use a long 10mm socket and stubby 3/8ths to remove the far left bolt. Once the bracket is loose remove the 2x 10mm lower bolts holding the passenger fan to the radiator.Now if you are lucky and not me the pressure clamp on the lower radiator hose is facing to the right of the car so you can remove it and remove the hose, Beside the hose there is the A/T Temp sensor that if you are also lucky the tab that removes the plug is facing up and not to the chassis like it did in mine.. If you are like me and have the lower radiator hose pressure clamp facing to the left of the car making it impossible for the nose pliers to fit and also the plug for the A/T Temp sensor is facing down to the chassis? Don�t worry we will come back at step #11.
10.- Once everything is loose is time to remove the several clips that are attached to the fans specially the passenger side fan. I simply did not have the room to be careful with these you might wanna save these I don�t know how I just broke them. The clips are:
Passenger Fan:
Driver Fan has the ATF Temperature Sensor cable that can be left in place, But the cable loom that connects the sensor and the fan has a clip on the upper part of the radiator which has to come out.
Now that both fans are free you can remove the Upper Radiator hose by undoing the Pressure Clamp with the Nose Pliers.. Remove the hose and set it aside.11.- If you are like me and have the most horrible luck of all time and have the lower rad hose clamp facing left and the temp sensor plug facing down? we can now up to this step able to push the radiator UP in order to make room. But first we need to hold the ATF warmer bracket so it doesn�t get in the way. This is what I did:
Now have a helper pull the radiator up, It wont be able to remove it just yet because the fans will get in the way due to the passenger fan hitting the ATF warmer tubes but there is enough room to remove the A/T Temp sensor plug out. Now you can remove the fans!12.- Another step that I simply could not picture and its in fact the hardest of them all, I will try my absolute best to describe this but its a little bit complicated.
A) Tilt the radiator as far as it will go to the front (It will stop when the condenser ends hit the headlights)
B) Grab the driver fan and pull it up so it falls out of the radiator base holes, you can now push the fan closer to the engine allowing the passenger fan to be sandwiched between the driver fan and radiator.
C) Grab the passenger fan now that is sandwiched between the driver fan and radiator and pull it through the space that was freed when you removed the hood latch, If needed pull the radiator up a little bit the fan should come out.
D) Now that the passenger fan is out you cannot remove the driver fan unless you remove the radiator.. In order to do this you will put the driver fan near the front engine mount this will allow you to finally remove the lower radiator Hose if you haven�t already.
E) This part is specially hard if you don�t have a helper. You will need to pull the radiator straight up while also moving the driver fan out of the way of the ATF warmer tubes, This is extremely cumbersome take your time and have lots of patience!You should now have the radiator out!
13.- Now grab your new radiator and we need to swap 3 parts: 1x A/F Temp sensor (Needs a 17mm socket) and 2x radiator rubber bases..
14.- Installation is basically reverse procedure until you hit the part where you install the upper radiator plastic cover, You must first BURP the radiator air bubbles.. I will tell you how on the steps for flushing that come next:
----------------------------------------------------------------------------------- FLUSHING ANTI-FREEZE + BURPING COOLANT---------------------------------------------------------------------------------------
1.- Now that you have your new radiator installer OR you are just simply flushing the operating capacity of the anti-freeze out of the system (FLUSH). You will need to remove the engine block drain bolt. First make sure you have the car on jack stands or on ramps! there is no need to remove the passenger wheel on the 2G MDX to reach the block drain bolt, Then put the key on position II (DO NOT START THE CAR) and set the A/C to FULL MAX HEAT wait until you feel the air coming from the foot area and close the key entirely.. This will allow some part of the A/C coolant lines to be drained with the block drain bolt.
2.- The drain bolt is located on the rear of the engine (firewall side) exactly behind the VTEC SOLENOID and Oil pressure sensor. I didn�t take an actual photo but this pic works as the entire J-Series engines drain bolt for the block is exactly the same (Note that you don�t need to unplug the sensor as this pic claims, at least not for the 2G MDX) catch as much of the antifreeze you can with an oil pan, You can also use a clear line tube in order to avoid spillage but I am too lazy for that so I did what I always do and let it flow.
3.- Wait until there is no more A/F draining from the block drain bolt and close it.. This is a banjo bolt so there is no need to go gorilla mode on the torque for it, snug is fine. Take this time to replace any coolant on the Reservoir if you are going for maximum new A/T as possible! Its only held by 1 plastic push pin, once removed just pull the reservoir UP to un-dock it.
You can now start the BURP Process!
4.- Its time to fill the radiator! obviously make sure the radiator drain valve is fully closed. Fill the radiator until it fills up completely.
Now start the engine and continue to fill it as the level decreases (because of air bubbles in the system). Continue to do this until the fans kick in and make sure the A/C is in MAX HEAT! so any air bubbles in the system come out.
5.- Once the fans kick in you can now close the radiator and its DONE!
Soo if you made up all this way? CONGRATULATIONS! You just successfully replaced your radiator and/Or flushed the coolant system!
Sit back and enjoy your work..
Hope this DIY is of help for anyone!!! Feel free to ask any questions you need.
Last edited by Skirmich; 01-24-2018 at 03:53 PM. Reason: Typos


Thread
Thread Starter
Forum
Replies
Last Post
JIGS
2G TL Problems & Fixes
10
05-24-2015 05:04 PM
rybin87
2G TL (1999-2003)
1
10-29-2010 10:16 AM