
Replacing the Brakes (with pictures) 3G Garage #D-041


AZ Community Team
Joined: May 2007
Posts: 32,488
Likes: 7,771
From: N35�03'16.75", W 080�51'0.9"
With re-hosted photos for anyone having trrouble with the original.
First of all, I want to thank Ron A for posting the scans from the Helms manual in this thread. That pretty much got me through what needed to be done.
Second, I don't believe there is a thread around that has actual pictures of someone doing the replacement so I snapped a few pictures when I changed my brakes last week in hopes this might help some of your DIY'ers with the project. It ended up being a pretty easy job once I figured out where everything was.
Tools Used (I will have to verify these later, right now I'm going from memory):
Front:
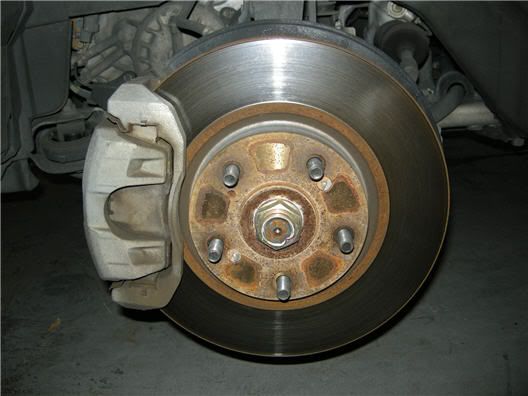
There are 3 bolts for the front that need to be removed. The first (and hardest) to remove is the 17mm bolt (A) at the bottom. I tried for about 15 minutes to break it loose before I soaked it with PB Buster. Let it sit for about 5 minutes then I put the socket on and was finally able to break it after hitting it with a rubber mallet.

You may have to hold "nut" (B) with a opened ended wrench. I didn't have to on the front calipers, but ended up having to on the rear ones.
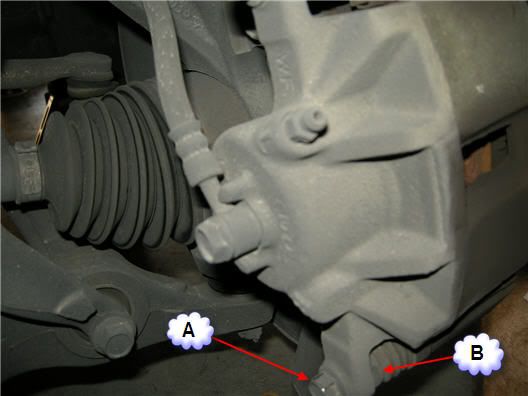
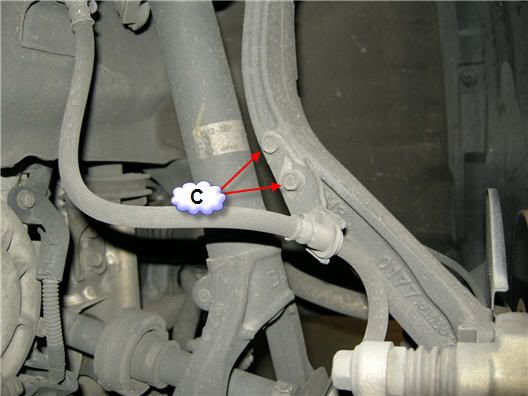
Then remove the Brake hose mounting bolts (C).
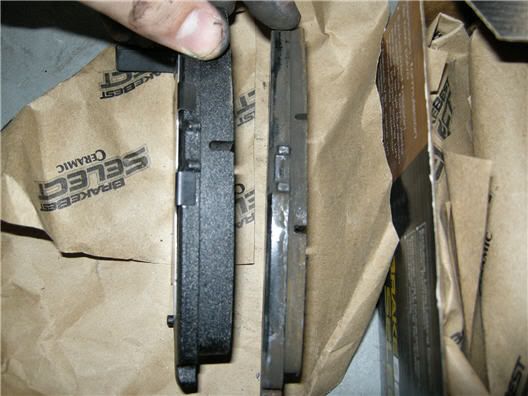
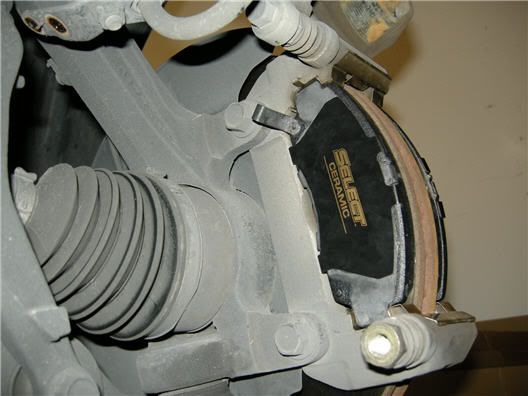
Now you should be able to open the caliper up and remove the old brake pads. Be sure to also remove the "pad retainers" (D).
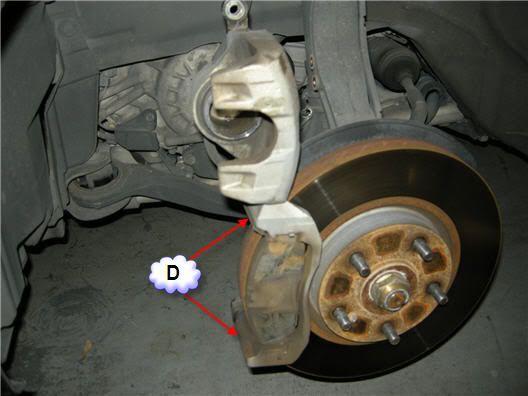
I still had a little bit of life left in the old ones, but they were starting to squeak, plus I already had the damn thing taken apart so....
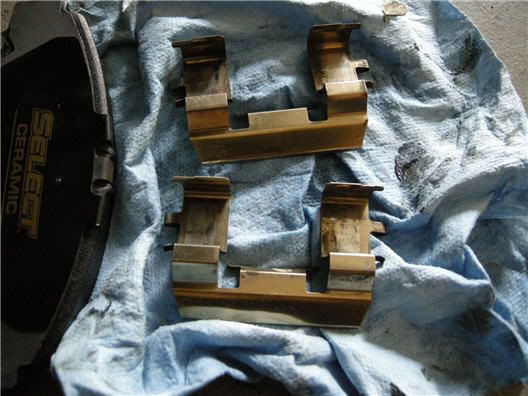
I cleaned the pad retainers with an old tooth brush, dish soap and water. I meant to get a picture of them before and after, but only got em after.
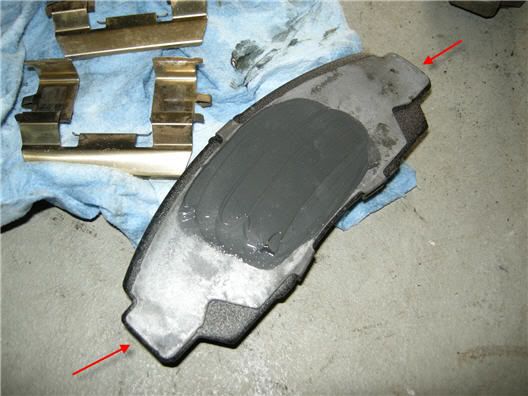
The Helms scans recommended you put grease between all the shims and pretty much everywhere except on the rotor and "pad" side of the break pad. So that means in between all the shims and there should be 2 shims for each brake pad (I reused the "inner shims" and used the "outter shims" that came with my brake pads). I also put some on the outside of the break pad where the pad sits in the pad retainers (pointed out below) in addition to the grease on the shim.
Pic with the new pads installed (from outside of wheel well):
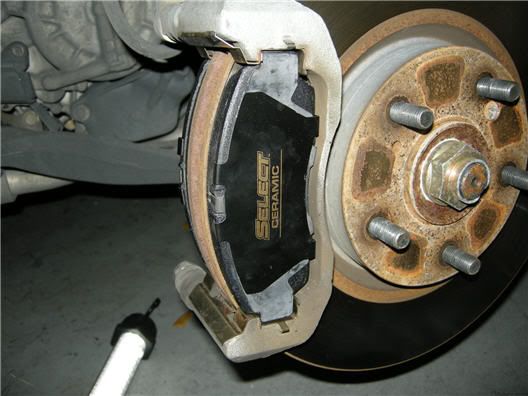
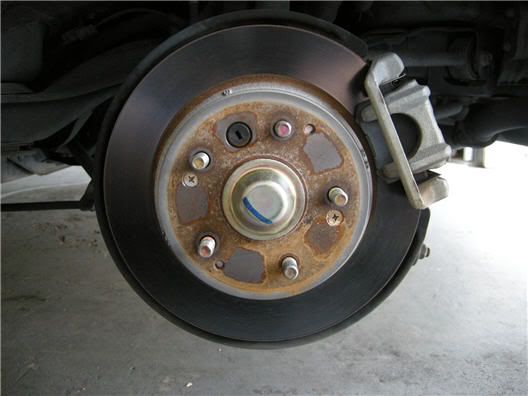
New pads installed (from inside of wheel well)
At this point you will need to push the caliper piston back in (sorry I didn't get a picture). There is good and bad news here. Good news is, as you push it in, it doesn't push back out. Bad news is, its a pain in the ass to push in. I think a C-clamp would have been nice here, but I just pushed it in with the end of a wrench. Once its pushed in flush to the caliper, you should be able to bring the caliper back down around the new pads and screw your bolts back in.
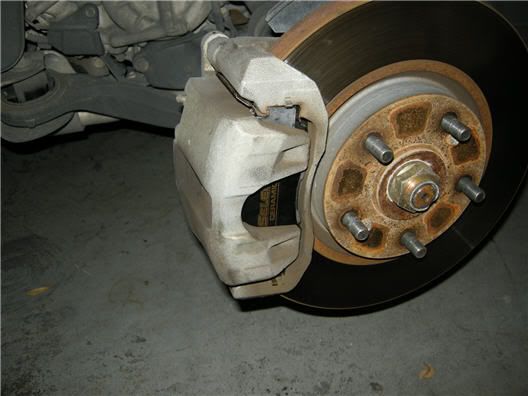
Here's the finished front:
Back:
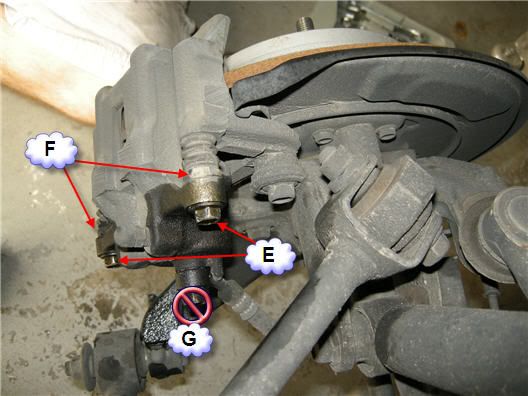
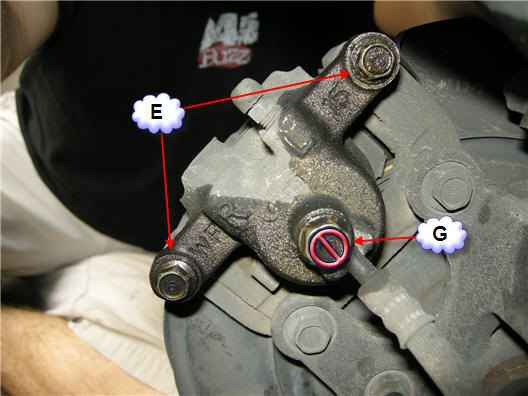
On the back brake caliper, its recommended to remove the brake line mount bolts first. Well, I didn't do this because I originally couldn't find where they were mounted and assumed it was where the brake line meeting the caliper (G). After I loosened it and brake fluid started leaking, I realized that was wrong and quickly tightened it back up . I then unscrewed the caliper bolts (E) while holding the nuts (F) with an open ended wrench or, in my case, a crescent wrench.
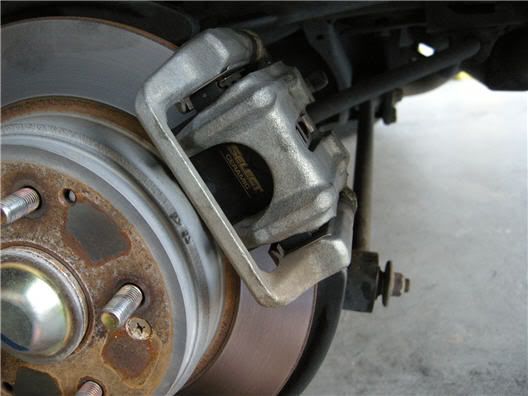
Here's another more direct angle:
Once you have the bolts off, just wiggle the caliper back and forth until it comes off. Once you have it off, remove the rear "shims" and clean then up:
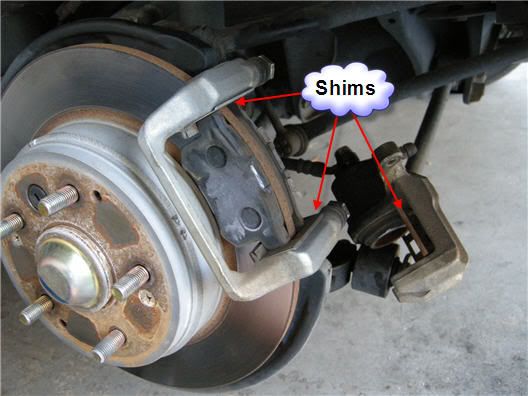
Grease up the pad shims like you did on the front pads. Note: I put a slightly thinner coat of grease on the rear shims. I figured they have less strain on them. But I'm not a grease expert, so I don't know if that matters.
Then you just put everything back together.
Like I said before, I didn't see a thread with actual pictures (which I prefer to scans from manuals) so I wanted to get one together. I probably left some stuff out somewhere, so I try and check back on this thread to answer any questions people might have.
Good Luck!
Second, I don't believe there is a thread around that has actual pictures of someone doing the replacement so I snapped a few pictures when I changed my brakes last week in hopes this might help some of your DIY'ers with the project. It ended up being a pretty easy job once I figured out where everything was.
Tools Used (I will have to verify these later, right now I'm going from memory):
- 17mm, 14mm and 12mm Sockets
- Rubber Mallet
- Cresent wrench (I believe a 6mm open ended wrench will work here, but I'm lazy )
- Small flat head screw driver
- PB Blaster
- Master Pro EP Moly Grease (can't find a link for it but it was $2.99 at O'Reilly Auto Parts for a 1lb tub which is enough to do about 43267986 brake jobs. If you can't find it I understand as long as it is some sort of "Moly" grease, it should work fine.)
Front:
There are 3 bolts for the front that need to be removed. The first (and hardest) to remove is the 17mm bolt (A) at the bottom. I tried for about 15 minutes to break it loose before I soaked it with PB Buster. Let it sit for about 5 minutes then I put the socket on and was finally able to break it after hitting it with a rubber mallet.
You may have to hold "nut" (B) with a opened ended wrench. I didn't have to on the front calipers, but ended up having to on the rear ones.
Then remove the Brake hose mounting bolts (C).
Now you should be able to open the caliper up and remove the old brake pads. Be sure to also remove the "pad retainers" (D).
I still had a little bit of life left in the old ones, but they were starting to squeak, plus I already had the damn thing taken apart so....
I cleaned the pad retainers with an old tooth brush, dish soap and water. I meant to get a picture of them before and after, but only got em after.
The Helms scans recommended you put grease between all the shims and pretty much everywhere except on the rotor and "pad" side of the break pad. So that means in between all the shims and there should be 2 shims for each brake pad (I reused the "inner shims" and used the "outter shims" that came with my brake pads). I also put some on the outside of the break pad where the pad sits in the pad retainers (pointed out below) in addition to the grease on the shim.
Pic with the new pads installed (from outside of wheel well):
New pads installed (from inside of wheel well)
At this point you will need to push the caliper piston back in (sorry I didn't get a picture). There is good and bad news here. Good news is, as you push it in, it doesn't push back out. Bad news is, its a pain in the ass to push in. I think a C-clamp would have been nice here, but I just pushed it in with the end of a wrench. Once its pushed in flush to the caliper, you should be able to bring the caliper back down around the new pads and screw your bolts back in.
Here's the finished front:
Back:
On the back brake caliper, its recommended to remove the brake line mount bolts first. Well, I didn't do this because I originally couldn't find where they were mounted and assumed it was where the brake line meeting the caliper (G). After I loosened it and brake fluid started leaking, I realized that was wrong and quickly tightened it back up
. I then unscrewed the caliper bolts (E) while holding the nuts (F) with an open ended wrench or, in my case, a crescent wrench.Here's another more direct angle:
Once you have the bolts off, just wiggle the caliper back and forth until it comes off. Once you have it off, remove the rear "shims" and clean then up:
Grease up the pad shims like you did on the front pads. Note: I put a slightly thinner coat of grease on the rear shims. I figured they have less strain on them. But I'm not a grease expert, so I don't know if that matters.
Then you just put everything back together.
Like I said before, I didn't see a thread with actual pictures (which I prefer to scans from manuals) so I wanted to get one together. I probably left some stuff out somewhere, so I try and check back on this thread to answer any questions people might have.
Good Luck!

AZ Community Team
Joined: May 2007
Posts: 32,488
Likes: 7,771
From: N35�03'16.75", W 080�51'0.9"
 . I got 50k miles so I have to check my pads somehow.
takin care of Business in
iTrader: (5)
Joined: Jan 2008
Posts: 30,994
Likes: 4,733
From: Kansas City, MO
you can either spend $100 on a hydraulic jack and jack stands.....so you can change an axle at a time....or you can just use the stock jack and work on 1 tire (brake) at a time....

Advanced
Joined: Jun 2006
Posts: 77
Likes: 5
From: North Carolina
Pad and Rotor Chang - Lessons Learned
So I just completed my first front pad and rotor change yesterday, and learned a couple lessons: (some painful, some enjoyable)
1) I went with the Duralast Cmax Gold pads, and new Duralast front rotors. While the pads seem to be awesome, the rotors are not EXACTLY the same size as the originals. The new Duralast rotors seem to be a little thinner, with more space in between the two discs. I hindsight, I feel like I should have left the rotors alone.
2) My 2006 AT TL has 94,000 miles on it, and these are the original rotors and pads. The pads still had probably 35% of the material left on them. I probably could have waited another 20,000 miles if I wanted. But since the brake fluid had never been bled, it was probably good for me to do this.
3) Getting those 2 rotor screws off is a HUGE pain. On the driver's side, I had to beat the hell out of them with an impact wrench, to the point of actually twisting the bits slightly. On the passenger's side, the impact wrench bits broke off in the screw! This led to a nightmare of hours of drilling into that hard metal. With one of the screws, my neighbor had to come over with his dremel to help. Again, I wish I just left the rotors alone. On the passenger's side, since I drilled the screws, I was not able to use new screws to secure the rotor to the hub. While the lug nuts do most of this, the new rotor had a little bit of "play" while I was putting the caliper back on and bleeding the brakes.
4) In my local Autozone and Advance Auto, there were a couple options of brands of "Synthetic DOT3 or DOT4 brake fluid". But I noticed that Prestone had a wet boiling point of like 284 degrees, but the Valvoline brand I bought had a boiling point of 311 degrees, so I went with that.


Joined: Sep 2008
Posts: 78,245
Likes: 20,198
All great info...I wonder if I've done this wrong in the past...I've never taken the caliper off where the slide assembly stays with the pads on the disk. Learn something new every day!
Race Director
Joined: Dec 2003
Posts: 12,521
Likes: 1,824
From: MAGA country
...4) In my local Autozone and Advance Auto, there were a couple options of brands of "Synthetic DOT3 or DOT4 brake fluid". But I noticed that Prestone had a wet boiling point of like 284 degrees, but the Valvoline brand I bought had a boiling point of 311 degrees, so I went with that.
Advanced
Joined: Jun 2006
Posts: 77
Likes: 5
From: North Carolina
Problems - Post Brake Pad and Rotor Change
Hey Guys, I wanted to check in with two problems after replacing with Duralast Gold CMAX brake pads and new duralast rotors. (only the front)
1) Grinding noise - While driving at low speeds, the ride is rough with a "rrrrrr...rrrrrrr.......rrrrrrrr.....rrrrrr" grinding noise. Almost like my front tires are all screwed up, and you can feel this in the pedals, and wheel.
2) Heavy dusting - After a 400 mile round trip drive to Charlotte, my driver's side wheel had TONS of brake dust. (from a ceramic pad)
So I think the issues are......
- The new shims and guides didn't fit 100% perfectly, so I think I need to take everything apart and readjust for a perfect fit.
- Re-grease everything so that all the components slide more easily.
Anyone have any more thoughts?
Should I now get new pads again since I drove 400 miles with them not properly working?
Race Director
Joined: Dec 2003
Posts: 12,521
Likes: 1,824
From: MAGA country
Hey Guys, I wanted to check in with two problems after replacing with Duralast Gold CMAX brake pads and new duralast rotors. (only the front)
1) Grinding noise - While driving at low speeds, the ride is rough with a "rrrrrr...rrrrrrr.......rrrrrrrr.....rrrrrr" grinding noise. Almost like my front tires are all screwed up, and you can feel this in the pedals, and wheel.
2) Heavy dusting - After a 400 mile round trip drive to Charlotte, my driver's side wheel had TONS of brake dust. (from a ceramic pad)
So I think the issues are......
- The new shims and guides didn't fit 100% perfectly, so I think I need to take everything apart and readjust for a perfect fit.
- Re-grease everything so that all the components slide more easily.
Anyone have any more thoughts?
Should I now get new pads again since I drove 400 miles with them not properly working?
1) Grinding noise - While driving at low speeds, the ride is rough with a "rrrrrr...rrrrrrr.......rrrrrrrr.....rrrrrr" grinding noise. Almost like my front tires are all screwed up, and you can feel this in the pedals, and wheel.
2) Heavy dusting - After a 400 mile round trip drive to Charlotte, my driver's side wheel had TONS of brake dust. (from a ceramic pad)
So I think the issues are......
- The new shims and guides didn't fit 100% perfectly, so I think I need to take everything apart and readjust for a perfect fit.
- Re-grease everything so that all the components slide more easily.
Anyone have any more thoughts?
Should I now get new pads again since I drove 400 miles with them not properly working?
2. Pads may be sticking. regrease the pins
3. Sticking/bad caliper?
4. Did the pads come with shims? If not, don't use any shims.
takin care of Business in
iTrader: (5)
Joined: Jan 2008
Posts: 30,994
Likes: 4,733
From: Kansas City, MO
^^^ i agree with all the points...
but also did you bed the pads correctly ? and new ceramic pads tend to dust like a biyatch....after 1000 odd miles they will be golden (from experiences)
but also did you bed the pads correctly ? and new ceramic pads tend to dust like a biyatch....after 1000 odd miles they will be golden (from experiences)
Advanced
Joined: Jun 2006
Posts: 77
Likes: 5
From: North Carolina
Post Install Issues
1) I'm going to work on this over the weekend, but I'm pretty sure the bolts were threaded properly.
2) Will do. I'm going to go back and regrease everything, pull of the little rubber pin covers, and regrease those as well.
3) I THINK the calipers are in good working order, but will check.
4) They did not come with shims. I basically put the shims from the old pads, onto the back of the new pads. I'll take them off. That may be my issue.
Advanced
Joined: Jun 2006
Posts: 77
Likes: 5
From: North Carolina
Persistent Problems
Well, no such luck. I've done the following.....
1) Removed the old shims.
2) Thoroughly greased the pins, and all components. (except the pad surface and rotor)
3) Checked threading. Everything is okay.
4) Thoroughly cleaned and brushed with a wire brush all contact surfaces.
I'm STILL experiencing a rough feeling, and still hearing a shush....shush....shush....sound coming from the wheels.
Anyone have any other thoughts?
Advanced
Joined: Jun 2006
Posts: 77
Likes: 5
From: North Carolina
Advanced
Joined: Jun 2006
Posts: 77
Likes: 5
From: North Carolina
??
All of my questions, comments, and thank you's on this thread were genuine statements, as I appreciate everyone's help, since I am not a regular brake-job'r, and am trying to figure this out.
Sorry if you took offense, but I really was just asking the question because I don't know.......

takin care of Business in
iTrader: (5)
Joined: Jan 2008
Posts: 30,994
Likes: 4,733
From: Kansas City, MO
swoosh, are you directing that to me? If so, with what statement do you think I was being sarcastic?
All of my questions, comments, and thank you's on this thread were genuine statements, as I appreciate everyone's help, since I am not a regular brake-job'r, and am trying to figure this out.
Sorry if you took offense, but I really was just asking the question because I don't know.......
All of my questions, comments, and thank you's on this thread were genuine statements, as I appreciate everyone's help, since I am not a regular brake-job'r, and am trying to figure this out.
Sorry if you took offense, but I really was just asking the question because I don't know.......
no...i wasnt that drunk LOL....i just thought he was being sarcastic....
Cruisin'
Joined: Sep 2008
Posts: 22
Likes: 1
I did my pads and rotors about a month ago. When I was going to bed the pads, the front right made a sound like grinding sheet metal. Come to find out, I must have slightly bent the metal disc behind the rotor (guessing it protects the hub/wheel assembly?) and it was rubbing against the rotor. Found where it was rubbing, bent it back and sound went away.
You might try locating where you think the noise is and feel behind that rotor.
You might try locating where you think the noise is and feel behind that rotor.
Instructor
Joined: Oct 2010
Posts: 220
Likes: 67
Well, no such luck. I've done the following.....
1) Removed the old shims.
2) Thoroughly greased the pins, and all components. (except the pad surface and rotor)
3) Checked threading. Everything is okay.
4) Thoroughly cleaned and brushed with a wire brush all contact surfaces.
I'm STILL experiencing a rough feeling, and still hearing a shush....shush....shush....sound coming from the wheels.
Anyone have any other thoughts?
1) Removed the old shims.
2) Thoroughly greased the pins, and all components. (except the pad surface and rotor)
3) Checked threading. Everything is okay.
4) Thoroughly cleaned and brushed with a wire brush all contact surfaces.
I'm STILL experiencing a rough feeling, and still hearing a shush....shush....shush....sound coming from the wheels.
Anyone have any other thoughts?
Advanced
Joined: Jun 2006
Posts: 77
Likes: 5
From: North Carolina
CMAX Dust
EagleEye, thanks for the feedback! I'm about 1,140 miles into my new front rotors and duralast CMAX Gold pads, and am still experiencing HEAVY HEAVY dusting.
I feel like I have the thin metal guides (that the pads move along) properly in place, but maybe I need to push them in further.
Are you saying that you took your screwdriver, and pushed that metal tab (the one that sits in between the two arms of the caliper) in even further?
I feel like I have the thin metal guides (that the pads move along) properly in place, but maybe I need to push them in further.
Are you saying that you took your screwdriver, and pushed that metal tab (the one that sits in between the two arms of the caliper) in even further?
Instructor
Joined: Oct 2010
Posts: 220
Likes: 67
EagleEye, thanks for the feedback! I'm about 1,140 miles into my new front rotors and duralast CMAX Gold pads, and am still experiencing HEAVY HEAVY dusting.
I feel like I have the thin metal guides (that the pads move along) properly in place, but maybe I need to push them in further.
Are you saying that you took your screwdriver, and pushed that metal tab (the one that sits in between the two arms of the caliper) in even further?
I feel like I have the thin metal guides (that the pads move along) properly in place, but maybe I need to push them in further.
Are you saying that you took your screwdriver, and pushed that metal tab (the one that sits in between the two arms of the caliper) in even further?
The dusting is really strange. I am really not sure what's going on. Is it at least smooth and quiet? And how's the performance? Better bite than the old pads?
Instructor
Joined: Oct 2010
Posts: 220
Likes: 67
Instructor
Joined: Oct 2010
Posts: 220
Likes: 67
EagleEye, thanks for the feedback! I'm about 1,140 miles into my new front rotors and duralast CMAX Gold pads, and am still experiencing HEAVY HEAVY dusting.
I feel like I have the thin metal guides (that the pads move along) properly in place, but maybe I need to push them in further.
Are you saying that you took your screwdriver, and pushed that metal tab (the one that sits in between the two arms of the caliper) in even further?
I feel like I have the thin metal guides (that the pads move along) properly in place, but maybe I need to push them in further.
Are you saying that you took your screwdriver, and pushed that metal tab (the one that sits in between the two arms of the caliper) in even further?
Instructor
Joined: Nov 2010
Posts: 154
Likes: 20
From: NoVA
I think it might be worth it to treat myself to a new tool and not mess around.


Team Owner
Joined: Sep 2006
Posts: 33,535
Likes: 1,142
its important the piston be pushed in flat-level and NOT all the way in
place an old pad against it- then the caliper piston tool
make sure the brake fluid wasnt topped off or it can overflow--thats really bad
flushing your brake fluid is a good plan now-then every year or 2 depending on how you drive and weather in your area
wiki hygroscopic for why
place an old pad against it- then the caliper piston tool
make sure the brake fluid wasnt topped off or it can overflow--thats really bad
flushing your brake fluid is a good plan now-then every year or 2 depending on how you drive and weather in your area
wiki hygroscopic for why

It's much better to open the bleeder screw when pushing the pads in. By removing the cap on the master cylinder you allow any debris that may be in the lines to be pushed into the master cylinder. This can cause problems to the seals.

Instructor
Joined: Aug 2008
Posts: 174
Likes: 6
From: Columbia, SC
EagleEye, thanks for the feedback! I'm about 1,140 miles into my new front rotors and duralast CMAX Gold pads, and am still experiencing HEAVY HEAVY dusting.
I feel like I have the thin metal guides (that the pads move along) properly in place, but maybe I need to push them in further.
Are you saying that you took your screwdriver, and pushed that metal tab (the one that sits in between the two arms of the caliper) in even further?
I feel like I have the thin metal guides (that the pads move along) properly in place, but maybe I need to push them in further.
Are you saying that you took your screwdriver, and pushed that metal tab (the one that sits in between the two arms of the caliper) in even further?
Advanced
Joined: Jun 2006
Posts: 77
Likes: 5
From: North Carolina
Still Really Confused - Heavy Dusting
EagleEye and everyone else, thanks very much for the suggestions and help. I think the grinding noise and feel could be more attributed to my tires. I have some Fuzion HRi tires on my TL, and while the tread life is awesome, everything else about the tire is crappy. With normal PSi and rotation, I've been having a bad cupping problem. So I rotated the tires, and (just to eliminate this being the problem), had an alignment done. At 97k miles, my TL was pretty much still in perfect alignment.
The grinding noise and feel seems to have become less noticeable. Maybe I was just paying too much attention to it. :-)
So my other big issue has to do with dusting. After putting brand new CMAX Gold pads and Rotors on the front, and driving about 1,800 miles, I'm still experiencing heavy dusting. The drivers side seems to dust worse than the passengers side.
I feel like I have taken the wheels off my car now more times than I can count, and I have done everything, including:
1) Thoroughly greasing everything except the surface of the pad.
2) Making sure the metal clip/guides were firmly in place, and 100% correctly seated and installed. I used the new clip/guides that came with the pads, and threw away my old ones.
3) Making sure all bolts and fittings were threaded properly, and tightened with proper torque.
I just got done doing this again, and here are some photos:
Dusting - This doesn't look too bad right now because it's just from around town driving, but after a 300 mile trip, the wheels are half black. Much worse than I ever experienced with my original pads. (notice all the little black bits

By thassett1 at 2011-08-13
Guides in place and properly seated.

By thassett1 at 2011-08-13
Bottom guides in place and properly seated.

By thassett1 at 2011-08-13
One more side shot. Everything in alignment. Same applies for the other side.

Uploaded with ImageShack.us
The grinding noise and feel seems to have become less noticeable. Maybe I was just paying too much attention to it. :-)
So my other big issue has to do with dusting. After putting brand new CMAX Gold pads and Rotors on the front, and driving about 1,800 miles, I'm still experiencing heavy dusting. The drivers side seems to dust worse than the passengers side.
I feel like I have taken the wheels off my car now more times than I can count, and I have done everything, including:
1) Thoroughly greasing everything except the surface of the pad.
2) Making sure the metal clip/guides were firmly in place, and 100% correctly seated and installed. I used the new clip/guides that came with the pads, and threw away my old ones.
3) Making sure all bolts and fittings were threaded properly, and tightened with proper torque.
I just got done doing this again, and here are some photos:
Dusting - This doesn't look too bad right now because it's just from around town driving, but after a 300 mile trip, the wheels are half black. Much worse than I ever experienced with my original pads. (notice all the little black bits
By thassett1 at 2011-08-13
Guides in place and properly seated.
By thassett1 at 2011-08-13
Bottom guides in place and properly seated.
By thassett1 at 2011-08-13
One more side shot. Everything in alignment. Same applies for the other side.

Uploaded with ImageShack.us
Instructor
Joined: Oct 2010
Posts: 220
Likes: 67
You're welcome dude. But, don't think we solved your problems, yet.
Good to hear about the grinding noise. Regarding dust, the inside of my wheels are black, too unless I clean them. When you referred to dusting - I was thinking more of it being brown/black on the outside of the wheels (like the BMW/Merc you see sometime). Otherwise, I think it's just regular dirt and normal... Take some pics when it's really bad. I'll take some from mine, too. See if it's what you're talking about.
Good to hear about the grinding noise. Regarding dust, the inside of my wheels are black, too unless I clean them. When you referred to dusting - I was thinking more of it being brown/black on the outside of the wheels (like the BMW/Merc you see sometime). Otherwise, I think it's just regular dirt and normal... Take some pics when it's really bad. I'll take some from mine, too. See if it's what you're talking about.