When you click on links to various merchants on this site and make a purchase, this can result in this site earning a commission. Affiliate programs and affiliations include, but are not limited to, the eBay Partner Network.
Hi, all. Just thought I'd share some insights on rebuilding a power-steering pump in the TL. I'm posting about this because the community response on this topic has been nothing short of epic and truly highlights why we're among the finest online automotive enthusiasts ilk the web has to offer. That, and this has been a nagging issue that is near and dear to my heart and really came as a wave of relief once it was resolved.
While it's a well known and documented issue with the TL (failure of the power-steering pump inlet (91345-RDA-A01)), fact is that the rubber components of the TL have a life expectancy that seems to peter out around 8 to 9 years or 180k in my case (and I don't consider that to be a bad thing). So, just some things to point out and consider before you decide to tackle this, some things to consider after replacing the aforementioned:
(1) Is there a whine from your engine, particularly on colder or wet days?
(2) Do you see any black residue or fluid accumulation on the PS body?
(3) Are you gradually losing PS fluid?
If such is the case, the pump seals are likely in need of replacement as the power steering pump seal, the main culprit (91349-P2A-003), is likely shot.
I did the repair many weeks ago, and I can happy report that with fall now here the problem is 100% fixed. Some things I'd like to point out:
(1) The shaft seal and rings are legit on borrowed time, or at least it has been for many of us after 8 years and 100k. The seal and rings will have lost all elasticity and will be very brittle. O-ring thickness loss can be estimated at 40% as compared to original (sorry for the lack of images on this)
(2) This is a VERY easy repair and does not require any expensive tools.
(3) This is VERY well documented on this forum thanks to the efforts of Jeremy (Rockstar143) and others.
(CLICK HERE FOR LINK >>>DIY A-105).
To boot, it's also available on You Tube by Eric the Car Guy and is virtually identical to ours.
(4) It's extremely inexpensive with costs running around $30 for all seals, assuming you're also replacing the bearing.
(5) The repair can be done in about 3 hours even if you're never done this and again, we have a TON of DIY information and a massive community to help.
(6) Pure and simple satisfaction that comes with DIY-ing.
Now, the only warning worth noting is that reinstallation of the four 8x28 bolts are slightly temperamental (torque must be very even), but that a very minor note. I also replaced my accessory belt since I was in there, because why not?
Anyway, thanks to Rockstar and the AZine community for all of your help with this. This issue was driving me batshit crazy some mornings and just kept putting it off until I had some downtime to tackle this. My biggest regret is not doing it sooner! Hope this help the higher-mileage guys and any other long-term owners and weekend wrenchers in part.
Perfect timing. I haven't logged in for months and this thread was one of the very first I saw. I'm noticing when I go to make a turn in wet conditions, I lose power to the steering for like a second, and when it returns, I get the squeal. Far and in between, but thank God, it's only happened while I was driving. My wife's the primary driving and she's never experienced it but like you said, it's about to get really cold and wet out. Thanx for this.
I just recently rebuilt mine too and my word of advice is to make sure you put the internals back together correctly. It took me three times to figure out that I wasn't re-installing the components in the correct orientation.
I highly suggest you print out the information from the repair manual and follow it to a T. I made the mistake of following a step by step video I found on youtube only to find out that although the PS pump they were rebuilding was *nearly identical, it was in fact different. The internal components were orientated differently then our 3G TL (2G vs 3G TL).
If you do that, it really is pretty simple.
Save yourself 6 hours of extra headaches and use the manual.
Great thread to remind people about rebuilding this vs. buying a new one. I rebuilt mine 3 years ago, took about 2 hours from start to finish including removal and reinstallation, and it's been silent since.
Thanks to Rockstar143 and everyone else that contributed!
1) can totally confirm your first point on the o-rings. My car's at 105k, 2008 (so 8 years old?). I just did this repair and the o-rings were super stiff and squished. Nothing was leaking and the pump wasn't making any noise, but I'm sure it wasn't far from that point. just more anecdotal evidence as if there wasn't enough.
2) getting the pulley off - some of us don't have impact tools so for those who have replaced the shaft seal and/or bearing, could you share with us how you were able to get the pulley off? I realize there's the option to wedge something through the pulley against the pump body, but that puts and undesirable lateral force on the pump shaft so that's not advisable.
I did this also, but didn't replace the bearing seen in your pic. If I'm not mistaken it wasn't part of Jeremy's DIY in the 3G garage. Any more info on that specific part?
I rebuilt mine a few weeks ago but still have a little bit of a whine. I replaced all the O rings as listed in the DIY though.
Edit: just saw it in the video. Damn, should've replaced that too
I did this also, but didn't replace the bearing seen in your pic. If I'm not mistaken it wasn't part of Jeremy's DIY in the 3G garage. Any more info on that specific part?
It's in the vid and the parts explosion as well. I positioned the bearing assembly atop an open vice with the shaft beneath and tapped it out with a ball peen hammer. Installation was the opposite. The original bearing appeared to have smooth movement with no play, so I'd wager you too should be OK.
If you still have a whine, something is out of alignment or improperly torqued. I'd revisit the repair.
1) can totally confirm your first point on the o-rings. My car's at 105k, 2008 (so 8 years old?). I just did this repair and the o-rings were super stiff and squished. Nothing was leaking and the pump wasn't making any noise, but I'm sure it wasn't far from that point. just more anecdotal evidence as if there wasn't enough.
2) getting the pulley off - some of us don't have impact tools so for those who have replaced the shaft seal and/or bearing, could you share with us how you were able to get the pulley off? I realize there's the option to wedge something through the pulley against the pump body, but that puts and undesirable lateral force on the pump shaft so that's not advisable.
See Death Metal's other thread where I posted a revised, compilation of this rebuild. As well as offering him advice on how to remove the pulley you asked about. I have a high-quality 3-speed impact wrench and was MUCH easier to remove via the method below:
Also, most often the bearing doesn't need replaced. You're supposed to check the free play with it removed. I re-used mine with no issues, no sense replacing a functioning part. If you ran on a dry system and damaged the bearing, you'd want to replace it, otherwise I see no need to. Especially if examining it shows it working freely.
Not sure of purpose of this thread...just another return in Google searches.
Last edited by MonkeyTrucker; 11-11-2015 at 12:40 PM.
Great thread, will keep this in mind. I just noticed some whine on mine last weekend when the weather dipped into the 30s. I ordered the gasket and 4 bottles of Honda PS fluid, will be replacing the inlet gasket this weekend along with a flush.
Great thread, will keep this in mind. I just noticed some whine on mine last weekend when the weather dipped into the 30s. I ordered the gasket and 4 bottles of Honda PS fluid, will be replacing the inlet gasket this weekend along with a flush.
Hey guy, do the complete reman, you'll wish you had later on. ALL of the internal gaskets are likely as shot as the most easily replaceable one.
Hey guy, do the complete reman, you'll wish you had later on. ALL of the internal gaskets are likely as shot as the most easily replaceable one.
If just changing the inlet keeps it quiet, thats good enough for me. Its 30mins of my time vs 3hours. If it continues to whine then ill consider the rebuild. This is my winter car so I just need it to be quiet in the cold haha
If just changing the inlet keeps it quiet, thats good enough for me. Its 30mins of my time vs 3hours. If it continues to whine then ill consider the rebuild. This is my winter car so I just need it to be quiet in the cold haha
I did only the inlet o-ring that you're going to do, my whine came back less than a year and did a complete reman.
If just changing the inlet keeps it quiet, thats good enough for me. Its 30mins of my time vs 3hours. If it continues to whine then ill consider the rebuild. This is my winter car so I just need it to be quiet in the cold haha
Inlet is the first measure, but that only barely helped for mine too.
A rebuild is in order and will be done this weekend since I keep seeing these threads pop up lately, I was just too lazy before.
Inlet is the first measure, but that only barely helped for mine too.
A rebuild is in order and will be done this weekend since I keep seeing these threads pop up lately, I was just too lazy before.
I just changed the inlet and flushed my fluid. All is quiet for now and no frothing of the fluid so I'm happy with the results. If it acts up again later, and a new inlet gasket doesn't fix it anymore, I'll rebuild at that point.
Also maybe coincidence, but I flushed my fluid before changing the gasket and the whine stopped. Fluid was very dark, I'm assuming my '06 with 79k miles had never been flushed before.
I have an '08 and took out an extended warranty that I have used enough to make it worth having. Push comes to shove, I'll take this on myself but want to ask, is this one of those FINE LINE things between repair or maintenance/upkeep? I'd love to just let the warranty work for me but not if it's gonna cause a hassle between the mechanic and the warranty company.
Stumbled on this thread... Dan!
I just joined your fraternity with a newborn of my own!
Funny enough, I had tackle a PS leak from a different part of the system...baby slept on my chest long enough for Mommy to be in a good enough mood to let me have a few TL hours to fix.
Anyway...some notes from my original repair. I didn't do the pulley side shaft o-ring thingy...didn't realize it existed until it was too late, but I have not had any issues with it leaking.
Original reason I had to tackle this wasn't sound, it was because it looked like I R Kelly Skeet skeeted honey all down the passenger side of my motor. Originally I thought it was an oil leak because it was present on the pan, but then my buddy Newton and I realized that my car hadn't been an extra in FF7 and spent any time upside down so it had to be coming from above.
That said, I guess I might add my most recent repair. Since I have an 04 manufactured in 2003 in a hot climate, I think I end up experiencing most failures pretty early on.
My high pressure line switch was leaking...maybe it was the o-ring, but the ps fluid was leaking from above that on the collar of the switch. But here's the kicker, it sits directly above the low pressure line you see behind passenger wheel so I thought it was that...(well it was weeping too but whatever) so I fuxored up that line a bit and ghetto rigged other hose clamps on it...decided to replace that as well, for good measure.
borrowed from my "build and bullshit" thread
Okay, so tackled the leak today...
replaced the leaking high pressure switch, then tackled the power steering low pressure hose that I'd butchered while searching for the leak.
Here's the new switch and down below, the new hose.
and here, to the right of the rear motor mount, the clamp on the new hose. I tightened them all up until I couldn't easily rotate the hose back and forth on the fitting.
Dan, you just made my day...this thread gave me a glimmer of hope that the old you still lurks in that leaned out body of yours. Hope your kid is great...must be 4 by now...you have a number 2 (IIRC?). Hope you'll be around more frequently and SO glad you're still rocking a 3G
It's been a bit colder here in Nor Cal these last few days. I just noticed for the first time this morning, that old familiar whine from the power steering pump.
This thread gives me hope that it will be a cheap and easy repair...hopefully. No signs of a leak anywhere and the fluid still looks good...
04 with 94k mi...
There was no obvious sign of leak in the sense that I couldn't see it dripping anywhere and there was very little if no whine on my PS pump, however the whole pump was covered in black grime since the housing seal was half the thickness of the new one and it was effectively misting microscopic droplets of PS fluid around in the direction of the belt and reservoir.
I would recommend changing the accessory belt while at it if you're unsure of its condition, anyway you'll already be prying on the tensioner to remove the belt from the pump. The belt is not an expensive item and it's better to change it preemptively than deal with the mess if it broke.
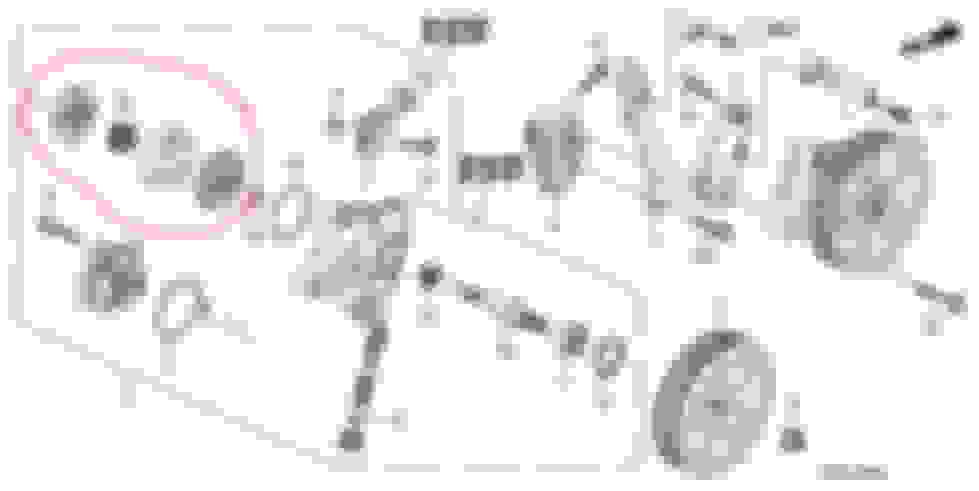
I can add that people attempting to rebuild their PS pump should be careful when taking the housing apart. When I took mine apart, suction of the leftover PS fluid made some of the parts stick together and then fall in a million pieces (circled in red in diagram). That added a good 15 minutes of putting it back together and cleaning everything, totally unnecessary step.
There was no obvious sign of leak in the sense that I couldn't see it dripping anywhere and there was very little if no whine on my PS pump, however the whole pump was covered in black grime since the housing seal was half the thickness of the new one and it was effectively misting microscopic droplets of PS fluid around in the direction of the belt and reservoir.
I would recommend changing the accessory belt while at it if you're unsure of its condition, anyway you'll already be prying on the tensioner to remove the belt from the pump. The belt is not an expensive item and it's better to change it preemptively than deal with the mess if it broke.
I can add that people attempting to rebuild their PS pump should be careful when taking the housing apart. When I took mine apart, suction of the leftover PS fluid made some of the parts stick together and then fall in a million pieces (circled in red in diagram). That added a good 15 minutes of putting it back together and cleaning everything, totally unnecessary step.
And if that does happen, make sure you put it all back together correctly! Each of the "paddles" has a rounded side and a square side, the rounded side needs to go to the outside. Also make sure the other parts are orientated the correct way (reference the manual).
And if that does happen, make sure you put it all back together correctly! Each of the "paddles" has a rounded side and a square side, the rounded side needs to go to the outside. Also make sure the other parts are orientated the correct way (reference the manual).
I expected the paddles to be rounded one way and square the other but after further inspection realized mine were rounded on both ends. YMMV. 04 Base TL with what I believe to be the original PS pump.
There was no obvious sign of leak in the sense that I couldn't see it dripping anywhere and there was very little if no whine on my PS pump, however the whole pump was covered in black grime since the housing seal was half the thickness of the new one and it was effectively misting microscopic droplets of PS fluid around in the direction of the belt and reservoir.
I would recommend changing the accessory belt while at it if you're unsure of its condition, anyway you'll already be prying on the tensioner to remove the belt from the pump. The belt is not an expensive item and it's better to change it preemptively than deal with the mess if it broke.
I can add that people attempting to rebuild their PS pump should be careful when taking the housing apart. When I took mine apart, suction of the leftover PS fluid made some of the parts stick together and then fall in a million pieces (circled in red in diagram). That added a good 15 minutes of putting it back together and cleaning everything, totally unnecessary step.
Upon closer inspection I found a light coating of sludge around the inlet hose and power steering body. The belt is pretty much new since I just did my timing belt less than 1,000 miles ago and a new OEM one was included...
Can anyone tell me if the MDX kit is the same as a TL? It looks the same but when I enter my car is says "does not fit"
http://www.ebay.com/itm/181784625124?redirect=mobile
I can't find one specific for TL on EBay...
Upon closer inspection I found a light coating of sludge around the inlet hose and power steering body. The belt is pretty much new since I just did my timing belt less than 1,000 miles ago and a new OEM one was included...
Can anyone tell me if the MDX kit is the same as a TL? It looks the same but when I enter my car is says "does not fit"
Look at the part numbers included, the tutorial by rockstar143 has nearly all of them needed minus the pulley one I believe. If the parts match, then buy it. Otherwise simply hit up your Acura/Honda dealership with the parts and they can order them if they don't have them. Mine got them the very next day.
So, this is the "tool" I made to hold the pulley in place. Some folks above have suggested to jam something through the pulley against the pump body, but this is not advisable as it puts a lateral force on the pump shaft and internals. From what I can tell, the Honda tool holds the pulley in place without touching anything else, and you can, more or less, recreate this with some bolts and a piece of strong lumber.
Well, about a year and a half after only changing my inlet o-ring to stop the nasty whining sound, I'm noticing that the entire backside of my PS pump is soaked in oil. Also explains the wet oil pan making it look like an oil leak. Went ahead and ordered all 5 o-rings and some PS fluid and will be tackling this in the next couple weeks. Hoping it'll cure my issues and that my oil pan will finally be dry!
Can one of you shed some light on how you got to the hose end and the clamp on that low pressure hose on the passenger side, by the rear motor mount? I have that same leak there now on my 07 accord V6. I have looked at this last year and noticed it's possible to get to it via a small small by the rear chassis. Looks like I need to untighten the hose clamp using a socket on a ratchet. How about pulling the hose off? From up top using a long reach 3/8" hose remover plyer? thanks.
Originally Posted by rockstar143
replaced the leaking high pressure switch, then tackled the power steering low pressure hose that I'd butchered while searching for the leak.
and here, to the right of the rear motor mount, the clamp on the new hose. I tightened them all up until I couldn't easily rotate the hose back and forth on the fitting. Attachment 64636
My car makes the whining noise. A fellow TL owner told me about replacing the O rings but not about this. Think I'm gonna go ahead and do it since my car is at 176. Thanks!
How do you know when your pump is actually failing? I replaced by o rings a year ago and had the whining return. I rebuilt my steering pump and used new o rings but still have the whining. I can't tell if it's just air in the system or if it's failing. I spent about 30min turning the wheel back and forth to get air out but it's still whining
Also want to add that i turned lock to lock with the car on about 30-40x but the fluid level stayed at the full line. I took the car for a short drive and everything felt fine although I still have the whine.

 11-08-2015, 11:04 PM
 That, and this has been a nagging issue that is near and dear to my heart and really came as a wave of relief once it was resolved.
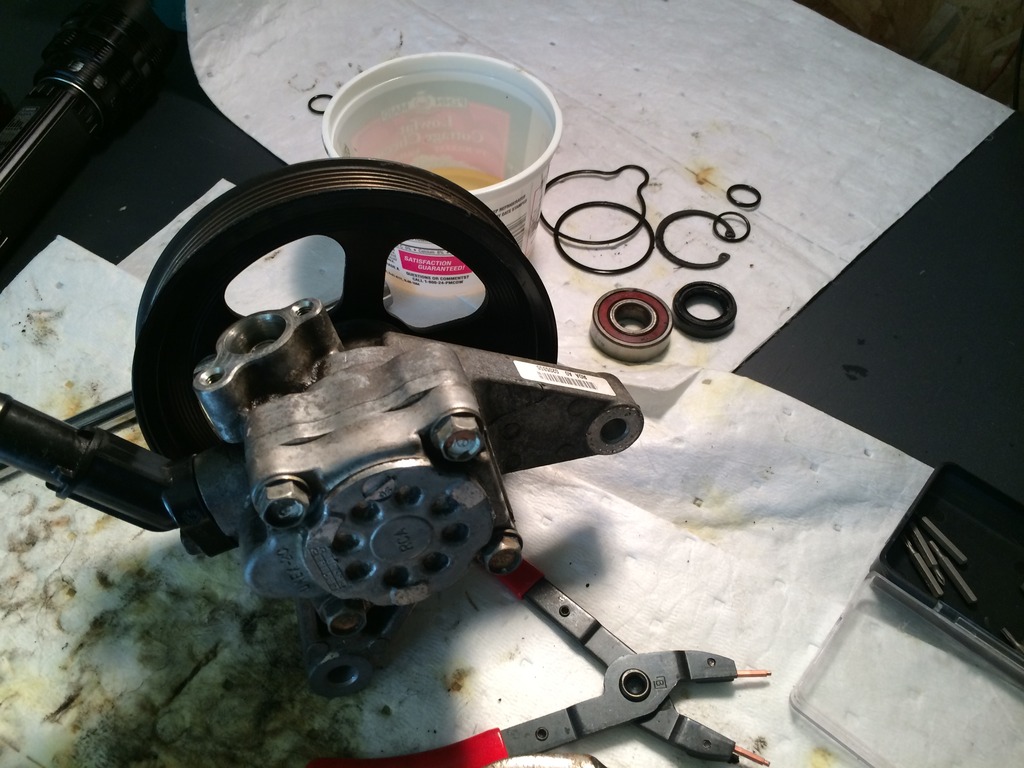


 Dan!
Dan!


 Add to Cart