
Those Who Have Done The ZKW-R Clear Lense Swap, Look Here!!!!
 06-14-2013, 09:23 PM
#1
Instructor
Thread Starter
Those Who Have Done The ZKW-R Clear Lense Swap, Look Here!!!!
Looking into purchasing and installing a set of ZKW-R clear lenses along with a Morimoto 5000K bulbs. Been doing a lot of research and the only thing that really confuses me is tuning the lenses. I've been getting mixed answers as far as the tuning goes. I know I have to turn the lense until the cut off is nice and clear.
Is it easier to bend the shield forward or backwards until the cut off is achieved or add spacers and possibly run into issues of the lense holder not fitting? Or do I have to do both?
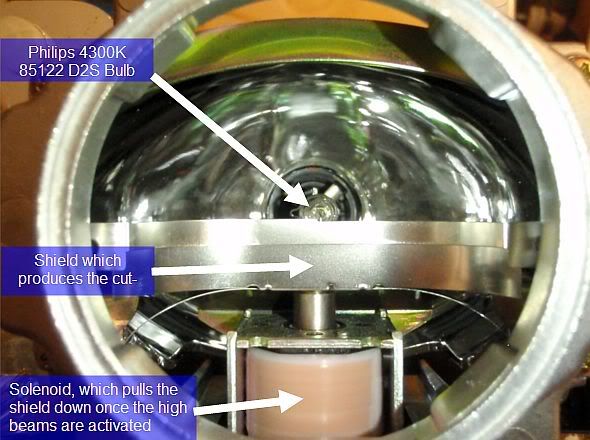
NOOB question, which part is the shield that I will be bending?
Any help would be appreciated.
Is it easier to bend the shield forward or backwards until the cut off is achieved or add spacers and possibly run into issues of the lense holder not fitting? Or do I have to do both?
NOOB question, which part is the shield that I will be bending?
Any help would be appreciated.
 06-14-2013, 09:52 PM
#3
Moderator
iTrader: (7)
Paperboy responding!
Remember all lenses are slightly different. If I were you I would get some cereal box spacers ready. 2 is about the max you can fit without modifying the retainer clip. Once you are ready to aim, try it with no spacers, 1 spacer, and 2 spacers. See which one gives you the sharpest cutoff. After the spacers, start playing with the cutoff shield, bend it slightly forward or backward to get the last bit of adjustment. Remember, a little bend goes a long way. After the sharpness is acquired, rotate the lens to just to see if it gets any better. It may or may not, as rotating the lens may not yield much difference.
It'll be easiest to do this with the projector removed but if you want to be lazy, it's okay just carrying the whole headlight around while doing the adjustments. Took me couple hours honestly, definitely take your time to experiment. The results will be much more satisfying.
Just a tip about the shield bending, if you can feel it bend, you probably bent it too much. These adjustments are done by like 0.5mm so just a hair.
O damn I just realized you are using the zkw-r lens not the genuine zkw. From my experience those dont take as much work to make perfect. Last time I installed one I just put 2 spacers and it was perfect, rotation didn't make a difference. You may have trouble fitting the clip back with the zkw-r so just be careful. 1 spacer would be fine too, unless you absolutely want that last bit of sharpness. I got my spacers from theretrofitsource, $1 each pair. I recommend those because it'll save you time cutting a perfect circle, and the quality on those will most likely be better than what you can make, since the ones they sell are machine made.
Last edited by Steven Bell; 06-15-2013 at 12:53 PM. Reason: Merged Posts
The following 3 users liked this post by paperboy42190:
06-14-2013, 10:03 PM
#4
Instructor
Thread Starter
O damn I just realized you are using the zkw-r lens not the genuine zkw. From my experience those dont take as much work to make perfect. Last time I installed one I just put 2 spacers and it was perfect, rotation didn't make a difference. You may have trouble fitting the clip back with the zkw-r so just be careful. 1 spacer would be fine too, unless you absolutely want that last bit of sharpness. I got my spacers from theretrofitsource, $1 each pair. I recommend those because it'll save you time cutting a perfect circle, and the quality on those will most likely be better than what you can make, since the ones they sell are machine made.
How would I go about powering the headlight while doing it inside house, have about 40ft to be able to make adjustments.
Last edited by TegoTL; 06-14-2013 at 10:06 PM.
06-14-2013, 10:05 PM
#5
Moderator
iTrader: (7)
I use my car to power it, plug on the harness on the HID ballast and turn on your lights. Works for me because where I park my car is a long alleyway so I aim it down the alleyway. I literally did this for couple hours into the night, and I think ppl looked at me all weird cuz I was lighting up the alleyway with something in my hand lol
06-14-2013, 10:09 PM
#6
Instructor
Thread Starter
I use my car to power it, plug on the harness on the HID ballast and turn on your lights. Works for me because where I park my car is a long alleyway so I aim it down the alleyway. I literally did this for couple hours into the night, and I think ppl looked at me all weird cuz I was lighting up the alleyway with something in my hand lol
Last edited by TegoTL; 06-14-2013 at 10:18 PM.
06-14-2013, 10:12 PM
#7

I've done the lens swap a total of 2 1/2 times. The 1/2 time I simply wanted to sharpen the cutoff but didn't get the result I had hoped for and I didn't want to open up the headlight again. I'm sure others have spent more time on their swap and have had better results.
I had to turn the lens until the cutoff was sharpest (least blurry) and marked it on the edge with a Sharpie. Then I moved the lens in an out about the distance of a few spacers. Simply to see if a spacer would help me. They didn't (my spacers were cut from cereal boxes but they gave me little improvement so I didn't put any in.) Then without permanently putting the lens on the projector, I would bend the high/low beam flap back or forward just a hair, hold the lens to the projector and see if the cutoff improved. Then repeat until I got the best result. Gotta say though, I think the curvature of the high/low beam flap could probably be adjusted to get better results as well.
I only have one decent picture of the cutoff at about 10 yards. On the diagonal part its sharp but it gets blurrier as it goes out to the edges.
Here's the picture link: https://plus.google.com/photos/10729...Ofz9enim_zC5gE
Either you guys are really quick or I'm super slow... there has been an entire conversation since began writing a few sentences haha
I don't think there's really a way to power directly from the battery. Just use the HID harness that was on your headlight. You should remove it before you bake the light.
Last edited by Steven Bell; 06-15-2013 at 12:54 PM. Reason: Merged Posts
Trending Topics
06-14-2013, 10:18 PM
#8
Instructor
Thread Starter
I just did the black out on the headlights, left the bulbs and the ballast in...no issues...lol!
06-14-2013, 10:22 PM
#9
Perhaps, I could see leaving the bulbs in, but personally I'd rather take everything off, especially the ballast. I don't how temperatures affect it but nearly doubling the maximum ambient temperature that could be reached on any given day would have me worried. But then again, I don't know what temperature you baked at.
06-14-2013, 10:23 PM
#10
Instructor
Thread Starter
Perhaps, I could see leaving the bulbs in, but personally I'd rather take everything off, especially the ballast. I don't how temperatures affect it but nearly doubling the maximum ambient temperature that could be reached on any given day would have me worried. But then again, I don't know what temperature you baked at.
 06-14-2013, 10:37 PM
#12
I've been using morimoto 5k just for a few months (less than 3 months) and one of the bulbs just took a shit on me about a month ago. When I say they took a shit on me, I mean that my passenger side bulb was at fault here. I would turn on the headlights and after approximately 2 minutes of my headlights being on, the passenger side bulb would just shut off.
I turn the headlights to the OFF position and turn it back ON (or AUTO during night) and both light bulbs power up just fine. Again, about 2 minutes later the driver side bulb would just shut off. I can switch my headlights off and back on all night and the passenger side bulb will fire up every time, but than it will also shut off after 2 minutes of use. My drivers side was just fine.
First I thought it was a ballast or a ignitor at fault. I removed my headlights and swapped over each part from my known good headlight to trouble shoot. First I swapped ballasts. Problem still occured. I swapped ignitors. Problem still occured. Last I swapped bulbs. Passenger bulb stayed lit the whole time. So I narrowed it down to the bulb.
So now I'm just using the 1 good morimoto 5k bulb and 1 offbrand 5k bulb. I plan on purchasing 81522+ bulbs from TRS in the future.
This is just to let you know my personal experience with the mori 5k bulbs.. Maybe I was just unfortunate because everyone else seems to say they are very good quality bulbs.
I used to think they were the shit when I first got them. Especially since I only paid like $45 + shipping for them. Now I wish I just bought the 81522+ to begin with.
Last edited by vietxquangstah; 06-14-2013 at 10:41 PM.
The following users liked this post:
rockstar143 (09-10-2013)
06-15-2013, 01:45 AM
#13
Moderator
iTrader: (7)
Yes you can power the ballast with power directly from battery, but how would you do it? You would need a positive and negative wire with the plug to go into the ballast, so might as well use the existing one on the car
06-15-2013, 09:07 AM
#14
Instructor
Thread Starter
1. Start by rotating the lenses untill its nice and sharp. Mark it with a sharpie.
2. Add 1 spacer to determine if it will make a difference and then add 2 to see if it makes more.
3. Bend the shield forward or backwards to increase the output.
Is this correct?
Also, do I have to clip on the lense holder everytime I'm tuning it with the shield and spacers and etc or hold it with my hand?
The shield will be the piece I'll be pushing forward or backwards correct?
I'm not even sure what bulb color to go with....debating 4300-5000k.
Last edited by TegoTL; 06-15-2013 at 09:13 AM.
The following users liked this post:
njresendez (03-17-2016)
06-15-2013, 10:30 AM
#16
Instructor
Thread Starter
06-15-2013, 10:34 AM
#17
I didn't have spacers in the final tuning stage but when experimenting with them before they would fall out every time the lens was moved which made it a PITA. If you end up with spacers perhaps it would be easier to clip on the lens and work from the bulb end.
 06-15-2013, 12:33 PM
#20
Race Director
iTrader: (8)
Smart man... gathering as much info in before he actually tackles the job, and even before he makes the purchase LOL
The following 3 users liked this post by guitarplayer16:
06-15-2013, 01:18 PM
#21
Moderator
iTrader: (7)
1. Start by rotating the lenses untill its nice and sharp. Mark it with a sharpie.
2. Add 1 spacer to determine if it will make a difference and then add 2 to see if it makes more.
3. Bend the shield forward or backwards to increase the output.
Is this correct?
Also, do I have to clip on the lense holder everytime I'm tuning it with the shield and spacers and etc or hold it with my hand?
The shield will be the piece I'll be pushing forward or backwards correct?
I'm not even sure what bulb color to go with....debating 4300-5000k.
2. Add 1 spacer to determine if it will make a difference and then add 2 to see if it makes more.
3. Bend the shield forward or backwards to increase the output.
Is this correct?
Also, do I have to clip on the lense holder everytime I'm tuning it with the shield and spacers and etc or hold it with my hand?
The shield will be the piece I'll be pushing forward or backwards correct?
I'm not even sure what bulb color to go with....debating 4300-5000k.
Anywhere between 50-100 ft is fine. I mean, just play with the projector a bit, even if its good at 100 ft, point it at something maybe 30 ft away just so you can see the cutoff line at other distances too. Some people like a sharper cutoff at a closer distance and with more color, so preference comes into play too.
06-15-2013, 05:43 PM
#23
06-15-2013, 06:40 PM
#25
Instructor
Thread Starter
06-15-2013, 06:44 PM
#26
Race Director
iTrader: (8)
Honestly, wait til you get the products and then install it and see if you're happy with it.
Some things you just have to wait until you actually get to installing it as it's more based on "if you need it/are you happy with it" when you test it...
Some things you just have to wait until you actually get to installing it as it's more based on "if you need it/are you happy with it" when you test it...
06-16-2013, 12:07 AM
#27
Safety Car
iTrader: (4)
Paperboy summed it up nicely. With the replicas you will not need to mess with the shield. I was able to obtain a incredibly sharp and colorful cutoff by just rotating lens and using 1 or two spacers. Don't forgot to compare both sides as you don't want two slightly different looking cutoffs.
The following users liked this post:
paperboy42190 (06-16-2013)
06-16-2013, 12:28 AM
#28
Moderator
iTrader: (7)
just remember, that not all lenses are created equal. theres no "definite" way to install any of these lenses. you will have to try it out and see how your results turn out. What we can tell you are just general approximations. When I installed my zkw lens shield bending was needed but it varies or everyone honestly.
06-16-2013, 08:57 AM
#29
Instructor
Thread Starter
1. Rotate the lense until its crisp and clear.
2. Add spacers to improve it if it needs it, start with one and add 2 possibly if it makes a difference. (Do I have to rotate the lense after adding spacers?)
3. Bending the shield forward (facing the car) , possibly not needed if I'm happy with spacers.
2. Add spacers to improve it if it needs it, start with one and add 2 possibly if it makes a difference. (Do I have to rotate the lense after adding spacers?)
3. Bending the shield forward (facing the car) , possibly not needed if I'm happy with spacers.
The following users liked this post:
TegoTL (06-17-2013)
06-21-2013, 06:00 PM
#35


 06-22-2013, 03:21 PM
#39
Safety Car
iTrader: (4)
I am all for amazing cutoffs and absolutely love the sharp line and amazing colors, but has anyone else found themselves constantly worried about other cars being under your cutoff line because of hills or turns?
On my new TLS I won't be doing the mod mainly because I don't wanna tamper with the car a whole lot, but also because I remember myself always being worried that a car is gonna pop up as I go over that hill ahead and they are just gonna get blasted. Maybe it's something I experience more since 3 of my 5 shifts at work are done at 10pm at night, and my commute has decent hills and turns to where an oncoming driver will be under your beam regardless of how they are aimed. I used to get flashed a LOT even with absolutely perfect OEM aimed headlights when I had my ZKW replicas, and it sucks because the people flash you and there isn't a lot you can do except ignore it or give them a quick tap of the real high beams lol. Also sucks that people don't think to realize that anytime your on hilly roads if your going to be under an oncoming cars beam that its gonna be bright. Even halogen headlights are bright as shit if your caught in the beam. Anyone else experience this with properly aimed ZKW's?
On my new TLS I won't be doing the mod mainly because I don't wanna tamper with the car a whole lot, but also because I remember myself always being worried that a car is gonna pop up as I go over that hill ahead and they are just gonna get blasted. Maybe it's something I experience more since 3 of my 5 shifts at work are done at 10pm at night, and my commute has decent hills and turns to where an oncoming driver will be under your beam regardless of how they are aimed. I used to get flashed a LOT even with absolutely perfect OEM aimed headlights when I had my ZKW replicas, and it sucks because the people flash you and there isn't a lot you can do except ignore it or give them a quick tap of the real high beams lol. Also sucks that people don't think to realize that anytime your on hilly roads if your going to be under an oncoming cars beam that its gonna be bright. Even halogen headlights are bright as shit if your caught in the beam. Anyone else experience this with properly aimed ZKW's?
06-22-2013, 06:10 PM
#40
Moderator
iTrader: (7)
thats just physics in action, light will always travel in a straight line(except for a black hole), and hills will put drivers in that path. Thats the reason I think OEM uses fresnel lens, so the transition of the cutoff line isn't so sharp that people think you are flickering your high beams. A fuzzy cutoff line would make the transition a little more smooth, however when looking directly in the path of the lights, it's going to be blinding no matter what. If people high beam you for that, there's not much you can do, they are probably high beaming a lot of people on the road if they dont understand how light projection works.
The following users liked this post:
phlyxaznxboi (02-13-2015)