
DIY Moleskin install step-by-step with pics 3G Garage #K-012
 05-02-2007, 11:45 AM
#41
Originally Posted by Xpditor
Huh? 
You are talking about the metal screws and not plastic pop-locks, I presume.
Or, are you making a joke? (One that doesn't seem to apply to this thread topic)
You are talking about the metal screws and not plastic pop-locks, I presume.
Or, are you making a joke? (One that doesn't seem to apply to this thread topic)
 05-02-2007, 12:17 PM
#42
Senior Moderator
Originally Posted by leedogg
halfway down the sides of the door, there's a screw you need to remove - it has a bumper on it. I forget what they are called, but apparently sometimes they 'Break' and will turn endlessly. I need to figure out how to get the damn thing off.
The only screws you need to remove are the ones holding the door panel as detailed in these photos: Moleskin Install
Other than that, I'm not sure which screw you are talking about.
 05-02-2007, 01:38 PM
#43
Originally Posted by Xpditor
The only screws you need to remove are the ones holding the door panel as detailed in these photos: Moleskin Install
Other than that, I'm not sure which screw you are talking about.
Other than that, I'm not sure which screw you are talking about.
05-02-2007, 02:50 PM
#44
Safety Car
Thread Starter
That is a normal screw going into the door itself with a rubber stop on it. If it's not coming out probably means it was stripped at the factory. You will need to help it come out.
05-02-2007, 03:05 PM
#45
Instructor

Join Date: Aug 2006
Age: 38
Posts: 113
Likes: 0
Received 0 Likes
on
0 Posts
when I went to my local shop the guy wanted to charge me $40 per door for mole skin and said it would void my 3M warranty if I get it tinted without the moleskin. Are there any side-effects of installing moleskin? somebody mentioned something about the car not being as quiet as before??
05-02-2007, 03:40 PM
#47
Senior Moderator
Originally Posted by leedogg
The arrow pointing to the screw on the door edge.
But, I did all screws by hand. Not that it makes a difference.
05-02-2007, 03:43 PM
#48
Instructor
Join Date: Aug 2006
Age: 38
Posts: 113
Likes: 0
Received 0 Likes
on
0 Posts
Originally Posted by Xpditor
It doesn't have anything to do with quiet. There's either hard rubber on glass or velvety moleskin on glass.
Which might be quieter?
Which might be quieter?
 05-02-2007, 07:56 PM
#49
'06 6MT WDP
Join Date: May 2006
Location: Pittsburgh, PA
Age: 48
Posts: 199
Likes: 0
Received 0 Likes
on
0 Posts
Originally Posted by ninor
when I went to my local shop the guy wanted to charge me $40 per door for mole skin and said it would void my 3M warranty if I get it tinted without the moleskin. Are there any side-effects of installing moleskin? somebody mentioned something about the car not being as quiet as before??
$40 per door is steep! You can do each door in about 15 minutes so that means they're charging you $160 an hour for labor. The moleskin costs next to nothing since they buy it in bulk I'm sure. Even if it took them 30 minutes per door that's $80 per hour! Any good tint shop should include it as part of the job and have it built into the price...but not $160 more.
EDIT: saw your other post and see that you ordered it yourself. Good choice.
05-03-2007, 12:46 AM
#50
Intermediate
Join Date: Aug 2006
Location: Central NJ
Age: 43
Posts: 25
Likes: 0
Received 0 Likes
on
0 Posts
Question about installing the moleskin?
Some are saying to put it on before tinting the windows and some have had a problem with that and are saying to put the moleskin after the tint is done? Is there really a correct answer for this and what would be the pros and cons of each?
Some are saying to put it on before tinting the windows and some have had a problem with that and are saying to put the moleskin after the tint is done? Is there really a correct answer for this and what would be the pros and cons of each?
05-03-2007, 05:58 AM
#51
'06 6MT WDP
Join Date: May 2006
Location: Pittsburgh, PA
Age: 48
Posts: 199
Likes: 0
Received 0 Likes
on
0 Posts
Doesn't matter. You pull the rubber insert out of the window to install the moleskin. When they tint, they should pull that out as well. So either way is fine.
05-03-2007, 09:25 AM
#52
Senior Moderator
 ^ ^
^ ^I did mine first so that the hard rubber wipers never touched my tint.
However, I could have waited until after the tint to do it as long as I didn't put my windows down.
Scratching the tint and then installing the moleskin is like closing the barn door after the horse left.
08-05-2007, 03:25 PM
#53
Originally Posted by pimpin-tl
That is a normal screw going into the door itself with a rubber stop on it. If it's not coming out probably means it was stripped at the factory. You will need to help it come out.

* upper left: square driver's mount hole
* upper right: "good" passenger's mount, side view
* bottom left: "good" mount, end view
* bottom right, "stripped" driver's mount, side view
You can see that the driver's side mount was stripped so that it was no longer square and so had nothing to grip in the hole. It was tough to get out, but after removing the passenger side (which I should have done first, but wasn't sure it was removable) I see that I probably could have removed by sliding a very small screwdriver in between the mount and the door -- through the "gap" between the two tabs until I touched the screw -- then immobilized the mount to remove the screw.
I can't believe I stripped this removing the screw; my guess is it was overtightened at the factory when it was installed.
Anybody ever pick one of these up at the dealership? Under warranty?
 Or at least get a part number?
08-05-2007, 04:37 PM
Or at least get a part number?
08-05-2007, 04:37 PM
#54
Originally Posted by kfhughes
I see that I probably could have removed by sliding a very small screwdriver in between the mount and the door -- through the "gap" between the two tabs until I touched the screw -- then immobilized the mount to remove the screw.
08-26-2007, 11:55 PM
#55
yes that mount can easily get stripped by the edge of the sheetmetal cutout when you overtighten the screw. I remedy it by sticking a flat screwdriver between the panels applying pressure while I tighten the screw with a phillip's. Then I just tighten lightly till the screw closes the gap. All the other screws and tabs are sufficient to keep the door on without a problem.
I have a big question because I like this thread:
WHY isn't this garaged yet?????????
I have a big question because I like this thread:
WHY isn't this garaged yet?????????
08-27-2007, 12:05 PM
#56
Senior Moderator
3G Garage
Originally Posted by rockyfeller
yes that mount can easily get stripped by the edge of the sheetmetal cutout when you overtighten the screw. I remedy it by sticking a flat screwdriver between the panels applying pressure while I tighten the screw with a phillip's. Then I just tighten lightly till the screw closes the gap. All the other screws and tabs are sufficient to keep the door on without a problem.
I have a big question because I like this thread:
WHY isn't this garaged yet?????????
I have a big question because I like this thread:
WHY isn't this garaged yet?????????
We have added the thread to the 3G Garage as it is great info with pics.
Dave
08-27-2007, 07:47 PM
#57
Pro
Join Date: Mar 2007
Location: Western Chicago Suburbs
Age: 40
Posts: 541
Likes: 0
Received 0 Likes
on
0 Posts
I'd really like to see this, but the link seems to be down again 
Can anyone add the pics / install guide to this thread perhaps?
Thanks in advance! I'm so glad I've been reading this forum (way TOO much since I got my TL), because I've wanted to get the windows tinted for some time now...
Steve
Can anyone add the pics / install guide to this thread perhaps?
Thanks in advance! I'm so glad I've been reading this forum (way TOO much since I got my TL), because I've wanted to get the windows tinted for some time now...
Steve
08-28-2007, 12:51 AM
#58
Senior Moderator
Now you see our generic concern for off-site linking. It's out of our direct control and subject to the dependability of someone else's server.
However, the folks are friends of ours (I sound like Tony Soprano, LOL) so we should have it up and running shortly.
Stay tuned.
However, the folks are friends of ours (I sound like Tony Soprano, LOL) so we should have it up and running shortly.
Stay tuned.
08-28-2007, 07:34 AM
#59
Safety Car

When I got my tints done my installer said felt or no felt? I said whats the difference? he said after a long period of time it starts scratching the tint unless u clean it out properly (every other carwash or whenever u feel like it....he said wipe it or vacuum it) I just cut mine off....it added to the cabin noise slightly but not that much..... it never bothered me
04-30-2008, 09:44 AM
#62
Banned

Join Date: Jul 2003
Posts: 483
Likes: 0
Received 0 Likes
on
0 Posts
Buy the kit for the TL from Tint Protector. It comes with the moleskin and the instructions.
Here is the members discount page. $25 for the kit.
http:///forummembers/
Here is the members discount page. $25 for the kit.
http:///forummembers/
05-25-2008, 08:20 PM
#67
Instructor

Join Date: Mar 2008
Location: Harrisburg, NC
Age: 48
Posts: 100
Likes: 0
Received 0 Likes
on
0 Posts
I took some pictures as I did the drivers door, hopefully it will suffice to fill in the gap where the broken links are. If I need to make a new thread I will be happy to. I will try to get the stuff posted in a bit.
05-25-2008, 09:57 PM
#68
Instructor
Join Date: Mar 2008
Location: Harrisburg, NC
Age: 48
Posts: 100
Likes: 0
Received 0 Likes
on
0 Posts
Here is a quick write-up on how I did the door panel and installed the moleskin.
First of all, here is an exploded diagram of where the screws are as well as the clips.
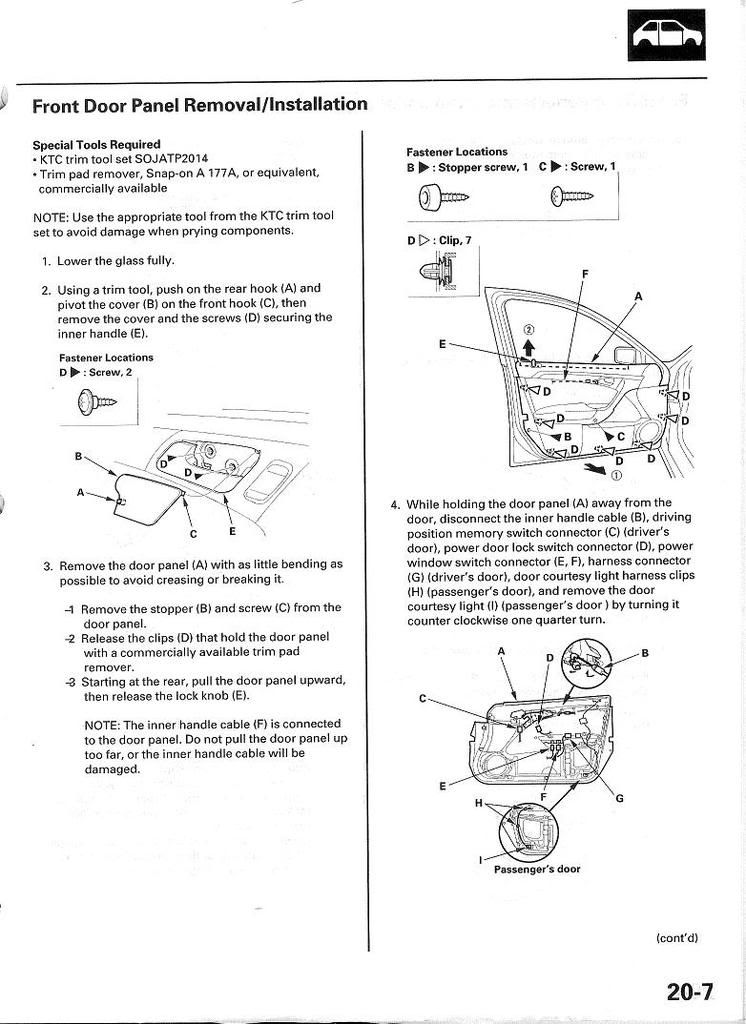
Pictured below is the door panel while fully attached:
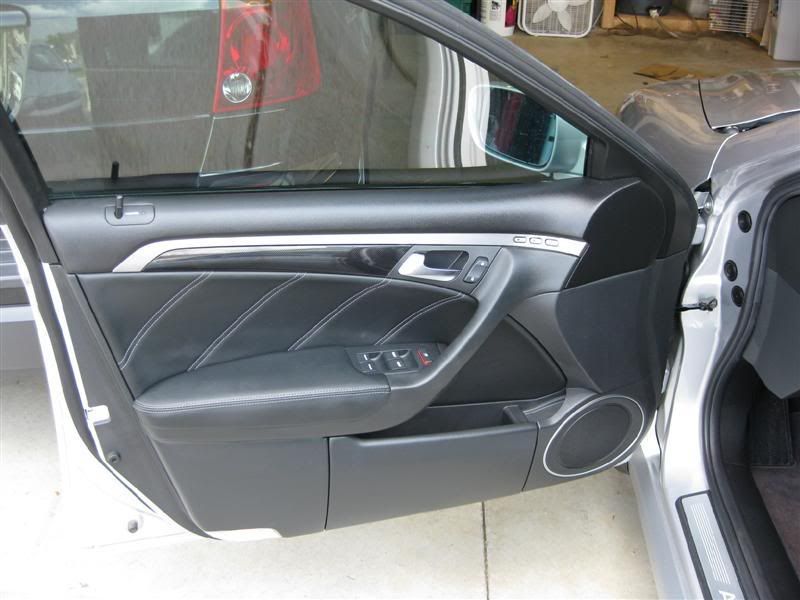
There are four screws per door panel and door panels attach the same so it's really easy. The screw locations are pictured below.
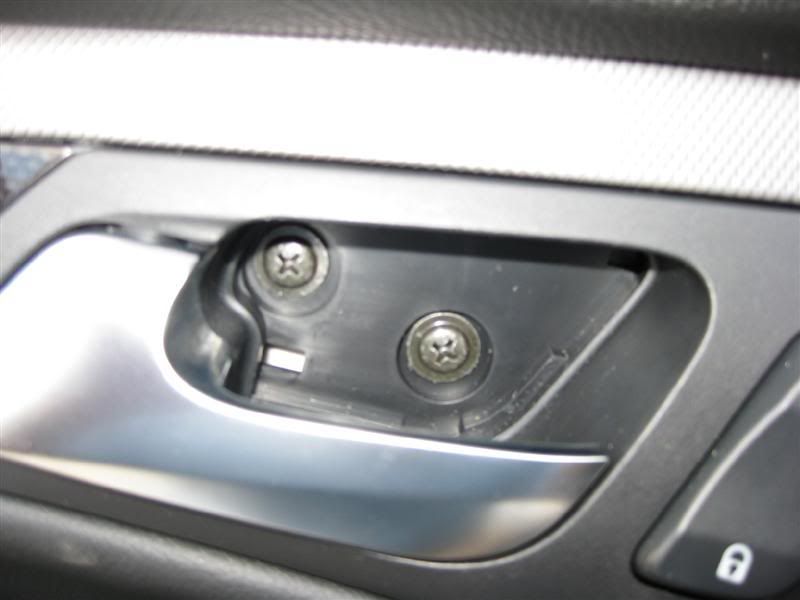
Behind the door handle is a panel that hides two screws. I used a tiny flat head screwdriver to remove this panel. On the little panel, towards the outer part of the door in the bottom there is a little clip that is quite easy to trigger. Once that is pulled in you can pull the little panel out. Here is the image with the panel removed:
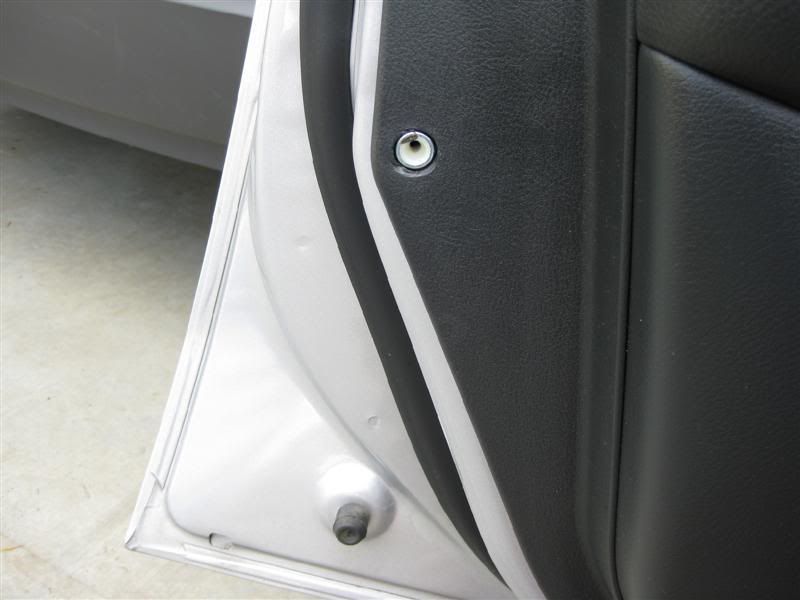
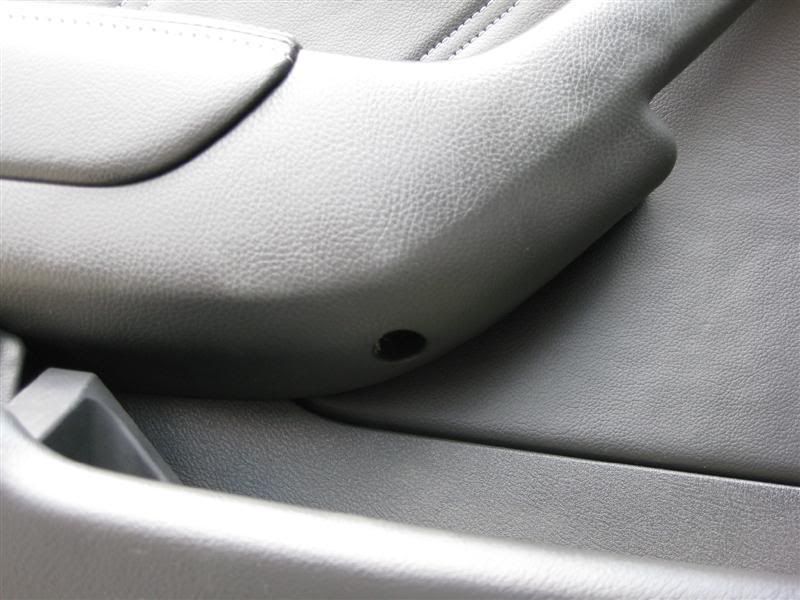
On the outer side of the door near the bottom is a rubber grommet. This is the screw that is easy to strip, in fact, my drivers side rear door didn't want to come out. If you're lucky, the screw will come out quite easily.
At the bottom of the handle there is a deep hole with a philips head screw. Simply remove this screw.
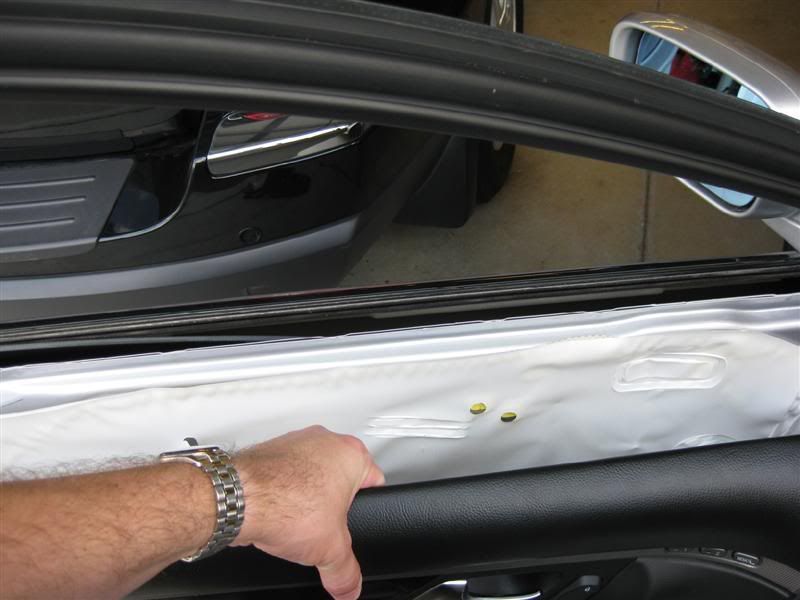
After all four screws are removed make sure your window is down and your lock is in the locked position. Grab the bottom of the door and start to gently pull. While you pull you can feel where the door is still attached. As you pull the door these will release. Out of the two panels I have done so far none broke so I believe they are fairly strong. Once you have the door panel loose the weatherstriping may remain on the door or it may come with the panel. Either way, remove it so you can use something abrasive for the adhesive to bond to. Pictured is the door panel removed:
I used some sandpaper to scuff up the weatherstriping, then cleaned it with rubbing alcohol. After that I attached the moleskin to both flaps that contact the window. Pictured below is a single strip of moleskin attached.

Once you are done with that simply reattach the weatherstriping to the door, then reattach the door panel.
There's nothing more to it. The hardest part is if you have that grommet and screw that is striped.
First of all, here is an exploded diagram of where the screws are as well as the clips.
Pictured below is the door panel while fully attached:
There are four screws per door panel and door panels attach the same so it's really easy. The screw locations are pictured below.
Behind the door handle is a panel that hides two screws. I used a tiny flat head screwdriver to remove this panel. On the little panel, towards the outer part of the door in the bottom there is a little clip that is quite easy to trigger. Once that is pulled in you can pull the little panel out. Here is the image with the panel removed:
On the outer side of the door near the bottom is a rubber grommet. This is the screw that is easy to strip, in fact, my drivers side rear door didn't want to come out. If you're lucky, the screw will come out quite easily.
At the bottom of the handle there is a deep hole with a philips head screw. Simply remove this screw.
After all four screws are removed make sure your window is down and your lock is in the locked position. Grab the bottom of the door and start to gently pull. While you pull you can feel where the door is still attached. As you pull the door these will release. Out of the two panels I have done so far none broke so I believe they are fairly strong. Once you have the door panel loose the weatherstriping may remain on the door or it may come with the panel. Either way, remove it so you can use something abrasive for the adhesive to bond to. Pictured is the door panel removed:
I used some sandpaper to scuff up the weatherstriping, then cleaned it with rubbing alcohol. After that I attached the moleskin to both flaps that contact the window. Pictured below is a single strip of moleskin attached.
Once you are done with that simply reattach the weatherstriping to the door, then reattach the door panel.
There's nothing more to it. The hardest part is if you have that grommet and screw that is striped.
01-29-2009, 10:07 PM
#70
Banned
Join Date: Jul 2003
Posts: 483
Likes: 0
Received 0 Likes
on
0 Posts
Our Tint Protector moleskin kit is easy to install and is made auto use.
We have a discount for AcuraZine members. The link it below.
http:///forummembers/
We have a discount for AcuraZine members. The link it below.
http:///forummembers/
07-01-2009, 10:45 AM
#71
Instructor
After getting the moleskin and tint installed, I would get glue streaks all over the window on hotter days. The factory weatherstripping was failing and bunched up every time the window went up and down. Has anyone had this problem?
I've had the tint redone about once for every window since the OEM weatherstripping keeps coming unglued. I just pull out the factory crap and leave the moleskin intact. So far, no problems, but I'm sure it doesn't help that it's 110 degrees today in Vegas.
Oh, by the way, all the links in this thread are dead except for where to buy the moleskin.
07-13-2009, 03:50 PM
#72
Banned
Join Date: Jul 2003
Posts: 483
Likes: 0
Received 0 Likes
on
0 Posts
This is what the tint starts to look like if you don't have the Tint Protector Kit.
http:///tintscr...leskinfelt.htm
http:///tintscr...leskinfelt.htm
11-13-2009, 07:10 PM
#73
Safety Car
Thread Starter
I forgot this was no longer working and got it up again folks. I asked a moderator to update the front page. Here is the link to the original working copy of this How-To!
http://www.acuraclubsa.com/DIY/moleskindiy.htm
Enjoy!
http://www.acuraclubsa.com/DIY/moleskindiy.htm
Enjoy!
11-27-2009, 04:19 PM
#76
get rid of the glue streaks with Goo Gone
I had the same problem. I removed the moleskin and did the instal in one piece instead of cutting the moleskin to fit each blade. I did this a couple months ago and have not hade any more glue streaks. You can ge the moleskin cheap at http://www.empirepao.com/
As I said, it resolved the problem for me.
peace,
Rolan
12-16-2009, 04:28 PM
#77
1st Gear

Join Date: Dec 2009
Posts: 1
Likes: 0
Received 0 Likes
on
0 Posts
Pimpin!
Thanks, great write up. Tint Protector moleskin is amazing too. I inadvertently stuck some on my dining room table and it look me 20 minutes to get it all off. That glue really sticks!
Thanks, great write up. Tint Protector moleskin is amazing too. I inadvertently stuck some on my dining room table and it look me 20 minutes to get it all off. That glue really sticks!
12-16-2009, 10:19 PM
#78
I have had no glue streaking since I installed the moleskin in one single strip. I recomend this to avoid glue streaks.
Happy Holydays,
Rolan
12-17-2009, 10:40 AM
#80
The moleskin can be pickup at any automotive store don't get ripped by tintprotector unless you are unsure what to buy....
As Rolan04Tl stated this link gives you a moleskin 10feet for 5 bucks!! This is the real price....
http://www.empirepao.com/moleskin.php
As Rolan04Tl stated this link gives you a moleskin 10feet for 5 bucks!! This is the real price....
http://www.empirepao.com/moleskin.php

