
[DIY] Let's Add Some Class: Footwell LED Lighting
 09-29-2013, 12:07 PM
#121
Race Director
Thread Starter
iTrader: (8)
Take the fuse out using the fuse puller in the engine fuse box, then put the mini add-a-fuse in where you pulled the 20A fuse out.
 09-29-2013, 03:28 PM
#123
3rd Gear

Join Date: Sep 2013
Posts: 3
Likes: 0
Received 0 Likes
on
0 Posts
Hi, sorry but i have one more question...
So i went to Canadian tire and Princess Auto, but they only have a 10Amp add a fuse... Can I still use that or do i need to find a 20 Amp add a fuse?
Thank you
So i went to Canadian tire and Princess Auto, but they only have a 10Amp add a fuse... Can I still use that or do i need to find a 20 Amp add a fuse?
Thank you
09-29-2013, 03:58 PM
#124
Race Director
Thread Starter
iTrader: (8)

 10-05-2013, 09:23 AM
#126
Race Director
iTrader: (3)
Join Date: Feb 2012
Location: South Florida
Age: 30
Posts: 18,278
Received 3,824 Likes
on
2,847 Posts
vleds.com
You'll be looking for the strips.
They also currently have a coupon code for October, 10% off.
Code :10OFF1013
You'll be looking for the strips.
They also currently have a coupon code for October, 10% off.
Code :10OFF1013
10-26-2013, 11:34 AM
#127

Ok, so I am brand new to the community here and have a 2g NBP TLS. I was looking to do this LED mod for a while but don't know how much I trust my electronic skills. I understand the add-a-fuse a little bit and that's where the positive is hooking up, but can the negative just be wired to a switch?
The switch I am mentioning is this one:
http://www.homedepot.com/p/Gardner-B...9#.Umvu_fnrz64
Thanks
The switch I am mentioning is this one:
http://www.homedepot.com/p/Gardner-B...9#.Umvu_fnrz64
Thanks
10-26-2013, 11:51 AM
#128
Race Director
Thread Starter
iTrader: (8)
You can definitely use a switch - I would use a nicer looking switch than that one, maybe a push switch that lights up - any auto parts store should have them in stock.
It really depends on how you want your lights to light up.
Do you want to have your footwell lights turn on automatically when you turn on your low beams? Do you want them to only turn on when the doors are open? Do you want to have them be able to turn on as soon as you start your car so they'll light up even during the day?
Don't worry about electronic skills - LEDs are the most easiest things to wire - just a positive and a negative wire.
10-26-2013, 12:18 PM
#129
The Boss
After having my led strips in for such a long time now. i just realized I can dim them using the brightness button on the dash. thought it was cool lol.
10-26-2013, 08:27 PM
#130
Well considering I'm looking to wire a switch and the LEDs I am looking to install will probably be blue or red, it would make the most sense to wire it so they turn on when you start the car?
What would be the easiest thing to wire for?
What do you think is the best option?
I'm just living and learning here,
sorry for the noobness
What would be the easiest thing to wire for?
What do you think is the best option?
I'm just living and learning here,
sorry for the noobness
10-26-2013, 08:32 PM
#131
Great Idea on the switch by the way, I just found one that may fit in the empty slot next to the dash dimmer to the left of my steering wheel on the lower dash if I can ever figure out how to access that part.
Here's the part:
http://www.superbrightleds.com/morei...n-switch/1201/
Here's the part:
http://www.superbrightleds.com/morei...n-switch/1201/
11-15-2013, 09:57 PM
#132
sooo do you guys have an suggestions on the best fuse to tap into? and do these but connectors prevent the job of soldering the wires together, i don't really get how that works
Is there anything easier to hook the wires up to?
thanks
Is there anything easier to hook the wires up to?
thanks
11-15-2013, 11:45 PM
#133
Race Director
Thread Starter
iTrader: (8)
Yup - butt connectors replace soldering wires together.
You can still solder, if you want instead of using butt connectors though.
Butt connector is the easier way to hook up the wires, besides the ghetto method of twisting wires together.
I suggest to tap into any fuse that is constantly on, for example the power seat.
You can still solder, if you want instead of using butt connectors though.
Butt connector is the easier way to hook up the wires, besides the ghetto method of twisting wires together.
I suggest to tap into any fuse that is constantly on, for example the power seat.
11-16-2013, 12:30 AM
#134
Mechanical Engineer
Gret DIY man! I'm going to tackle this tomorrow afternoon. I have respectable hands on and theoretical skills, and was planning on using 22 gauge as we have it readily available in our engineering labs. Are there any cons to this gauge besides the smaller diameter, such as the increased resistance?
The following users liked this post:
guitarplayer16 (11-16-2013)
11-16-2013, 11:19 AM
#135
Race Director
Thread Starter
iTrader: (8)
Gret DIY man! I'm going to tackle this tomorrow afternoon. I have respectable hands on and theoretical skills, and was planning on using 22 gauge as we have it readily available in our engineering labs. Are there any cons to this gauge besides the smaller diameter, such as the increased resistance?
Usually LED wires are small gauge around 22awg so I don't see a problem.
11-17-2013, 09:11 AM
#136
Do you think if I have an illuminating switch and tap into a fuse thats constantly on that it will ruin the battery?
I don't know how much energy that switch would take to glow if its on all the time, and if you had the option, 10 or 20 amp mini/add-a-fuse
I don't know how much energy that switch would take to glow if its on all the time, and if you had the option, 10 or 20 amp mini/add-a-fuse
11-17-2013, 09:20 AM
#137
sorry, but I understand almost everything up to what you did with the negative wire. Is it necessary to connect that to the negative battery terminal? I thought it just had to be connected to a screw that was fastened to the metal frame of the car?
Forgive me if I'm wrong but I want to make sure I have a solid understanding of what I'm doing before I attempt this
Forgive me if I'm wrong but I want to make sure I have a solid understanding of what I'm doing before I attempt this
 11-17-2013, 11:12 AM
#139
Race Director
Thread Starter
iTrader: (8)
sorry, but I understand almost everything up to what you did with the negative wire. Is it necessary to connect that to the negative battery terminal? I thought it just had to be connected to a screw that was fastened to the metal frame of the car?
Forgive me if I'm wrong but I want to make sure I have a solid understanding of what I'm doing before I attempt this
Forgive me if I'm wrong but I want to make sure I have a solid understanding of what I'm doing before I attempt this
Do you want them to be on 24/7? You would put the negative to the ground bolt.
Do you want them on when you start your car? You would put the positive to fuse #32, and negative to a ground bolt.
Do you want them to turn on only when the doors are open? You would follow this DIY and tap the negative wire to the dome supervisor wire.
Do you want them to turn on only when you turn on your headlights? You would tap the negative wire to the parking light wire.
11-17-2013, 01:10 PM
#140
The negative wire gets tapped to a source depending on how you want the lights to come on.
Do you want them to be on 24/7? You would put the negative to the ground bolt.
Do you want them on when you start your car? You would put the positive to fuse #32, and negative to a ground bolt.
Do you want them to turn on only when the doors are open? You would follow this DIY and tap the negative wire to the dome supervisor wire.
Do you want them to turn on only when you turn on your headlights? You would tap the negative wire to the parking light wire.
If a driver, front passenger, and rear passenger opens the door than only 3 will illuminate and when they close the door it will shut off.
Mine only come on when the door is open and turns off when the door is closed. I do not have it wired up to a switch so I do not have independent control of the LED lights. I wired it up to the door pin switch for each door.
I always have my interior light switch in the OFF position so wiring it to the dome "supervisor" wire wasn't an option, plus I didnt' want all 4 to always turn on when majority of the time it's only me getting in and out the car lol
11-17-2013, 11:10 PM
#141
7th Gear

Join Date: Nov 2013
Posts: 7
Likes: 0
Received 0 Likes
on
0 Posts
Sooo this may be a noobish question but I think my TL it's an 08 base with Nav already has that footwell lighting but it's a blue/greenish looking color and it's very very dim? I think it even stay on when you close the door and your driving I'll check when I get home I'm working right now. But does that sound normal or am I trippin tits over here?
11-18-2013, 08:35 AM
#142
I know u said that the 10amp add a fuse is ok but putting a 20amp fuse in one of the slots is exceeding the rated amperage for the alot. the 3amp fuse is ok in the other but was wondering if the power seat slide 20amp fuse is the only one we can use, maybe another that is 10amp or less
11-18-2013, 10:52 AM
#143
The Boss
Sooo this may be a noobish question but I think my TL it's an 08 base with Nav already has that footwell lighting but it's a blue/greenish looking color and it's very very dim? I think it even stay on when you close the door and your driving I'll check when I get home I'm working right now. But does that sound normal or am I trippin tits over here?
11-18-2013, 10:57 AM
#144
Mechanical Engineer
Guitarplayer, I completed this yesterday and it looks great. The DIY was extremely helpful! I only did the front and passenger footwells and they're grounded to a bolt in the car.
However, every time I plugged the add a fuse in and put the corresponding fuse in the fuse box, I lost whatever function in my car I plugged the assembly into. I tried everything including the wiper motor fuse. So, I cut the add a fuse out and wired just the power wire to the fuse slot (ignition option 1 fuse #9) and held it in place with a spare fuse (cutting the ground part so just the power section is held in). Works great, but I'm throwing a CEL. I know this is not the correct way to do this, but is there any way I can solve the problem to get rid of the CEL? I don't mind redoing the add a fuse, but I tried every fuse that only has power with the key/ignition and nothing worked correctly. Thanks again!
However, every time I plugged the add a fuse in and put the corresponding fuse in the fuse box, I lost whatever function in my car I plugged the assembly into. I tried everything including the wiper motor fuse. So, I cut the add a fuse out and wired just the power wire to the fuse slot (ignition option 1 fuse #9) and held it in place with a spare fuse (cutting the ground part so just the power section is held in). Works great, but I'm throwing a CEL. I know this is not the correct way to do this, but is there any way I can solve the problem to get rid of the CEL? I don't mind redoing the add a fuse, but I tried every fuse that only has power with the key/ignition and nothing worked correctly. Thanks again!
11-18-2013, 11:19 AM
#145
Race Director
Thread Starter
iTrader: (8)
I know u said that the 10amp add a fuse is ok but putting a 20amp fuse in one of the slots is exceeding the rated amperage for the alot. the 3amp fuse is ok in the other but was wondering if the power seat slide 20amp fuse is the only one we can use, maybe another that is 10amp or less
You can most definitely find another fuse that is 10A or less

Just refer to the fuse box cover and find a 10A fuse, and read the description and find out if it's powered 24/7.
Guitarplayer, I completed this yesterday and it looks great. The DIY was extremely helpful! I only did the front and passenger footwells and they're grounded to a bolt in the car.
However, every time I plugged the add a fuse in and put the corresponding fuse in the fuse box, I lost whatever function in my car I plugged the assembly into. I tried everything including the wiper motor fuse. So, I cut the add a fuse out and wired just the power wire to the fuse slot (ignition option 1 fuse #9) and held it in place with a spare fuse (cutting the ground part so just the power section is held in). Works great, but I'm throwing a CEL. I know this is not the correct way to do this, but is there any way I can solve the problem to get rid of the CEL? I don't mind redoing the add a fuse, but I tried every fuse that only has power with the key/ignition and nothing worked correctly. Thanks again!
However, every time I plugged the add a fuse in and put the corresponding fuse in the fuse box, I lost whatever function in my car I plugged the assembly into. I tried everything including the wiper motor fuse. So, I cut the add a fuse out and wired just the power wire to the fuse slot (ignition option 1 fuse #9) and held it in place with a spare fuse (cutting the ground part so just the power section is held in). Works great, but I'm throwing a CEL. I know this is not the correct way to do this, but is there any way I can solve the problem to get rid of the CEL? I don't mind redoing the add a fuse, but I tried every fuse that only has power with the key/ignition and nothing worked correctly. Thanks again!
Fuse #32 is the fuse you want to use that has power when the car is "On".
I would use the add-a-fuse for that, and revert what you did with fuse #9.
Off topic, but how are you liking mech eng?
11-18-2013, 08:06 PM
#146
Mechanical Engineer
Alright, I'm pretty sure I tried that fuse, but I couldn't get it to work. My theory was that the the add a fuse rated for 1-10 A would supply a max of 10 A to that fuse, regardless of the higher amperage fuse plugged into it. So, it wouldn't fully power a 30 A slot since only a max of 10 A would be supplied, however I'm not sure if that's correct (my electrical knowledge is very math based lol).
As for this semester, the enjoyment comes and goes. However, the program is very intriguing and I have enjoyed the first round of my internship. It's just difficult and stressful, and I'm no genius when it comes to higher-level calculus and differential equations lol. Are you studying/contemplating engineering?
As for this semester, the enjoyment comes and goes. However, the program is very intriguing and I have enjoyed the first round of my internship. It's just difficult and stressful, and I'm no genius when it comes to higher-level calculus and differential equations lol. Are you studying/contemplating engineering?
 11-19-2013, 02:41 PM
#148
Race Director
Thread Starter
iTrader: (8)
Alright, I'm pretty sure I tried that fuse, but I couldn't get it to work. My theory was that the the add a fuse rated for 1-10 A would supply a max of 10 A to that fuse, regardless of the higher amperage fuse plugged into it. So, it wouldn't fully power a 30 A slot since only a max of 10 A would be supplied, however I'm not sure if that's correct (my electrical knowledge is very math based lol).
As for this semester, the enjoyment comes and goes. However, the program is very intriguing and I have enjoyed the first round of my internship. It's just difficult and stressful, and I'm no genius when it comes to higher-level calculus and differential equations lol. Are you studying/contemplating engineering?
As for this semester, the enjoyment comes and goes. However, the program is very intriguing and I have enjoyed the first round of my internship. It's just difficult and stressful, and I'm no genius when it comes to higher-level calculus and differential equations lol. Are you studying/contemplating engineering?
I'm also studying ME. I'm in second year and all this work is killing me.
Ain't no rest for the wicked.
The switch would be wired to the negative wire of the LEDs.
In position 1, it is connecting the dome trigger to function the LEDs. In the second position the LEDs will turn on at your command since there is power (fuse 32) and a ground (ground bolt).
The following users liked this post:
Tl4eva (04-01-2014)
11-19-2013, 07:47 PM
#149
Mechanical Engineer
I will try and give it another go this weekend, along with a switch. Yeah I hear you man, I'm a senior and it's extremely hard to describe the workload to anyone that hasn't experienced it. Good luck and thanks again for the info.
11-21-2013, 04:33 PM
#150
Ok so now that I've grasped the concept.
Here's the application.
Maybe I'm in the wrong thread but I have a 2G 03 tl type S
sooo as a result my drivers side fusebox does not have a fuse #32
here are the options
I took a pic of the driver side fusebox and the fusebox cover, my thinking was that I connect it to the fuse entitled (daylight) (see fusebox cover photo), however I do not know how much power is necessary, and what the amp should be, if its a 7.5 amp does that mean I need a 7.5amp add-a-fuse
I know its an easy project, but I'm new to the whole thing and really understand what I'm doing before I go pulling fuses in my car.
Thanks
04-12-2014, 12:21 AM
#152
The negative wire gets tapped to a source depending on how you want the lights to come on.
Do you want them to be on 24/7? You would put the negative to the ground bolt.
Do you want them on when you start your car? You would put the positive to fuse #32, and negative to a ground bolt.
Do you want them to turn on only when the doors are open? You would follow this DIY and tap the negative wire to the dome supervisor wire.
Do you want them to turn on only when you turn on your headlights? You would tap the negative wire to the parking light wire.
Do you want them to be on 24/7? You would put the negative to the ground bolt.
Do you want them on when you start your car? You would put the positive to fuse #32, and negative to a ground bolt.
Do you want them to turn on only when the doors are open? You would follow this DIY and tap the negative wire to the dome supervisor wire.
Do you want them to turn on only when you turn on your headlights? You would tap the negative wire to the parking light wire.
thanks for the DIY guide btw! this guide is what made me consider even trying this mini project
04-12-2014, 12:45 AM
#153
Race Director
Thread Starter
iTrader: (8)
hey guitar player i just orderd some 8" LED strips off ebay and will attempt this project in a few days... you mentioned if you want these LEDs to activate and stay on when the parking lights/low beams are on i would need to tap the negative LED wire to the parking light wire.. would you happen to know where that wire is located? and what the easiest route would be?
thanks for the DIY guide btw! this guide is what made me consider even trying this mini project
thanks for the DIY guide btw! this guide is what made me consider even trying this mini project
Remove the driver dash under cover on the driver side, then remove the driver lower dash cover as shown in the DIY.


The parking light wire is a red and black with on a connector bundled on the left of the frame.
It should be directly under the driver side air vent.
This is what the "connector bundle" looks like.
The parking light wire is shown on the picture also. It's the far corner one.
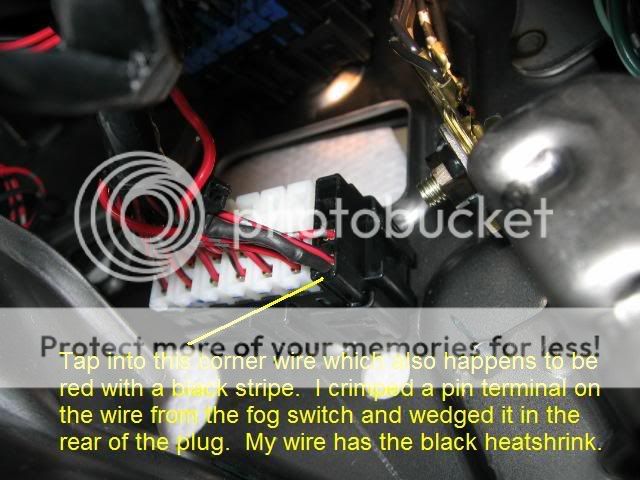
Don't wedge the footwell wire to the pin like they did in the picture - use a T-Tap splice connector as it's easier.
Cheers
Last edited by guitarplayer16; 04-12-2014 at 12:58 AM.
04-12-2014, 02:57 AM
#154
Yes, it's very easy to locate, actually.
Remove the driver dash under cover on the driver side, then remove the driver lower dash cover as shown in the DIY.
The parking light wire is a red and black with on a connector bundled on the left of the frame.
This is what the "connector bundle" looks like.
The parking light wire is shown on the picture also. It's the far corner one.
Don't wedge the footwell wire to the pin like they did in the picture - use a T-Tap splice connector as it's easier.
Cheers
 04-12-2014, 09:18 PM
#156
Race Director
Thread Starter
iTrader: (8)

Let me know if you guys need any help.
Always here to help
04-14-2014, 07:58 PM
#157
i had another quick question.. im looking to install a switch in my setup so i can turn off the leds when i want..
my question is which line am i supposed to connect the load and line on the switch terminal?
![[DIY] Let's Add Some Class: Footwell LED Lighting-ypbs3pj.jpg](https://acurazine.com/forums/attachments/3g-tl-2004-2008-93/106955d1683162666t-%5Bdiy%5D-lets-add-some-class-footwell-led-lighting-ypbs3pj.jpg)
does the add a fuse line connect to the Line terminal of the switch and the Load terminal connects to the parking light wire?
my question is which line am i supposed to connect the load and line on the switch terminal?
![[DIY] Let's Add Some Class: Footwell LED Lighting-ypbs3pj.jpg](https://acurazine.com/forums/attachments/3g-tl-2004-2008-93/106955d1683162666-%5Bdiy%5D-lets-add-some-class-footwell-led-lighting-ypbs3pj.jpg)
does the add a fuse line connect to the Line terminal of the switch and the Load terminal connects to the parking light wire?
04-14-2014, 08:22 PM
#158
Race Director
Thread Starter
iTrader: (8)
You can install the SPST switch anywhere inbetween the add-a-fuse and the LED positive wire.
The "load" would be hooked towards the add a fuse.
The "line" would be hooked towards the LED positive wire.
You don't need to connected ANYTHING between the parking light wire =)
So it goes:
Add-A-Fuse >>>>>>>>>>>>>>>>>>LOAD PIN |Switch| LINE PIN >>>>>>>>>>>>>>LED Positive wire.
Then:
LED Negative wire >>>>>>>>>>>>>>>>>>>>>>>>>>>>> Parking light wire.
Last edited by guitarplayer16; 04-14-2014 at 08:25 PM.
04-14-2014, 08:31 PM
#159
You can install the SPST switch anywhere inbetween the add-a-fuse and the LED positive wire.
The "load" would be hooked towards the add a fuse.
The "line" would be hooked towards the LED positive wire.
You don't need to connected ANYTHING between the parking light wire =)
So it goes:
Add-A-Fuse >>>>>>>>>>>>>>>>>>LOAD PIN |Switch| LINE PIN >>>>>>>>>>>>>>LED Positive wire.
Then:
LED Negative wire >>>>>>>>>>>>>>>>>>>>>>>>>>>>> Parking light wire.
The "load" would be hooked towards the add a fuse.
The "line" would be hooked towards the LED positive wire.
You don't need to connected ANYTHING between the parking light wire =)
So it goes:
Add-A-Fuse >>>>>>>>>>>>>>>>>>LOAD PIN |Switch| LINE PIN >>>>>>>>>>>>>>LED Positive wire.
Then:
LED Negative wire >>>>>>>>>>>>>>>>>>>>>>>>>>>>> Parking light wire.
also lastly im only adding led strips in the front... so in this case i would be adding t taps between the switch and the leds correct? not between the add a fuse and switch? for the passenger side led strip
Last edited by champaned_out; 04-14-2014 at 08:37 PM.
04-14-2014, 08:51 PM
#160
Race Director
Thread Starter
iTrader: (8)
You are correct!
If you put tap the passenger LEDs between the add-a-fuse and switch, the switch will only work for the driver side LED lol. Not what you want.
Tap it between the switch and driver's LED and the switch will work for both
If you put tap the passenger LEDs between the add-a-fuse and switch, the switch will only work for the driver side LED lol. Not what you want.
Tap it between the switch and driver's LED and the switch will work for both