When you click on links to various merchants on this site and make a purchase, this can result in this site earning a commission. Affiliate programs and affiliations include, but are not limited to, the eBay Partner Network.
Thought I'd let you guys know that I replaced the brush holder assembly on my 125K mile TSX. It had no effect upon the slow crank behavior; still cranks as slow as ever...
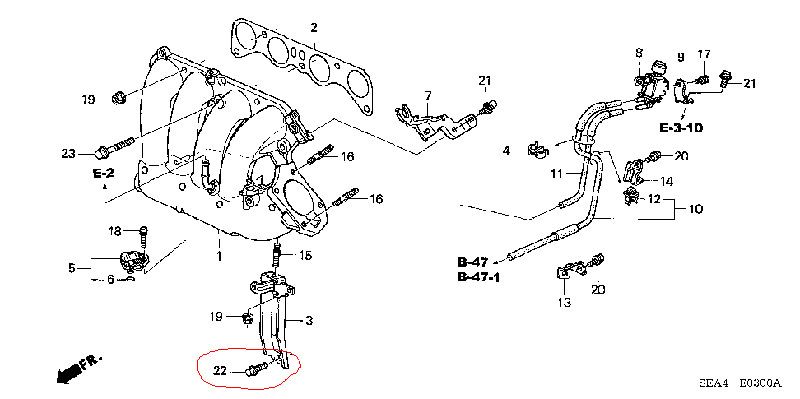
I have a problem...the bracket bolt under the manifold is now stripped. I guess it was rusted or something, but the fucker wouldn't budge and ended up stripping.
When using the craftsman rounded bolt socket, be sure to tap the socket firmly onto the bolt head to insure engagement before attempting to turn bolt w/ ratchet.
You may have to experiment w/ two socket sizes. Smaller size may work better to grip a shallow bolt head, as large size may bottom out w/ only minor engagement.
I am in the process of replacing my starter and it's been going rather smoothly. I have been able to remove the bottom bracket bolt with ease, but I am having such a hard time disconnecting the harness (gray color) behind the IM. I see there's some sort of a release tab on the side but I have been trying for the past 30 minutes without success. I'm afraid of breaking it if I continue yanking it. Any tips on how to get this done?
I am in the process of replacing my starter and it's been going rather smoothly. I have been able to remove the bottom bracket bolt with ease, but I am having such a hard time disconnecting the harness (gray color) behind the IM. I see there's some sort of a release tab on the side but I have been trying for the past 30 minutes without success. I'm afraid of breaking it if I continue yanking it. Any tips on how to get this done?
I finally figured out how to disconnect the harness...... There are two release tabs, one on the male end and the other on the female end.
Overall, it took me about 4 hours to complete the job, not including the two trips to the auto parts store. The first starter I bought was a new Pro Start starter from Pepboys but it would not fit (couldn't line up the mounting holes). I don't know if I ordered the wrong part but it doesn't look the same as the OEM, it had an extra cylinder for the solenoid and the ground. I went ahead and ordered a remanufactured starter from Advance Auto and it looks exactly the same as the OEM. Installation went relatively easy, I took my time making sure that the hoses and harnesses were re-connected properly. Total cost is $150ish. In addition to the starter, I went ahead and replaced the IM gasket and had to buy a gallon of Coolant since I spilled some when I removed some of the hoses.
I would give this job a difficulty rating of 5 out of 10 (10 being engine/transmission overhaul). This thread, the Helms manual along with the countless YouTube videos made this job a lot less scary than what I had anticipated.
I forgot to add..... My issue started a few weeks ago....
I was having some intermittent starting issues. Sometimes it doesn't start right away but if you wait a few minutes or jump start it, it would eventually start again. Then came this weekend, it would not start, no clicking noise, lights and radio were fine though. I called AAA and the guy could not jump start it. He tested the battery and it was fine, it's only a few months old. He suggested to go ahead and take it to the shop but I declined.
I started to do some troubleshooting and everything I checked was fine, I did not see any corrosion around the battery or cables and did not find any blown fuse. I started looking online and it looks like this job will cost between $300 to $700, this gave me the motivation to go ahead and remove the starter to get it tested (needless to say, it failed according to the Advance Auto worker)
I am in the middle of this job. It has been quite the PITA especially because it is cold and snowy in the midwest. Luckily we have a garage, that we were able to push the car into to work on. When I went to get a new starter from the parts store it has a completely different design and has an externally mounted solenoid on top. It barely fits below the bar where as before there was plenty space between the terminal and the bar.
According to the instructions that came with the sheet a new supplier was used because of the systemic problems with the original design. Does anyone else have this type of construction, any problems with it down the road?
Well, did you get the bolt off and replace starter?
good luck
Nope, I said "fuck it" and took it to the dealer. I got the starter online (OEM honda) and the local Acura dealer charged $260.80 to install it. Done, no problems since.
108K miles and just had to do this. Went to O'Reillys and picked up a starter for $127. Had issues disconnecting the wiring harness on the bottom of the IM as well and finally just unscrewed it from the manifold. My bracket was different than the one show in the pics. As long as you remove the coolant tank you will have excellent access to the bottom bracket bolt. Just jam something between the motor and the rad hose thats in your way and you'll be able to the bottom bracket clearly. No need to go underneath the car as the video shows. Much easier from above. Thanks for the thread, made it much, much easier!
While the pics were very helpful, I think the Service manual is a much better resource for this. The you tube video above is incredibly helpful as well. Except for the my struggles with separating one of the harness, it was relatively easy, just time consuming. My dumbass eventually figured it out
I had to replace starter in my TSX in Sept 2013 (106K miles) for same reason; intermittent contact from starter solenoid. OP pics were very helpful and I had no problems.
I copied this thread w/ pics to my TSX folder when first posted. I have found in past that helpful threads tend to vanish w/ time
If anyone wants original PM me w/ your email address and I'll forward.
Nice write up...gonna give it a shot. Dealership prices are criminal. Can someone confirm this is the correct part for this job:
http://www.ebay.com/itm/New-Starter-ACURA-TSX-2-4L-2004-2005-04-05-/291179690800?pt=Motors_Car_Truck_Parts_Accessories&hash=item43cba97b30&vxp=mtr
Thank You!
The pictures still load. I had someone test it who was not logged into Acurazine and the pictures came up.
I actually had to replace the $100 Chinese starter this past weekend! Word to the wise, spend the $250 and get the Honda refurb. My TSX actually sounds like a Honda again when it starts. Since I didn't have to document the install this time, I replaced the starter from start to finish in less than an hour!
The old starter completely locked up and wouldn't turn anymore. I barely got 3 years out of the cheap starter. I installed it at 135k and it died at 189700. That is sad.
Thank you very much for this post. It helped out and yesterday enabled us to change my starter out in under two hours because of you letting us know what problems to prepare for ahead of time.
Many thanks Burijon! My starter needed replacement after 235,000 miles. Dealership wanted $640 plus tax. Bought a starter at AutoZone for $120.00. Using this thread, I was able to replace in 4 hours. As others have said, the bottom bracket bolt and bottom harness are the two hardest steps. I probably spent 1.5 hours on those two things. Removal of coolant overflow tank was great advice.
I replaced my starter on Friday morning. I got an OEM new Honda one for $210+tax through my buddy at a Honda dealership here in Ottawa.
Removing the intake manifold was simple EXCEPT for the lower bracket bolt that is near the front engine mount. To access that, for anyone else doing this, I HIGHLY recommend taking 2 minutes to remove the drivers' side radiator fan. One electrical clip and two small bolts and it comes right out. Once that's removed, a 3/8" drive 14mm socket and a 6" extension will get you just enough access for that lower bolt on the IM bracket. It's a bit of a pain, but it is possible.
Once that's out, the starter replacement itself is simple, and re-assembling everything takes maybe 10 minutes if you remember where all the hoses and clips go.
The new starter sounds COMPLETELY different and sounds like it should - starts quickly, sounds powerful, and no more sluggish starting.
For shits and giggles, I took apart the old one (262,000km on it). I don't have pics with me but will post later. The armature had multiple nicks/gouges in a few spots. The 4 metal contacts (the ones attached to the braided copper wires) -- two of them were worn down almost such that the copper braid wasn't even contacting them anymore! And, lastly, the teeth of the starter were mostly rounded off and missing a few small pieces. No missing teeth, but sections of most teeth were gone. Flywheel, thankfully, had no damage that I could see.
I successfully used this guide to replace the battery / starter cable assembly as it had extensive corrosion. To get the nut off of the starter without removing the starter itself, I sawed an 1/8" off of the side of the plastic shroud closest to the front in order to get a box wrench on it.
The bolt on the bottom bracket came off with ease. I removed the overflow tank as previously suggested and was able to get a 1/2" drive with extension and universal joint down in there...no breaker bar necessary.
The most troubling part was the coolant lines on the throttle body. I was but wasn't really prepared to catch the coolant coming out of them and suggest starting with the lower of the two lines. I used a golf tee and aluminum tape to plug the leak.
Thanks for the writeup and comments; it made this an easy task.
I recently been having slow starts, which eventually turned into non starts. Battery, cables, and terminals looked good (or so I thought). Pulled everything apart to replace the starter and noticed that the black calble running to the starter solenoid was chewed into (mice poo was also in the area). I got my original starter tested at Autozone, which passed. I'm in the the process of patching the cable. Any idea what the gauge size of this cable? Since I already have everything apart I was going to replace the starter (so I don't have to pull everything apart again). For reference, I have an '04 Acura TSX with 172k miles.
Rodents chewed into the black cable going to the starter solenoid.
Getting this wire separated enough from the rest of the starter sub harness is a major PITA. Connector holders do want to budge. I'm wondering if I should have purchased the entire sub harness from Acura for $120...
Getting this wire separated enough from the rest of the starter sub harness is a major PITA. Connector holders do want to budge. I'm wondering if I should have purchased the entire sub harness from Acura for $120...
Finally finished the starter and wire fixes. Starts right up! First time "burping" the air from the coolant system. I was following the service manual, which instructed me to let the car warm up with the radiator cap loosley attached to the radiator. I turned off the car after the fans kicked on twice as instructed and my radiator definitely burped coolant everywhere! The radiator cap popped off. It was actually pretty funny. Then I had to clean up. I'm not sure what I did wrong....
So you removed throttle body to replace starter? Not really necessary.
I found the shop manual suggestion in Engine Cooling to allow to warm w/ radiator cap loose. I would disagree w/ suggested procedure. If you fill w/ coolant slowly, you will trap a minimum amount of air, and if warmed w/ cap loose, coolant will expand, escape the system and be lost.
I fill carefully to minimize trapped air, warm engine w/ cap on, allow to cool, and top off coolant. There will be a volume loss due to air trapped in heater core and throughout the system.
The shop procedure might work if you only run engine for perhaps 1-2 mins, and then install radiator cap. This will allow air to be circulated and escape at the radiator cap.
Saved me at LEAST $500. I am a complete newbie when it comes to engine repair, so it took me about 4 hours. It was a major pain to take out the bottom anchor bolt, but it was super easy once I took out the coolant reservoir. DEFINITELY take out the coolant reservoir (its only 2 screws, so easy).
Also, I did not undo the coolant lines. I was able to tilt the manifold out of the way to get at the starter without undoing the cooling lines....definitely recommend doing this to save some time and effort.
I thought you had to remove the coolant lines is what I'm seeing in every instruction from owners on this job. How does coolant not get everywhere once you take in the intake manifold off if you keep the lines on?
What an awesome resource the forums have been over the years. Selling my tsx after 8 years but just used this write up yesterday to replace a failing starter before I sell.
I had to replace starter in my TSX in Sept 2013 (106K miles) for same reason; intermittent contact from starter solenoid. OP pics were very helpful and I had no problems.
I copied this thread w/ pics to my TSX folder when first posted. I have found in past that helpful threads tend to vanish w/ time
If anyone wants original PM me w/ your email address and I'll forward.
good luck
Hi TexasHonda. Could you send me the TSX starter replacement thread with pictures if you still have it. My email in q_gaskin@yahoo.com Thanks.


 12-08-2013, 09:00 AM