DIY-Install of two 5.6 inch monitors in the headrest..
 01-12-2008, 11:38 AM
#1
200,000 mile club
Thread Starter
Join Date: Jul 2007
Location: Charlotte, NC
Age: 48
Posts: 1,774
Likes: 0
Received 35 Likes
on
15 Posts
DIY-Install of two 5.6 inch monitors in the headrest..
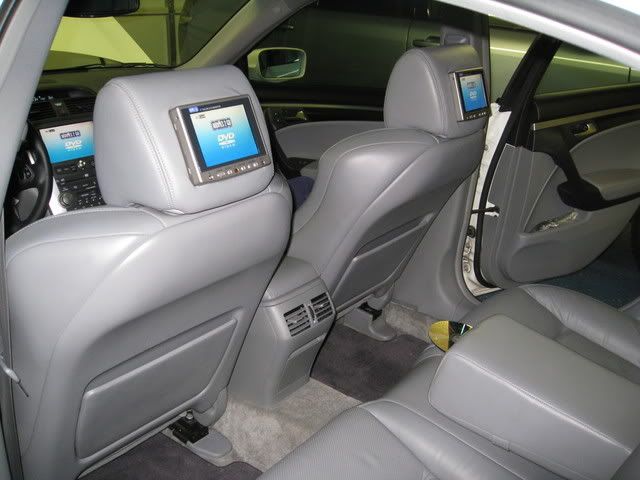
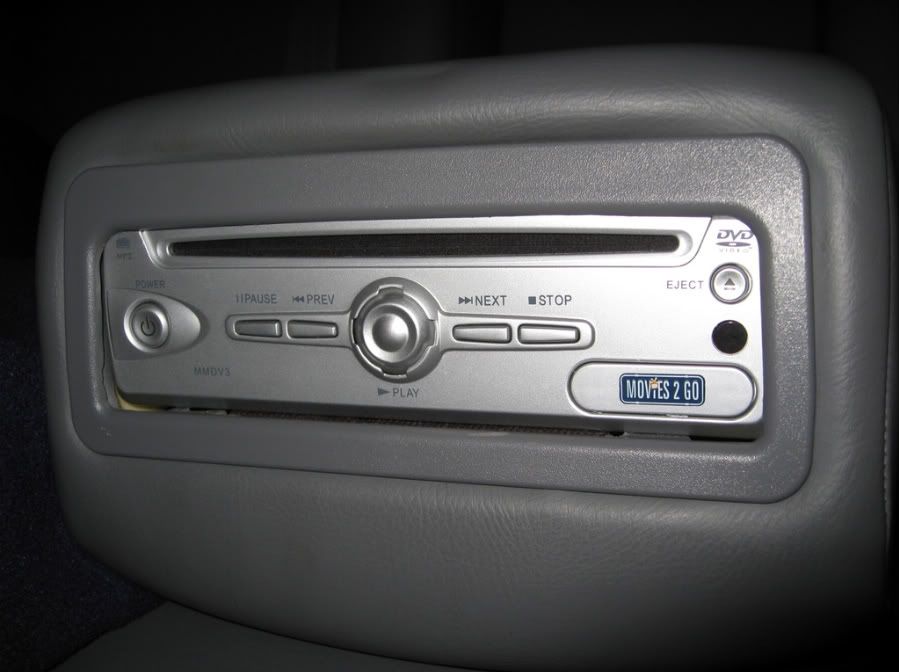
OK, before I begin I have to say this project was fairly simple. The only thing that was nerve racking was actually cutting the headrests to fit the monitors in. I really was sweating during that process. I already installed the dvd (movies 2 go) audiovox dvd player in the rear seat cup holder spot. The two special 6 pin wires were run before I found the monitors on E-bay. These monitors are not designed to be installed into a headrest but were at a really cheap price, so I couldn't pass it up. They are only 5.6 inch monitors, not the normal seven inch like the others. I can always cut the headrests in the future for the bigger ones. With that being said in the pictures you will see the monitors are not flush. This is to show you how the process works if you care to do it yourself. The TL seats are simple to take apart and with a little knowledge can be done with ease.
The first thing you want to do is size up the monitor and center it up on the back of the headrest......
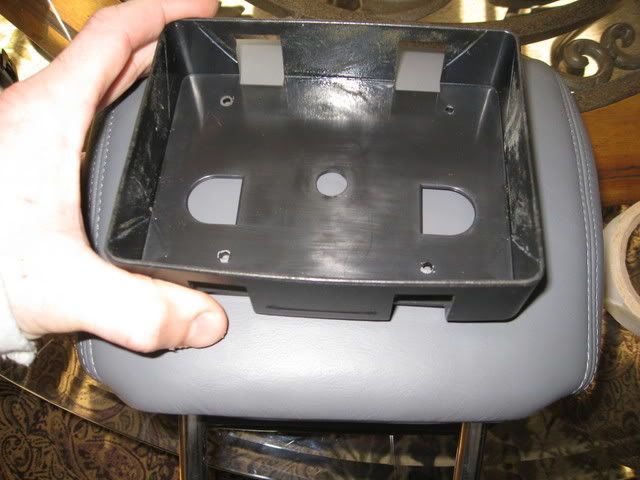
Next you want to tape the area where the bracket sits in...........

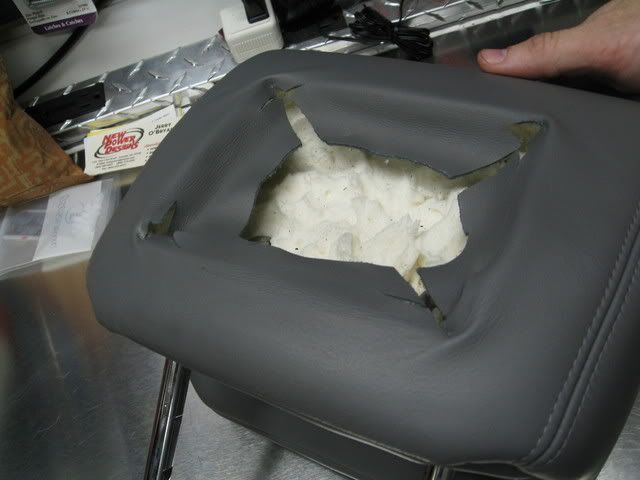
Next you want to cut an X into the box. Make sure you start the X on each side about a 1/4 in at each corner......Then carefully cut the foam back to the size of the monitor bracket....Note not to cut to deep as you won't be able to put the foam back in. The TL has the headrest metal brackets a little less than one inch deap. My Monitors are over that hense why they are not flush. This process takes a lot of patience and time. Take your time and test fit the bracket.....
I overlapped the leather so you won't see the plastic bracket. All you are going to see is the monitor when complete......
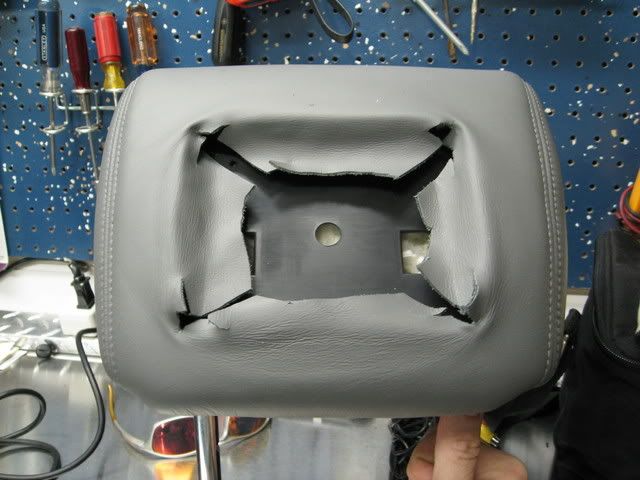
I then had rounded the corners so the leather looks flat around the corners instead of puckered up.
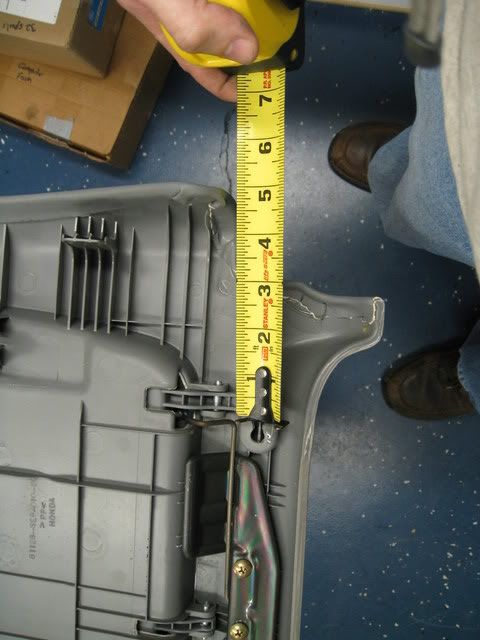
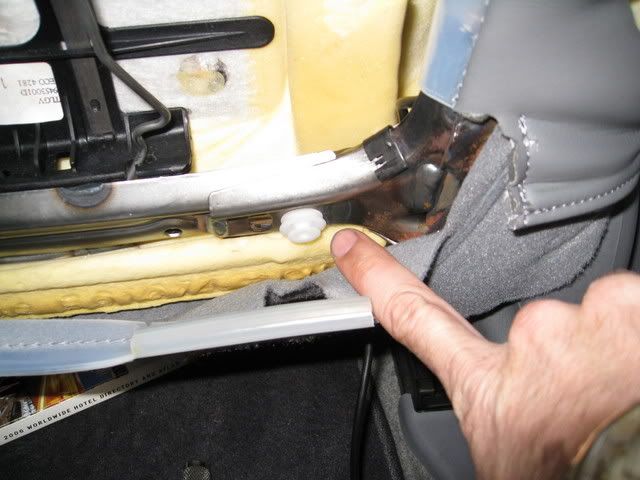
Next you are going to pull the hard plastic back seat covers off....There are two clips five inces in from the edget of the cover on each side. You need to feel your hands up there and try to pull them apart from right from the clip.......
I made the mistake of not pulling the first clip near it causing it to crack the clip holder off the back of the cover. I had to epoxy the part back into place. After you pull the bottom off, lift up on the cover and it will come right off.....

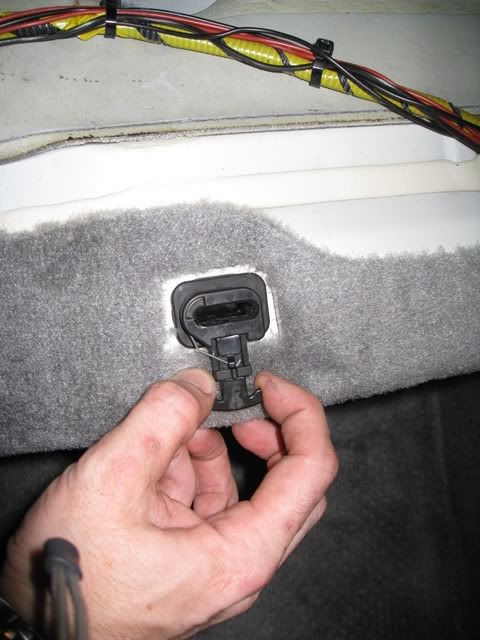
The clips on the bottom are a one shot deal. They are designed to break under pressure. Unfortunately for me, one of the clips were stronger than the clip holder. You will need to buy new clips (2 per seat, 4 total) from the dealer at a little over 2 dollars each. The part Number is 91566-SPO-003..... I had to bust the clip into a lot of pieces before I could get it out.....Here is a picure the new clip and the old clip......

The clip location is on the bottom as shown before I broke it off....... Notice also I had pulled the fabric back to expose the entire clip making it easier for me.....
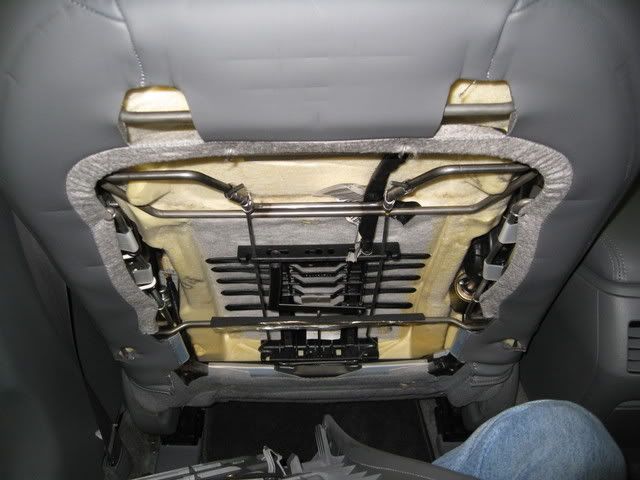
Here is a picture of the back seat exposed to see that you have plenty of room to run the wires..... I had a special 6 pin harness and connector that not even Radio shack had. I had to connect them together into the back of the seat. It is ok for now but not perment. What you want to do is have a connection under the seat so when you remove the seat it unplugs with the rest of the wires.....
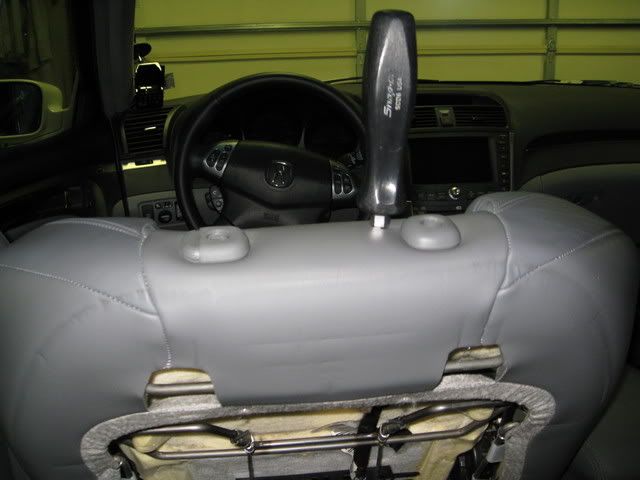
Cut a X into the top of the seat and poke a hole down into the seat with a large screwdriver to run the wires in..........
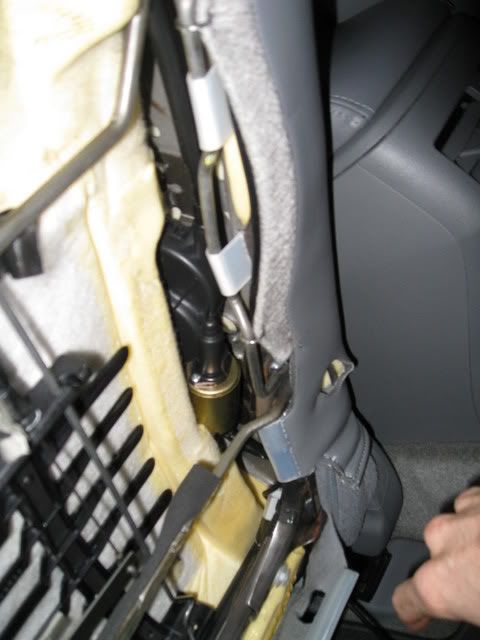
On the bottom of the seat I cut a slit into the carpet part of the bottom of the seat. I unbolted the seat and ran the wires under the carpet and had them come out on the hump part next to the back inside corner of the drivers and passangers seat. Kind of a hard picture to look at as it's on an angle. Where my hand is you can see the wire sticking out of the bottom of the seat. Make sure it doesn't get caught in the seat track and that you leave plenty of wire for when the seats moved around.......
Two remove the lower seat here is the link on doing so but to remove the bottom cushion there are two clips under the seat about 8-10 inches in on each side....Pull the clips foward and then the seat will pull up......
https://acurazine.com/forums/showthread.php?t=107568
Finally do the opposite to put it back together and let the kids enjoy there own movies, music, etc. The two monitors have an av input for a ps2 and have volume controls and headrest plugs so those long trips can be a little more pleasant. Enjoy!
The first thing you want to do is size up the monitor and center it up on the back of the headrest......
Next you want to tape the area where the bracket sits in...........
Next you want to cut an X into the box. Make sure you start the X on each side about a 1/4 in at each corner......Then carefully cut the foam back to the size of the monitor bracket....Note not to cut to deep as you won't be able to put the foam back in. The TL has the headrest metal brackets a little less than one inch deap. My Monitors are over that hense why they are not flush. This process takes a lot of patience and time. Take your time and test fit the bracket.....
I overlapped the leather so you won't see the plastic bracket. All you are going to see is the monitor when complete......
I then had rounded the corners so the leather looks flat around the corners instead of puckered up.
Next you are going to pull the hard plastic back seat covers off....There are two clips five inces in from the edget of the cover on each side. You need to feel your hands up there and try to pull them apart from right from the clip.......
I made the mistake of not pulling the first clip near it causing it to crack the clip holder off the back of the cover. I had to epoxy the part back into place. After you pull the bottom off, lift up on the cover and it will come right off.....
The clips on the bottom are a one shot deal. They are designed to break under pressure. Unfortunately for me, one of the clips were stronger than the clip holder. You will need to buy new clips (2 per seat, 4 total) from the dealer at a little over 2 dollars each. The part Number is 91566-SPO-003..... I had to bust the clip into a lot of pieces before I could get it out.....Here is a picure the new clip and the old clip......
The clip location is on the bottom as shown before I broke it off....... Notice also I had pulled the fabric back to expose the entire clip making it easier for me.....
Here is a picture of the back seat exposed to see that you have plenty of room to run the wires..... I had a special 6 pin harness and connector that not even Radio shack had. I had to connect them together into the back of the seat. It is ok for now but not perment. What you want to do is have a connection under the seat so when you remove the seat it unplugs with the rest of the wires.....
Cut a X into the top of the seat and poke a hole down into the seat with a large screwdriver to run the wires in..........
On the bottom of the seat I cut a slit into the carpet part of the bottom of the seat. I unbolted the seat and ran the wires under the carpet and had them come out on the hump part next to the back inside corner of the drivers and passangers seat. Kind of a hard picture to look at as it's on an angle. Where my hand is you can see the wire sticking out of the bottom of the seat. Make sure it doesn't get caught in the seat track and that you leave plenty of wire for when the seats moved around.......
Two remove the lower seat here is the link on doing so but to remove the bottom cushion there are two clips under the seat about 8-10 inches in on each side....Pull the clips foward and then the seat will pull up......
https://acurazine.com/forums/showthread.php?t=107568
Finally do the opposite to put it back together and let the kids enjoy there own movies, music, etc. The two monitors have an av input for a ps2 and have volume controls and headrest plugs so those long trips can be a little more pleasant. Enjoy!
 01-12-2008, 11:47 AM
#3
200,000 mile club
Thread Starter
Join Date: Jul 2007
Location: Charlotte, NC
Age: 48
Posts: 1,774
Likes: 0
Received 35 Likes
on
15 Posts
I forgot to tell you guys, to hold the monitor bracket inot the headrest, you need to get a type glue or epoxy so it sticks to the foam. To hold the headrest into place of the bracket, use velcro or double sided tape.
01-12-2008, 12:20 PM
#5
200,000 mile club
Thread Starter
Join Date: Jul 2007
Location: Charlotte, NC
Age: 48
Posts: 1,774
Likes: 0
Received 35 Likes
on
15 Posts
No you can. The 7 inch newer monitors are thinner than what I got. Like I said the monitors are older and thicker than normal. Someone on here has the 7 inch ones in the car. It looks great.

Trending Topics
01-12-2008, 02:25 PM
#9
AZ Community Team

Join Date: May 2007
Location: N35�03'16.75", W 080�51'0.9"
Posts: 32,488
Received 7,770 Likes
on
4,341 Posts
I knew before I opened it that this was your thread, J.
Looks good. Yes, flush mounted 7" would be nice, but the install still looks clean. A tilt/swivel in the screen frame would be cool too. Bet your youngster love's having Shrek or Finding Nemo on the road though.
Nice job and good write up.
Looks good. Yes, flush mounted 7" would be nice, but the install still looks clean. A tilt/swivel in the screen frame would be cool too. Bet your youngster love's having Shrek or Finding Nemo on the road though.
Nice job and good write up.
04-03-2008, 07:16 PM
#15
200,000 mile club
Thread Starter
Join Date: Jul 2007
Location: Charlotte, NC
Age: 48
Posts: 1,774
Likes: 0
Received 35 Likes
on
15 Posts
Take the cup holder parts out and trim the excess foam to get the dvd player to fit. I used the trim ring from the cup holders to put around the center console. Poke a hole in the back and run the wires to the nav2go unit. Ya gotta think a little and take your time. it's a little scary to crack into the car parts but take your time with it.
The following users liked this post:
$ACURATL4LIFE$ (03-07-2014)
04-08-2008, 10:56 AM
#16
07 TL-S
It looks good, especially for a DYI. but like others said try to see if you can somehow make it look more flushed.
I have 7inch widescreen alpines in my headrest and it looks like it came stock with the car, but then again i paid mad $$$ for it.
i need thta nav2go adapter. the shop i got it done at wouldnt do it cause they said it was illegal... whatever
I have 7inch widescreen alpines in my headrest and it looks like it came stock with the car, but then again i paid mad $$$ for it.
i need thta nav2go adapter. the shop i got it done at wouldnt do it cause they said it was illegal... whatever
04-11-2008, 09:48 AM
#17
EVNS TL
Join Date: Jan 2008
Age: 47
Posts: 290
Likes: 0
Received 0 Likes
on
0 Posts
Wow the angle is all wrong for viewing. I hate to be negative but i wouldnt want that in my car. i think i would have sunk the lcds into the headrest to line them up with eye level . Nothing against your install or anything, i just would have dont it different.
04-11-2008, 06:34 PM
#18
200,000 mile club
Thread Starter
Join Date: Jul 2007
Location: Charlotte, NC
Age: 48
Posts: 1,774
Likes: 0
Received 35 Likes
on
15 Posts
Originally Posted by evnash
Wow the angle is all wrong for viewing. I hate to be negative but i wouldnt want that in my car. i think i would have sunk the lcds into the headrest to line them up with eye level . Nothing against your install or anything, i just would have dont it different.
04-17-2008, 08:09 PM
#20
Cool, I was about to tackle this project at the same time you did but I ran out of time with the other projects I was doing on the car and it was COLD in December! I have all the parts lying here still to do it and look forward to getting em done. Thanks for all the detailed pics and instructions. Makes me a little more at ease now. There are probably only 4 or 5 other threads with pics but none as detailed. Looks good.
I have 7" wide Pyle screens which are going to be a tight fit and a challenge but my perfectionistic gene is gonna make it come out nice. I already did my console DVD install outlined in another thread. It's that headrest cutting that seems like the nightmare. Well I did a lot of reading about it and I'm confident I can do it.
There is an install where someone has cut the excess length of the headrest post inside to make the monitor fit. Also instead of relying on just glue, I wanted to use zip ties and mount the shrouds securely. I forgot who but someone here has a thread about it that gave me the idea. You might want to look into it.
I had a thread awhile ago asking how to remove the backs of the front seats. Your detailed explanation answers that. Thanks! I heard from others that I would have to break those clips. Do you figure there is any other smarter way to do this? This was the one part I was worried about and I wanted to take my time and research. I think it is waaay to easy to break those clip holders. The clips themselves I don't care about. Those are the same standard clips all over the interior panels in our cars like around the door sills. I just don't want to break the holders. Once those break, the panel will never fit right again. (did that in a few other places on the car) There's got to be another method. I am maybe going to try with a nail puller or small pry bar maybe?
I also was looking in the market for LCDs with a swiveling shroud. I usually have my headrest tilted full forward (Been driving German cars way too long before my TL) There are only a few made made with an adjustable shroud, and any left are of an old type of LCD and design. I decided to stick to the nice sleek one I have becuase it has really great viewing angles anyways. I figure for the once in awhile that someone sits back there and it's being used I'll just tilt the headrest back, no biggie.
04-17-2008, 09:09 PM
#21
200,000 mile club
Thread Starter
Join Date: Jul 2007
Location: Charlotte, NC
Age: 48
Posts: 1,774
Likes: 0
Received 35 Likes
on
15 Posts
Great to hear that I helped you out in this. Those clips are designed to break. It's a one shot deal. Just get a puller that can grab as close to the clip as possible or you will break the seat cover. I did on one and put epoxy on it. It has held up with no problems. Most of the seat covers are held in on top as you will see when you get yours apart. If I do it with the larger monitors, I am going to look into the swivil monitors. Good luck and let me know if you need any help!
03-07-2014, 06:07 PM
#25
Suzuka Master
he wired it up back in 2008!

Thread
Thread Starter
Forum
Replies
Last Post
emailnatec
5G TLX Tires, Wheels & Suspension
29
09-28-2018 04:27 PM
InFaMouSLink
Car Parts for Sale
3
10-30-2015 09:43 AM
johnpancakes014
2G TL Performance Parts & Modifications
3
09-27-2015 12:58 PM

