Rear SPC camber DIY. - how to fix the dust boot
 05-01-2013, 07:06 PM
#1
Burning Brakes
Thread Starter

Rear SPC camber DIY. - how to fix the dust boot
I decided to get rear camber kit because of inside tire wear. my car had -1.4 and -1.6 stock. but I just wasn't happy with the awesome inner baldness when i drive with people in the back. (me and 3 girls weighing less than 110lbs road tripped 2000miles with trunk full of luggage, inside edge of my DWS went bald)
Also, it's nice to have less camber in the rear when i throw the car around turns, it lets the rear slide with less effort.
I was told numerous times I should get rear sway bar, but rear sway bar reduces roll and INCREASES side to side weight transfer if i don't upgrade the fronts with it.so.. i passed.
I'm not about to make a tail happyish car tail MORE happy.
I chose SPC because,,,,, i have ingalls and i'm not happy with the softy soft bushings. If you played with ingalls arms, you'd know the rubber bushings can be easily deformed with finger if you have average strength.
They're only good for holding alignment crusing on a smooth surface. car twitches as you go over any irregularities or concave roads.
It's okay on smooth surface, but on anything harsher than silky soft new pavement, it feels like you hand-tightened lugnuts, or some suspension bolts are loose, or ,,, feels like 2002 suburban with 200k miles.
I took a cab today and i must say. it feels like a taxi crown vic with independent suspension lol
more info
https://acurazine.com/forums/3g-tl-tires-wheels-suspension-97/j-power-camber-kit-review-864705/
https://acurazine.com/forums/3g-tl-tires-wheels-suspension-97/rear-toe-keep-getting-slightly-out-after-ingalls-camber-kit-885207/
pics of ingalls fail
https://acurazine.com/forums/showpos...2&postcount=15
so
1. if you care about how your car drives
2. if you're lowered NO MORE THAN A SPEC in the rear.
you should get SPC.
I played with the suspension with the shock absorber assembly off and loose bolts, and seems like it DOES throw the toe out when you lower it a lot. (i.e. tuck tires)
If you really need ingalls, if you look at the first link above, he tells you how to build your own ingalls kit with OEM bushings.
anyway here it goes
day 1. prepping with dust boot and anti-seize.
my neighbor is just moving in so i decided to not do it today. I like quiet lol.
1

yay USPS. I ordered them on sunday night. got here SC on wednesday morning all the way from California. awesome.
It was $160 shipped on eBay.
Plus it had the new red urethane boot in the picture!!!
http://www.ebay.com/itm/261181879033...84.m1439.l2649
2.

Fail. What do i expect from ebay. It had the crack-prone OLD black rubber boot. but i have a fix for it.
crack prone : http://www.heeltoeauto.com/tech-arti...l-joints..html
3.

OEM rubber boot for rear ball joint.
same ball joint, same boot, should fit, right?
I was really curious, how do you "assemble" a ball joint boot..... in USA....?
4.

OEM vs SPCboot side by side
The holes are same diameter. they just look different because of my lens.
5.

Start revoving the circlip with whatever tool you have.
With the amount of kitchen tools I use, I .. *insert sexist joke*
Anyway. it's like a keychain ring.
6.

Once you budge the lip off, then keep doing it.
do NOT use your fingernail. i flipped mine doing what is pictured. the SPC circlip is way stronger than skunk2 (which i have in front, and did the same procedure)
Believe or not, the only screwdriver I have is a walmart philips for adjusting headlight aim..... I do not have a flathead but it would be handy. Time to go pop some tags at HF tools.

7.

There we go. Flipped thumbnail is to blame for blurry picture.
Now you can pull it off.
I used mine on the + of alternator because i ripped the OEM boot on it.
8.

Boot off. The grease really looks like neosporin lol
Factory manual suggests you should fill the dust boot with grease,, I went to Autozone to rent the ball joint popper and to buy some ball joint grease,, they all looked at me weird when I told them I'm looking for a small tube of ball joint grease to put it in the dust boot. So i skipped that step. SPC must've lubed it up inside, and it's a sealed ball joint so I decided to take a Xanax and not lose sleep over it.
8. Slide OEM dust boot on. I didn't take a picture.
9. Now the circlip...... If you have circlip or snap ring plier, use them. I don't. I lack many tools I should have by now lol.
The service manual suggests you use a honda tool that's like a cone chopped off on the top, it's made out of metal.
But. I'm not buying it. Don't even know where to buy anyway.
So I used kitchen utensil. Again.

I couldn't take a pic while I actually slide it down on the wedge made with two knives because it'd keep popping off when i let go of one hand.
but here are the steps
a. Make a triangle with 2 knives
b. Hold the top tight. Bottom won't slide because it'll rub against the rubber.
c. Slide the circlip on. All the way down to the position shown in the pic
d. Talk dirty to the knives to spread for you, or just force them to spread. I forced them.
When you slide the ring down, they were top pointy.
Now you're going to make them bottom-pointy so the ring slides down.
e. If you're lucky, (or naughty enough) they'll snap right on spot. Or if you're unlucky like me, you'll end up with this.

Use your pliers or whatever manly tool you have (includes fingernail)
I used a fork to snap them back down lol.
*time for another sexiest joke*
Try not to scorch the rubber TOO much with whatever tool you use. It's strong yes, and the ends of circlips are pointing tangent to the circle instead of hugging the curve so you don't accidentally rip the boot, but still, it's not a kevlar boot.
10. done

coat the threads with permatex anti seize and let them soak overnight THIS IS CRUCIAL
Appendix : things I tried to use to get the snap ring on.

man this little thing is only $150 and SO MUCH FUN. and never breaks when you crash numerous times. Don't buy your coaxial toy helicopter from the mall. Get this one from Blade.

Snapped the neck of my beer bottle (and I needed an excuse to have one)
Turns out, the diameter is too small for the ball joint no matter where I snap off. Wasted an hour snapping 5 beer bottles off lol
I drink Sam Adams. If you drink different beer, it might work for you.
putting it on tomorrow. chicken nugget time. will update.
Also, it's nice to have less camber in the rear when i throw the car around turns, it lets the rear slide with less effort.
I was told numerous times I should get rear sway bar, but rear sway bar reduces roll and INCREASES side to side weight transfer if i don't upgrade the fronts with it.so.. i passed.
I'm not about to make a tail happyish car tail MORE happy.
I chose SPC because,,,,, i have ingalls and i'm not happy with the softy soft bushings. If you played with ingalls arms, you'd know the rubber bushings can be easily deformed with finger if you have average strength.
They're only good for holding alignment crusing on a smooth surface. car twitches as you go over any irregularities or concave roads.
It's okay on smooth surface, but on anything harsher than silky soft new pavement, it feels like you hand-tightened lugnuts, or some suspension bolts are loose, or ,,, feels like 2002 suburban with 200k miles.
I took a cab today and i must say. it feels like a taxi crown vic with independent suspension lol
more info
https://acurazine.com/forums/3g-tl-tires-wheels-suspension-97/j-power-camber-kit-review-864705/
https://acurazine.com/forums/3g-tl-tires-wheels-suspension-97/rear-toe-keep-getting-slightly-out-after-ingalls-camber-kit-885207/
pics of ingalls fail
https://acurazine.com/forums/showpos...2&postcount=15
so
1. if you care about how your car drives
2. if you're lowered NO MORE THAN A SPEC in the rear.
you should get SPC.
I played with the suspension with the shock absorber assembly off and loose bolts, and seems like it DOES throw the toe out when you lower it a lot. (i.e. tuck tires)
If you really need ingalls, if you look at the first link above, he tells you how to build your own ingalls kit with OEM bushings.
anyway here it goes
day 1. prepping with dust boot and anti-seize.
my neighbor is just moving in so i decided to not do it today. I like quiet lol.
1
yay USPS. I ordered them on sunday night. got here SC on wednesday morning all the way from California. awesome.
It was $160 shipped on eBay.
Plus it had the new red urethane boot in the picture!!!
http://www.ebay.com/itm/261181879033...84.m1439.l2649
2.
Fail. What do i expect from ebay. It had the crack-prone OLD black rubber boot. but i have a fix for it.
crack prone : http://www.heeltoeauto.com/tech-arti...l-joints..html
3.
OEM rubber boot for rear ball joint.
same ball joint, same boot, should fit, right?
I was really curious, how do you "assemble" a ball joint boot..... in USA....?
4.
OEM vs SPCboot side by side
The holes are same diameter. they just look different because of my lens.
5.
Start revoving the circlip with whatever tool you have.
With the amount of kitchen tools I use, I .. *insert sexist joke*
Anyway. it's like a keychain ring.
6.
Once you budge the lip off, then keep doing it.
do NOT use your fingernail. i flipped mine doing what is pictured. the SPC circlip is way stronger than skunk2 (which i have in front, and did the same procedure)
Believe or not, the only screwdriver I have is a walmart philips for adjusting headlight aim..... I do not have a flathead but it would be handy. Time to go pop some tags at HF tools.
7.
There we go. Flipped thumbnail is to blame for blurry picture.
Now you can pull it off.
I used mine on the + of alternator because i ripped the OEM boot on it.
8.
Boot off. The grease really looks like neosporin lol
Factory manual suggests you should fill the dust boot with grease,, I went to Autozone to rent the ball joint popper and to buy some ball joint grease,, they all looked at me weird when I told them I'm looking for a small tube of ball joint grease to put it in the dust boot. So i skipped that step. SPC must've lubed it up inside, and it's a sealed ball joint so I decided to take a Xanax and not lose sleep over it.
8. Slide OEM dust boot on. I didn't take a picture.
9. Now the circlip...... If you have circlip or snap ring plier, use them. I don't. I lack many tools I should have by now lol.
The service manual suggests you use a honda tool that's like a cone chopped off on the top, it's made out of metal.
But. I'm not buying it. Don't even know where to buy anyway.
So I used kitchen utensil. Again.
I couldn't take a pic while I actually slide it down on the wedge made with two knives because it'd keep popping off when i let go of one hand.
but here are the steps
a. Make a triangle with 2 knives
b. Hold the top tight. Bottom won't slide because it'll rub against the rubber.
c. Slide the circlip on. All the way down to the position shown in the pic
d. Talk dirty to the knives to spread for you, or just force them to spread. I forced them.
When you slide the ring down, they were top pointy.
Now you're going to make them bottom-pointy so the ring slides down.
e. If you're lucky, (or naughty enough) they'll snap right on spot. Or if you're unlucky like me, you'll end up with this.
Use your pliers or whatever manly tool you have (includes fingernail)
I used a fork to snap them back down lol.
*time for another sexiest joke*
Try not to scorch the rubber TOO much with whatever tool you use. It's strong yes, and the ends of circlips are pointing tangent to the circle instead of hugging the curve so you don't accidentally rip the boot, but still, it's not a kevlar boot.
10. done
coat the threads with permatex anti seize and let them soak overnight THIS IS CRUCIAL
Appendix : things I tried to use to get the snap ring on.
man this little thing is only $150 and SO MUCH FUN. and never breaks when you crash numerous times. Don't buy your coaxial toy helicopter from the mall. Get this one from Blade.
Snapped the neck of my beer bottle (and I needed an excuse to have one)
Turns out, the diameter is too small for the ball joint no matter where I snap off. Wasted an hour snapping 5 beer bottles off lol
I drink Sam Adams. If you drink different beer, it might work for you.
putting it on tomorrow. chicken nugget time. will update.

The following 3 users liked this post by 4drviper:
 05-03-2013, 02:09 AM
#4
Burning Brakes
Thread Starter
day 2. Install.
DIY at your own risk.
Things you need
10mm tall shallow socket (it's not a deep socket by any means. But I needed to use the longest of shallow I had)
12mm whatever socket for brake line bracket (don't worry you're just undoing the bracket. no touching the actual line.
14mm shallow socket for chassis side bolt
17mm deep socket for ball joint bolt
19mm for lugnut
Autozone ball joint popper (PN : 27020)
A pair of plyers for cotter pin
Jack & stands
Permatex anti-seize
Paper towel to clean up the spilled grease from popping ball joint.
Things you want
PB blaster
Creeper
Sandpaper
Gloves
Beer
(might have missed something. my whole body aches and I have a migrane)
okay heere we go.
1. Jack the car up and lower on jack stands.
2. Remove rear wheels
(If you're frustrated by lack of how-to pictures for 1,2 please go to a certified automotive technician lol)
3.

Undo the OEM cotter pin. it looks like this. It's REUSABLE SO don't bend the living vtec out of it.
While the straight side is through the bolt, the bent side "hugs" one of the castle on the castle nut.
a. Push on the head in gently
b. Spread the bent side so it un-hugs the castle
c. pull it out. BE GENTLE (......that's what she said)
4.


Undo the castle nut 17mm. Depending on the length of your breaker bar, it might be a little uncomfortable because you might hit the front of rear fender.
5.

Support the bottom of the knuckle and raise it to make the ball joint kinda parallel to the ground - makes it easier to slide in the fork.
(I have no regret using fork and tearing the boot because OEM arms are going into the trash anyway. but to my surprise, my arm's boot didn't rip)
6.

I used a half of the jack handle for extra leverage. I weigh 120 naked and I didn't even have to fully exert my weight on it. It's a easy pop (well compared to front upper BJ. TEEHE BJ)
Make sure you insert the fork all the way you can. It's not the best angle against the knuckle and it might slip.
I slipped and almost ate the paint + almost dented my rear door.
7.

Popped
8.

Lower the jack and this is how high the arm is.
9.

Undo the 12mm bolts. There's 2. One is covered by the handle. Sorry for crappy angle. You can see the 2 bolt holes in the next pic.
10.

Undo the wheel speed sensor bracket bolt 10mm.
11.


Undo the 14mm. Mine broke easy on both sides, 100% southern car, but you might need to spray some PB blaster here and there.
Here's why : rust

12.

OEM vs SPC. I made their length about the same, only to realize it's not really important later on lol.
One thing I noticed, SPC ball joint is a lot tighter than OEM (duh,,, it's NEW.) I know but Skunk2 front ball joint wasn't much tighter than OEM at all.
Oh well the tighter the better, if you know what I mean.
Now you know where everything is.
PUT EVERYTHING BACK TOGETHER or read more for detailed way of how I did it.
13. Loosely install 14mm bolt through the upper arm and chassis. I lubed the crap out of this bolt with permatex in fear of having irremovable rust while I stay in Canada for next few years.
Oh. It's 43lb-ft btw.
14. Support the bottom of the knuckle to raise the knuckle so the hole the BJ go through is well............ I don't know how to explain. but you'll have to work it in.
REUSE OEM CASTLE NUT.
the SPC nut is too short, and doesn't cover the pinhole through the bolt.
Plus, you get to reuse the OEM cotter pin too.
I threaded on the SPC castle nut provided to tap on the bolt with a breaker bar to get the bolt to the orientation I needed to slide into the hole perfectly.
* You could do it the other way : install the BJ first THEN do the 14mm. But, to get the BJ in, I had to tug and push on the knuckle a bit. Would it be easier to wiggle the knuckle against 4 other suspension arms' bushings and reach in for 14mm? or just snugging on the castle nut while wiggling it in front of you?
Your call. *
15. Tighten ball joint to 36lb-ft. look for the hole, tighten until you get the hole, cotter pin in.
Torque spec 36-42lb-ft
16. Support the bottom of the knuckle so the suspension is where the car sits normally. You could do this in a lot of ways
a. reference to the picture in above steps where the arm hangs in the air by itself.
b. if you look from the back, the toe arm and camber (lower) arm are parallel to each other, while both are slightly aiming down toward the ground coming out from the middle of the car.
c. put the wheel on, lift the wheel until you get to your ride height. mark the bushings with some sort of sharpie. lower it. remove wheel, reposition arm, tighten.
I did all 3 about 3 times each...................... OCD.......
aaaaaaaaaaaaand done.


JK you're not.
17. Tighten the 10mm bolt back for wheel speed sensor. 7.2lb-ft.
18. Tighten 12mm bolts for brake line bracket. 16lb-ft. I did 20lb-ft. Didn't strip.
Things you need
10mm tall shallow socket (it's not a deep socket by any means. But I needed to use the longest of shallow I had)
12mm whatever socket for brake line bracket (don't worry you're just undoing the bracket. no touching the actual line.
14mm shallow socket for chassis side bolt
17mm deep socket for ball joint bolt
19mm for lugnut
Autozone ball joint popper (PN : 27020)
A pair of plyers for cotter pin
Jack & stands
Permatex anti-seize
Paper towel to clean up the spilled grease from popping ball joint.
Things you want
PB blaster
Creeper
Sandpaper
Gloves
Beer
(might have missed something. my whole body aches and I have a migrane)
okay heere we go.
1. Jack the car up and lower on jack stands.
2. Remove rear wheels
(If you're frustrated by lack of how-to pictures for 1,2 please go to a certified automotive technician lol)
3.
Undo the OEM cotter pin. it looks like this. It's REUSABLE SO don't bend the living vtec out of it.
While the straight side is through the bolt, the bent side "hugs" one of the castle on the castle nut.
a. Push on the head in gently
b. Spread the bent side so it un-hugs the castle
c. pull it out. BE GENTLE (......that's what she said)
4.
Undo the castle nut 17mm. Depending on the length of your breaker bar, it might be a little uncomfortable because you might hit the front of rear fender.
5.
Support the bottom of the knuckle and raise it to make the ball joint kinda parallel to the ground - makes it easier to slide in the fork.
(I have no regret using fork and tearing the boot because OEM arms are going into the trash anyway. but to my surprise, my arm's boot didn't rip)
6.
I used a half of the jack handle for extra leverage. I weigh 120 naked and I didn't even have to fully exert my weight on it. It's a easy pop (well compared to front upper BJ. TEEHE BJ)
Make sure you insert the fork all the way you can. It's not the best angle against the knuckle and it might slip.
I slipped and almost ate the paint + almost dented my rear door.
7.
Popped
8.
Lower the jack and this is how high the arm is.
9.
Undo the 12mm bolts. There's 2. One is covered by the handle. Sorry for crappy angle. You can see the 2 bolt holes in the next pic.
10.
Undo the wheel speed sensor bracket bolt 10mm.
11.
Undo the 14mm. Mine broke easy on both sides, 100% southern car, but you might need to spray some PB blaster here and there.
Here's why : rust
12.
OEM vs SPC. I made their length about the same, only to realize it's not really important later on lol.
One thing I noticed, SPC ball joint is a lot tighter than OEM (duh,,, it's NEW.) I know but Skunk2 front ball joint wasn't much tighter than OEM at all.
Oh well the tighter the better, if you know what I mean.
Now you know where everything is.
PUT EVERYTHING BACK TOGETHER or read more for detailed way of how I did it.
13. Loosely install 14mm bolt through the upper arm and chassis. I lubed the crap out of this bolt with permatex in fear of having irremovable rust while I stay in Canada for next few years.
Oh. It's 43lb-ft btw.
14. Support the bottom of the knuckle to raise the knuckle so the hole the BJ go through is well............ I don't know how to explain. but you'll have to work it in.
REUSE OEM CASTLE NUT.
the SPC nut is too short, and doesn't cover the pinhole through the bolt.
Plus, you get to reuse the OEM cotter pin too.
I threaded on the SPC castle nut provided to tap on the bolt with a breaker bar to get the bolt to the orientation I needed to slide into the hole perfectly.
* You could do it the other way : install the BJ first THEN do the 14mm. But, to get the BJ in, I had to tug and push on the knuckle a bit. Would it be easier to wiggle the knuckle against 4 other suspension arms' bushings and reach in for 14mm? or just snugging on the castle nut while wiggling it in front of you?
Your call. *
15. Tighten ball joint to 36lb-ft. look for the hole, tighten until you get the hole, cotter pin in.
Torque spec 36-42lb-ft
16. Support the bottom of the knuckle so the suspension is where the car sits normally. You could do this in a lot of ways
a. reference to the picture in above steps where the arm hangs in the air by itself.
b. if you look from the back, the toe arm and camber (lower) arm are parallel to each other, while both are slightly aiming down toward the ground coming out from the middle of the car.
c. put the wheel on, lift the wheel until you get to your ride height. mark the bushings with some sort of sharpie. lower it. remove wheel, reposition arm, tighten.
I did all 3 about 3 times each...................... OCD.......
aaaaaaaaaaaaand done.
JK you're not.
17. Tighten the 10mm bolt back for wheel speed sensor. 7.2lb-ft.
18. Tighten 12mm bolts for brake line bracket. 16lb-ft. I did 20lb-ft. Didn't strip.
Last edited by 4drviper; 05-03-2013 at 02:13 AM.
05-03-2013, 02:08 PM
#5
Burning Brakes
Thread Starter
Driving impressions.
The wiggle in the back is gone.
How it felt with ingalls was, when I hit pavement irregularities, it felt like yes, the shocks are working, but the bushings were moving, giving the car left-to-right motion when i was only hitting up-down irregularites (i know they can cause tire to go left-right, I tested it over same road i drive 4 times a week, a diagonal train track)
I still have to feel it in the twisties, but that's gonna have to wait till I get new brakes.
(I wonder if autozone will replace my rotors every other week under their lifetime warranty lol)
I'm gonna wrap the threads with some foamy vinyl so road grime&salt don't get in.
conclusion : There's a reason why Acura decided to put a spherical bearing in the toe arm, and I agree it needs the spherical bearing instead of normal rubber bushing. I don't know suspension geometrys THAT well, but it feels right. no more indepent-rear-suspension-crown-vic
(I'm exaggerating a bit with the crown vic statement)
 05-03-2013, 05:03 PM
#7
-------Tim-------
Very good Idea with the OEM Honda boot! I will be ordering those at the same time as the SPC camber arm. Good write-up! Thanks!
Last edited by Slpr04UA6; 05-03-2013 at 05:05 PM.
Trending Topics
05-04-2013, 12:33 PM
#8
Burning Brakes
Thread Starter
^ wasn't my idea lol honda tech civics do it with skunk2.
I did with my skunk2, worked fine.
so I thought I'd give it a shot with SPC too.
I did with my skunk2, worked fine.
so I thought I'd give it a shot with SPC too.
05-08-2013, 03:26 PM
#10
Burning Brakes
Thread Starter
I have a question : did anyone notice the ball joint doesn't sit perpendicular to the knuckle hole it goes into after an alignment?
i mean it's a 360 degree ball joint so it shouldn't matter but it bugs me lol..
i mean it's a 360 degree ball joint so it shouldn't matter but it bugs me lol..
05-08-2013, 08:32 PM
#12
Burning Brakes
Thread Starter
no you can't push up at that point with wheels on. it's covered.
and it's not rotor it's umm flat bottom spot of rear knuckle.
btw. what's so hard about jacking up the rear tow hook?
 05-19-2013, 05:47 PM
#15
Burning Brakes
Thread Starter
Good write up. Are these the SCP arms you ordered?
http://store.excelerateperformance.c.../i-397045.aspx
Can they also adjust toe?
http://store.excelerateperformance.c.../i-397045.aspx
Can they also adjust toe?
I didn't buy from XLR8 but yes they are.
No they don't adjust toe. you already have a cam bolt for that from the factory.
Factory toe arm has a rock hard bushing paired with sealed spherical bearing for best "feeling" so unless you don't mind your TL driving like a crown victoria, I suggest keeping OEM toe arm.
(if you're lowered too much you can't keep OEM toe arm because it will go out of adjustment range but then again if anyone lowers THAT much that person doesn't deserve to complain about how it drives anyway.)
05-19-2013, 09:21 PM
#16
Racer
I didn't buy from XLR8 but yes they are.
No they don't adjust toe. you already have a cam bolt for that from the factory.
Factory toe arm has a rock hard bushing paired with sealed spherical bearing for best "feeling" so unless you don't mind your TL driving like a crown victoria, I suggest keeping OEM toe arm.
(if you're lowered too much you can't keep OEM toe arm because it will go out of adjustment range but then again if anyone lowers THAT much that person doesn't deserve to complain about how it drives anyway.)
05-20-2013, 06:57 AM
#17
-------Tim-------
^if your camber is off from factory spec, the SPC arm can get your camber back to spec, and then theoretically (spelling?) you should have enough adjustment to get toe within spec. I am pretty sure member "Rockstar" Jeremy is running just the SPC arm with stock toe arm....
Someone with more knowledge can correct me if I am wrong....
Someone with more knowledge can correct me if I am wrong....
The following users liked this post:
rockstar143 (02-22-2016)
05-21-2013, 04:48 PM
#18
Burning Brakes
Thread Starter
You can create your own ingall style adjustable toe arm with OEM bushings.
https://acurazine.com/forums/showpos...9&postcount=29
https://acurazine.com/forums/showpos...9&postcount=29
08-27-2014, 03:25 PM
#19
Race Director
....anyway here it goes
day 1. prepping with dust boot and anti-seize.
my neighbor is just moving in so i decided to not do it today. I like quiet lol.
1
yay USPS. I ordered them on sunday night. got here SC on wednesday morning all the way from California. awesome.
It was $160 shipped on eBay.
Plus it had the new red urethane boot in the picture!!!
http://www.ebay.com/itm/261181879033...84.m1439.l2649
2.
Fail. What do i expect from ebay. It had the crack-prone OLD black rubber boot. but i have a fix for it.
crack prone : http://www.heeltoeauto.com/tech-arti...l-joints..html
According to an SPC vendor, the red boots are the old boots that SPC first used on these arms. The only reports I have seen of boot cracking/splitting have been with the red boots.
SPC re-designed the boots and the newer boot is the black "bellow" style boot. I have not seen any reports of the newer black boot cracking. If you still want to swap the OEM boot in place of the newer, re-designed boot, have at it. But I don't think it's an issue any more.
Last edited by nfnsquared; 08-27-2014 at 03:27 PM.
The following users liked this post:
cokorote (08-27-2014)
08-27-2014, 10:11 PM
#21
Race Director
I just ordered mine from THMotorsports, $146.58 shipped. (For 2).
The following users liked this post:
cokorote (08-28-2014)
08-28-2014, 12:13 AM
#22
Burning Brakes
Thread Starter
Good to know that SPC is standing behind their product! Silly me. I was actually surprised to see black boots because in the photo it was red. But the black one still doesn't feel as heavy-duty as OEM ones and I just decided to put OEM on rather than pay 15% restocking fee. Wish I had known before.
Enjoy your camber freedom It's been a year and half with numerous potholes and 25,000 miles and mine are still solid. (Better be)
Enjoy your camber freedom
It's been a year and half with numerous potholes and 25,000 miles and mine are still solid. (Better be)
09-01-2014, 06:17 PM
#23
Race Director
Curious. Why is that? I'm doing this tomorrow and not sure how long it will be before I can get to an alignment shop. Since my camber is out of spec (-1.9), I was thinking that making the new arms a little longer would make the camber less negative. Am I misguided on my thinking?
Last edited by nfnsquared; 09-01-2014 at 06:20 PM.
09-01-2014, 08:37 PM
#24
Moderator
iTrader: (7)
OP, have you ever noticed that the accords and tsx's dont use a spherical bushing for the toe arm? only the TL does. any thoughts? the suspension components are pretty much the same amongst the tsx/accord/tl
09-02-2014, 03:28 AM
#26
Burning Brakes
Thread Starter
Curious. Why is that? I'm doing this tomorrow and not sure how long it will be before I can get to an alignment shop. Since my camber is out of spec (-1.9), I was thinking that making the new arms a little longer would make the camber less negative. Am I misguided on my thinking?

If I had to survive indefinite days with camber kit and no alignment I wouldn't. To be honest my car walked sideways like a truck with bent frame and live rear axle.. (Your luck may vary, I don't know) Maybe if I used a level to "measure" camber before & after I may have been able to get away, but on the rack, I saw toe changing as much as 0.15 as the camber arm was being adjusted soooooo, I still think you'd need an alignment.
Let us know if car is drivable without alignment!
I'm just guessing but when I drove my friend's 05 Accord coupe, it felt like a Cadillac DTS despite having the exact same ergonomics as my car in driver's seat. Maybe that explains why. I think if you put it side by side (rubber vs bearing) you will feel it but if you just give a random person a TL with all rubber bushing, they won't notice something's up unless they own one.
Kinda like right after racing go karts, TL feels like it's riding on a cloud.
Last edited by 4drviper; 09-02-2014 at 03:41 AM.
09-03-2014, 10:22 PM
#27
Race Director
Installed my SPC arms today. Very easy job. The second side will go faster once you've seen how to do the first side. Thanks to 4drviper for the DIY!!
Here's just a few notes/additions to his excellent DIY (numbering does not coincide with the DIY):
1. I bought new cotter pins just because I wasn't sure how corroded my old pins would be (8 North Dakota winters). As it turns out, my old pins were fine, but I went ahead and used the new pins since I had them.
2. The SPC supplied nut is indeed too short. Wonder why they haven't fixed that yet? Anyhow, the old nuts were still in decent shape and worked fine. If you are unsure of their condition, you may want to consider having new ones on hand just in case.
3. Just an FYI, for the body side of the arm, the nut is 17mm and the bolt head is 14mm. I soaked both ends in PB overnight, but it still took most of my body weight and a breaker bar plus the jack handle on the end of the breaker bar to break the nut loose (both sides). The nut and bolt were both in good shape with minimal corrosion, so I'm surprised at how much force was required to break them loose. I used a wire brush to clean the bolt and nut threads.
4. Also, I wouldn't recommend using any anti-seize. A/S alters the torque specs. Just clean the threads with a wire brush if the nut doesn't thread cleanly.
5. The service manual says to remove the wheel sensor from the knuckle, but that is not necessary if you have a deep 17mm socket. Just be careful around the sensor.
6. When installing the new arms, I tried it both ways: One side I did the body side bolt first, then the ball joint. And vice versa for the other side. They were both about the same level of effort IMO. You just have to man-handle the wheel/knuckle to a position that allows the appropriate end to fit into position. It's a little bit of a PITA either way, but not too bad. If you had 2 people, it would be a cinch.
7. Loading the suspension before final tightening: Before I started, I used a long level and painter's tape to mark the level of one of the wheel studs on the fender. As it turns out, I don't really think this is necessary. Just raise the knuckle until you see/hear the car lift off of the jack stand. Then do your final tightening.
8. Since I was dealing with out of spec camber to the negative side, I made both of the new arms about 3/16"-1/4" longer than the old arms. When I drove it for the first time after the installation (headed straight to the alignment shop), it drove fine. I did not experience any of the peculiar issues that 4drviper had after installation.
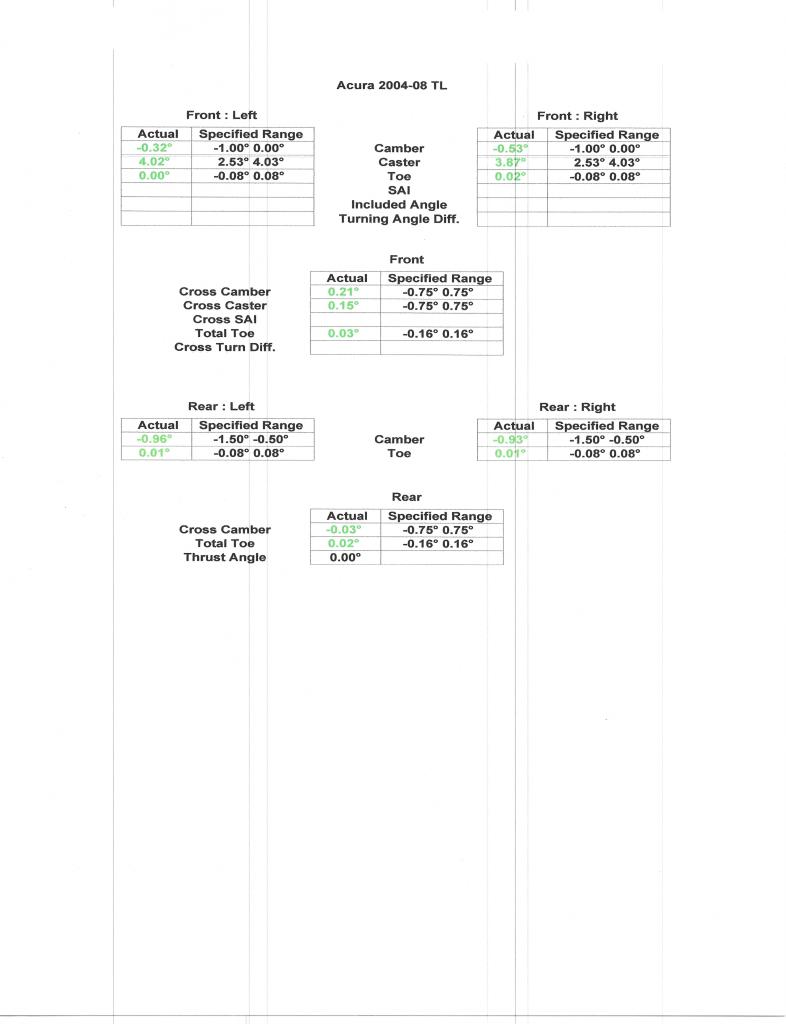
So, I get to the alignment shop and explain very clearly to the gal at the counter that I had installed adjustable camber arms and I wanted the camber set to -1.0 and the toe as close to 0 as possible. The guy did a great job on the toe, but somehow he didn't attempt to get the camber to -1.0. The "after" camber was -1.2 for the left side and -1.3 for the right side. I complained about this and the dumbass service manager started giving me a line of crap about how it couldn't be adjusted any farther, yada, yada, yada. You should seen the look in his eyes when I asked him to show me that the new, adjustable camber arms had reached their limit To make a long story short, I'll be going back tomorrow and this time they'll do what I ask. I can't believe the extent some places will go to try and BS their way out of a situation. I'm sure they get away with this all the time, sadly enough. (This was Tires Plus, and yes, I'll be speaking with the manager and the owner tomorrow).
Anyhow, for the first time in years, I am not right at or outside of the max negative camber spec for the rear end. I have a 440 mile road trip tomorrow morning, so it will be a good test. So far, these things are rock solid. I am very glad that I installed these and my advice to anyone considering adjustable camber options for the rear end is to go with the SPC arms. I wouldn't even consider Ingals or the other equivalent kits.
And once again, my thanks to 4drviper for the DIY
Here's just a few notes/additions to his excellent DIY (numbering does not coincide with the DIY):
1. I bought new cotter pins just because I wasn't sure how corroded my old pins would be (8 North Dakota winters). As it turns out, my old pins were fine, but I went ahead and used the new pins since I had them.
2. The SPC supplied nut is indeed too short. Wonder why they haven't fixed that yet? Anyhow, the old nuts were still in decent shape and worked fine. If you are unsure of their condition, you may want to consider having new ones on hand just in case.
3. Just an FYI, for the body side of the arm, the nut is 17mm and the bolt head is 14mm. I soaked both ends in PB overnight, but it still took most of my body weight and a breaker bar plus the jack handle on the end of the breaker bar to break the nut loose (both sides). The nut and bolt were both in good shape with minimal corrosion, so I'm surprised at how much force was required to break them loose. I used a wire brush to clean the bolt and nut threads.
4. Also, I wouldn't recommend using any anti-seize. A/S alters the torque specs. Just clean the threads with a wire brush if the nut doesn't thread cleanly.
5. The service manual says to remove the wheel sensor from the knuckle, but that is not necessary if you have a deep 17mm socket. Just be careful around the sensor.
6. When installing the new arms, I tried it both ways: One side I did the body side bolt first, then the ball joint. And vice versa for the other side. They were both about the same level of effort IMO. You just have to man-handle the wheel/knuckle to a position that allows the appropriate end to fit into position. It's a little bit of a PITA either way, but not too bad. If you had 2 people, it would be a cinch.
7. Loading the suspension before final tightening: Before I started, I used a long level and painter's tape to mark the level of one of the wheel studs on the fender. As it turns out, I don't really think this is necessary. Just raise the knuckle until you see/hear the car lift off of the jack stand. Then do your final tightening.
8. Since I was dealing with out of spec camber to the negative side, I made both of the new arms about 3/16"-1/4" longer than the old arms. When I drove it for the first time after the installation (headed straight to the alignment shop), it drove fine. I did not experience any of the peculiar issues that 4drviper had after installation.
So, I get to the alignment shop and explain very clearly to the gal at the counter that I had installed adjustable camber arms and I wanted the camber set to -1.0 and the toe as close to 0 as possible. The guy did a great job on the toe, but somehow he didn't attempt to get the camber to -1.0. The "after" camber was -1.2 for the left side and -1.3 for the right side. I complained about this and the dumbass service manager started giving me a line of crap about how it couldn't be adjusted any farther, yada, yada, yada. You should seen the look in his eyes when I asked him to show me that the new, adjustable camber arms had reached their limit
To make a long story short, I'll be going back tomorrow and this time they'll do what I ask. I can't believe the extent some places will go to try and BS their way out of a situation. I'm sure they get away with this all the time, sadly enough. (This was Tires Plus, and yes, I'll be speaking with the manager and the owner tomorrow).Anyhow, for the first time in years, I am not right at or outside of the max negative camber spec for the rear end. I have a 440 mile road trip tomorrow morning, so it will be a good test. So far, these things are rock solid. I am very glad that I installed these and my advice to anyone considering adjustable camber options for the rear end is to go with the SPC arms. I wouldn't even consider Ingals or the other equivalent kits.
And once again, my thanks to 4drviper for the DIY
Last edited by nfnsquared; 09-03-2014 at 10:29 PM.
09-05-2014, 02:58 PM
#28
Race Director
Well, after a second trip back to Tires Plus, I was finally able to get them to follow simple instructions and set the rear camber where I wanted it.
I put 150 lbs in the trunk and 100 lbs in the back seat along with a full tank of gas. This weight was a compromise between an empty car with just me in it and the weight of the car when I have it fully loaded with the gear/tools I sometimes have to carry around on road trips (250-300 miles) or a car with a full passenger load.
I'm fairly confident that camber will now remain within specs even if the car is fully loaded (it was previously at -1.9 and -2.0 when fully loaded). In a couple of weeks, I'll be installing the Aspec suspension and I'll do another alignment check then. Car rides fine on these settings. More to come after the Aspec install
Last edited by nfnsquared; 09-05-2014 at 03:06 PM.
09-05-2014, 04:08 PM
#29
Burning Brakes
Thread Starter
2. Yes indeed. I reused my castle nuts because they wouldn't catch the cotter pin.
4. Whoops .-. gonna re-torque whole suspension when I do motor mount sometime this month.
(Innovative v2 75A on 5AT on its way now hehehehehehe)
5. I didn't either. I used Harbor Freight color deep socket and didn't even know about the speed sensor thing until nfn^2 mentioned it.
8. Good to hear! I must have turned the toe bolt when my OCD was making me loosen and retorque some of the suspension arms. Left & Right gets confusing when i'm looking up from the floor
I am very glad you have eliminated (or scared off) one of "those" shops. This is why auto industry people don't like "car people" hehehe
Thank you for sharing your experience.
On the same line of thoughts : common sense seems to be a fuckin' superpower these days. How could the manager think you wouldn't know about the shiny new camber arm hahaha.
Since he mentioned about loading, I would like to add another pleasant experience. I would like to have done what he did, but since I don't carry cargo as often as he does, I didn't. My cambers are -0.8 all around. I will be short and just say I've had 300lbs on the bumper rail and another 100lbs in the trunk and the interior full of things you can lift with one hand (Type S rear suspension) and it sagged, not as bad as those overloaded Nissan sedans tho. After 2500miles with the load, rear tires of treadwear 300 shows no camber/toe damage.
I ASSUME that once camber is set right at stock height, it doesn't hurt much when suspension cycles.
4. Whoops .-. gonna re-torque whole suspension when I do motor mount sometime this month.
(Innovative v2 75A on 5AT on its way now hehehehehehe)
5. I didn't either. I used Harbor Freight color deep socket and didn't even know about the speed sensor thing until nfn^2 mentioned it.
8. Good to hear! I must have turned the toe bolt when my OCD was making me loosen and retorque some of the suspension arms. Left & Right gets confusing when i'm looking up from the floor
I am very glad you have eliminated (or scared off) one of "those" shops. This is why auto industry people don't like "car people" hehehe
Thank you for sharing your experience.
Well, after a second trip back to Tires Plus, I was finally able to get them to follow simple instructions and set the rear camber where I wanted it.
I put 150 lbs in the trunk and 100 lbs in the back seat along with a full tank of gas. This weight was a compromise between an empty car with just me in it and the weight of the car when I have it fully loaded with the gear/tools I sometimes have to carry around on road trips (250-300 miles) or a car with a full passenger load.
I'm fairly confident that camber will now remain within specs even if the car is fully loaded (it was previously at -1.9 and -2.0 when fully loaded). In a couple of weeks, I'll be installing the Aspec suspension and I'll do another alignment check then. Car rides fine on these settings. More to come after the Aspec install
I put 150 lbs in the trunk and 100 lbs in the back seat along with a full tank of gas. This weight was a compromise between an empty car with just me in it and the weight of the car when I have it fully loaded with the gear/tools I sometimes have to carry around on road trips (250-300 miles) or a car with a full passenger load.
I'm fairly confident that camber will now remain within specs even if the car is fully loaded (it was previously at -1.9 and -2.0 when fully loaded). In a couple of weeks, I'll be installing the Aspec suspension and I'll do another alignment check then. Car rides fine on these settings. More to come after the Aspec install
On the same line of thoughts : common sense seems to be a fuckin' superpower these days. How could the manager think you wouldn't know about the shiny new camber arm hahaha.
Since he mentioned about loading, I would like to add another pleasant experience. I would like to have done what he did, but since I don't carry cargo as often as he does, I didn't. My cambers are -0.8 all around. I will be short and just say I've had 300lbs on the bumper rail and another 100lbs in the trunk and the interior full of things you can lift with one hand (Type S rear suspension) and it sagged, not as bad as those overloaded Nissan sedans tho. After 2500miles with the load, rear tires of treadwear 300 shows no camber/toe damage.
I ASSUME that once camber is set right at stock height, it doesn't hurt much when suspension cycles.
01-04-2015, 05:04 PM
#30
Burning Brakes

I'm also trying to get away from the Ingalls kit because I noticed the toe is always a little off after adjustment.
So to those who have installed the SPC kit, can you tell me if adjustment of the SPC arm affects toe? Thanks.
So to those who have installed the SPC kit, can you tell me if adjustment of the SPC arm affects toe? Thanks.
 So far so good - no complaints here
01-06-2015, 09:06 AM
So far so good - no complaints here
01-06-2015, 09:06 AM
#32
Burning Brakes
Thanks for that response.
I've been annoyed with the toe out situation with the Ingalls kit. And the 2 arms have also rusted out, so much for the "best camber kit" out there. I originally went with Ingalls because of that dumb article on HeelToeAuto's website regarding the SPC kit's boot splitting. Now I have to go back and put back the two lower stock arms and install the SPC kit. I love the fact that you can adjust camber without affecting toe. That's the most annoying fact with the Ingalls kit.
I've been annoyed with the toe out situation with the Ingalls kit. And the 2 arms have also rusted out, so much for the "best camber kit" out there. I originally went with Ingalls because of that dumb article on HeelToeAuto's website regarding the SPC kit's boot splitting. Now I have to go back and put back the two lower stock arms and install the SPC kit. I love the fact that you can adjust camber without affecting toe. That's the most annoying fact with the Ingalls kit.
01-06-2015, 10:23 AM
#33
Pro
Yeah, I've read the same posts. It's weird that some have had no problems with the Ingalls kit and others seem to all have the same issue as you are with the toe arm. Originally, I went with the SPC kit strictly because my bolts are rusted and if I went the Ingalls route I wouldn't be able to get the bolts off. So I just thought it'd be easier swapping out the upper ball joint arm and call it a day....which is actually a more in-depth install than the Ingalls kit.
01-06-2015, 10:51 AM
#34
Burning Brakes
The toe is CONSTANTLY out, even right after an alignment. I'm only on HFP suspension on my 07 Accord. It's almost useless to do an alignment for the rear. The Ingalls bushings aren't in a "donut" state either as others reported. Ingalls kit also is built poorly. Both arms rusted out within a year with the finish on the body of the arm "flaked off" as a few big pieces of paint. I don't think the SPC kit install is as involved. Taking an arm off a ball joint isn't as bad as people think, you need to knock on the metal where the ball joint goes through with a few hard whacks and it'll break loose even without a special tool. I've done this already for the front upper and lower ball joints. It was VERY INVOLVED with the Ingalls install because the inside eccentric bolt for the toe arm totally fused to the metal sleeve. It required a sawzall + a new set of cam plates, bolts, and nuts.
01-06-2015, 11:10 AM
#35
Pro
Yeah, I can imagine that being really frustrating after getting an alignment each time. Hopefully, going back to the stock toe arm with the upper arm kit will correct the problems for ya.
You're right the install for the ball joint wasn't too difficult and fairly straight forward. I just heard the install on the Ingalls was a bit easier as long as you didn't have to cut out the rusted bolts....which seems to be a problem for those of us in the colder climates. I admit I was a bit nervous when installing since I was essentially learning on the job - but I took my time and everything came out just fine.
You're right the install for the ball joint wasn't too difficult and fairly straight forward. I just heard the install on the Ingalls was a bit easier as long as you didn't have to cut out the rusted bolts....which seems to be a problem for those of us in the colder climates. I admit I was a bit nervous when installing since I was essentially learning on the job - but I took my time and everything came out just fine.
01-06-2015, 11:51 AM
#36
Burning Brakes
I won't be learning on the job, but I'm taking it to a shop to get it done anyway this time around because the alignment rack will be right there and I don't have to fuss and get nervous driving with the rear alignment way off for days.
01-06-2015, 12:39 PM
#37
Burning Brakes
Thread Starter
Ingalls don't have to stay "donut" to give you headache. It's (well, soft) made out of donut dough.. lol I think if they wanted it to work, they should've at least kept the toe spherical bearing, and match OEM hardness on the rest of the rubber. Not to mention OEM arm (not the toe, the one goes in the bottom), the dogbone HOUSES whole rubber while ingalls, rubber is not secured inside metal housing.
You don't need to whack anything (unless you're into that sort of thing ). $15 ball joint(or tie rod) fork from Autozone, forgot which size. Just eyeball and get 2 of them. I'd keep it if I had more than 1 car but hey, it's free tool rental. Slide your jack handle over the fork handle and gently press down and pop.
Tip for you salty road guys. I took an old windshield heat shield and cut them into 2" x 5" stripes and wrapped the band around thread and tightened using 2 zipties per each strip. They're soft so they'll mold themselves into the shape of threads and keep what needs to stay out out and whatever anti seize you put in in.
Any kind of flexible foam with some thickness would work.
I did it anyways because happy alignment tech = precise alignment.
And affecting toe, I thought because rear multi-link is somewhat "organic" adjusting camber will affect toe a bit, but its very very minimal, and non-existent according to nfnsquared.
I'll be getting new alignment before summer to reduce camber and see again, but last time I went in for alignment, tech said the rear was as easy as cars with OEM camber adjustment. Front... I had to sweet talk into him how hard it is being a car enthusiast these days and he agreed to let it slide hehe... (Skunk2) and he had the same arms so he had "proper" tools. (there is really no way to easily adjust skunk2 arms)
IMO Honda and Subaru are, compared to other Japanese makers, more of engineering nerds than businessmen. There's a good reason why they went the extra mile (and cost) to put spherical bearing in the rear of TL.
You don't need to whack anything (unless you're into that sort of thing
). $15 ball joint(or tie rod) fork from Autozone, forgot which size. Just eyeball and get 2 of them. I'd keep it if I had more than 1 car but hey, it's free tool rental. Slide your jack handle over the fork handle and gently press down and pop.Tip for you salty road guys. I took an old windshield heat shield and cut them into 2" x 5" stripes and wrapped the band around thread and tightened using 2 zipties per each strip. They're soft so they'll mold themselves into the shape of threads and keep what needs to stay out out and whatever anti seize you put in in.
Any kind of flexible foam with some thickness would work.
I did it anyways because happy alignment tech = precise alignment.
And affecting toe, I thought because rear multi-link is somewhat "organic" adjusting camber will affect toe a bit, but its very very minimal, and non-existent according to nfnsquared.
I'll be getting new alignment before summer to reduce camber and see again, but last time I went in for alignment, tech said the rear was as easy as cars with OEM camber adjustment. Front... I had to sweet talk into him how hard it is being a car enthusiast these days and he agreed to let it slide hehe... (Skunk2) and he had the same arms so he had "proper" tools. (there is really no way to easily adjust skunk2 arms)
IMO Honda and Subaru are, compared to other Japanese makers, more of engineering nerds than businessmen. There's a good reason why they went the extra mile (and cost) to put spherical bearing in the rear of TL.
Last edited by 4drviper; 01-06-2015 at 12:42 PM.
01-06-2015, 01:16 PM
#38
Burning Brakes
The toe is greatly affected with the Ingalls setup, big time. The front lower arm up front, when adjusted, affects the toe right away as I was told. The SPC setup is the right way to do it. You are moving the top of the suspension and now the lower portion, which is affected by 2 arms.
01-06-2015, 03:16 PM
#39
Burning Brakes
Tip for you salty road guys. I took an old windshield heat shield and cut them into 2" x 5" stripes and wrapped the band around thread and tightened using 2 zipties per each strip. They're soft so they'll mold themselves into the shape of threads and keep what needs to stay out out and whatever anti seize you put in in.
Any kind of flexible foam with some thickness would work.
Any kind of flexible foam with some thickness would work.


