DIY: ThermoBlok Spacers install / EGR cleaning
 03-31-2007, 08:28 PM
#1
08 Civic SI
Thread Starter
DIY: ThermoBlok Spacers install / EGR cleaning
Well my spacer kit came in the mail today and i got right to instaling them.
the time it took me to complete this was about 2 hours going slowly and about 30 min trying to get the old gaskets off .
.

first thing is to take the intake, i have a short ram so it was simple to get out, the stock air box is a little more involved. then you are going to want to do is remove everthing conected to the throttle body and intake manifold. make sure plug up the the coolant lines so to minimize coolant lose
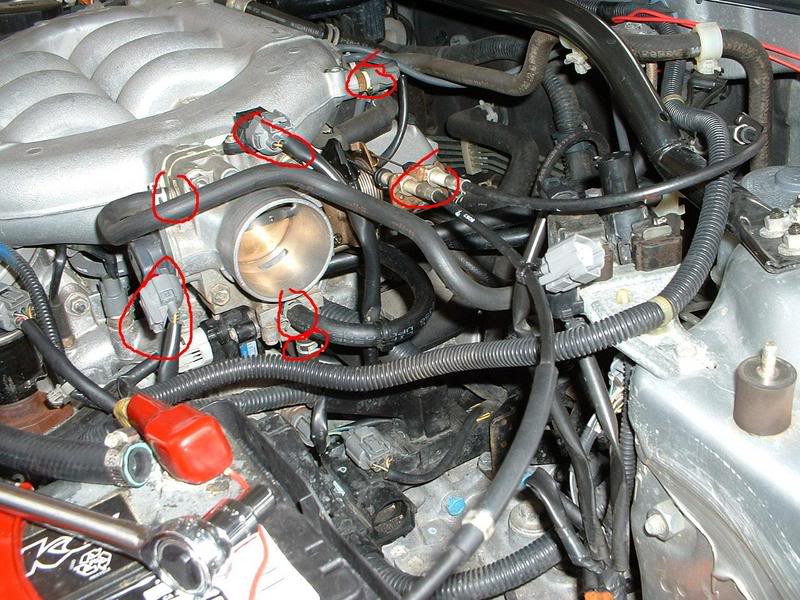
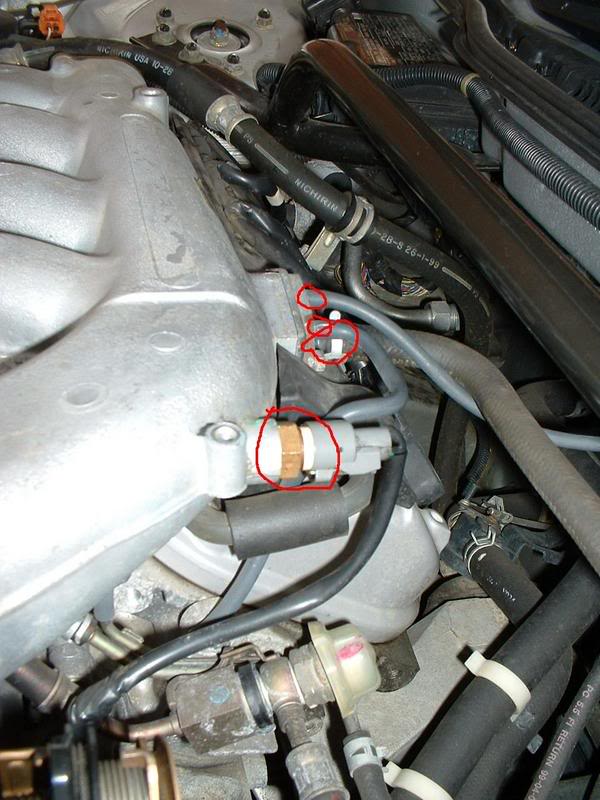
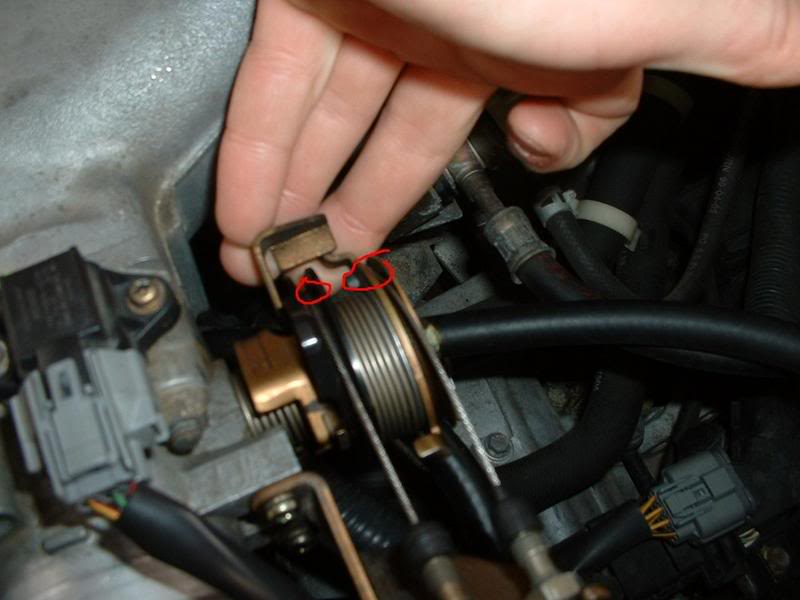
and dont forget this little hose in the back
after all the hoses and such are off turn your atention to the throttle cables. they are a little dificult to remove.
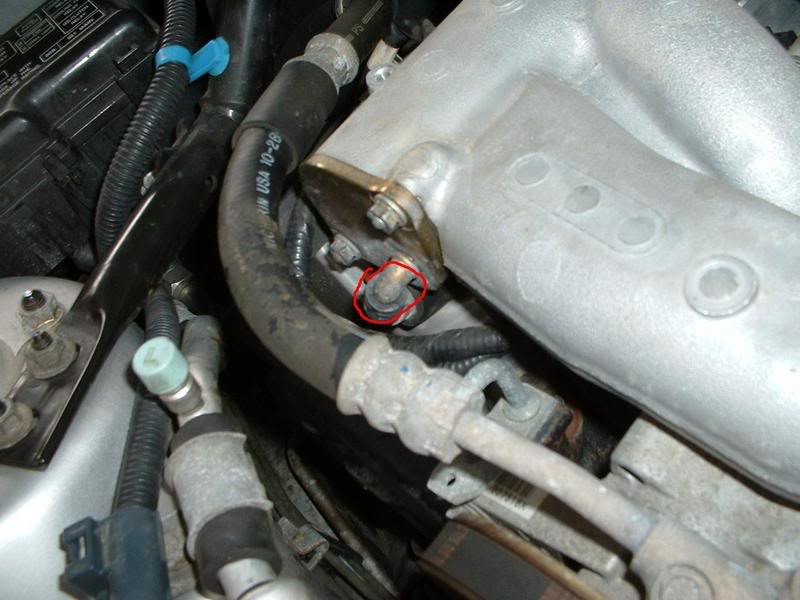
first thing you will want to take a wrench and loosen the cable mounts
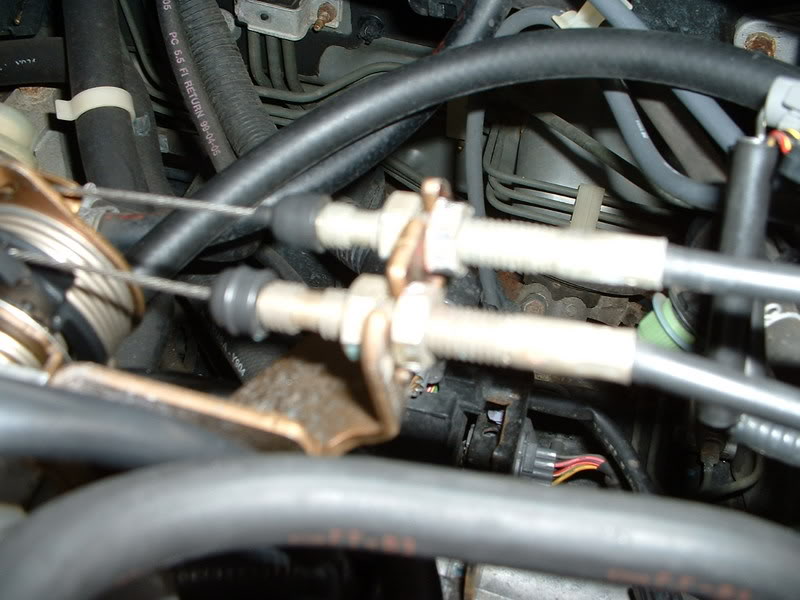
next pull the throttle back till the butterfly is open, the trick to getting them off is while holding it open, slide the cable out. you will have too see it for yourself its not easy to explain, but its not hard.
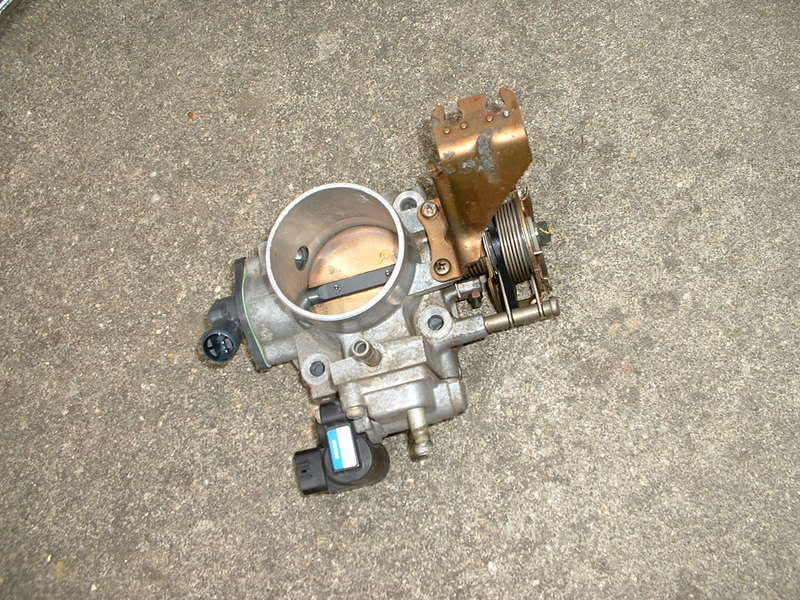
when once you have made sure that everthing is disconected you can go ahead and remove the bolts on the throttle body, there are 4 of them, the one in the back is a little hard to get to, i used a socket extension.
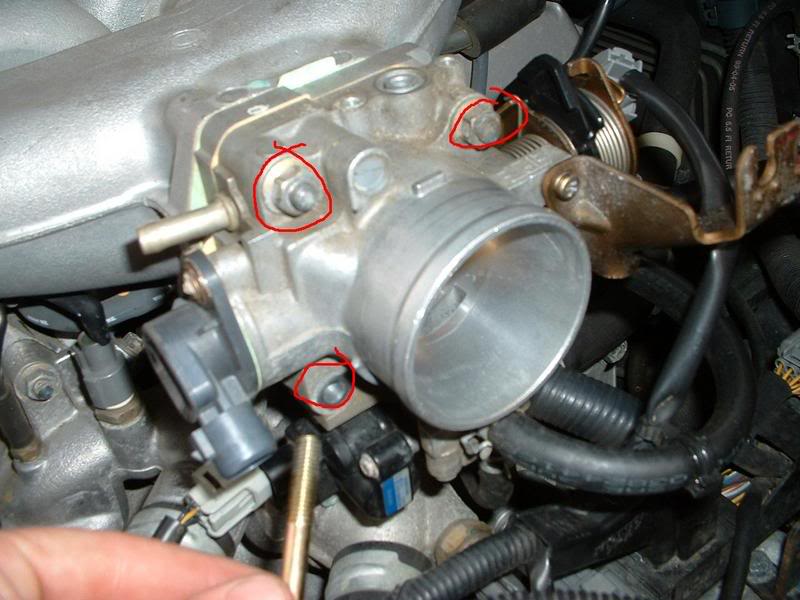
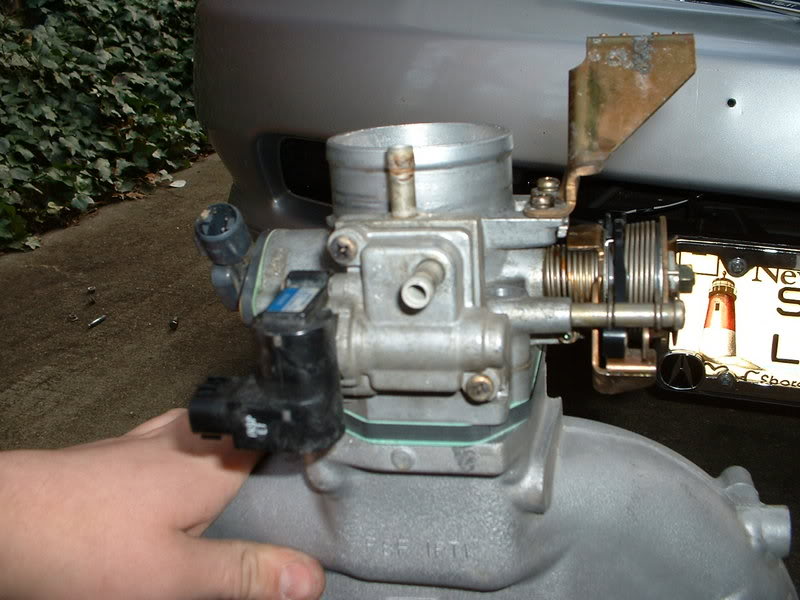
after all the bolts are off gently pull off the throttle body
put the throttle body aside
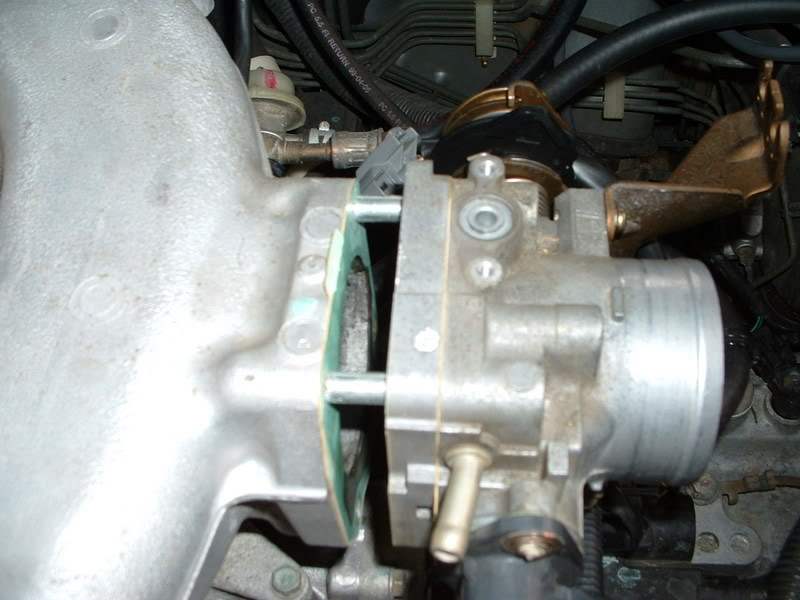
next up is the intake manifold, just take off these bolts with a 14mm socket and extension
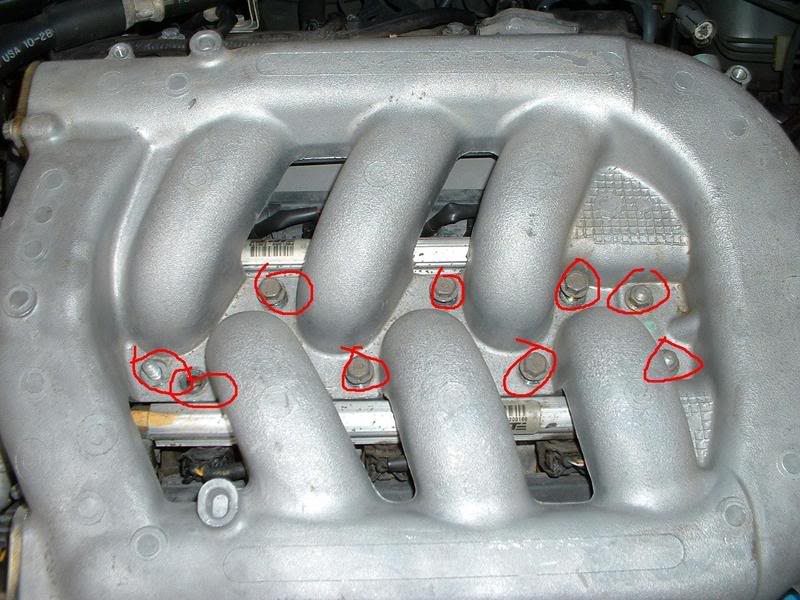
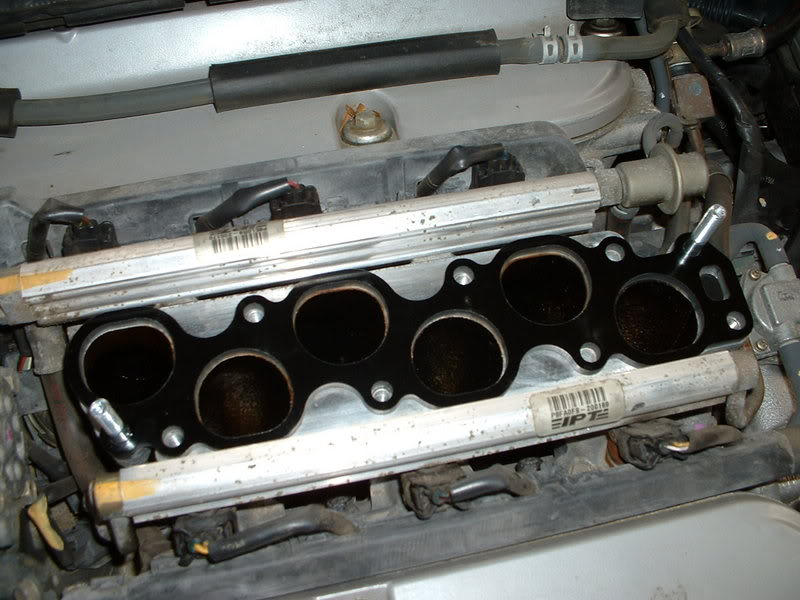
gently remove the manifold, and make sure that everything is connected again, so you dont pull up with somthing still atached
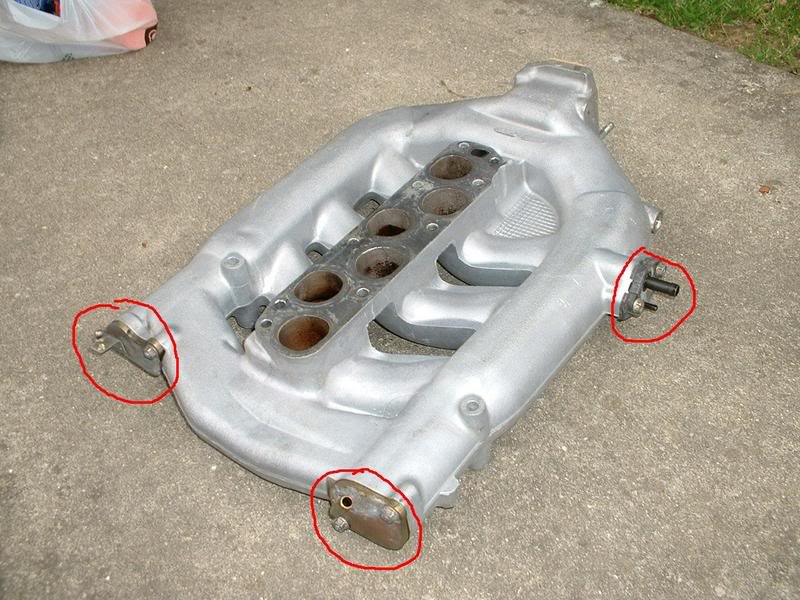
with a 10mm socket remove these 3 things and put them aside.

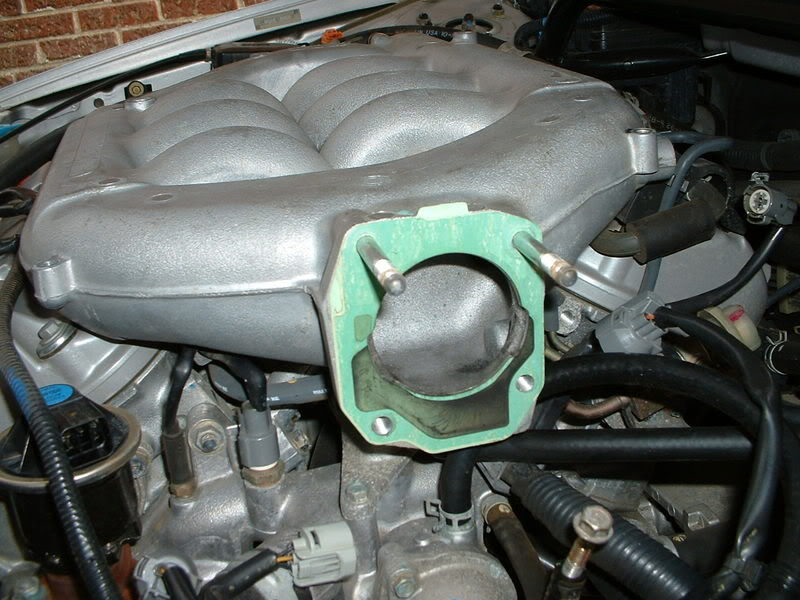
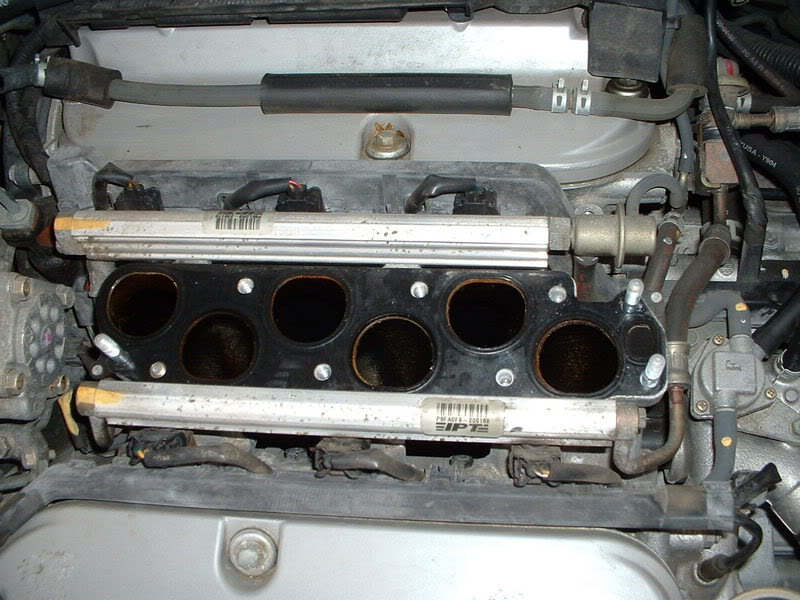
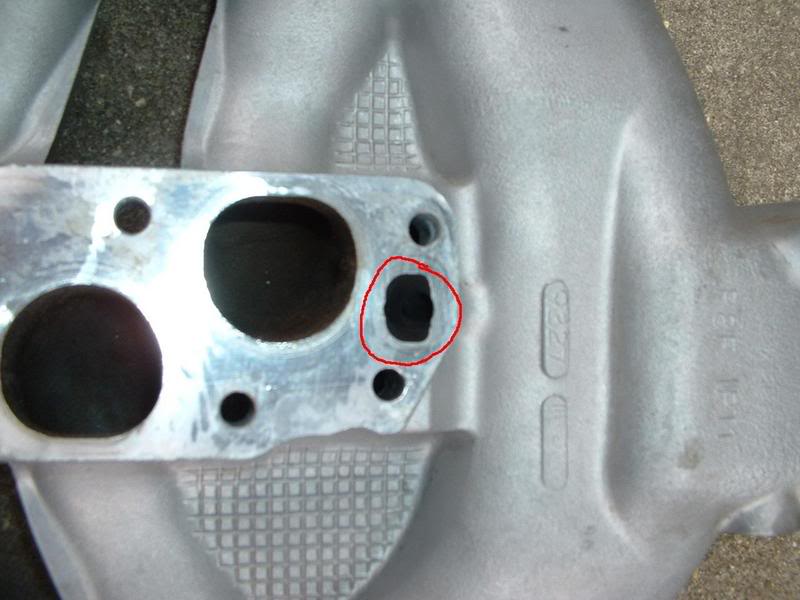
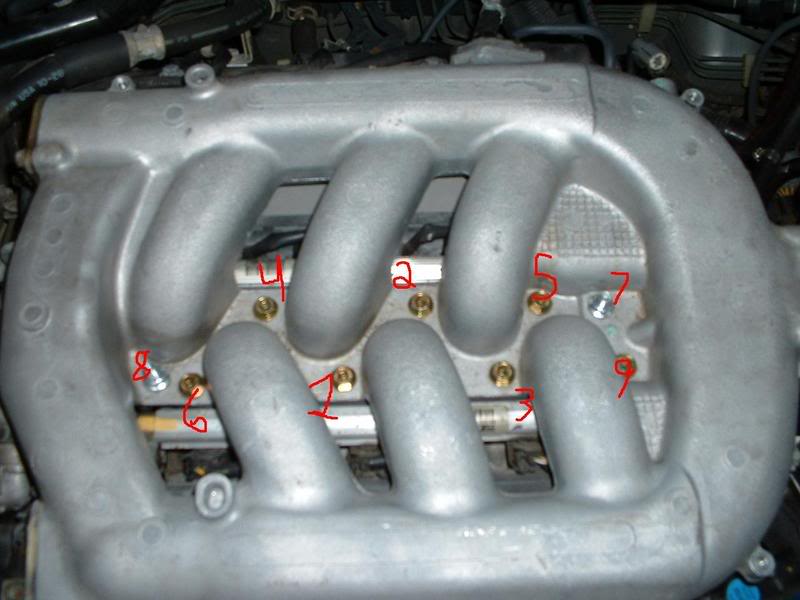
hear is the infamous EGR port, give that thing and the whole manifold a good spra down with throttle body cleaner. take your time here, it took me 3 cans to get this thing clean, make sure ou hose out all that crap. it was a milky white/brown nastyness it took me about 30 min to get it fully clean. let it dry out in the sun.
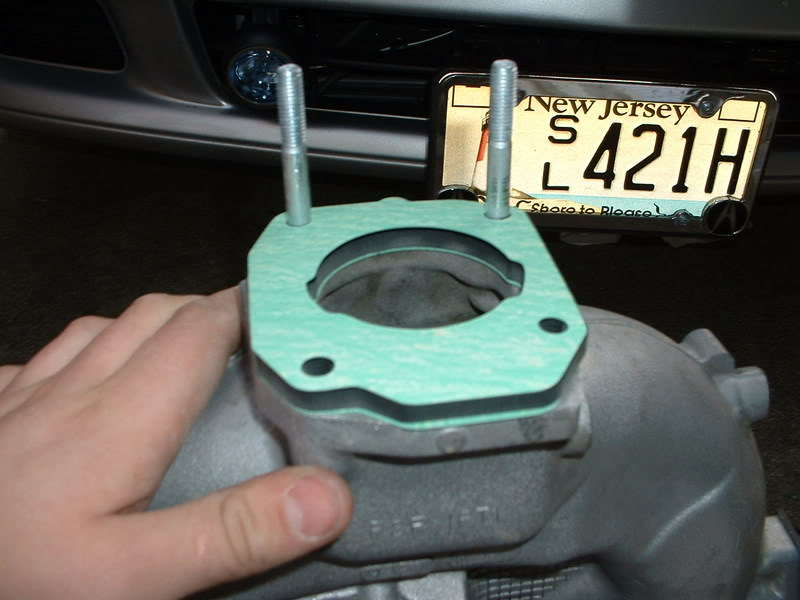
once everything is clean and dry get started on installing the spacers. the bolts will have to come off to be replaced with the longer new ones. the easyest wa is to get some plyers of somthing to grip them with and unscrew them.
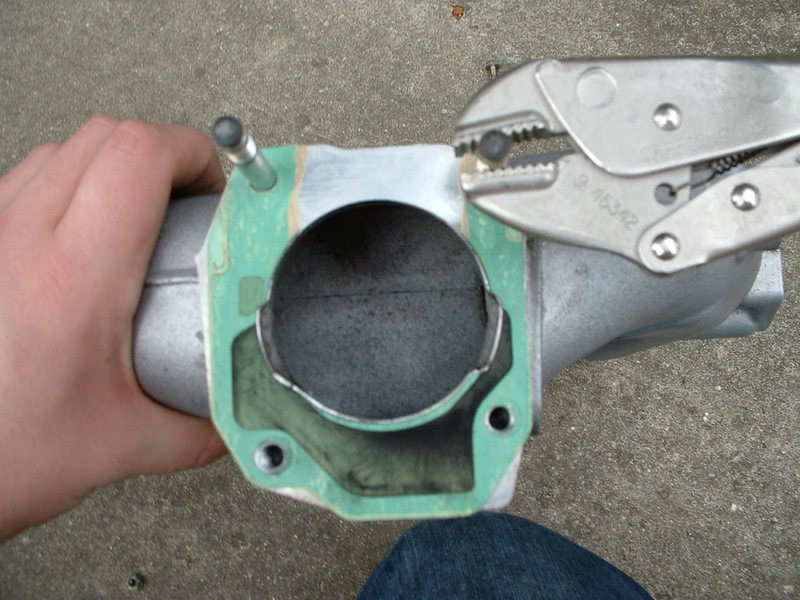
then get the gasket off, it was a pain and time consuming. make sure the gasket is fully off and the surface is clean.
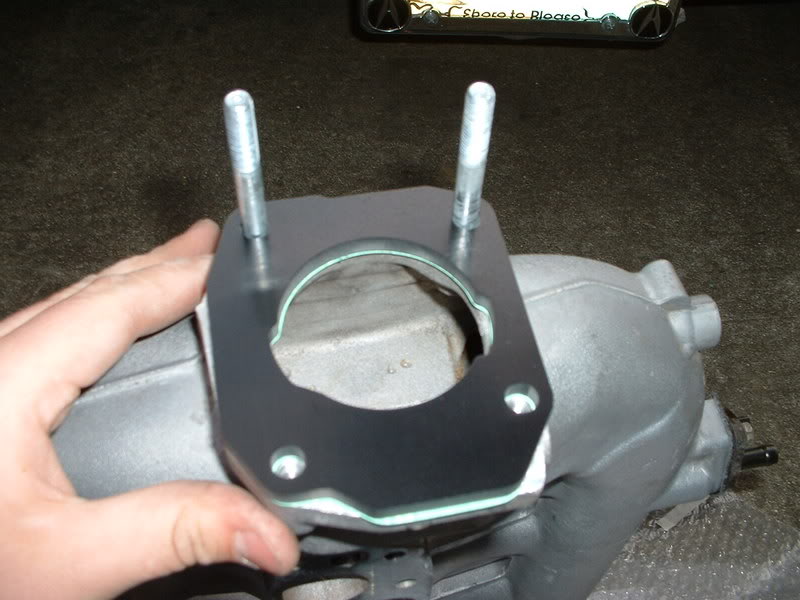
now install the supplyed gasket followed by the spacer and the other suppled gasket
bolt on the throttle body and torque to 14 - 18 lb-ft DO NOT OVER TORQUE
now take off the old bolts and install the new bolts just like the throttle body.
clean the surface where the stock gasket was on the lower manifold. the replace the stock gasket followed by the spacer then the suppled gasket.
now bolt on the manifold with the new bolts, and toruqe them in this order to 16-18 lb-ft DO NOT OVERTOURQE!!
now replace all the cables and hoses in the reverse order, and if u want use the throttle bosy coolant bypass that was included.
i have to say the spacers were well worth it, i havent floored the car yet, but i definalty feel better responce and MUCH smoother ride with a free flowing egr. the low end power gain is great. the combo off a good cleaning and spacer install brought life back to my car if you have any questions just ask
the time it took me to complete this was about 2 hours going slowly and about 30 min trying to get the old gaskets off
.first thing is to take the intake, i have a short ram so it was simple to get out, the stock air box is a little more involved. then you are going to want to do is remove everthing conected to the throttle body and intake manifold. make sure plug up the the coolant lines so to minimize coolant lose
and dont forget this little hose in the back
after all the hoses and such are off turn your atention to the throttle cables. they are a little dificult to remove.
first thing you will want to take a wrench and loosen the cable mounts
next pull the throttle back till the butterfly is open, the trick to getting them off is while holding it open, slide the cable out. you will have too see it for yourself its not easy to explain, but its not hard.
when once you have made sure that everthing is disconected you can go ahead and remove the bolts on the throttle body, there are 4 of them, the one in the back is a little hard to get to, i used a socket extension.
after all the bolts are off gently pull off the throttle body
put the throttle body aside
next up is the intake manifold, just take off these bolts with a 14mm socket and extension
gently remove the manifold, and make sure that everything is connected again, so you dont pull up with somthing still atached
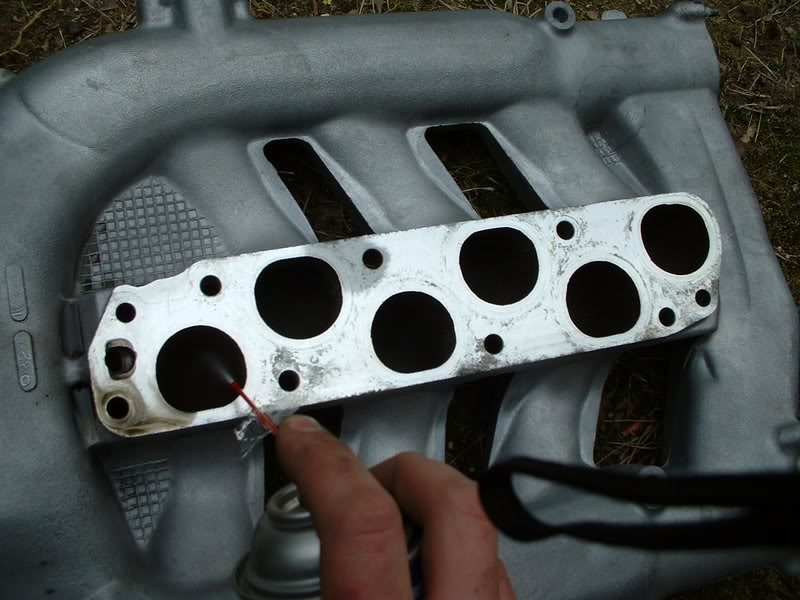
with a 10mm socket remove these 3 things and put them aside.
hear is the infamous EGR port, give that thing and the whole manifold a good spra down with throttle body cleaner. take your time here, it took me 3 cans to get this thing clean, make sure ou hose out all that crap. it was a milky white/brown nastyness
it took me about 30 min to get it fully clean. let it dry out in the sun.once everything is clean and dry get started on installing the spacers. the bolts will have to come off to be replaced with the longer new ones. the easyest wa is to get some plyers of somthing to grip them with and unscrew them.
then get the gasket off, it was a pain and time consuming. make sure the gasket is fully off and the surface is clean.
now install the supplyed gasket followed by the spacer and the other suppled gasket
bolt on the throttle body and torque to 14 - 18 lb-ft DO NOT OVER TORQUE
now take off the old bolts and install the new bolts just like the throttle body.
clean the surface where the stock gasket was on the lower manifold. the replace the stock gasket followed by the spacer then the suppled gasket.
now bolt on the manifold with the new bolts, and toruqe them in this order to 16-18 lb-ft DO NOT OVERTOURQE!!
now replace all the cables and hoses in the reverse order, and if u want use the throttle bosy coolant bypass that was included.
i have to say the spacers were well worth it, i havent floored the car yet, but i definalty feel better responce and MUCH smoother ride with a free flowing egr. the low end power gain is great. the combo off a good cleaning and spacer install brought life back to my car
if you have any questions just ask

The following 8 users liked this post by orgnlprankster7:
3.2TLc (10-27-2012),
careface (01-29-2013),
flyboiip26 (07-18-2011),
hohmst1 (12-13-2012),
PVP01CL-P (01-28-2015),
and 3 others liked this post.
 04-01-2007, 07:45 AM
#4
Senior Moderator
great writeup!!
04-01-2007, 10:58 AM
#5
Boomer SOONER

Join Date: Jul 2003
Location: McKinney, TX
Age: 41
Posts: 3,729
Likes: 0
Received 14 Likes
on
14 Posts
very good DIY! I did this with about 80000 miles on my car mainly because my EGR port was completely clogged and it threw an engine code. I took off the intake manafold at 110000 also because it was running a little rough and the EGR port was half way clogged again - that little thing gets dirty fast!
Trending Topics

 04-02-2007, 01:15 PM
#11

DaLine and others
For full tech info on the space age Thermoblock heat insulating spacer block
go to www.outlawengineering.com thats that makers website
Less temp transfer to the intake manifold is a good thing!
For full tech info on the space age Thermoblock heat insulating spacer block
go to www.outlawengineering.com thats that makers website
Less temp transfer to the intake manifold is a good thing!
04-04-2007, 12:30 AM
#13
Instructor
iTrader: (1)
Join Date: Jul 2006
Location: San Jose, Ca 95129
Age: 37
Posts: 124
Likes: 0
Received 0 Likes
on
0 Posts
Originally Posted by Bambo2888
sweet, since there is now a good write-up, i will consider getting these now
X2. How did you know what to do? Just look at service manual/other car's diys?
04-04-2007, 12:47 AM
#14
08 Civic SI
Thread Starter
Originally Posted by mmmmmbarb
X2. How did you know what to do? Just look at service manual/other car's diys?
05-23-2007, 10:02 AM
#16
08 Civic SI
Thread Starter
Originally Posted by AMGala
Just to be clear, you don't have to remove the original lower manifold gasket like you have to remove the original throttle body gasket, right?
05-23-2007, 02:56 PM
#24
08 Civic SI
Thread Starter
Originally Posted by SSMTL01
nice- thanks! Does cleaning the EGR improve gas mileage

 05-25-2007, 07:42 AM
#28
08 Civic SI
Thread Starter
Originally Posted by cyde7399
Does anyone happen to know the torque specs for the nuts and bolts on the intake manifold?
05-25-2007, 10:51 AM
#29
Proper torque in the correct order as described and then go back and check them all again!
Hand snug each bolt- then the tool and torque wrench to final setting
Hand snug each bolt- then the tool and torque wrench to final setting
05-25-2007, 08:27 PM
#31
Its only a 1/4 inch thick- no probs with clearance
The engine cover bolts to the manifold and the hood is plenty high above that
Install and enjoy the cooler intake air performance
These days of $#!$ per gal gas- every little bit helps!
The engine cover bolts to the manifold and the hood is plenty high above that
Install and enjoy the cooler intake air performance
These days of $#!$ per gal gas- every little bit helps!
 09-16-2007, 02:56 PM
#35
10th Gear

Join Date: Jul 2005
Age: 58
Posts: 10
Likes: 0
Received 0 Likes
on
0 Posts
Removed my intake last week to clean the EGR port and your procedure was the greatest.
Step by step with all the needed info.
THANKS!!
No more check engine light and much better running machine now.
Step by step with all the needed info.
THANKS!!
No more check engine light and much better running machine now.
 09-17-2007, 10:47 AM
#38
Cruisin'

Join Date: Aug 2007
Age: 45
Posts: 21
Likes: 0
Received 0 Likes
on
0 Posts
only one note -
when removing the studs from the manifold(s), instead of unscrewing them with vice-grips, use a simple technique called "double-nutting."
just screw one nut down, so that you have at least 1.5 times the thickness of a nut's worth of threads left above the first nut. then screw another nut down on top of the first one. use two open-end wrenches to tighten the nuts against one another. then you can just put an open end wrench on one of the nuts and back the stud out.
works like a charm, guaranteed.
otherwise, great write-up.
a question - do these cars have any kind of EGR valve(s), or is it just the port that gets dirty?
09-17-2007, 02:49 PM
#39
Senior Moderator
Originally Posted by carl m
only one note -
when removing the studs from the manifold(s), instead of unscrewing them with vice-grips, use a simple technique called "double-nutting."
just screw one nut down, so that you have at least 1.5 times the thickness of a nut's worth of threads left above the first nut. then screw another nut down on top of the first one. use two open-end wrenches to tighten the nuts against one another. then you can just put an open end wrench on one of the nuts and back the stud out.
works like a charm, guaranteed.
otherwise, great write-up.
a question - do these cars have any kind of EGR valve(s), or is it just the port that gets dirty?
when removing the studs from the manifold(s), instead of unscrewing them with vice-grips, use a simple technique called "double-nutting."
just screw one nut down, so that you have at least 1.5 times the thickness of a nut's worth of threads left above the first nut. then screw another nut down on top of the first one. use two open-end wrenches to tighten the nuts against one another. then you can just put an open end wrench on one of the nuts and back the stud out.
works like a charm, guaranteed.
otherwise, great write-up.
a question - do these cars have any kind of EGR valve(s), or is it just the port that gets dirty?
09-21-2007, 12:09 PM
#40
Advanced
Join Date: Jun 2006
Location: Lakewood, CO
Age: 37
Posts: 57
Likes: 0
Received 0 Likes
on
0 Posts
Ok sorry if this is a total noob question but I'm going to clean the EGR port this weekend, if I had the money for the spacers I'd do em in a heartbeat while this is all apart. But if I take this all apart, am I going to need new gaskets, or can I reuse the old ones?

