When you click on links to various merchants on this site and make a purchase, this can result in this site earning a commission. Affiliate programs and affiliations include, but are not limited to, the eBay Partner Network.
Perform Do-It-Yourself auto maintenance at your own risk. You can injure someone or damage the car. You and only you, are responsible for your work and safety.
Front and rear, left and right is ALWAYS related to the car itself, NOT how you are facing it:
LEFT is always the DRIVER side.
RIGHT is always the PASSENGER side.
Text relates to the picture below the text.
Spark plugs needed: NGK SILKR8A-S laser iridium.
Tools needed:
Straight tip screwdriver.
Ratchet wrench.
305mm extension (with lock to prevent socket from falling off).
Flexible coupling.
10mm socket.
Long reach needle nose pliers.
Hose clamp pliers.
Hose pick (helpful).
Hose separator tool (helpful).
Place the hood prop rod in the service position. This also facilitates checking the oil, as shown:
Disconnect the negative battery cable (10mm). This safety precaution always applies to auto maintenance:
Using a straight-tip screwdriver, unfasten the 4 quarter-turn cam-locks and remove the engine cover:
CAUTION: Do not touch or lean on the charge air cooling fins. Light touch will bend them!
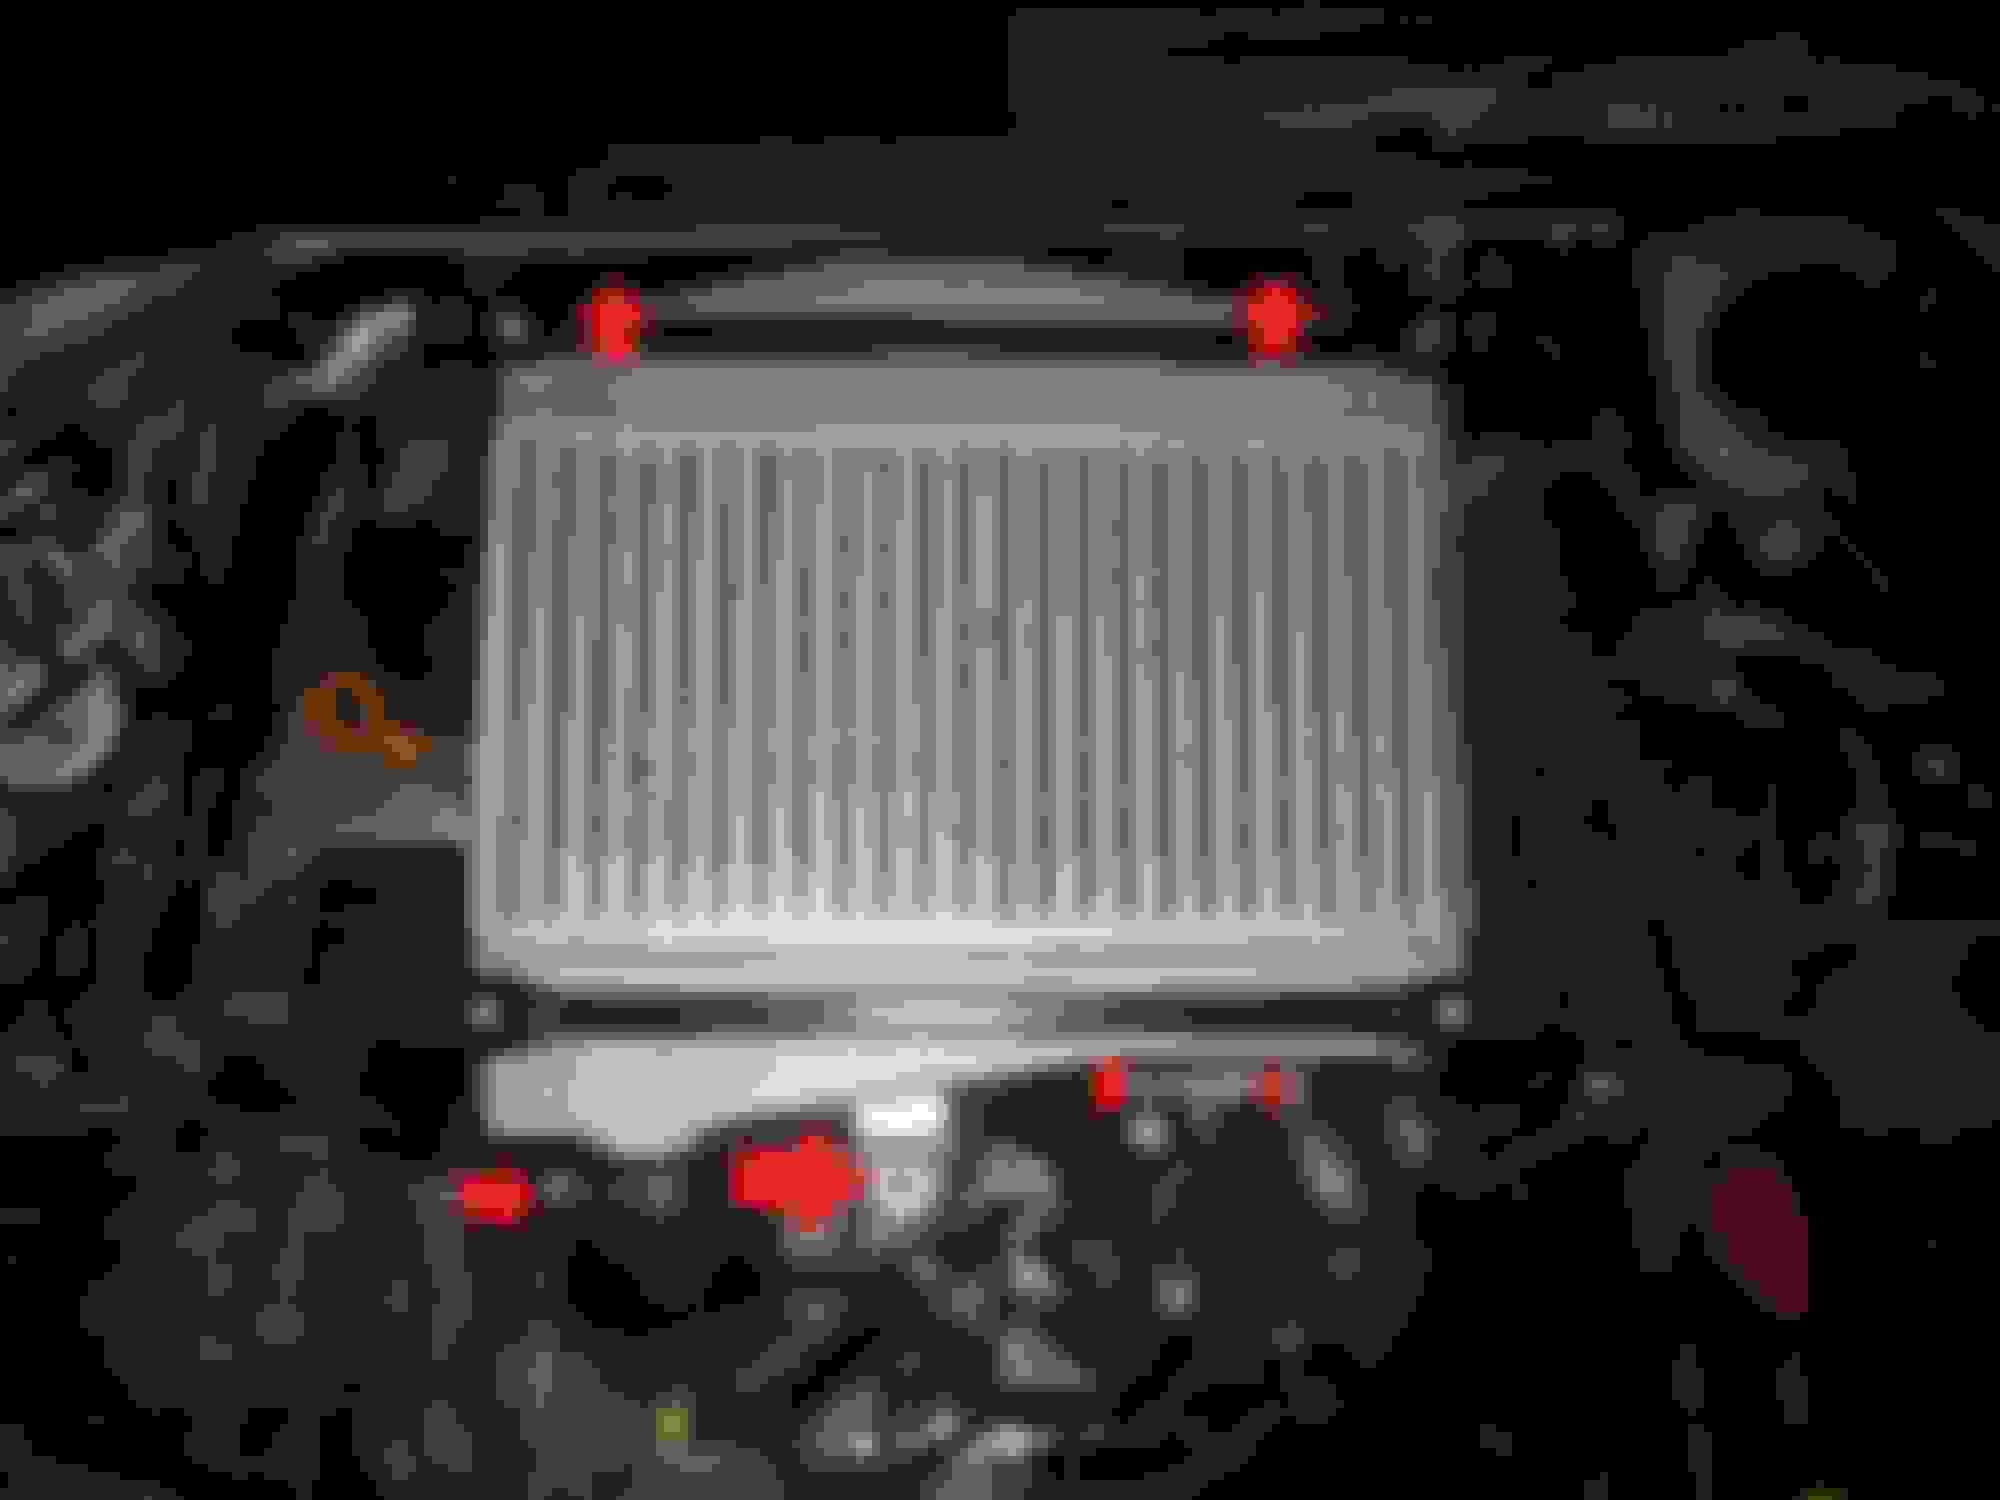
Remove the four 10mm hex bolts holding the charge air cooler. One is in the front:
The one on the right will require the extension:
The other two are on the left. The one to the rear will require the flex and extension. The one on the side only secures the air intake duct to the charge cooler. It is shorter than the other 3. Place the bolts in a labeled baggie.
The bypass control valve is on the front left side of the charge air cooler. The valve will remain attached to the cooler. Disconnect 5 fittings at the bypass control valve. Here is an overview:
1. Boost sensor plug.
2. Bypass outlet pipe (returns to the inlet air duct).
3. Upper bypass control hose (from the bypass control solenoid).
4. Lower bypass control hose (from the bypass control solenoid).
5. Vacuum hose (to the air intake duct).
The boost sensor plug (1.) has a squeeze tab on top to release. Squeeze the tab and gently pull the plug off:
Then pull the boost sensor wiring clip off the air bypass pipe:
Use the hose clamp pliers to remove the air bypass outlet pipe and clamp. (2.). The picture shows the hose clamp pliers holding the clamp compressed -- they are nice to have. Now, you will have to shift the charge cooler around some to get the clamp and pipe off. Grab the pipe with your hand and rotate it slightly clockwise and counter-clockwise on the fitting to free it, then work it off. Place the clamp in a labeled baggie.
Use the needle nose pliers to squeeze the clamp on the upper bypass control hose (3.) and slide the clamp back down the hose off the fitting:
Use the hose pick to gently loosen the hose from the fitting. Grab the hose and rotate it slightly with your hand until it turns, then it will slide off:
If needed, use the hose separator tool to slide the hose off the fitting:
Do the same with the lower bypass control hose (4.). Here are the bypass control hoses off the fittings:
The lower vacuum hose (5.) is harder to reach. Use needle-nose pliers to retract the clamp and then gently squeeze the hose and rotate it till it loosens and pull it off:
This completes all fittings at the bypass control valve.
Next loosen the turbocharger outlet pipe upper clamp at the rear of the charge cooler. These will require the 10mm socket with flex and extension. (Note in the picture the blue clamp stop lines. More on those later.)
Loosen the upper clamp and let it slide down the pipe:
Then loosen the 10mm clamps on the charge air outlet pipe on the front of the charge cooler. Now the cooler is ready to come off. HOLD THE COOLER BY THE SIDES AND FRAME ONLY. DO NOT TOUCH THE COOLING FINS. LIGHT TOUCH WILL BEND THEM. Work the cooler up at the front and remove the charge air outlet pipe:
After the front is free, work the cooler out of the turbocharger outlet pipe at the rear. Immediately place tape over the turbocharger outlet pipe. This will prevent anything from falling into the compressor spool:
Here is the charge air cooler. You can use a fin rake or a very small straight-tip screwdriver to gently straighten any bent fins:
With the charge air cooler off, you have access to the spark plug cover. This picture shows the fuel rail cover removed, but that isn't required for spark plug work. Remove the four 10mm hex bolts and place them in a labeled baggie.
Remove the spark plug cover. Now you can see the ignition coils and blue electrical plugs:
In this picture the you can see the reflection of the tape over the turbocharger outlet pipe. The ignition coils are each attached by one 10mm hex bolt.
Due to the tight fit, the plugs must be disconnected and ignition coils removed one at a time. Work from left to right. Start with the far left plug as it is not blocked by the others. The press release tab is on the front of each blue plug. Squeeze it and gently work/slide the plug off. Remove the 10mm hex bolt on that ignition coil and place it in a labeled baggie. Now pull upward on the coil -- rotate and wiggle (the coil ) and it will pop free of the spark plug. Place the coil in a box.
Move to the next one right and repeat. Bag the bolts and box the coils. Here is number 3 being removed:
Now attach the 5/8" spark plug socket to the extension. Lower it into the spark plug well until it contacts. Rotate, pushing gently until it clicks on to the spark plug. The rubber socket liner will capture the plug. Remove the spark plug. Use compressed air or a vacuum and clean out the spark plug well:
You can install the new plug after each old one is removed. That is the best way. Installation is in part 3, so I didn't write that this way. I taped over each clean plug well until ready for installation. If you leave the plug well open, tape over it.
Here is a comparison of the old plug with 78000 miles, to the new plug. The gap has widened to 0.81mm and the sharp edges of the electrodes are worn rounded. (The camera doesn't quite capture the detail.)
Honda expects a service life of 100000 miles. They also specify a gap from 0.7mm to 0.8mm (0.028" - 0.031") and calls for replacement if the electrodes are rounded. At 78000 miles, these plugs would have certainly gone the full distance. They look good; with a dry, medium brown color, no oil and no burned or cracked insulator ceramic. NGK Laser Iridium are VERY good plugs.
NGK Laser Iridium spark plugs come pre-gapped to about .711mm (0.028"). This allows for full wear through the allowable gap range. Do not attempt to measure the gap with a feeler gauge as it will scrape the iridium coating off the electrodes:
Lightly wipe the ceramic insulator with dielectric silicone grease. Snap the plug into the spark plug socket. Make sure it won't fall out.
Thinly coat the threads with anti-sieze compound:
Remove any tape from the spark plug hole. Gently lower the plug into the well, holding the extension straight as possible. ALWAYS start a spark plug by hand. Ease the plug into the hole and turn until the threads catch. DO NOT use a wrench. Turn the extension by hand until the plug bottoms out and the seal washer makes contact.
CAUTION: If the plug offers any resistance, it may be cross-threaded. Remove it and start over. The last thing you want is a damaged, stuck plug at the bottom of a spark plug well, deep in the cylinder head. If you have any reason to believe the threads in the head are not right, use a spark plug thread chaser.
Once you are certain the plug is in right with the seal washer seated by hand, attach a torque wrench and torque to Honda specification: 18 N-m (13 ft-lb or 156 in-lb). This crushes the seal washer to seal the combustion chamber without damaging the plug.
CAUTION: 18 N-m is not much! The torque wrench should click before completing 1/2 turn. If it doesn't, STOP and investigate. If the seal washer was in contact, you should reach 18 N-m in approximatley 1/2 turn. DO NOT go beyond 3/4 of a turn for any reason!
Starting now from the right and working left, install the ignition coils and blue plugs. Lower the coil into the well. Hold it so you can slide and click on the blue electrical plug, then push it down onto the spark plug. Seat it and snug down the 10mm bolt (12 N-m). Repeat with the other 3 coils.
Now install the spark plug cover and snug down the bolts (9.8 N-m):
Remove the tape from the turbocharger outlet pipe and any other hoses you may have protected.
Lightly lube the hose and pipe fittings with silicone grease. (Don't get the grease inside the open fitting.) Holding the charge cooler by the frame, work it into the turbocharger outlet first, then into the cooler outlet pipe and onto the intake throttle body. You may have to stop and fit the bypass air clamp and pipe at some point. This takes a bit of finesse, but it will go.
Once the turbo and cooler outlet pipes are seated, line up the cooler bolt holes and snug the bolts down (12.0 N-m). Now align the turbo and cooler outlet pipe clamps with their original positions and tighten. Remember the blue clamp stop lines? Tighten until the excess clamp end reaches the blue line. If it takes more than that, Honda says replace the clamp:
Finally, attach the 5 fittings to the bypass valve in the opposite order that they were removed. Begin with the vacuum hose at the bottom. Seat the hoses all the way and reposition the clamps in their original position. When done, snap the boost sensor wire clip over the bypass pipe (review the picture to see how the clip goes on the pipe) and click on the sensor plug.
Completion should look like this:
Make sure there are no tools or objects left in the engine bay.
Attach the negative battery cable. Start the engine and check for leaks, vibration, etc. Check that the MIL and other warning lights are out.
Got the NGKs from my local Advance Auto for $13.00 each.
Cool... Last time I checked, which was a month or two ago, NGK did not sell them to the "public" and you could only get them thru the dealer for $20 something each.
That's good news!!! I hate buying from the dealer. You pay 50% more for the same Sh%%t
just replaced my plugs today. Two comments I would like to remind the DIY's.
1) make sure to cover the turbo outlets with tape or something. I didn't and when I used my compressor to blow out and clean the spark plug holes and area, pieces of sand went into the hoses. Luckily, I stopped and coved them before I did too much damage. I was able to clean the sand out
2) Also, you need an extension on the spark plug socket (5/8") that LOCKS. It took me 5 minutes to get out the socket after I torqued the plug since only the extension came out. Next time i'll tac weld them together.
I just changed mine today and it took about 1-2 hours. The trickiest part for me were the hoses. They tend to get stuck and require some work to break the seal. Also, reassembling the intercooler was tricky since the front hose did not want to get back on.
The way the instructions are written, it sounds like the spark plug well is cleaned AFTER the spark plug is removed.
Shouldn't the well be cleaned BEFORE the spark plug is removed to avoid the possibility of dirt falling into the spark plug hole?
The way the instructions are written, it sounds like the spark plug well is cleaned AFTER the spark plug is removed.
Shouldn't the well be cleaned BEFORE the spark plug is removed to avoid the possibility of dirt falling into the spark plug hole?
Yes, that's a good call. I missed that. Thanks.
Compressed air or vacuum if the plug is still in place and vacuum if the plug is out.
for clarification, when ordering these plugs don't bother adjusting the gap correct?
Correct. They come pre gapped. If you try to gap them the electrode will break and you will be out $10 for ruining the plug. I got mine from rock auto. Plan on doing them when my ets intercooler comes in.
Any noticeable gain in MPG's? I want to do this now, before I drove from Vancouver BC to Halifax NS my friends and I checked all four and one was worn more than the others but they being far more experienced than me said it should be fine and don't worry about ordering new ones. It has since been a road trip and about 25k km since then. worth the effort and cost? my car has 115,000km +/- a little on it now.
thanks for all the help. it took me 2.5 hours to do plugs. they were brown but now they are new. runs nice. changed anti freeze and trans fluid. it was a busy saturday. great pictures and explainations. thank you:
Any noticeable gain in MPG's? I want to do this now, before I drove from Vancouver BC to Halifax NS my friends and I checked all four and one was worn more than the others but they being far more experienced than me said it should be fine and don't worry about ordering new ones. It has since been a road trip and about 25k km since then. worth the effort and cost? my car has 115,000km +/- a little on it now.
I'm wondering the same. I have about 86,000 miles on mine and am thinking its about time to do this.
I did this today with the help of you're DIY and it went without a hitch and it took me about an hour an a half. The only thing I didn't do as per you're DIY was in regards to the vacuum lines for the bypass valve. Mine were pretty stuck and I didn't have a pick or a hose puller so instead I just removed the two bolts that attached the bypass valve to the TMIC. It worked fine. I assume there's no problems with doing it this way? I have test driven the car and it feels much better so if anyone can't get the lines off just do like I did and it will be fine. just don't lose the orange packing on the inter-cooler side!
Hello, I am would like to attempt to do this this weekend, but I am having trouble viewing the pictures. I know the thread is quite old but does anyone have access to these pictures and is there a way you can get them to me.
Thanks.
Hello, I am would like to attempt to do this this weekend, but I am having trouble viewing the pictures. I know the thread is quite old but does anyone have access to these pictures and is there a way you can get them to me.
Thanks.
Can't view these pics either. Looks like great info but would love to have the pics too, any ideas??
I would be happy to recreate 737 Jock's post if anyone still has the pics. I just hit 100k miles and was thinking of trying this but am nervous without pics.
I did this on my own without pics some months back. Getting the I/C off wasn't too bad - getting it back on was kind of a PITA. I can snap a pic of the I/C tomorrow and "paint" it up with some arrows pointing to what you need to remove to yank it off.
Once out of the way, each coil is held in place by a single bolt and a wire. Remove bolt, undo clip, then just use a spark plug socket and a 12" extension to remove the plugs. Reverse order to put them back in. Make sure engine is fully cold prior to doing this - it reduces the risk of stripping threads. That said, if you just take your time when putting the new plugs in you'll be fine. If you feel any un-natural resistance while turning, back it out and try again.
The absolute hardest part for me was lining the I/C back up so that both hoses slipped over the pipes. Getting the bypass valve back on can be a little tough as well if you have big hands. A close 2nd was loosening the hose clamps as depending on their orientation, it can be hard to get a socket or screwdriver on it (the screws are phillips head with a hex edge, so either works). The rest kind of fell into place after that. All in all, a 2 hour job for someone that hadn't done it before. If / when I need plugs again, it'll probably take an hour.
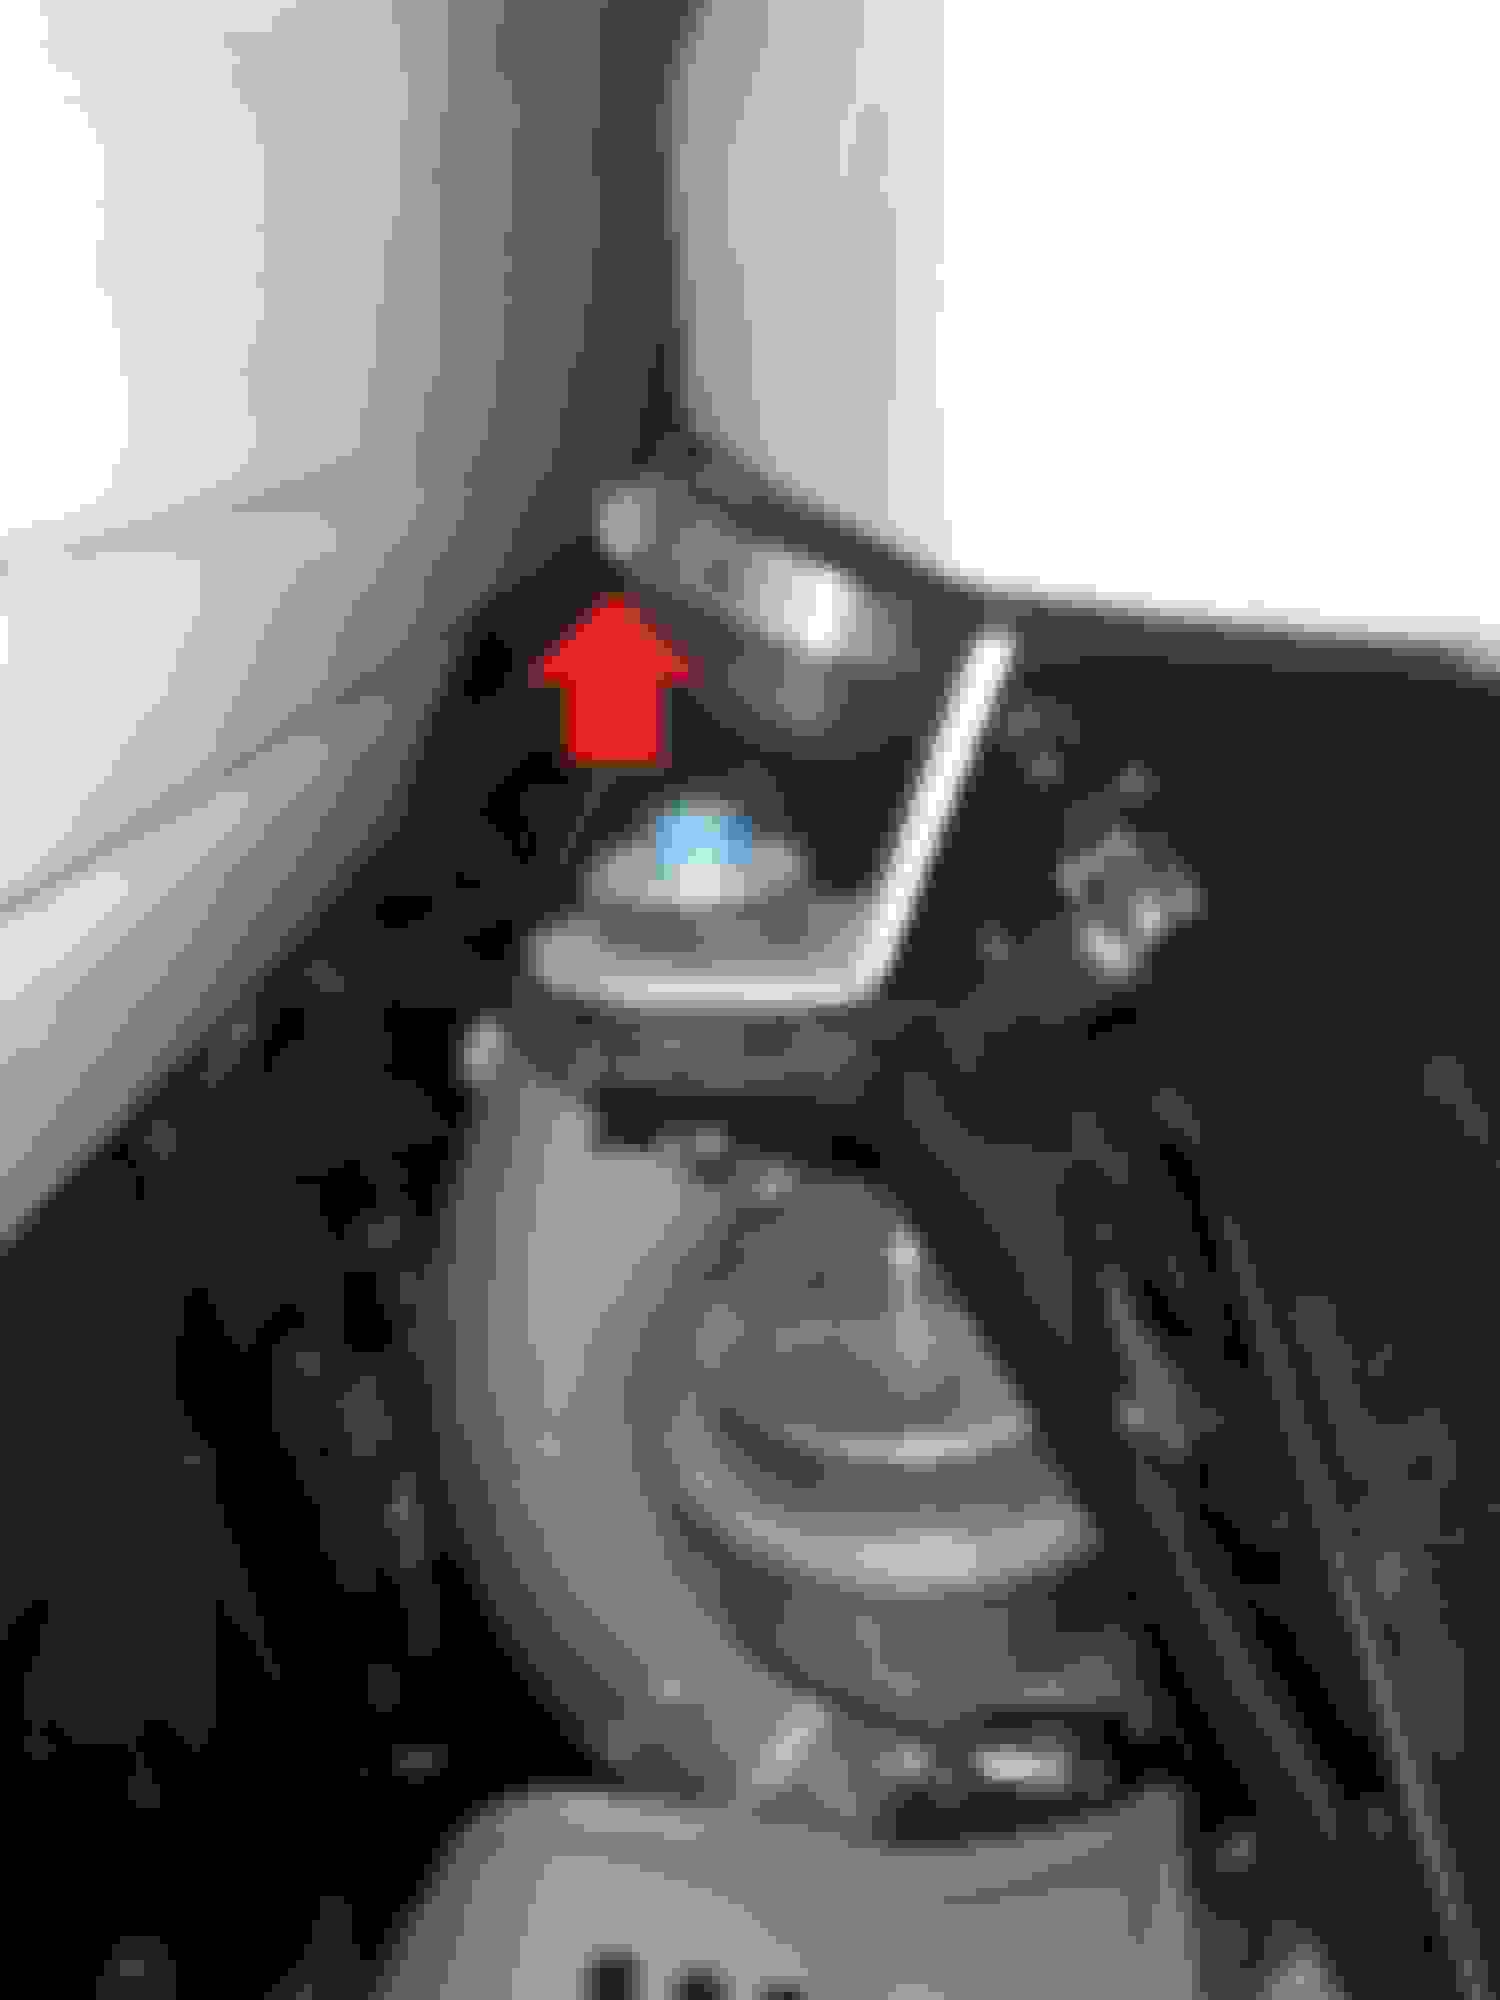
Ok, as promised here are a couple crappy pics that I hope will assist those looking to do spark plugs or anything else that requires removal of the I/C. Keep in mind this is the way *I* did it, as I think others may have gone a different route with the bypass valve. In the various arrows I drew are numbers 1, 2 and 3. Explanation as follows:
First, remove the big plastic I/C cover (not pictured). Just use a giant screwdriver or a penny to twist each plastic screw 1/4 turn and lift off. Done. Ignore the black bars on top of the I/C - they are just brackets to hold the cover and will not get in the way.
1. These are the 3 bolts that hold the I/C in place. One in the foreground and two more that weren't captured in my pic, but are roughly where the arrows point. I suggest a long, skinny socket extension - 1/4" is probably the easiest as the space is tight.
2. These two bolts hold the bypass value to the I/C. The right bolt is clearly visible, the left one is just under the valve. I'm *not* pointing to the bolt facing upwards in the pic - the one you want is under it. Again, this can be a tricky reach. Be VERY careful not to drop the bold when removing, lest it land somewhere you can't reach.
3. These are the hose clamps...front one is simple, the rear one is tough at best, insanely difficult at worst, depending on its position. You will probably come at it from the passenger side. You may want a socket joint + extension to reach it effectively.
Once all of the above are done, you should be able to pull the I/C off. I lifted from the back, pulling it out of the hose, and from there I was able to lift the whole I/C while pushing toward the back of the car to remove it from the front hose. I left both hoses on the car, but if you run into issues you can try loosing the other clamps and taking the hoses off with the I/C.
Once all is off, the actual changing of the plugs should take 10 minutes. Again, remove coils with a single bolt each and then a spark plug socket and 12" extension. I do not recall the different socket sizes needed, but as long as you have a standard metric set you'll be golden. If I recall right, you can pretty much disassemble any Honda with a 10mm.
How come whenever I click on the original post images it keeps saying "click and discover image shack"
The photos are no longer hosted by Image Shack, so they are not available. Normally you should not have to click on them. Maybe the OP will re-post them Pretty-please???
Thanks to these posts, I got adventurous and changed the plugs in my wife's RDX. I followed the second procedure of removing the bypass valve rather than disconnecting all the hoses. The rear cooler bolt and the rear hose clamps were a bit difficult. Needed to use a knuckle on the socket extension to fight with those. Had trouble getting the cooler back on and wound up pulling the rear hose from the car and attaching it to the cooler, then putting the cooler on. When installing plugs, I like to turn the new plugs counterclockwise until I feel them drop into the position where the threads will catch, then start turning clockwise. Back in the 60's had to change plugs every 10,000 miles. These had 130K - pretty amazing!
Changed the plugs on my wife's 08 a few nights ago. Was a piece of cake. Pulling the intercooler isn't a problem as long as you have 1/4" drive tools. My 3/8" extensions were too thick to easily reach the rear mounting bolts even with a swivel attached. Took me about an hour and a half from start to finish. I was really surprised how good the factory plugs looked for 100k miles. Iridium is amazing.
 09-27-2010, 01:13 PM


 ) and it will pop free of the spark plug. Place the coil in a box.


 Pretty-please???

