Console Armrest Cover Tearing/Delamination

 10-26-2012, 08:51 PM
#42

For sure. I will get a few for you tomorrow and post em up!
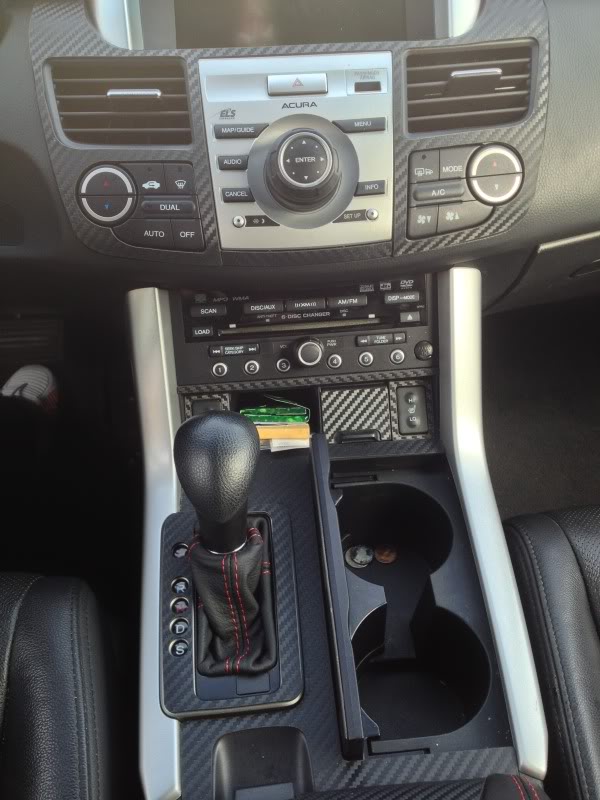
The one I have is obviously not "real" carbon fiber. I have had many real ones over the years and thought I would change it up a bit. I like this one a lot! Even though the real ones are super clean I like the low profile look of the Dinoc Carbon Fiber.
Check back tomorrow
The one I have is obviously not "real" carbon fiber. I have had many real ones over the years and thought I would change it up a bit. I like this one a lot! Even though the real ones are super clean I like the low profile look of the Dinoc Carbon Fiber.
Check back tomorrow
The following users liked this post:
vaprea (10-26-2012)
10-26-2012, 10:42 PM
#43
Instructor
For a rear wing or front lip� maybe even a hood or trunk; real carbon fiber all the way! But for interior trim, vinyl is great.
Thanks for the quick response!
Thanks for the quick response!
10-27-2012, 04:46 PM
#44
Click here for the Dash Kit pics! I didnt want to get this one going in a different direction.
Here is a pic of the shift boot installed.... This is not a mod for the faint of heart believe it or not. Had I known it was going to be as tough as it was I would have dont a write up on it. Getting the old boot off and new one on was not easy. First time I have ever seen a shift boot held captive!
Here is a pic of the shift boot installed.... This is not a mod for the faint of heart believe it or not. Had I known it was going to be as tough as it was I would have dont a write up on it. Getting the old boot off and new one on was not easy. First time I have ever seen a shift boot held captive!
11-02-2012, 11:31 PM
#46
http://www.ebay.com/itm/170920940529...84.m1439.l2649
You have to be careful when cutting it to make sure that there is enough slack for all the gear positions to be reached. Also pay close attention to how you take it all apart, its gotta go back the same way.
You will need a pretty hefty staple gun as well.
You have to be careful when cutting it to make sure that there is enough slack for all the gear positions to be reached. Also pay close attention to how you take it all apart, its gotta go back the same way.
You will need a pretty hefty staple gun as well.
11-04-2012, 07:42 PM
#47
So because my armrest was tearing and I am outside of warranty I went ahead and picked up one from Autotrimming on Ebay. Spoke to them over the phone first and was confident with them and the work they do. I also went ahead and purchased a shift boot with red stitching to match. They dont make them for the RDX but they do make them for the RSX. I plan on modding it a bit and making it work.
It takes a few minutes to take the arm rest off and then about another 30 to remove all the old staples from the OEM cover. Then it took me about 45 minutes to stretch the leather around the console and re-staple it. I used small 1/4" staples in a smaller staple gun that I have and they seemed to work well. In a few spots that where the staple was able to penetrate the plastic you can feel a little bump under the padding and leather but nothing that will poke through or be uncomfortable.
When its done it looks great! I would say deffinitly spend some extra time really pulling and streatching the leather so that its tight. You also want to make sure that the lines end up being straight when its all done.
This is what the armrest looks like, I will post up again when I get the shift boot put on this weekend.
01-07-2013, 06:21 PM
#48

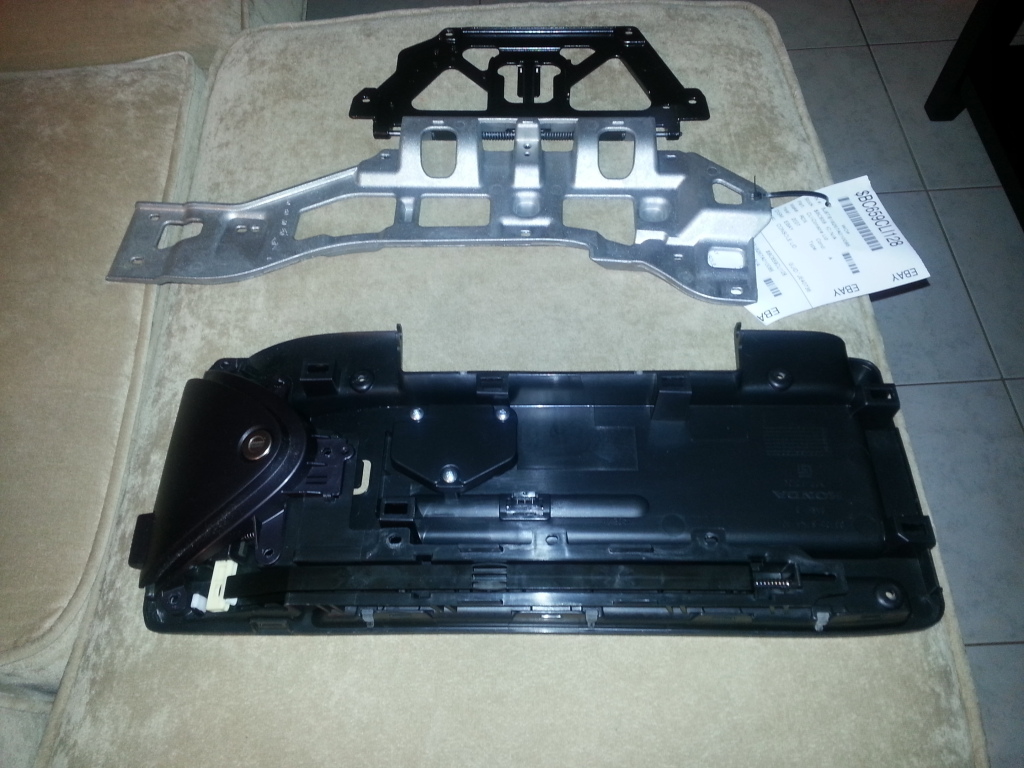
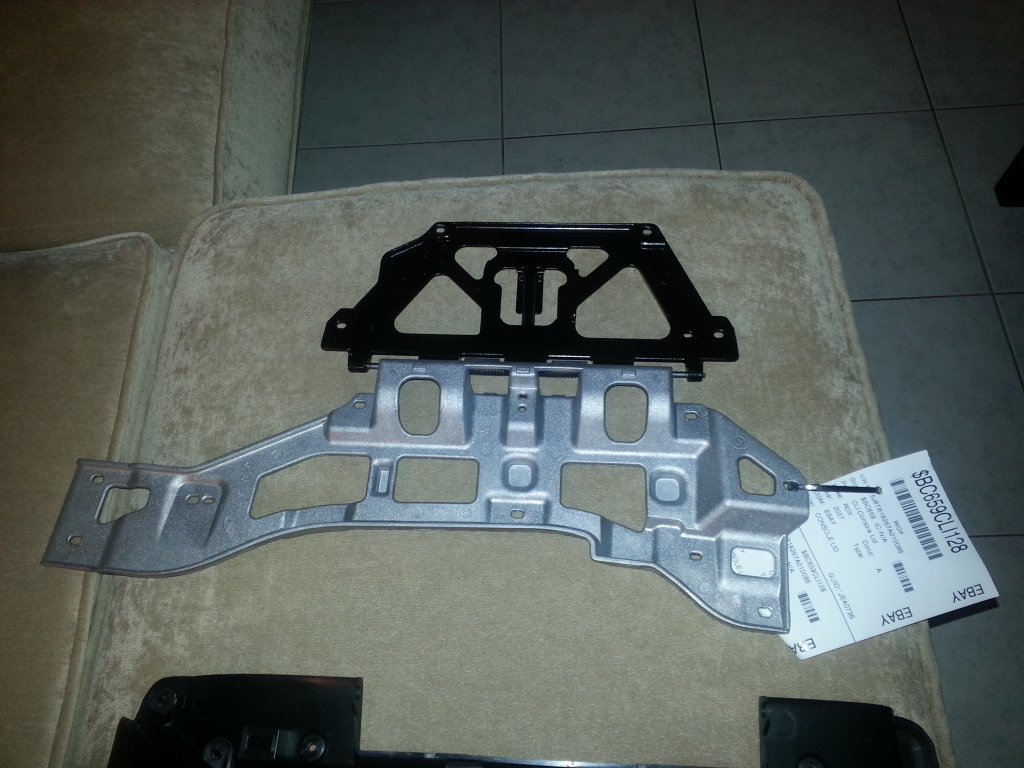
Sorry to post this Here, i tried to start a blackmarket thread but do not have the option, guess too new. Anyways, I bought an arm rest from LKQ off ebay and I have a crap load of free pieces, not sure if anyone wold want it, but hey its free. If its all going to the garbage. I am not sure is people can PM either lol. Anyways, mods if you can give me the privelage that would be great. Anyways, here are pics of armrest parts minus cover for FREEEEEE. Now I will check this thread in a few days. If you want it let me know asap. My GF has given me a 2 week timeframe to get it out of the house, women lol

07-29-2013, 04:42 PM
#49
haole kama'a-ina
Thread Starter
Well, after 2 years the replacement armrest is showing wear.
This time I'm going to take it to an upholstery shop and have it covered in furniture fabric -- possibly leather, not sure yet -- there are hundreds of choices.
Some time back, I took our kitchen chairs to this shop and he covered my Mitsu Ralliart armrest at the same time. It came out very nice and has held up well. He charged less to cover it than I would have paid for a new one.
 08-16-2013, 03:40 PM
#54
The only advice I would give is to let the leather sit out in the sun for a bit so that its just a little more flexible and pulls a little easier. I would also say not to worry about how many staples you use when putting it all back together, they all get covered up by the bottom plastic tray.
Good luck man!
08-22-2013, 08:02 PM
#55
6th Gear

Join Date: Aug 2013
Posts: 6
Likes: 0
Received 0 Likes
on
0 Posts
Just finished installing my grey armrest cover. It took 20 minutes and was real easy thanks to the great instructions listed above. Mine cost about $78 and was here in no time. Couple of follow up pointers. There are only two types of screws so you don't need to worry about mixing them up. They are obvious in their differences.
I would use a 1" gasket scraper or some other type of wide, strong, flat stock instead of a screwdriver to pry the lid off of the base. The clips pop right off with no difficulty but the wider tool gives more prying authority.
When you reinstall the cover to the base, you need to push down on the upper edge so it gets tucked inside the plastic clips on the lip. Otherwise the lid will have a slight gap where it meets the base. Look on the second picture at the yellow square. That gap will show if you dont hook the clips on the lid under the ones on the base.
This was great. Thanks a bunch for the well described instructions. I was fretting over this for a while, fearing the cost from the dealer. Now I can tell them to pound sand!!
08-22-2013, 08:07 PM
#56
6th Gear
Join Date: Aug 2013
Posts: 6
Likes: 0
Received 0 Likes
on
0 Posts
Just finished installing my grey armrest cover. It took 20 minutes and was real easy thanks to the great instructions listed above. Mine cost about $78 and was here in no time. Couple of follow up pointers. There are only two types of screws so you don't need to worry about mixing them up. They are obvious in their differences.
I would use a 1" gasket scraper or some other type of wide, strong, flat stock instead of a screwdriver to pry the lid off of the base. The clips pop right off with no difficulty but the wider tool gives more prying authority.
When you reinstall the cover to the base, you need to push down on the upper edge so it gets tucked inside the plastic clips on the lip. Otherwise the lid will have a slight gap where it meets the base. Look on the second picture at the yellow square. That gap will show if you dont hook the clips on the lid under the ones on the base.
This was great. Thanks a bunch for the well described instructions. I was fretting over this for a while, fearing the cost from the dealer. Now I can tell them to pound sand!!
I would use a 1" gasket scraper or some other type of wide, strong, flat stock instead of a screwdriver to pry the lid off of the base. The clips pop right off with no difficulty but the wider tool gives more prying authority.
When you reinstall the cover to the base, you need to push down on the upper edge so it gets tucked inside the plastic clips on the lip. Otherwise the lid will have a slight gap where it meets the base. Look on the second picture at the yellow square. That gap will show if you dont hook the clips on the lid under the ones on the base.
This was great. Thanks a bunch for the well described instructions. I was fretting over this for a while, fearing the cost from the dealer. Now I can tell them to pound sand!!
08-29-2013, 02:19 PM
#57
3rd Gear

Join Date: Aug 2013
Posts: 3
Likes: 0
Received 0 Likes
on
0 Posts
So I purchased this guy: http://www.ebay.com/itm/2007-2012-Ac...-/170916977506
and tried to staple it following EZZZZY1's instructions but hit some snags:
The only staples I could find were 1/4". What is used in the OEM are 1/8" upholstery staples which are shockingly hard to find. EZZZZY1's said they didn't really poke through (assuming he used 1/4" staples?) so I did give it a try but then the staple gun I bought (not the cheapest but not the nicest) wouldn't penetrate the plastic. Not to say that staples aren't the way to go (EZZZZY1's stapled cover looks great) but I gave up on them.
I eventually took the leather from eBay and the center console part to an upholstery shop and asked them to do it however they thought was best. They ended up gluing the whole thing but it turned out perfect and the glue + leather hasn't shown any signs of budging even in 95 degree temps with full sun on the car for 8 hours. Cost was $75 for the shop to do it. So total cost, with the leather from eBay, was $120.
A new OEM console with the standard vinyl (faux leather) cover is ~$80 to ~$100 online so I definitely paid a little more but the real leather (especially if you got the red stitching like EZZZZY1) is kinda a nice touch.
10-26-2013, 10:42 PM
#58
3rd Gear

Join Date: Aug 2010
Location: Palm Beach Gardens FL
Age: 40
Posts: 3
Likes: 0
Received 1 Like
on
1 Post
Missing Photos
I am hoping to do this repair and I noticed some of the photos are missing. Any chance you still have the photos? Any help would be much appreciated. I am planning on doing this repair for my wife.
Thank you,
Eric
Thank you,
Eric
The following users liked this post:
spineman (03-31-2015)
 03-26-2014, 02:26 PM
#60
mrgold35
My arm rest started to rip at the seams from my elbow. Went ahead and replaced with leather and the local shop did an excellent job color matching. Feels a lot better compared to the OEM thin plastic leatherette from before. It cost me $100 and they did everything (remove, fix, & replace).
04-02-2014, 11:40 AM
#61
10th Gear

Saw this in looking for a replacement for my torn one.
They are made out of leather and pretty reasonable priced if you are willing to install yourself. I messaged them and asked if they would do other colors for the stitching and will update when the reply.
http://www.ebay.com/itm/2007-2012-Ac...721b62&vxp=mtr
They are made out of leather and pretty reasonable priced if you are willing to install yourself. I messaged them and asked if they would do other colors for the stitching and will update when the reply.
http://www.ebay.com/itm/2007-2012-Ac...721b62&vxp=mtr
I didn't do quite as good of a job as you in getting everything pulled tight, but I can go back and fix that. I used a pneumatic staple gun and 1/8" staples for the install that I already had from recovering a couple dirt bike seat pans.
Just for reference, here's the staple gun I used. It's not cheap, but it is one of the few guns that will shoot down to an 1/8" staple.
22 Gauge (3/8" Crown) Fine Wire Stapler - 5/32" leg capacity
Bostitch 21671B
04-21-2014, 03:37 PM
#62

My arm rest started to rip at the seams from my elbow. Went ahead and replaced with leather and the local shop did an excellent job color matching. Feels a lot better compared to the OEM thin plastic leatherette from before. It cost me $100 and they did everything (remove, fix, & replace).
Removed it myself, had local place match color and for $100 got a new leather on e that will last forever and looks/feels great.
I had bought a few pre-fab ones on ebay and they were junk. Much better option for same price.
07-27-2014, 07:34 PM
#63
Safety Car
After going through 2 OEM armrests, I decided to try something a little different.
I removed the thin, tan vinyl covering that was peeling from the armrest. The fabric underneath is actually pretty nice. It's got the original padding and is soft to touch. It's a gray herringbone pattern that closely matches the trim on the dash.
I removed the armrest to work with it. The vinyl comes off pretty easily. Just a second or 2 with a heat gun on low, and then peel: repeat till finished. Use just enough heat to loosen the vinyl; too much will melt it and make everything harder. I peeled everything except the center stripe, which was still in good shape. Then I cleaned the fabric with Tuff Stuff upholstery cleaner.
It's been on the car for a month now and looks pretty nice; almost like it was supposed to be that way. Also softer on skin than the sweaty vinyl. It's a sturdy fabric and pretty easy to keep clean with Tuff Stuff. When the door armrest vinyl starts to peel (it's already bubbling) I plan to do the same, as that is the same material. Then the doors will match the console.

 08-21-2014, 10:57 AM
#66

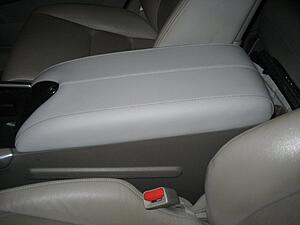
The RDX center armrest cover has had bubbles and/or been tearing.

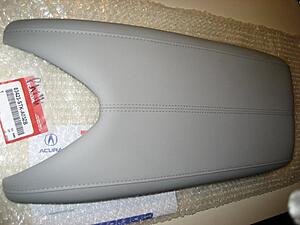
The original part was 83423-STK-A01ZB for gray and 83423-STK-A01ZA for black. If you are getting yours replaced be aware the original parts are still available.
However, Acura has revised the part with a new part number. Revision means they have developed a fix. The new part numbers are 83423-STK-A03ZB for gray and 83423-STK-A02ZA for black. Make sure you get the new parts.
If you are out of warranty, the gray one is available at internet Acura dealers for only about $18 to $22. The black one is much more (about $70). So far no one has been able to explain why.
Will post a replacement DIY when I get the part.
10-01-2014, 02:22 PM
#67
1st Gear

Join Date: Oct 2014
Posts: 1
Likes: 0
Received 0 Likes
on
0 Posts
Hi 737 Jock - I have to install a new center arm rest in my wife's 2007 RDX - I have this part:
- would you mind posting your installation instructions again as none of the images load anymore - too old a post maybe?
Would really appreciate the help as I can't find the info anywhere else.
Thanks in advance!!
A
Would really appreciate the help as I can't find the info anywhere else.
Thanks in advance!!
A

 05-01-2015, 11:28 AM
#72
1st Gear

Join Date: May 2015
Posts: 1
Likes: 0
Received 0 Likes
on
0 Posts
Trying to DIY..need images from previous post
Can someone please provide the images/pictures in the post from Jock 737 on 7-30-2010. The information there is very useful, but the imageshack frogs just suck !! 
 07-04-2015, 06:12 PM
#74

My vinyl armrest is also peeling and coming apart. I found the leather part on ebay and it costs the same as the vinyl, around $27, and looks much better. I think the leather will hold better. But I'm unwilling to ask an upholstery shop here in LA, it'll cost an arm and a leg, labor is too expensive here.
The installation involves some effort based on the reports here. Especially the stapling of the leather under the plastic cover.
I too cannot see 737's DIY photos.
The installation involves some effort based on the reports here. Especially the stapling of the leather under the plastic cover.
I too cannot see 737's DIY photos.
07-06-2015, 10:48 AM
#75

It shouldn't be TOO bad...I had an upholstery shop here replace the piece with leather for 100 bucks, including parts. I'm sure I could have done it myself, but I doubt I'd make it look as good as they did.
07-11-2015, 08:06 PM
#76

I did the replacement this evening on my wife's 2007 RDX; took about 20 minutes total.
The following 3 users liked this post by peg1104:
07-13-2015, 04:02 PM
#77

My center armrest was peeling. So I took it off and went to the local fabric store. I found some vinyl that was a perfect color match. All my staples were too long to use on the armrest. So I just use contact cement and stretched and pulled the material over the armrest. I also wanted some more padding so I installed some under the vinyl so I just used contact cement and stretched and pulled the material over the armrest. The only problem with the extra padded armrest is it hits the passenger seat so you can't leave it up. The whole thing cost me eight bucks and so far nobody has noticed that it is not original. It has been working for four months now.
Mike
Mike
11-13-2015, 05:22 PM
#78

I'm a new member, tried to view the pictures for this, but they will not open. I have a 2010 RDX and the center console lid is all tore up, so I bought replacement fabric for it, but I can't figure out how to remove it. Any help??
First, be sure you get the new part number. Here is the new gray armrest cover:

You will need a #2 cross-tip screwdriver. Make sure you retain all screws and don't mix them up. I use labeled baggies.
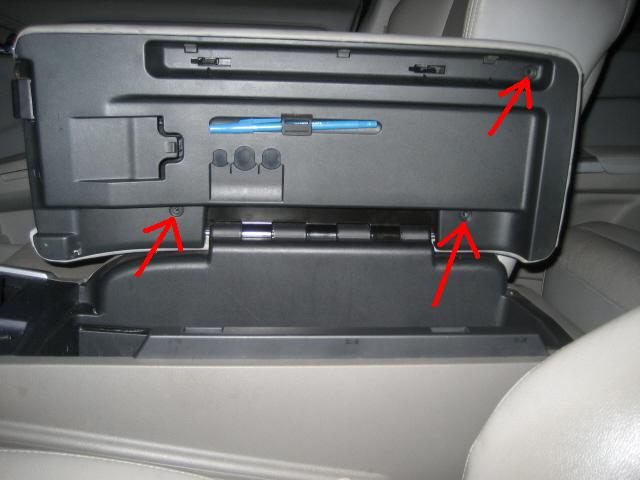
Move the driver seat down and back; ie, out of the way. Open the console/armrest door. It will remain in the full open position.
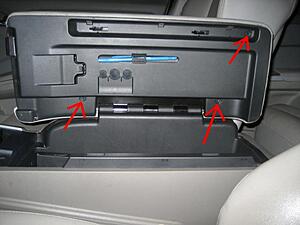
With a #2 cross-tip screwdriver, remove the three base retaining screws (red arrows):

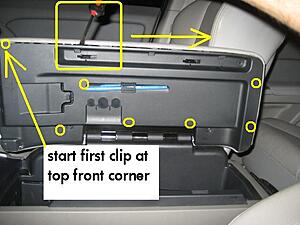
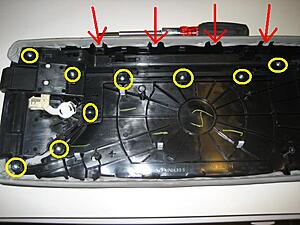
There are 7 plastic clips holding the base to the cover and the hinge is sandwiched in between the base and cover. First you must remove the base by prying out the seven plastic clips. Their locations behind the base are circled in yellow below. Start at the top front corner GENTLY prying out the first clip, then work along the top edge, loosening as you go. The base will catch on the lock hooks -- slide the hooks back to free it. Pry down along the rear edge and the base should come free:

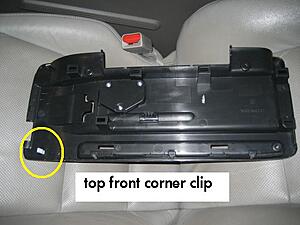
Here is the inside of the base, showing the top front corner clip. This is the only clip that is on the base (the other 6 clips are on the cover):

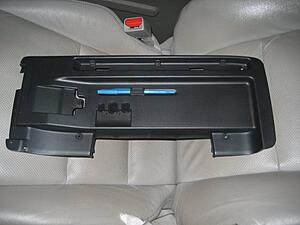
The base will be re-used. Set it aside:

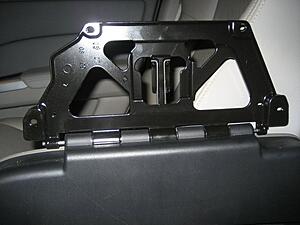
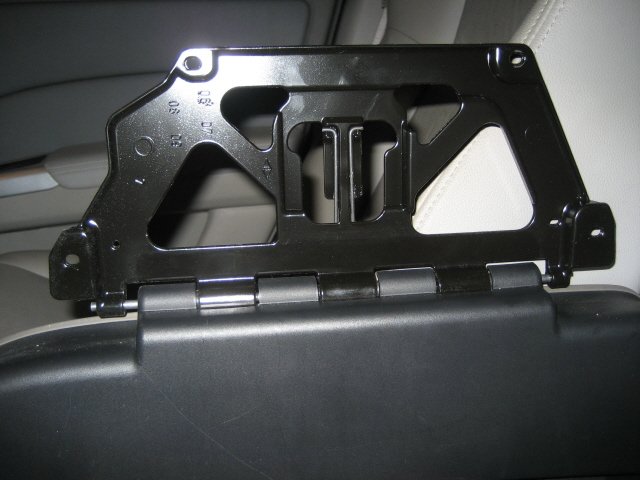
Now you can remove the cover from the hinge. Remove the 2 screws (red arrows) at the top of the hinge:

Tilt the lid closed enough to lift off the cover. The hinge spring will return it to upright:

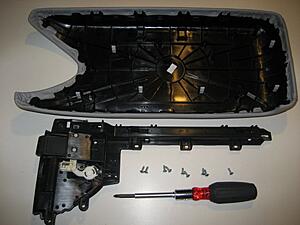
You must remove the lock assembly from the old cover and attach it to the new one. Remove the 9 screws from the lock assembly (yellow circles). Tilt the lock assembly up and out from under the plastic tabs on the cover (red arrows):

Here is the lock assembly ready to be installed into the new cover. You can also see the other six plastic clips inside the new cover:

Now just reverse the previous steps.
IMPORTANT; the metal screws will be installed in plastic. Turn each screw down till the head contacts the plastic, then snug it a little. DO NOT OVER TIGHTEN
Tilt the lock assembly in and under the tabs on the new cover. Work it gently into place and install the 9 screws.
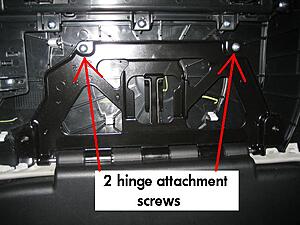
Tilt the hinge enough to install the new cover. Work it into place until the screw holes line up. It has guide pins which will help align it. Install the 2 hinge attachment screws.
Now try closing the lid. It should close and latch. If it doesn't latch, recheck your lock assembly install. It may rattle a little -- that's OK -- the base has bumpers which will fix that.
Now open again and note where the plastic clips are on the cover and base. Work the base into position and slip it over the lock hooks so that the hooks protrude through the slots in the base.
Support the cover from behind and press the clips in, pushing at the clip locations.
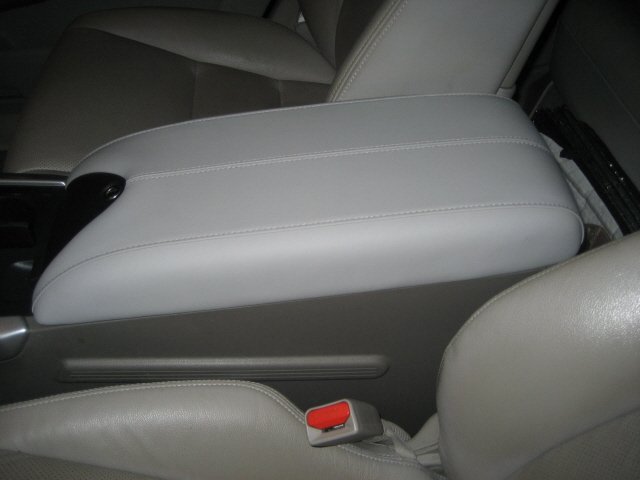
Install the 3 base retaining screws. Ask wife to come see her new armrest:

You will need a #2 cross-tip screwdriver. Make sure you retain all screws and don't mix them up. I use labeled baggies.
Move the driver seat down and back; ie, out of the way. Open the console/armrest door. It will remain in the full open position.
With a #2 cross-tip screwdriver, remove the three base retaining screws (red arrows):
There are 7 plastic clips holding the base to the cover and the hinge is sandwiched in between the base and cover. First you must remove the base by prying out the seven plastic clips. Their locations behind the base are circled in yellow below. Start at the top front corner GENTLY prying out the first clip, then work along the top edge, loosening as you go. The base will catch on the lock hooks -- slide the hooks back to free it. Pry down along the rear edge and the base should come free:
Here is the inside of the base, showing the top front corner clip. This is the only clip that is on the base (the other 6 clips are on the cover):
The base will be re-used. Set it aside:
Now you can remove the cover from the hinge. Remove the 2 screws (red arrows) at the top of the hinge:
Tilt the lid closed enough to lift off the cover. The hinge spring will return it to upright:
You must remove the lock assembly from the old cover and attach it to the new one. Remove the 9 screws from the lock assembly (yellow circles). Tilt the lock assembly up and out from under the plastic tabs on the cover (red arrows):
Here is the lock assembly ready to be installed into the new cover. You can also see the other six plastic clips inside the new cover:
Now just reverse the previous steps.
IMPORTANT; the metal screws will be installed in plastic. Turn each screw down till the head contacts the plastic, then snug it a little. DO NOT OVER TIGHTEN
Tilt the lock assembly in and under the tabs on the new cover. Work it gently into place and install the 9 screws.
Tilt the hinge enough to install the new cover. Work it into place until the screw holes line up. It has guide pins which will help align it. Install the 2 hinge attachment screws.
Now try closing the lid. It should close and latch. If it doesn't latch, recheck your lock assembly install. It may rattle a little -- that's OK -- the base has bumpers which will fix that.
Now open again and note where the plastic clips are on the cover and base. Work the base into position and slip it over the lock hooks so that the hooks protrude through the slots in the base.
Support the cover from behind and press the clips in, pushing at the clip locations.
Install the 3 base retaining screws. Ask wife to come see her new armrest:
01-03-2016, 10:48 PM
#79

Now with images!
I was able to find another page (in another language) that appears to have all of the original pictures: ��������� ��� ��� - International Acura Club
I did the replacement this evening on my wife's 2007 RDX; took about 20 minutes total.
I did the replacement this evening on my wife's 2007 RDX; took about 20 minutes total.
How To: Install New RDX Arm Rest Cover
- First, be sure you get the new part number. Here is the new gray armrest cover:
- You will need a #2 cross-tip screwdriver. Make sure you retain all screws and don't mix them up. I use labeled baggies.
- Move the driver seat down and back; ie, out of the way. Open the console/armrest door. It will remain in the full open position.
- With a #2 cross-tip screwdriver, remove the three base retaining screws (red arrows):
- There are 7 plastic clips holding the base to the cover and the hinge is sandwiched in between the base and cover. First you must remove the base by prying out the seven plastic clips. Their locations behind the base are circled in yellow below. Start at the top front corner GENTLY prying out the first clip, then work along the top edge, loosening as you go. The base will catch on the lock hooks -- slide the hooks back to free it. Pry down along the rear edge and the base should come free:
- Here is the inside of the base, showing the top front corner clip. This is the only clip that is on the base (the other 6 clips are on the cover):
- The base will be re-used. Set it aside:
- Now you can remove the cover from the hinge. Remove the 2 screws (red arrows) at the top of the hinge:
- Tilt the lid closed enough to lift off the cover. The hinge spring will return it to upright:
- You must remove the lock assembly from the old cover and attach it to the new one. Remove the 9 screws from the lock assembly (yellow circles). Tilt the lock assembly up and out from under the plastic tabs on the cover (red arrows):
- Here is the lock assembly ready to be installed into the new cover. You can also see the other six plastic clips inside the new cover:
- Now just reverse the previous steps.
- IMPORTANT; the metal screws will be installed in plastic. Turn each screw down till the head contacts the plastic, then snug it a little. DO NOT OVER TIGHTEN
- Tilt the lock assembly in and under the tabs on the new cover. Work it gently into place and install the 9 screws.
- Tilt the hinge enough to install the new cover. Work it into place until the screw holes line up. It has guide pins which will help align it. Install the 2 hinge attachment screws.
- Now try closing the lid. It should close and latch. If it doesn't latch, recheck your lock assembly install. It may rattle a little -- that's OK -- the base has bumpers which will fix that.
- Now open again and note where the plastic clips are on the cover and base. Work the base into position and slip it over the lock hooks so that the hooks protrude through the slots in the base.
- Support the cover from behind and press the clips in, pushing at the clip locations.
- Install the 3 base retaining screws. Ask wife to come see her new armrest:


The following 6 users liked this post by Hammed_Man:
dP- (08-03-2023),
Kaputnik (01-03-2016),
Kenji_BKNY (09-04-2020),
markmass (01-29-2019),
red00tl (07-10-2016),
and 1 others liked this post.
01-03-2016, 11:33 PM
#80
^^Thanks brother! Many thanks for resurrecting this with the original photos.
My cover is perfect on my 2008, so I suspect it was replaced at some point. But I need to open it up and put some thick grease or something on the lock assembly movable bits. It's got a rattle from hell intent on driving me insane. Of course my wife's auditory range cannot detect it, and she just rolls her eyes at me.
My cover is perfect on my 2008, so I suspect it was replaced at some point. But I need to open it up and put some thick grease or something on the lock assembly movable bits. It's got a rattle from hell intent on driving me insane. Of course my wife's auditory range cannot detect it, and she just rolls her eyes at me.

