
How to remove overhead console?
 08-05-2004, 10:13 AM
#1
Instructor
Thread Starter

How to remove overhead console?
I searched and the only hardwire V1 installs I found is where they ran the wires through the A-pillar. In my 330ci, I hardwired the V1 using the power from the moonroof, via the overhead console. Is this possible with the TL? I was wondering because I haven't found anyone who has done it yet? If it's possible, I'll probably try and do it tonight.
Thanks,
-Brandon
Thanks,
-Brandon

 08-05-2004, 10:38 AM
#3
Instructor
Thread Starter
But the V1 comes with the hardwire kit which allows you to tap into the wires. You can just remove that wire tapper thing(I forogt what it's called) if you ever want to un-hardwire your V1.
I'll have to check it out.
Thanks,
-Brandon
I'll have to check it out.
Thanks,
-Brandon
08-05-2004, 12:38 PM
#4
Advanced

Join Date: Jun 2004
Location: Lewisville, TX
Posts: 61
Likes: 0
Received 0 Likes
on
0 Posts
It definitely is possible, that is how I have mine wired. You have to take out the map lights and the reflector plates to get the screws out. That took me forever to figure out.
08-05-2004, 01:02 PM
#5
I do my own work.
Join Date: Jul 2004
Location: ATL
Age: 42
Posts: 1,488
Likes: 0
Received 0 Likes
on
0 Posts
Originally Posted by stocks2k
.....have to take out the map lights and the reflector plates to get the screws out. That took me forever to figure out.
08-05-2004, 03:11 PM
#6
Instructor
Join Date: Jun 2004
Location: Pittsburg, CA
Age: 45
Posts: 242
Likes: 0
Received 0 Likes
on
0 Posts
Used V-1 (1999) for $275 or New Escort 8500 x50?
Do you think it's worth it to buy a used V-1 for $275? It was bought brand new in 1999. or Should I get Escort 8500 x50 instead? Thanks,
08-05-2004, 03:37 PM
#7
Instructor
Thread Starter
Originally Posted by stocks2k
It definitely is possible, that is how I have mine wired. You have to take out the map lights and the reflector plates to get the screws out. That took me forever to figure out.
Thanks!
-Brandon
Trending Topics
08-05-2004, 07:58 PM
#8
Instructor
Thread Starter
How to remove overhead console?
Anyone have tips or a how to on removing the overhead console where the lights and sunroof controls are? I am going to hardwire my V1 up there. Any help would be appreciated.
Thanks,
-Brandon
Thanks,
-Brandon
08-05-2004, 08:06 PM
#9
Powered by Guinness

Join Date: Mar 2004
Location: Stockton, CA
Age: 54
Posts: 1,541
Likes: 0
Received 2 Likes
on
2 Posts
It consists of two sections - the 'switch and light section' and the frame. The switch section just pops out - there is one clip that hold it in, then disconnect the wiring harness connectors. The frame has four screws holding it in. 
08-06-2004, 08:57 AM
#10
Advanced
Join Date: Jun 2004
Location: Lewisville, TX
Posts: 61
Likes: 0
Received 0 Likes
on
0 Posts
Pop out the clear map light lenses with a butter knife then you have to "bend" the silver reflectors to remove them from the console. Remove the 4 screws holding the assembly to the roof. I don' remember what wires I used, but I think they were to the sunroof because my radar stays powered on until I open the drivers door just like the windows and sunroof. I just used a volt meter to find the correct wirs.
08-06-2004, 09:28 AM
#11
Instructor
Thread Starter
I got the light lense out, but I can not get those reflectors out. It's like they are glued in the middle or something. I can get the top and bottom edges out, but the middle is in there tight. I don't want to break something on a 2-day old car! Any advice?
Thanks,
-Brandon
Thanks,
-Brandon
08-06-2004, 10:34 AM
#12
To remove the entire console: (Note: The Service Manual is confusing me here, because it looks like they give two different procedures, so I will give you both and you can use the one that works best for you. I don't have the ambition to try and remove my console just so I can see which works.)
Procedure #1: (Note: As reported by Aegir in the next post, this one works)
1. Remove the moonroof switch.
2. Carefully pull down the roof console.
3. Disconnect the 20P connector from the roof console.
Procedure #2:
1. Carefully pry off each lens with a small screwdriver.
2. Remove the 4 bolts securing the roof console.
3. Pull out the roof console, then disconnect the HFL unit connector.
If someone does this, let me know exactly which procedure you used and I will try and get the info into the 3G Garage.
edit added 7/14/2005:
Also see F-103: Visor area rattle (removal of SunVisor, map light console, front/rear map light)
https://acurazine.com/forums/showthread.php?t=100981
 08-06-2004, 04:23 PM
#13
Powered by Guinness
Join Date: Mar 2004
Location: Stockton, CA
Age: 54
Posts: 1,541
Likes: 0
Received 2 Likes
on
2 Posts
Originally Posted by Ron A
To remove the entire console: (Note: The Service Manual is confusing me here, because it looks like they give two different procedures, so I will give you both and you can use the one that works best for you. I don't have the ambition to try and remove my console just so I can see which works.)
Procedure #1:
1. Remove the moonroof switch. (Note: As reported by Aegir in the next post, this one works)
2. Carefully pull down the roof console.
3. Disconnect the 20P connector from the roof console.
Procedure #2:
1. Carefully pry off each lens with a small screwdriver.
2. Remove the 4 bolts securing the roof console.
3. Pull out the roof console, then disconnect the HFL unit connector.
If someone does this, let me know exactly which procedure you used and I will try and get the info into the 3G Garage.
08-06-2004, 10:05 PM
#14
Originally Posted by Aegir
It's basically Procedure 1, but even easier. Just pull the roof console from the frame. The two harness connectors can then be disconnected. It's that easy.
08-07-2004, 10:51 AM
#15
Instructor
Thread Starter
I removed the lense covers and tried to remove the reflectors. When I pulled on them hard enough, the entire piece came out. Then all you have to do is remove the 4 bolts and the frame comes out.
-Brandon
-Brandon
 08-16-2004, 02:33 PM
#17
I do my own work.
Join Date: Jul 2004
Location: ATL
Age: 42
Posts: 1,488
Likes: 0
Received 0 Likes
on
0 Posts
Originally Posted by lstepnio
Which wire are you guys tapping for ignition switched 12V+?
08-17-2004, 08:49 AM
#19
I do my own work.
Join Date: Jul 2004
Location: ATL
Age: 42
Posts: 1,488
Likes: 0
Received 0 Likes
on
0 Posts
Originally Posted by brandonb
I used the power wire of the moonroof controls. It's the green wire on the very end. Hope this helps.
-Brandon
-Brandon
That's exactly what I was looking for. Thanks a lot.
01-19-2008, 02:23 PM
#20
Switched 12VDC power in the moon roof console
Guys,
I though this may help. Remember the key is to get the moonroof switch out without damage. Use a feeler gauge to push the latch in and the switch falls out no problem. I will show the whole process below:
This is the feeler gauge. Whatever you use has to be thin enough to slip between the switch body and the moon roof console housing.

Insert the blade into the gap at the top of the switch body.

As you push the blade in the switch will pop out as soon as the latch disengages.


Pull the switch out and then detach it from the connector by pressing in on the center catch on the switch. This will allow the connector to come out. Once the switch is out pull down on the top of the panel from inside of the switch mounting hole and the whole panel will pop out. It only has one center mounted clip and comes out very easily.

The three wire connector that goes to the auto-dimming mirror is the best place to get power. Push the Invisicord probes into the back of the connector. You can see the red and white wire of the Invisicord coming in from the left side of the blue connector. Black is ground, Yellow/green is switched +12VDC from the ignition. You can use wire ties to secure the invisidord wire to the mirror power so the Invisicord connectors do not get pulled out.

I used mine for a radar detector, It�s a Done deal

I though this may help. Remember the key is to get the moonroof switch out without damage. Use a feeler gauge to push the latch in and the switch falls out no problem. I will show the whole process below:
This is the feeler gauge. Whatever you use has to be thin enough to slip between the switch body and the moon roof console housing.
Insert the blade into the gap at the top of the switch body.
As you push the blade in the switch will pop out as soon as the latch disengages.
Pull the switch out and then detach it from the connector by pressing in on the center catch on the switch. This will allow the connector to come out. Once the switch is out pull down on the top of the panel from inside of the switch mounting hole and the whole panel will pop out. It only has one center mounted clip and comes out very easily.
The three wire connector that goes to the auto-dimming mirror is the best place to get power. Push the Invisicord probes into the back of the connector. You can see the red and white wire of the Invisicord coming in from the left side of the blue connector. Black is ground, Yellow/green is switched +12VDC from the ignition. You can use wire ties to secure the invisidord wire to the mirror power so the Invisicord connectors do not get pulled out.
I used mine for a radar detector, It�s a Done deal
The following users liked this post:
kfanciulli (08-13-2014)
05-24-2008, 10:49 AM
#22
1st Gear

Join Date: May 2008
Age: 58
Posts: 1
Likes: 0
Received 0 Likes
on
0 Posts
Originally Posted by brandonb
I used the power wire of the moonroof controls. It's the green wire on the very end. Hope this helps.
-Brandon
-Brandon
Thanks for the pics
 05-12-2009, 09:30 PM
#24
Pro
I removed the overhead console by popping out the dome lights, taking out the bulbs and the reflectors (be careful with those), this exposes 4 bolts, and the whole thing comes down. I used an invisicord to plug into the back of the green connector, the ground i just put under one of the bolts. I was very easy and works great, a plus is that it's powered with the key. It's very easy with the invisicord and I didn't see the feeler gauge option when I did mine, that looks really easy
05-16-2009, 04:46 PM
#25
5th Gear

Join Date: Mar 2009
Age: 41
Posts: 5
Likes: 0
Received 0 Likes
on
0 Posts
07-19-2009, 09:59 PM
#26
Modding my TL in
Join Date: Jun 2005
Location: Chicago SW Burbs
Age: 51
Posts: 317
Likes: 0
Received 1 Like
on
1 Post
Sorry to resurrect an old threat, but I decided after four and a half years to relocate my radar detector from the dash to under the rear view mirror.
I had some aluminum bars hanging around so I made a custom mount for my radar detector (going to upgrade soon). I basically bent a piece of aluminum and slid it between the glass and the overhead console and up towards the middle. I drilled a hole through the bar to the metal on the roof to secure it in place. I then covered the new bracket with black spray paint then the soft part of velcro.
Here is the result:
02-21-2010, 03:28 PM
#27
Just hard wired my V1 today and have it suction cupped to the window near the rear view mirror. The pictures and details on how to remove the stuff to get power it made it so easy. FYI you can stuff the V1 connection block and wires on the hidden out of sight on the passenger side of the bracket that helps hold the center consul that is around the dome lights near the mirror. If you remove the four 8mm bolts that hold the plastic case behind the lights you will see what I'm referring to.
02-22-2010, 12:48 PM
#28

you guys are taking the overhead console the hard way!
on the right side of the white lights, you need a thin screwdriver.
stick it in the little crease next to the light and wiggle the whole center piece comes out in about 2 seconds!
then you can play with all the wires in there.
i just took it down to disconnect my hands free (pioneer double din will handle that)
took me about 4 mins flat.
12-05-2013, 08:18 AM
#32
Advanced

Join Date: Nov 2013
Posts: 50
Likes: 0
Received 0 Likes
on
0 Posts
Potentially stupid question, but if your auto dim is turned off will the radar detector still get power? I hate auto dim, it's always turned off.
Guys,
I though this may help. Remember the key is to get the moonroof switch out without damage. Use a feeler gauge to push the latch in and the switch falls out no problem. I will show the whole process below:
This is the feeler gauge. Whatever you use has to be thin enough to slip between the switch body and the moon roof console housing.

Insert the blade into the gap at the top of the switch body.

As you push the blade in the switch will pop out as soon as the latch disengages.


Pull the switch out and then detach it from the connector by pressing in on the center catch on the switch. This will allow the connector to come out. Once the switch is out pull down on the top of the panel from inside of the switch mounting hole and the whole panel will pop out. It only has one center mounted clip and comes out very easily.

The three wire connector that goes to the auto-dimming mirror is the best place to get power. Push the Invisicord probes into the back of the connector. You can see the red and white wire of the Invisicord coming in from the left side of the blue connector. Black is ground, Yellow/green is switched +12VDC from the ignition. You can use wire ties to secure the invisidord wire to the mirror power so the Invisicord connectors do not get pulled out.

I used mine for a radar detector, It�s a Done deal

I though this may help. Remember the key is to get the moonroof switch out without damage. Use a feeler gauge to push the latch in and the switch falls out no problem. I will show the whole process below:
This is the feeler gauge. Whatever you use has to be thin enough to slip between the switch body and the moon roof console housing.
Insert the blade into the gap at the top of the switch body.
As you push the blade in the switch will pop out as soon as the latch disengages.
Pull the switch out and then detach it from the connector by pressing in on the center catch on the switch. This will allow the connector to come out. Once the switch is out pull down on the top of the panel from inside of the switch mounting hole and the whole panel will pop out. It only has one center mounted clip and comes out very easily.
The three wire connector that goes to the auto-dimming mirror is the best place to get power. Push the Invisicord probes into the back of the connector. You can see the red and white wire of the Invisicord coming in from the left side of the blue connector. Black is ground, Yellow/green is switched +12VDC from the ignition. You can use wire ties to secure the invisidord wire to the mirror power so the Invisicord connectors do not get pulled out.
I used mine for a radar detector, It�s a Done deal

 08-13-2014, 11:24 PM
#37
Thanks for the help! Of course, before I searched the forum I tried removing the console by tugging on the OUTER portion and broke two of the four mounting tabs off
 . Spent more time JB Welding those back on than I did wiring my V1!
Very clean final result.
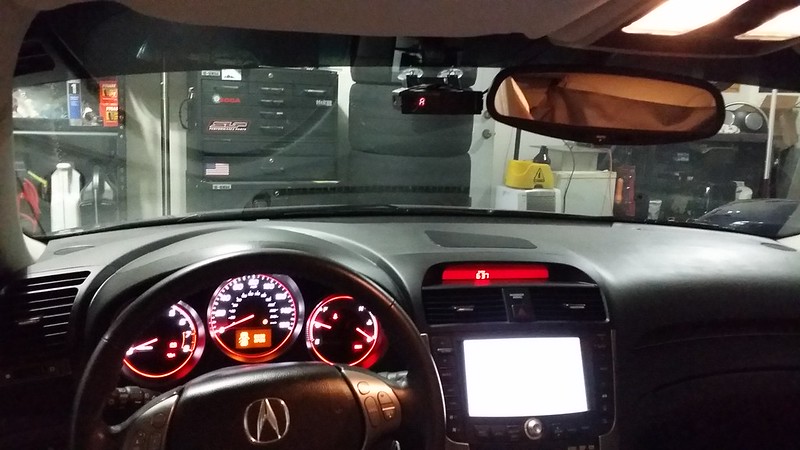 v1hardwire by kfanciu, on Flickr
2003 Porsche 911 Turbo [pics] UMW 1-bar ECU tune | H&R Coilovers & 24mm rear sway | CCW C10's 235f/315r
2008 Acura TL Type S 6MT [pics]
ex's: '01 BMW M5, '08 G37S Coupe 6MT, ''98 Trans Am WS6 M6, '98 Trans Am M6 conv't, '97 Mustang Cobra conv't, '92 Stealth Twin Turbo
The following users liked this post:
EvilVirus (08-14-2014)
 08-14-2014, 06:01 PM
#39
[x] FWCC [x]
Lucky u guys can use your radar -.-...i got a cobra one i spent $350 on a few yrs ago and i barely use it since here in NYC the law is pretty strict with them.


Thread
Thread Starter
Forum
Replies
Last Post
mlody
5G TLX (2015-2020)
85
12-04-2019 02:11 PM
InFaMouSLink
Car Parts for Sale
6
10-27-2015 06:52 PM

