Console Armrest Cover Tearing/Delamination
 07-03-2010, 01:53 PM
#1
haole kama'a-ina
Thread Starter
Console Armrest Cover Tearing/Delamination
The RDX center armrest cover has had bubbles and/or been tearing.

The original part was 83423-STK-A01ZB for gray and 83423-STK-A01ZA for black. If you are getting yours replaced be aware the original parts are still available.
However, Acura has revised the part with a new part number. Revision means they have developed a fix. The new part numbers are 83423-STK-A03ZB for gray and 83423-STK-A02ZA for black. Make sure you get the new parts.
If you are out of warranty, the gray one is available at internet Acura dealers for only about $18 to $22. The black one is much more (about $70). So far no one has been able to explain why.
Will post a replacement DIY when I get the part.

The following users liked this post:
Lucky52 (08-21-2014)

 07-30-2010, 10:39 AM
#7
haole kama'a-ina
Thread Starter
Replacing the Armrest Cover
First, be sure you get the new part number. Here is the new gray armrest cover:

You will need a #2 cross-tip screwdriver. Make sure you retain all screws and don't mix them up. I use labeled baggies.
Move the driver seat down and back; ie, out of the way. Open the console/armrest door. It will remain in the full open position.
With a #2 cross-tip screwdriver, remove the three base retaining screws (red arrows):

There are 7 plastic clips holding the base to the cover and the hinge is sandwiched in between the base and cover. First you must remove the base by prying out the seven plastic clips. Their locations behind the base are circled in yellow below. Start at the top front corner GENTLY prying out the first clip, then work along the top edge, loosening as you go. The base will catch on the lock hooks -- slide the hooks back to free it. Pry down along the rear edge and the base should come free:

Here is the inside of the base, showing the top front corner clip. This is the only clip that is on the base (the other 6 clips are on the cover):

The base will be re-used. Set it aside:

Now you can remove the cover from the hinge. Remove the 2 screws (red arrows) at the top of the hinge:

Tilt the lid closed enough to lift off the cover. The hinge spring will return it to upright:

You must remove the lock assembly from the old cover and attach it to the new one. Remove the 9 screws from the lock assembly (yellow circles). Tilt the lock assembly up and out from under the plastic tabs on the cover (red arrows):

Here is the lock assembly ready to be installed into the new cover. You can also see the other six plastic clips inside the new cover:

Now just reverse the previous steps.
IMPORTANT; the metal screws will be installed in plastic. Turn each screw down till the head contacts the plastic, then snug it a little. DO NOT OVER TIGHTEN
Tilt the lock assembly in and under the tabs on the new cover. Work it gently into place and install the 9 screws.
Tilt the hinge enough to install the new cover. Work it into place until the screw holes line up. It has guide pins which will help align it. Install the 2 hinge attachment screws.
Now try closing the lid. It should close and latch. If it doesn't latch, recheck your lock assembly install. It may rattle a little -- that's OK -- the base has bumpers which will fix that.
Now open again and note where the plastic clips are on the cover and base. Work the base into position and slip it over the lock hooks so that the hooks protrude through the slots in the base.
Support the cover from behind and press the clips in, pushing at the clip locations.
Install the 3 base retaining screws. Ask wife to come see her new armrest:

You will need a #2 cross-tip screwdriver. Make sure you retain all screws and don't mix them up. I use labeled baggies.
Move the driver seat down and back; ie, out of the way. Open the console/armrest door. It will remain in the full open position.
With a #2 cross-tip screwdriver, remove the three base retaining screws (red arrows):
There are 7 plastic clips holding the base to the cover and the hinge is sandwiched in between the base and cover. First you must remove the base by prying out the seven plastic clips. Their locations behind the base are circled in yellow below. Start at the top front corner GENTLY prying out the first clip, then work along the top edge, loosening as you go. The base will catch on the lock hooks -- slide the hooks back to free it. Pry down along the rear edge and the base should come free:
Here is the inside of the base, showing the top front corner clip. This is the only clip that is on the base (the other 6 clips are on the cover):
The base will be re-used. Set it aside:
Now you can remove the cover from the hinge. Remove the 2 screws (red arrows) at the top of the hinge:
Tilt the lid closed enough to lift off the cover. The hinge spring will return it to upright:
You must remove the lock assembly from the old cover and attach it to the new one. Remove the 9 screws from the lock assembly (yellow circles). Tilt the lock assembly up and out from under the plastic tabs on the cover (red arrows):
Here is the lock assembly ready to be installed into the new cover. You can also see the other six plastic clips inside the new cover:
Now just reverse the previous steps.
IMPORTANT; the metal screws will be installed in plastic. Turn each screw down till the head contacts the plastic, then snug it a little. DO NOT OVER TIGHTEN
Tilt the lock assembly in and under the tabs on the new cover. Work it gently into place and install the 9 screws.
Tilt the hinge enough to install the new cover. Work it into place until the screw holes line up. It has guide pins which will help align it. Install the 2 hinge attachment screws.
Now try closing the lid. It should close and latch. If it doesn't latch, recheck your lock assembly install. It may rattle a little -- that's OK -- the base has bumpers which will fix that.
Now open again and note where the plastic clips are on the cover and base. Work the base into position and slip it over the lock hooks so that the hooks protrude through the slots in the base.
Support the cover from behind and press the clips in, pushing at the clip locations.
Install the 3 base retaining screws. Ask wife to come see her new armrest:
The following 7 users liked this post by 737 Jock:
dr427 (11-04-2012),
HEAVY_RL (10-07-2012),
Lucky52 (08-21-2014),
Mainframe Guy (06-27-2014),
SinCity (08-20-2013),
and 2 others liked this post.
Trending Topics
08-04-2010, 06:22 PM
#10
Instructor
I haven't had this problem, but do you think it might be caused by the sunlight through the sunroof? I always close the visor because I'm paranoid that the direct sunlight will damage the leather interior.
08-06-2010, 10:32 AM
#12
Lizard King
It could be the sun, but I doubt it is the heat... Doesn't get much hotter that where I live... 100 in the garage! 110 outside! Mine (2007) still looks like new.
08-09-2010, 02:58 AM
#13
10th Gear
Join Date: Apr 2009
Location: Los Angeles, CA
Posts: 11
Likes: 0
Received 0 Likes
on
0 Posts
Was happening on my center and drivers armrest...Cerritos Acura replaced under 'Goodwill' warranty with the new parts, but if it happens again they said I'm SOL.
02-11-2011, 08:01 PM
#14
2008 Acura RDX
Join Date: May 2008
Location: Jamaica W.I.
Age: 61
Posts: 1,227
Likes: 0
Received 58 Likes
on
48 Posts
The RDX center armrest cover has had bubbles and/or been tearing.
The original part was 83423-STK-A01ZB for gray and 83423-STK-A01ZA for black. If you are getting yours replaced be aware the original parts are still available.
However, Acura has revised the part with a new part number. Revision means they have developed a fix. The new part numbers are 83423-STK-A03ZB for gray and 83423-STK-A02ZA for black. Make sure you get the new parts.
If you are out of warranty, the gray one is available at internet Acura dealers for only about $18 to $22. The black one is much more (about $70). So far no one has been able to explain why.
Will post a replacement DIY when I get the part.
05-24-2011, 08:20 AM
#16
haole kama'a-ina
Thread Starter
From 2007 to 2011, the RDX interiors come in either Black or Taupe.
Black leather takes the Black console armrest cover.
Taupe leather takes the Gray console armrest cover.
Look at the "Acura Showroom Interior Interactive" and you can see that the console cover is gray with the taupe seats.
Black leather takes the Black console armrest cover.
Taupe leather takes the Gray console armrest cover.
Look at the "Acura Showroom Interior Interactive" and you can see that the console cover is gray with the taupe seats.
05-24-2011, 08:40 AM
#17
10th Gear

From 2007 to 2011, the RDX interiors come in either Black or Taupe.
Black leather takes the Black console armrest cover.
Taupe leather takes the Gray console armrest cover.
Look at the "Acura Showroom Interior Interactive" and you can see that the console cover is gray with the taupe seats.
Black leather takes the Black console armrest cover.
Taupe leather takes the Gray console armrest cover.
Look at the "Acura Showroom Interior Interactive" and you can see that the console cover is gray with the taupe seats.

The following users liked this post:
vaprea (05-18-2012)

 12-10-2011, 06:15 PM
#23
Suzuka Master

thanks a lot for the instructions, took me 30 minutes. Bought it for $80 shipped. It starting coming apart right after warranty. You are right, they've upgraded the leather, its more durable.
01-16-2012, 04:47 PM
#24
Pro
In case any of you don't feel like taking this on yourself, I took my RDX in for B1 service today and mentioned the armrest and they said they would switch it out no questions asked. I only have 3 months left on my warranty so wanted to make sure I had everything fixed along with the rear driver-side seat latch which was rattling (another common problem I've read on this forum).
05-18-2012, 09:36 AM
#25
4th Gear

Join Date: May 2012
Location: Brooklyn
Age: 44
Posts: 4
Likes: 0
Received 0 Likes
on
0 Posts
Just want to show my appreciation for this thread. My console cover is in really rough shape at 55,000 miles. Completely unacceptable. But, thanks to this community I'm ordering the part and will fix it myself. Rock on, Acurazine.
 05-23-2012, 02:20 PM
#27
2nd Gear

Join Date: May 2012
Posts: 2
Likes: 0
Received 0 Likes
on
0 Posts
great write-up, my wife's RDX is also bubbling up, i'm assuming we are out of warranty (at 58k) and truth be told i've never set foot in an acura dealership, but i think with this info even a clutz like myself can fix it once i order the replacement.
05-29-2012, 05:51 PM
#29
Instructor

First, be sure you get the new part number. Here is the new gray armrest cover:
You will need a #2 cross-tip screwdriver. Make sure you retain all screws and don't mix them up. I use labeled baggies.
Move the driver seat down and back; ie, out of the way. Open the console/armrest door. It will remain in the full open position.
With a #2 cross-tip screwdriver, remove the three base retaining screws (red arrows):
There are 7 plastic clips holding the base to the cover and the hinge is sandwiched in between the base and cover. First you must remove the base by prying out the seven plastic clips. Their locations behind the base are circled in yellow below. Start at the top front corner GENTLY prying out the first clip, then work along the top edge, loosening as you go. The base will catch on the lock hooks -- slide the hooks back to free it. Pry down along the rear edge and the base should come free:
Here is the inside of the base, showing the top front corner clip. This is the only clip that is on the base (the other 6 clips are on the cover):
The base will be re-used. Set it aside:
Now you can remove the cover from the hinge. Remove the 2 screws (red arrows) at the top of the hinge:
Tilt the lid closed enough to lift off the cover. The hinge spring will return it to upright:
You must remove the lock assembly from the old cover and attach it to the new one. Remove the 9 screws from the lock assembly (yellow circles). Tilt the lock assembly up and out from under the plastic tabs on the cover (red arrows):
Here is the lock assembly ready to be installed into the new cover. You can also see the other six plastic clips inside the new cover:
Now just reverse the previous steps.
IMPORTANT; the metal screws will be installed in plastic. Turn each screw down till the head contacts the plastic, then snug it a little. DO NOT OVER TIGHTEN
Tilt the lock assembly in and under the tabs on the new cover. Work it gently into place and install the 9 screws.
Tilt the hinge enough to install the new cover. Work it into place until the screw holes line up. It has guide pins which will help align it. Install the 2 hinge attachment screws.
Now try closing the lid. It should close and latch. If it doesn't latch, recheck your lock assembly install. It may rattle a little -- that's OK -- the base has bumpers which will fix that.
Now open again and note where the plastic clips are on the cover and base. Work the base into position and slip it over the lock hooks so that the hooks protrude through the slots in the base.
Support the cover from behind and press the clips in, pushing at the clip locations.
Install the 3 base retaining screws. Ask wife to come see her new armrest:
No homo but you are my hero
thank for posting this up I am out of warranty and thought this was going to be expensive.
06-04-2012, 01:17 PM
#30
6th Gear

Join Date: May 2012
Posts: 6
Likes: 0
Received 0 Likes
on
0 Posts
I received the part and completed the install on Thursday night. It took about all of 20 minutes and looks great. My GF is extremely happy with the results. Thank's for the step by step DIY.
07-20-2012, 02:56 PM
#31
3rd Gear

Join Date: Jul 2012
Posts: 3
Likes: 0
Received 0 Likes
on
0 Posts
center console armrest "bubbles"
I have the same issue with my 2006 RL, tried talking to the dealer and acura, both UNRESPONSIVE, even telling me "That's not a defect". Call this number at Acura Customer care and let them know it IS a defect and we are tired of hearing it is not our problem. My Rl is is great condition, 85,000 miles and perfect...except for this DEFECT.
800 382-2238 x115188
anthony will answer, flood Acura Customer care with calls and let's get this fixed. spend $50,000+ for a car and this is what happens?
800 382-2238 x115188
anthony will answer, flood Acura Customer care with calls and let's get this fixed. spend $50,000+ for a car and this is what happens?
07-27-2012, 01:50 PM
#32
1st Gear

Join Date: Jul 2012
Location: San Diego, CA
Posts: 1
Likes: 0
Received 0 Likes
on
0 Posts
Help please
To 737 Jock-
My center console finally tore after all the bubbling. I did look online with the part # you provided, but the cheapeast gray one I found was $$75. Can you help me out and point me in the right direction in regards to websites?
Thanks much!
My center console finally tore after all the bubbling. I did look online with the part # you provided, but the cheapeast gray one I found was $$75. Can you help me out and point me in the right direction in regards to websites?
Thanks much!
 09-18-2012, 01:18 PM
#34
1st Gear

Join Date: Sep 2012
Posts: 1
Likes: 0
Received 0 Likes
on
0 Posts
The RDX center armrest cover has had bubbles and/or been tearing.
The original part was 83423-STK-A01ZB for gray and 83423-STK-A01ZA for black. If you are getting yours replaced be aware the original parts are still available.
However, Acura has revised the part with a new part number. Revision means they have developed a fix. The new part numbers are 83423-STK-A03ZB for gray and 83423-STK-A02ZA for black. Make sure you get the new parts.
If you are out of warranty, the gray one is available at internet Acura dealers for only about $18 to $22. The black one is much more (about $70). So far no one has been able to explain why.
Will post a replacement DIY when I get the part.
The original part was 83423-STK-A01ZB for gray and 83423-STK-A01ZA for black. If you are getting yours replaced be aware the original parts are still available.
However, Acura has revised the part with a new part number. Revision means they have developed a fix. The new part numbers are 83423-STK-A03ZB for gray and 83423-STK-A02ZA for black. Make sure you get the new parts.
If you are out of warranty, the gray one is available at internet Acura dealers for only about $18 to $22. The black one is much more (about $70). So far no one has been able to explain why.
Will post a replacement DIY when I get the part.
09-18-2012, 08:38 PM
#35
 10-07-2012, 03:09 PM
#36

Saw this in looking for a replacement for my torn one.
They are made out of leather and pretty reasonable priced if you are willing to install yourself. I messaged them and asked if they would do other colors for the stitching and will update when the reply.
http://www.ebay.com/itm/2007-2012-Ac...721b62&vxp=mtr
They are made out of leather and pretty reasonable priced if you are willing to install yourself. I messaged them and asked if they would do other colors for the stitching and will update when the reply.
http://www.ebay.com/itm/2007-2012-Ac...721b62&vxp=mtr
The following users liked this post:
spineman (03-31-2015)
10-26-2012, 03:55 PM
#38
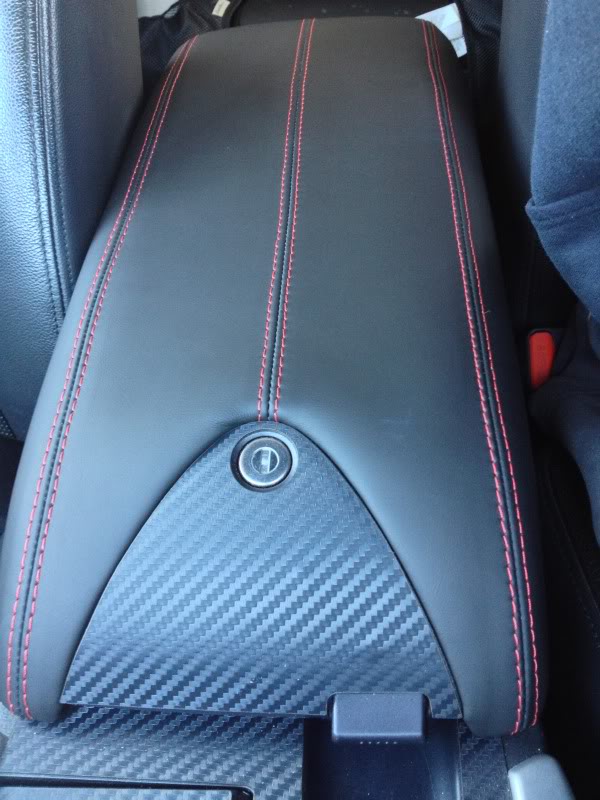
So because my armrest was tearing and I am outside of warranty I went ahead and picked up one from Autotrimming on Ebay. Spoke to them over the phone first and was confident with them and the work they do. I also went ahead and purchased a shift boot with red stitching to match. They dont make them for the RDX but they do make them for the RSX. I plan on modding it a bit and making it work.
It takes a few minutes to take the arm rest off and then about another 30 to remove all the old staples from the OEM cover. Then it took me about 45 minutes to stretch the leather around the console and re-staple it. I used small 1/4" staples in a smaller staple gun that I have and they seemed to work well. In a few spots that where the staple was able to penetrate the plastic you can feel a little bump under the padding and leather but nothing that will poke through or be uncomfortable.
When its done it looks great! I would say deffinitly spend some extra time really pulling and streatching the leather so that its tight. You also want to make sure that the lines end up being straight when its all done.
This is what the armrest looks like, I will post up again when I get the shift boot put on this weekend.
The following users liked this post:
dr427 (11-04-2012)