
DIY installation of Daytime Running Lights**with detailed pictures** 3G Garage #G-067
 05-13-2006, 10:59 AM
#1
Pro
Thread Starter
Join Date: Mar 2006
Location: Delaware/Philly
Age: 47
Posts: 547
Likes: 0
Received 3 Likes
on
3 Posts
DIY installation of Daytime Running Lights**with detailed pictures** 3G Garage #G-067
This is to install the DesignTech DRL module Model # 20013 on the 3rd gen TL. I purchased it from Autobarn.com and it costs $29.95.
[IMG]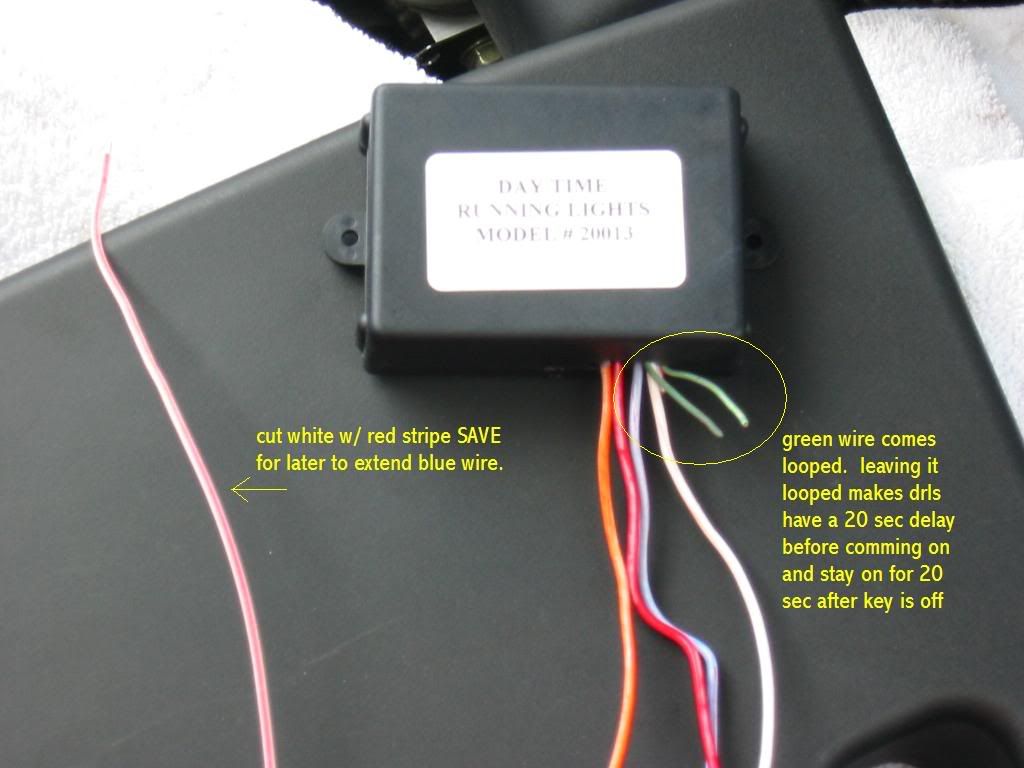
This is the Module
[IM G]
G]
These are the tools you will need along with a two connectors that the kit does not come with. I put di-electric grease at my connections, this is not nessesary but it helps to prevent any corosion of the connections.
[I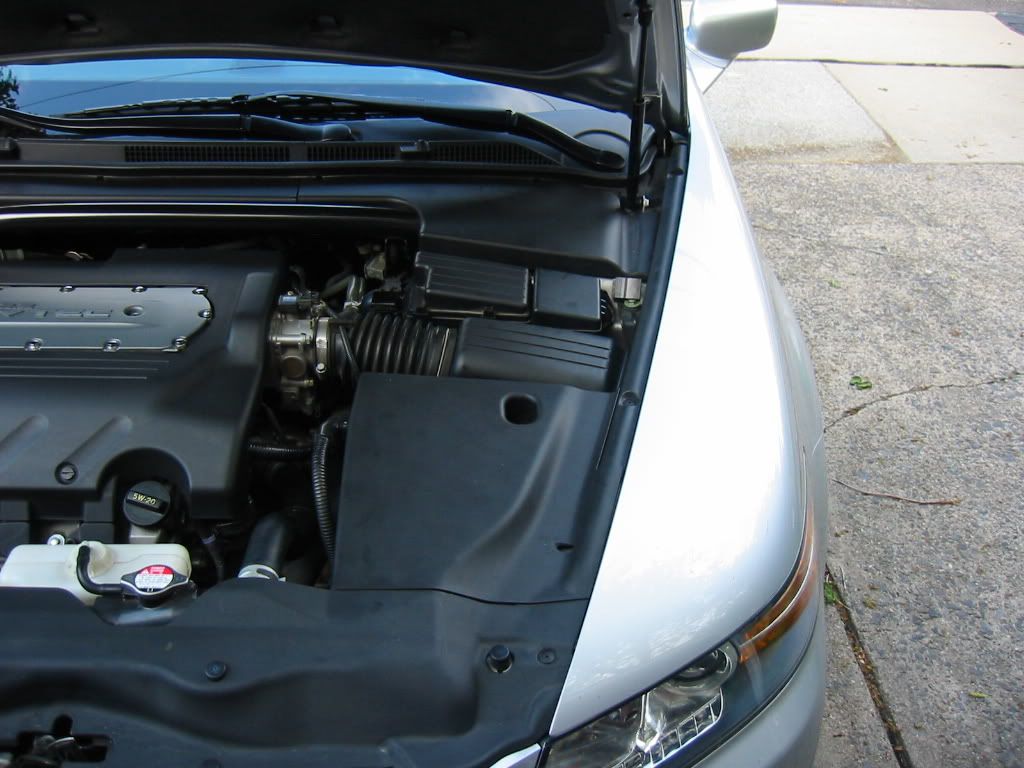 MG]
MG]
This is the area where you will be installing the module.
[/IMG]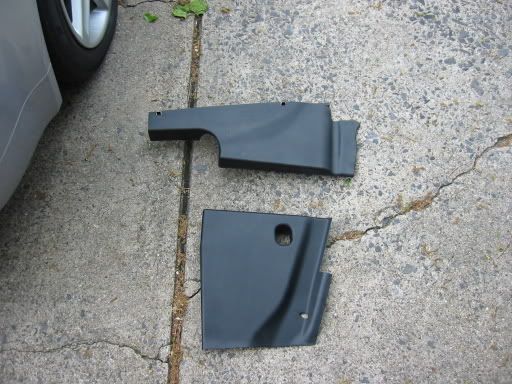
Remove the battery cover and Brake fluid cover.
[IMG]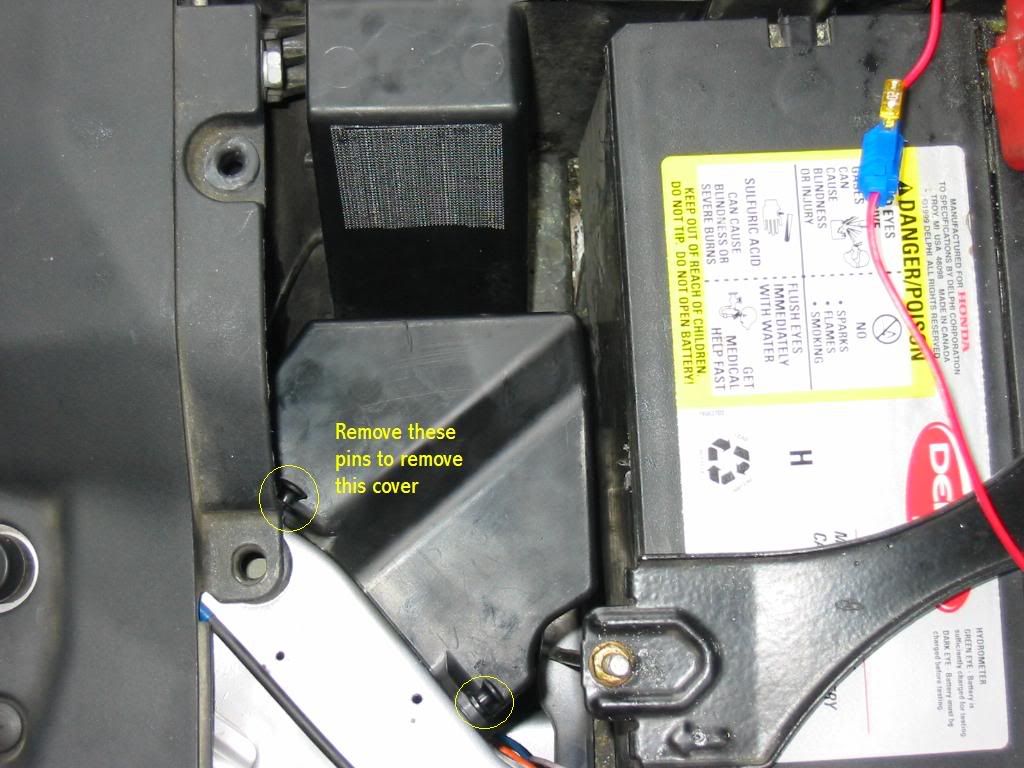
Remove this cover to access the fog light/ ballast connnectors. For easier access the battery may be removed. I didn't because I am an auto tech and I am used to working in tight quarters. NOTE: MAKE SURE YOU HAVE YOUR RADIO/NAVI CODES HANDY.
[IMG]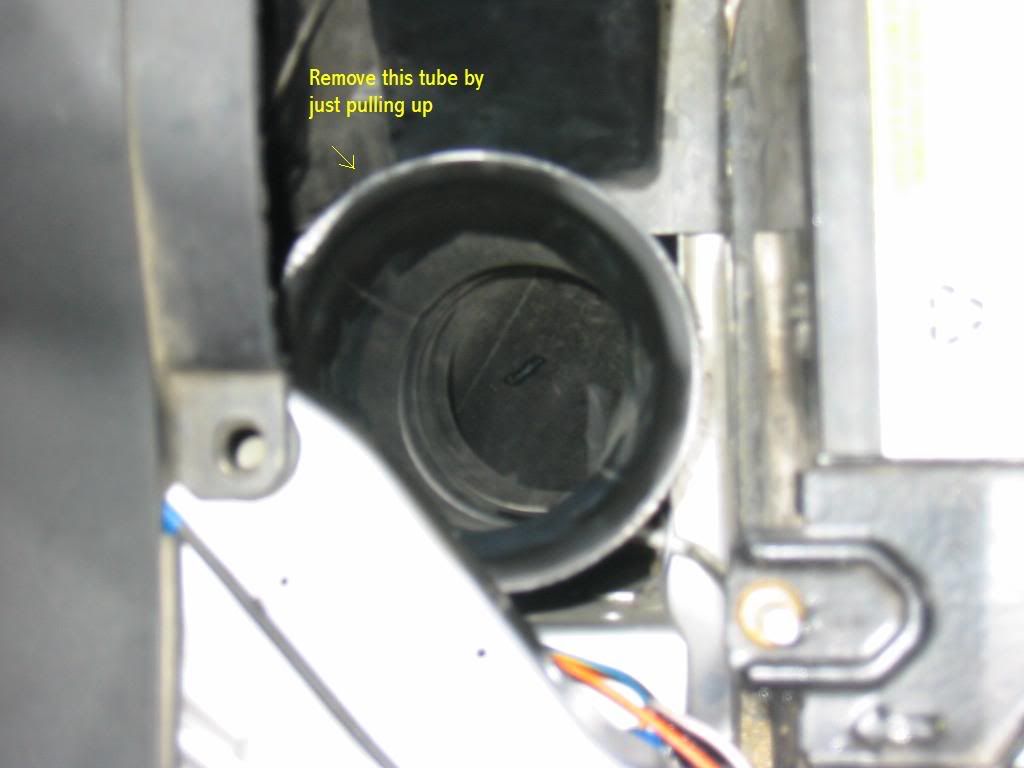 Remove this tube by pulling up on it. This tube is located under the cover that you just removed.
[/IMG]
This is the first connection. If you are using the DesignTech directions this is the "power +12 volt wire)MAKE SURE YOUR HEADLIGHTS ARE OFF!
[IMG]
This is the the area where you will find the wiper motor wire harness.
[IMG]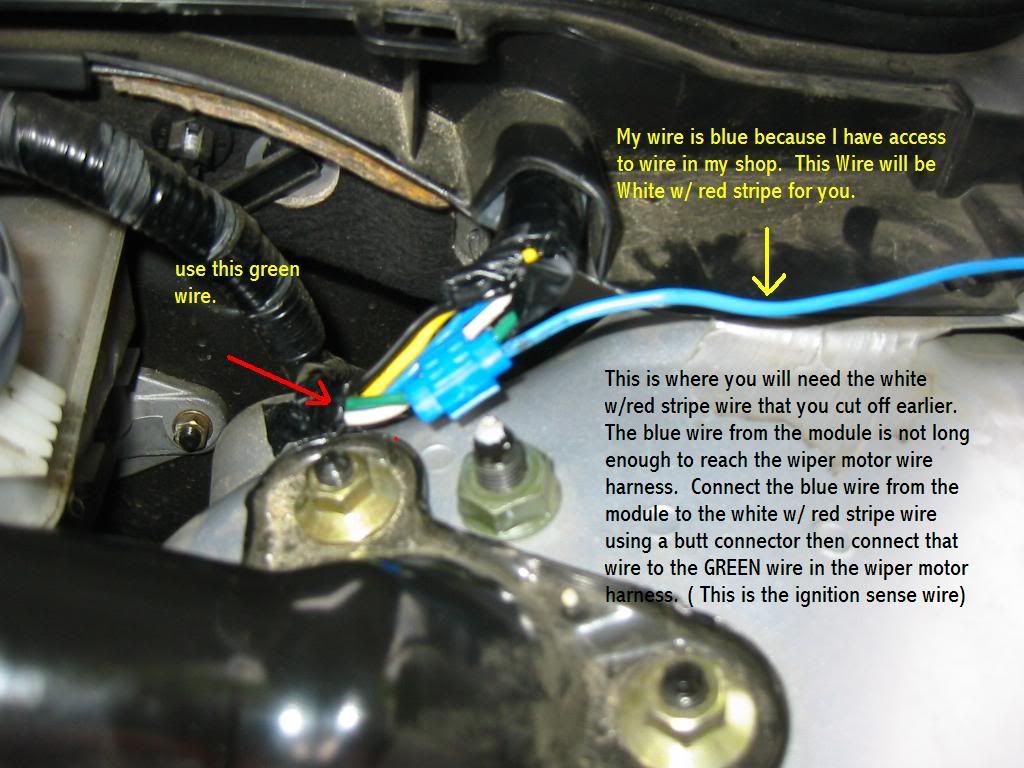
This is the connection for the "ignition sense wire" Use the Green wire from this harness. You will find that if you mount your module in the same place as me the blue wire will not reach. This is where you will use the white w/red stripe wire that you cut off the module earlier. Use a butt connector to connect it to the blue wire out of the module. After you have extended the blue wire with the white w/ red stripe wire you will then connect it to the GREEN wire in the wiper motor wire harness.
[/IMG]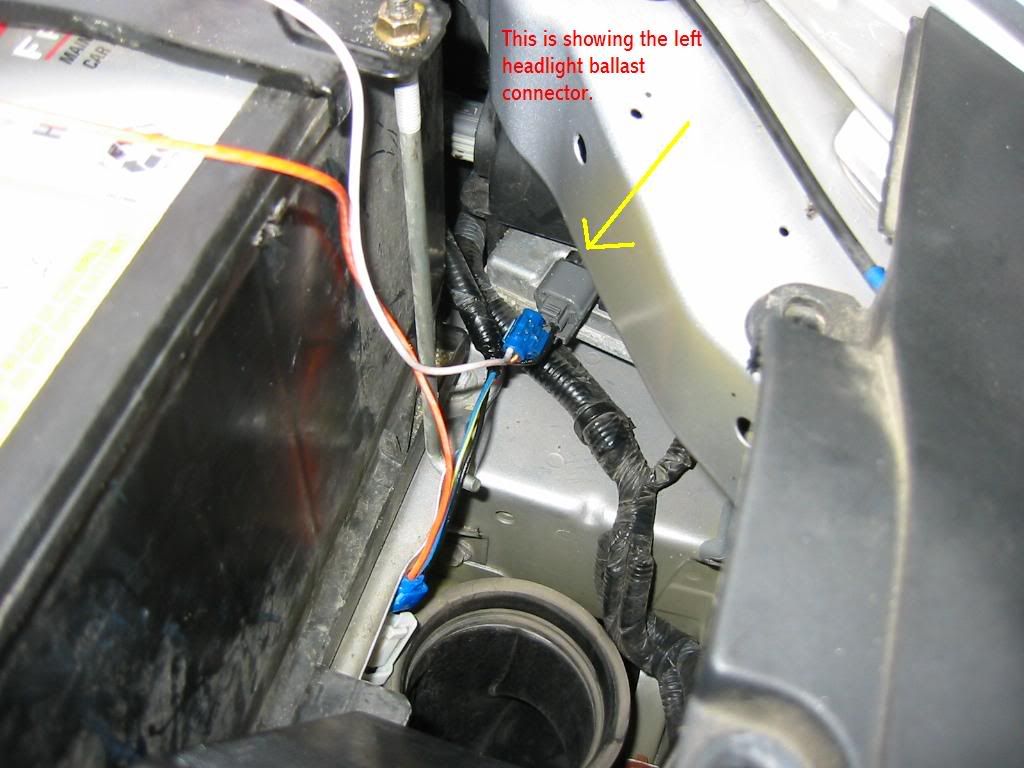
This is the location of the left headlight ballst connector
[IMG]

This is the left fog light connector once it is unplugged from bulb.
[IMG]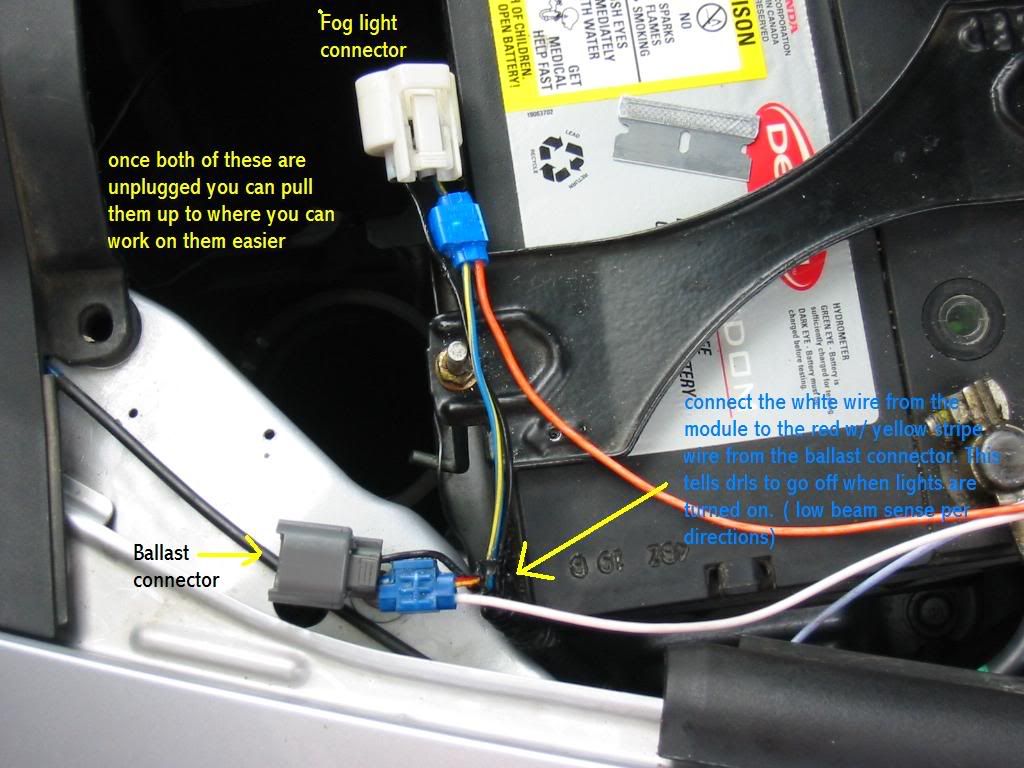
Once both connectors are unplugged you can pull them up to where you can work on them. You will need to remove some of the tape to access. First connect the white wire from the module to the Red w/ yellow stripe wire on the ballast connector(the grey one)(this will be called "low beam head light sense is the designtech directions. Now connect the orange wire to the blue w/yellow stripe wire of the fog light connector.(this will be called "high beam headlight output" in the designtech directions.) Once connections are made plug connectors back in and tidy up your wires.
[IMG]
This is installing the air tube. Make sure the white marks line up and the tube is pushed all the way into the rubber collar.
[IMG]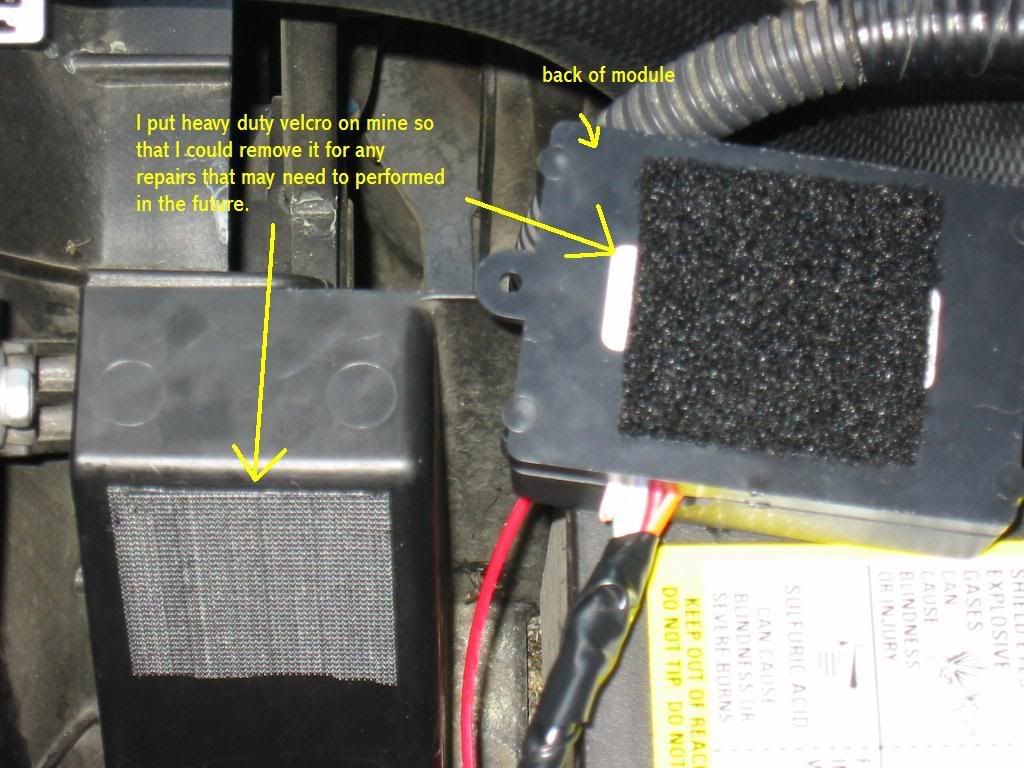
I chose this location because it is covered and cooled and for ease of the connections. There are also no moving parts to interfer with the wires. I purchased heavy duty outdoor velcro from the hardware store. I wanted to be able to move my module if I need to in the future.
[/IMG]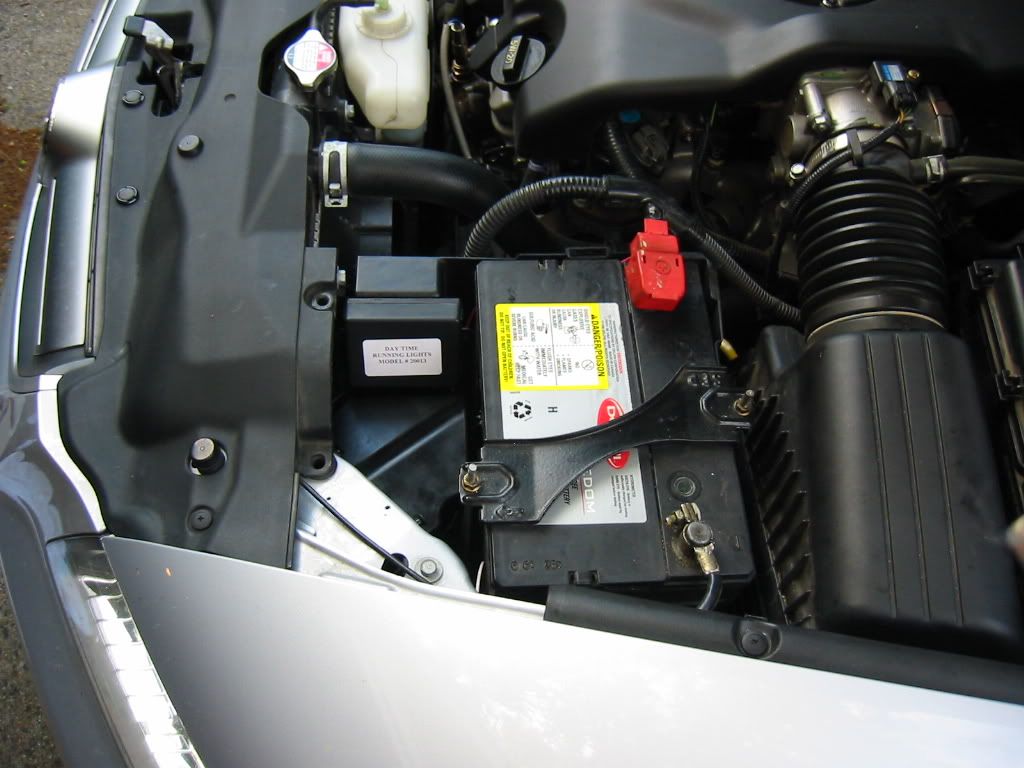
This is what is looks like before the battery cover is put back on.
[IMG]
I Hope this is detailed enough, if anyone has any questions please ask.
[IMG]
This is the Module
[IM
G]These are the tools you will need along with a two connectors that the kit does not come with. I put di-electric grease at my connections, this is not nessesary but it helps to prevent any corosion of the connections.
[I
MG]This is the area where you will be installing the module.
[/IMG]
Remove the battery cover and Brake fluid cover.
[IMG]
Remove this cover to access the fog light/ ballast connnectors. For easier access the battery may be removed. I didn't because I am an auto tech and I am used to working in tight quarters. NOTE: MAKE SURE YOU HAVE YOUR RADIO/NAVI CODES HANDY.
[IMG]
Remove this tube by pulling up on it. This tube is located under the cover that you just removed.[/IMG]
This is the first connection. If you are using the DesignTech directions this is the "power +12 volt wire)MAKE SURE YOUR HEADLIGHTS ARE OFF!
[IMG]
This is the the area where you will find the wiper motor wire harness.
[IMG]
This is the connection for the "ignition sense wire" Use the Green wire from this harness. You will find that if you mount your module in the same place as me the blue wire will not reach. This is where you will use the white w/red stripe wire that you cut off the module earlier. Use a butt connector to connect it to the blue wire out of the module. After you have extended the blue wire with the white w/ red stripe wire you will then connect it to the GREEN wire in the wiper motor wire harness.
[/IMG]
This is the location of the left headlight ballst connector
[IMG]
This is the left fog light connector once it is unplugged from bulb.
[IMG]
Once both connectors are unplugged you can pull them up to where you can work on them. You will need to remove some of the tape to access. First connect the white wire from the module to the Red w/ yellow stripe wire on the ballast connector(the grey one)(this will be called "low beam head light sense is the designtech directions. Now connect the orange wire to the blue w/yellow stripe wire of the fog light connector.(this will be called "high beam headlight output" in the designtech directions.) Once connections are made plug connectors back in and tidy up your wires.
[IMG]
This is installing the air tube. Make sure the white marks line up and the tube is pushed all the way into the rubber collar.
[IMG]
I chose this location because it is covered and cooled and for ease of the connections. There are also no moving parts to interfer with the wires. I purchased heavy duty outdoor velcro from the hardware store. I wanted to be able to move my module if I need to in the future.
[/IMG]
This is what is looks like before the battery cover is put back on.
[IMG]
I Hope this is detailed enough, if anyone has any questions please ask.
 05-13-2006, 11:09 AM
#2
Pro
Thread Starter
Join Date: Mar 2006
Location: Delaware/Philly
Age: 47
Posts: 547
Likes: 0
Received 3 Likes
on
3 Posts
PLease note:
If you leave the green looped wire connected the DRLs will be delayed in comming on for 20 seconds. This wire also keeps them on for 20 seconds after the car is turned off. This option is totally your preference.

 05-13-2006, 03:57 PM
#7
Moderator
Nice write-up, for those who are interested. 
However, I personally do not want nor would ever install DRLs. I just don't see the point of them; I think they're a complete waste of power, and I'm not sure how effective they are anyway.
However, I personally do not want nor would ever install DRLs. I just don't see the point of them; I think they're a complete waste of power, and I'm not sure how effective they are anyway.
Trending Topics
 05-13-2006, 04:53 PM
#9
Pro
Thread Starter
Join Date: Mar 2006
Location: Delaware/Philly
Age: 47
Posts: 547
Likes: 0
Received 3 Likes
on
3 Posts
Originally Posted by DaveCSparty
Thanks for the excellent write up.
Damn, this seems a lot more complicated than I originally thought...
Damn, this seems a lot more complicated than I originally thought...
The following users liked this post:
tl08newbie (04-02-2014)
05-13-2006, 04:58 PM
#10
Pro
Thread Starter
Join Date: Mar 2006
Location: Delaware/Philly
Age: 47
Posts: 547
Likes: 0
Received 3 Likes
on
3 Posts
Originally Posted by italia8287
correct me if im wrong, but doesnt this void your warranty??
05-13-2006, 05:44 PM
#11
not vtech... VTEC!!!
Excellent write-up!! Very detailed explaination!
Regarding voiding the warranty, the dealer had to prove the part that you modded is the direct cause of the failure before they can reject your warranty.
Radio fried b/c some how the tap short circuited => probably void your warranty on the radio.
Excessive tire wear => will still be covered under warranty.
05-13-2006, 07:06 PM
#12
2005 - Anthracite TL 6MT

Join Date: Dec 2005
Location: Detroit suburbs
Posts: 22
Likes: 0
Received 0 Likes
on
0 Posts
Thanks Bhelsdon!
Great pictures and description. I have also ordered one and look forward to doing the deed. I think I will remove the battery to give my fumble fingers some more room to work.
Mark
Great pictures and description. I have also ordered one and look forward to doing the deed. I think I will remove the battery to give my fumble fingers some more room to work.
Mark
05-13-2006, 10:33 PM
#13
Advanced
Join Date: Jan 2006
Location: Oregon
Age: 65
Posts: 52
Likes: 0
Received 0 Likes
on
0 Posts
well done bud. I'm not a DRL fan either but I'm impressed with your well documented instructions. I bet everyone is hoping you have a bunch of rattles to fix now too! hehe
05-13-2006, 11:00 PM
#15
Team Nighthawk Mambo King
Join Date: Mar 2005
Location: Westfield, MA
Age: 64
Posts: 1,089
Likes: 0
Received 2 Likes
on
2 Posts
Great write up, I wish I could set mine up so that I could run the fogs (by just turning the switch) w/out having to have the HID's on,...but this is getting one step closer...
 05-13-2006, 11:28 PM
#17

Originally Posted by ayethetiense
Can this be modified so that there is a switch available? So i can turn it on and off as i want to?
Steve
05-14-2006, 08:04 AM
#18
Pro
Thread Starter
Join Date: Mar 2006
Location: Delaware/Philly
Age: 47
Posts: 547
Likes: 0
Received 3 Likes
on
3 Posts
Originally Posted by Greg-ster
Wow, thanks for the write up!
Is there a way to turn down the brightness of the DRL's, since 75% brightness seems bright (correct me if I am wrong)?
Is there a way to turn down the brightness of the DRL's, since 75% brightness seems bright (correct me if I am wrong)?
05-14-2006, 09:04 AM
#20
Since they are HID's, aren't they just "on or off"? I can't see how the brightness can be controlled in our version of the HID's, but I guess it could be...
Originally Posted by bhelsdon
Am not sure, but from what I have read 75% is the industry standard. Mine look bright in the picture because the car is in the shade. I parked my TL next to my friends 06 325 and compared the drls, they look almost identical.
 05-14-2006, 10:29 AM
#22
Pro
Thread Starter
Join Date: Mar 2006
Location: Delaware/Philly
Age: 47
Posts: 547
Likes: 0
Received 3 Likes
on
3 Posts
Originally Posted by clausda0
great write up, why install daytime running lights if you don't have to have them by law, and if we have one of the few cars that doesn't make that come with the car.?

 05-14-2006, 10:32 AM
#23
Pro
Thread Starter
Join Date: Mar 2006
Location: Delaware/Philly
Age: 47
Posts: 547
Likes: 0
Received 3 Likes
on
3 Posts
Originally Posted by stingrey
Since they are HID's, aren't they just "on or off"? I can't see how the brightness can be controlled in our version of the HID's, but I guess it could be...
05-14-2006, 03:58 PM
#26
Cruisin'

Join Date: Apr 2004
Location: Cheverly MD
Age: 80
Posts: 18
Likes: 0
Received 0 Likes
on
0 Posts
Excellent ---- another alternative for the ignition sense wire is to tap it instead to any black/red - these are the +12vdc side for all parking and side marker lights (the series originates at the under-hood junction block). With this connection the DRL's will come on and off with parking lights (with or without the delay feature) - all the other #20013 functions would be unchanged.
05-15-2006, 06:52 PM
#27
Pro
Thread Starter
Join Date: Mar 2006
Location: Delaware/Philly
Age: 47
Posts: 547
Likes: 0
Received 3 Likes
on
3 Posts
Originally Posted by cdmontgomery
Excellent ---- another alternative for the ignition sense wire is to tap it instead to any black/red - these are the +12vdc side for all parking and side marker lights (the series originates at the under-hood junction block). With this connection the DRL's will come on and off with parking lights (with or without the delay feature) - all the other #20013 functions would be unchanged.
05-15-2006, 07:05 PM
#28
2005 - Anthracite TL 6MT
Join Date: Dec 2005
Location: Detroit suburbs
Posts: 22
Likes: 0
Received 0 Likes
on
0 Posts
Thanks CDMontgomery for the suggestion to take the ignition sensing off the park lites. It gives more control and should be a reasonable alternative.
You mention a junction box to tie into this switched connection. Could you clarify where this junction box is located?
Do you or anyone have any suggestions for other locations off the ignition switch more open than the wiper motor harness??
Thanks,
Mark
You mention a junction box to tie into this switched connection. Could you clarify where this junction box is located?
Do you or anyone have any suggestions for other locations off the ignition switch more open than the wiper motor harness??
Thanks,
Mark
05-16-2006, 08:19 PM
#29
Pro
Thread Starter
Join Date: Mar 2006
Location: Delaware/Philly
Age: 47
Posts: 547
Likes: 0
Received 3 Likes
on
3 Posts
Do you or anyone have any suggestions for other locations off the ignition switch more open than the wiper motor harness??
Thanks,
Mark[/QUOTE]
The wiper motor harness is the most open NON engine managment wire harness that I could locate. There is only one cover over it, and that cover is designed to be removed easily.
Thanks,
Mark[/QUOTE]
The wiper motor harness is the most open NON engine managment wire harness that I could locate. There is only one cover over it, and that cover is designed to be removed easily.
05-17-2006, 07:17 PM
#30
Cruisin'

Join Date: May 2006
Age: 43
Posts: 21
Likes: 0
Received 0 Likes
on
0 Posts
What lights are used when you flash someone during the daytime without the lights on? Is it the foglights?
Does this mod interfere with that?
Since the HIDs have to "warm up" I wouldn't think they are used for "flash to pass"... thanks
Does this mod interfere with that?
Since the HIDs have to "warm up" I wouldn't think they are used for "flash to pass"... thanks
05-17-2006, 07:27 PM
#31
Pro
Thread Starter
Join Date: Mar 2006
Location: Delaware/Philly
Age: 47
Posts: 547
Likes: 0
Received 3 Likes
on
3 Posts
Originally Posted by DaveCSparty
What lights are used when you flash someone during the daytime without the lights on? Is it the foglights?
Does this mod interfere with that?
Since the HIDs have to "warm up" I wouldn't think they are used for "flash to pass"... thanks
Does this mod interfere with that?
Since the HIDs have to "warm up" I wouldn't think they are used for "flash to pass"... thanks
05-18-2006, 12:03 AM
#32
Forced Induction
bhelsdon:
Thanks for the write up on everything, followed your instructions, which may see confusing but are super detailed once you start installing the module. I did everything the same exact way, except there is a resovior in the wa in the 6spd which I didn't see in your pics but the wiper harness.......so I cut the plastic piece holding the harness to the firewall and looped the harness around the resovior to work on the wire.
Only think I dont like the way it is, when I start th car, lights are on, kinda kill the batt while starting the car. But I couldnt find or rather reach the turn signal/parking light harness....I was thinking anyone have to replace the turning signal bulb? do you need to do it from the bottom? or remove the fender? seems like its impossible to get to otherwise.
Overall, great write up, I got the module in the mail today, have all the needed supplies in the garage, so I didn't need anything, and install took about 30 min to do.
05-18-2006, 04:24 AM
#33
Cruisin'
Join Date: May 2006
Age: 43
Posts: 21
Likes: 0
Received 0 Likes
on
0 Posts
Originally Posted by DeadLock
bhelsdon:
Only think I dont like the way it is, when I start th car, lights are on, kinda kill the batt while starting the car. But I couldnt find or rather reach the turn signal/parking light harness....I was thinking anyone have to replace the turning signal bulb? do you need to do it from the bottom? or remove the fender? seems like its impossible to get to otherwise.
Only think I dont like the way it is, when I start th car, lights are on, kinda kill the batt while starting the car. But I couldnt find or rather reach the turn signal/parking light harness....I was thinking anyone have to replace the turning signal bulb? do you need to do it from the bottom? or remove the fender? seems like its impossible to get to otherwise.
05-18-2006, 06:04 AM
#34
Forced Induction
no not kill while start the car, but its not helping to put more strain on the batt while starting.
using the signal harness would mean they are only on when the parking lights are on
using the signal harness would mean they are only on when the parking lights are on
05-18-2006, 06:32 AM
#35
Pro
Thread Starter
Join Date: Mar 2006
Location: Delaware/Philly
Age: 47
Posts: 547
Likes: 0
Received 3 Likes
on
3 Posts
if you reconnect the green looped wire comming out of the module they will be delayed from comming on for 20 seconds.They will, how ever stay on for about 20 seconds after the car is turned of. This would be a solution for you if you don't like them on while cranking.
05-18-2006, 09:57 PM
#37
Cruisin'
Join Date: May 2006
Age: 43
Posts: 21
Likes: 0
Received 0 Likes
on
0 Posts
I'm embarrassed but what is the third tool that we need? We need the pliers, wire cutters and ___? Is it a wire stripper?
Also, what two connectors doesn't come with the kit that I have to buy? Is it the ones pictured with the tools? What do I ask for when I go to radio shack or home depot?
Lastly... do you just put the greaser stuff at the connection the tape over it?
Sorry for all the questions. Thanks!
Ordered the kit tonight with the "acurazine" code for 10% off
05-19-2006, 06:44 AM
#40
Pro
Thread Starter
Join Date: Mar 2006
Location: Delaware/Philly
Age: 47
Posts: 547
Likes: 0
Received 3 Likes
on
3 Posts
Originally Posted by DaveCSparty
I'm embarrassed but what is the third tool that we need? We need the pliers, wire cutters and ___? Is it a wire stripper?
Also, what two connectors doesn't come with the kit that I have to buy? Is it the ones pictured with the tools? What do I ask for when I go to radio shack or home depot?
Lastly... do you just put the greaser stuff at the connection the tape over it?
Sorry for all the questions. Thanks!
Ordered the kit tonight with the "acurazine" code for 10% off
Also, what two connectors doesn't come with the kit that I have to buy? Is it the ones pictured with the tools? What do I ask for when I go to radio shack or home depot?
Lastly... do you just put the greaser stuff at the connection the tape over it?
Sorry for all the questions. Thanks!
Ordered the kit tonight with the "acurazine" code for 10% off
one connector is a butt connector and the other is just a solderless krimp on ringlet. You can find these at any harware/auto store. and yes they are pictured with the tools.
just put a little bit of di-electric grease inside the connectors before you put the wires in them. after you have tested to see if everything works, then you tape everything up.
The following users liked this post:
UNIVERSE_04 (11-28-2012)

